How to install and configure ADFS on Windows Server 2016 with inSync Cloud
This article applies to:
- OS: Windows Server 2016
- Product edition: inSync Cloud
- Only a Druva Cloud administrator can set up Single Sign-on.
- Configure Single Sign-on based on the applicable scenarios:
- New Druva customers that is; Phoenix customers on-boarded after July 02, 2018, and inSync customers on-boarded after July 14, 2018, must refer to the instructions given in this article.
- Existing inSync customers who have not configured Single Sign-on until July 14th, 2018, must configure Single Sign-on using the Druva Cloud Platform Console. For more information, see Set up Single Sign-on.
- Existing Phoenix customers with Single Sign-On enabled and have purchased inSync license, must replicate the Phoenix Single Sign-On setting to inSync.
Overview
This article provides the steps to install and configure Active Directory Federation Services (ADFS) on Windows Server 2016 with inSync Cloud.
Before configuring ADFS
- Register your Windows Server 2016 server as a member of the existing domain.
- Log in to ADFS server as a domain administrator.
- Obtain a valid certificate of the ADFS server.
Install and configure ADFS on Windows Server 2016 with inSync Cloud
Installation and configuration steps:
Install the ADFS role
To install the ADFS role:
- Open Server Manager > Manage > Add roles and features. The Add Roles and Features wizard is launched.
- On the Before you begin page, click Next.
- On the Select installation type page, select Role-based or Feature-based installation, and then click Next.
- On the Select destination server page, click Select a server from the server pool and click Next.
- On the Select server roles page, select Active Directory Federation Services and click Next.
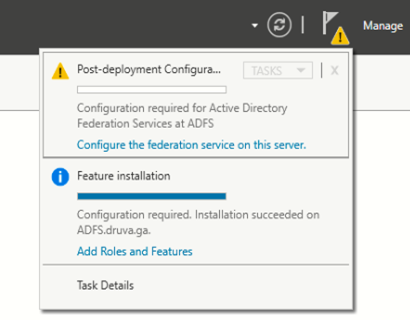
- On the confirmation page, click Install. The wizard displays the installation progress.
- Verify the installed component and click Close.
Configure the federation server
To configure the federation server:
- On the Server Manager Dashboard, click the Notifications flag and then click Configure the federation service on the server. The Active Directory Federation Service Configuration Wizard is launched.
- On the Welcome page, select Create the first federation server in a federation server farm and click Next.
- On the Connect to Active Directory Domain Services page, specify an account with domain administrator rights for the Active Directory domain that the current system is connected to and then click Next.
- On the Specify Service Properties page, enter the following details before clicking Next:
- Browse to the location of the SSL certificate and import it.
- Enter a Federation Service Name. This is the same value provided when you enrolled an SSL certificate in Active Directory Certificate Services (AD CS).
- Enter a Federation Service Display Name.
- On the Specify Service Account page, select Use an existing domain user account and click Next.
- On the Specify Configuration Database page, select Create a database on this server using Windows Internal Database and click Next.
- On the Pre-requisite Checks page, verify that all prerequisite checks were successfully completed and click Configure.
- Review the results and check whether the configuration has completed successfully on the Results page.

Configure ADFS to integrate with inSync Cloud
After installing the ADFS role on Windows Server 2016, configure ADFS to integrate with inSync Cloud as follows:
- Create a relying party
- Create a new claim rule
- Create a custom rule
- Get the IdP certificate
- Configure the SSO settings
Create a relying party
To create a relying party:
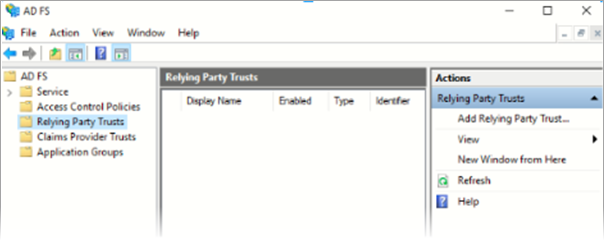
- On the Start menu, click Administrative Tools > AD FS Management. The ADFS Management console is launched.
- Click Relying Party Trusts. The wizard to add a relying party is launched.
- On the Add Relying Party Trusts Wizard, select Claims Aware and then click Start.
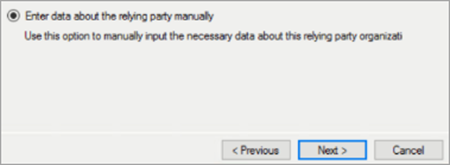
- Under Select Data Source, select Enter data about the relying party manually.
- In Specify Display Name field, enter inSync Cloud.
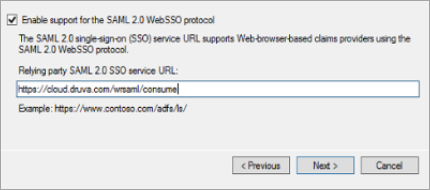
- In the Configure URL section, select Enable Support for SAML 2.0 WebSSO Protocol and enter Relying party service URL as https://cloud.druva.com/wrsaml/consume.
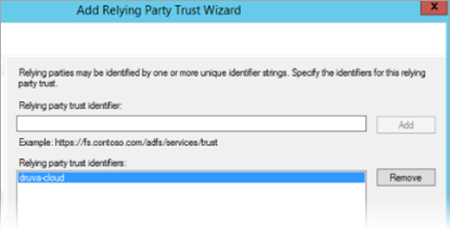
- On the Configure Identifiers page, enter Relying Party Trust Identifier as druva-cloud.
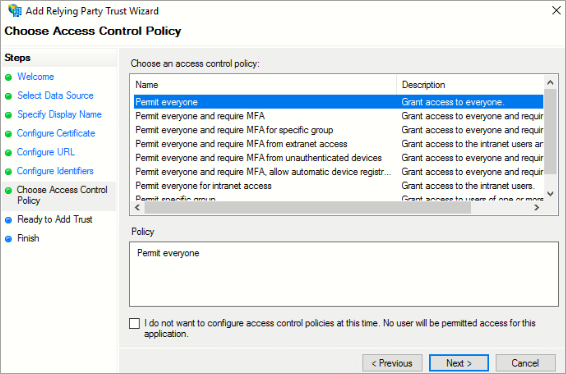
- Under Choose Access Control Policy, select Permit everyone and click Next. This allows all users to access the relying party, these policies can later be modified as required.
- On the Finish page, select Configure claims issuance policy for this application and click Close. The Claim Issuance policy page is launched.
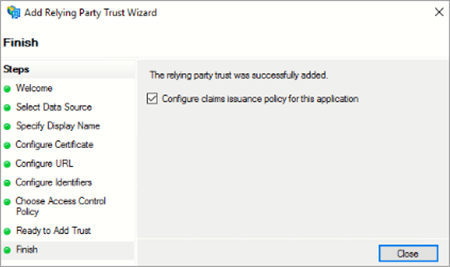
If the Claim Issuance Policy page does not open, open AD FS Management Snap and right-click Relying party trust > select Edit Claim Issuance Policy.
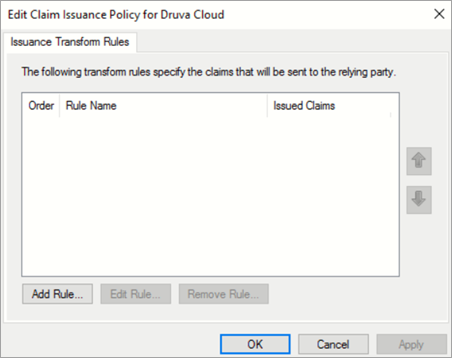
Create a new claim rule
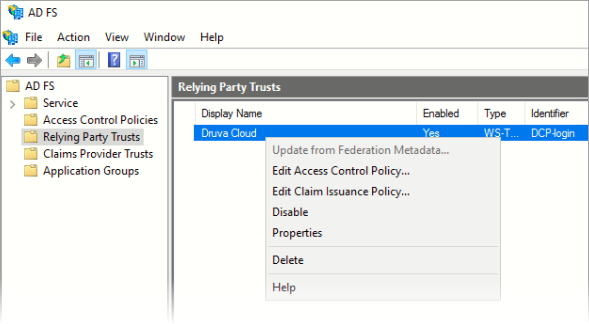
- Right-click Druva Cloud under Relying Party Trusts list and select Edit Claim Issuance Policy from the menu.
- On the Issuance Transform Rules tab, click Add Rule.
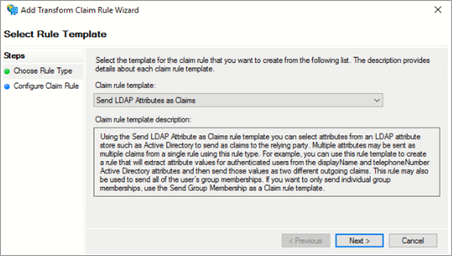
- Under Select Rule Template, set Send LDAP attributes as Claims as the rule template and click Next.
- In the Edit Rule section, set the claim rule name as Active Directory.
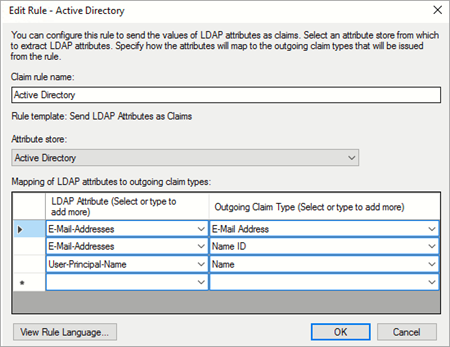
- Enter the appropriate values in each field based on the descriptions provided below.
Field Action Claim rule name Enter a name for the claim rule. Attribute store Select Active Directory from the list. Mapping of LDAP attributes to outgoing claim types LDAP Attribute Enter the outgoing claim type. E-mail Addresses Enter the Name ID. E-mail Addresses Enter the e-mail address. User-Principal-Name Enter the user name. - Click OK.
Create a custom rule
- On the Edit Claim Issuance Policy window, under Issuance Transform Rules tab, click Add Rule. The Select Rule Template page is displayed.

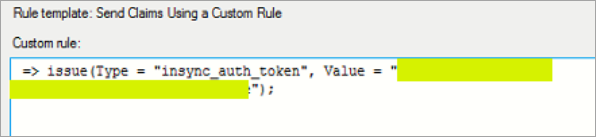
- From the Claim rule template list, select Send Claims Using a Custom Rule and click Next. The Edit Rule – LDAP EMAIL window is displayed.
- Enter appropriate values based on the actions suggested below for each field.
Field Action Claim rule name Enter the name of the customer rule. Custom rule => issue(Type = "insync_auth_token", Value = "value of SSO Token generated from inSync Management Console");
-
Click Finish.
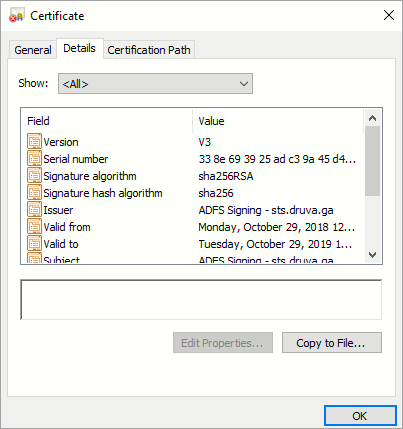
Get the IdP certificate
IdP certificate is required before configuring the Single Sign-On with inSync Cloud. To get the IdP certificate:
- On the Start menu, click Administrative Tools > AD FS Management.
- Expand to the Service folder and click Certificates.
- Double-click on the Token-signing certificate.
- Click Details and click Copy to File.
- On the Certificate Export Wizard, select Base-64 encoded X.509 (.CER) and click Next.
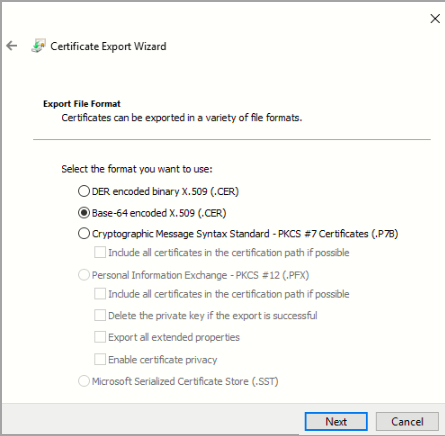
- On the File to Export page, enter the file name as idpcert.cer, and then click Next.
- Copy the contents of the idpcert.cer certificate and provide it while configuring the single sign-on settings on the inSync Management Console.
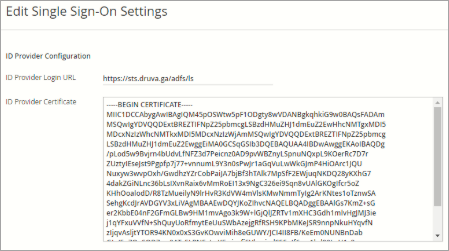
Configure the Single Sign-On settings
To configure the single sign-on settings login to Druva admin console.
- On the inSync Management Console, go to Settings.
- Open the Single Sign-On tab and click Edit.
- Enter appropriate attribute values based on the descriptions provided below for each field.
SAML Attribute Description and value ID Provider Login URL https://{fqdn-name of the ADFS server}/adfs/ls (for e.g. https://sts.druva.ga/adfs/ls) ID Provider Certificate Provide the content of the idpcert.cer certificate. AuthnRequests Signed Select this check box to get signed SAML Authentication Requests. By default, SAML Authentication Requests are not signed.
Want Assertions Encrypted Select this check box to enable encryption for the SAML assertions. By default, encryption is disabled.
- Click Save.
- Activate the inSync Client and access the inSync Management Console using SSO.