How to configure SSO for Druva Cloud Platform (DCP) using Google as IdP
This article applies to:
- Product edition: inSync Cloud using Druva Cloud Platform (DCP)
- Only a Druva Cloud administrator can set up Single Sign-on.
- Configure Single Sign-on based on the applicable scenarios:
- New Druva customers (on-boarded after July 14, 2018) must configure Single Sign-on using the Druva Cloud Platform Console. For more information, see Set up Single sign-on.
- Existing Phoenix and inSync customers who already have configured Single Sign-on must continue to use the existing Single Sign-on settings of Phoenix and the Single Sign-on settings of inSync as applicable.
Overview
This article describes how to configure SSO for Druva Cloud Platform using Google as IdP.
The configuration is performed in four steps:
- Configure Druva Cloud Platform to work with Google IdP
- Update schema and authorization values for Google IdP
- Map token to user
- Update attribute mapping
Configure Druva to work with Google IdP
- Log in to Google IdP Admin Console (https://admin.google.com)
- Click on Apps from the quick launch.
- Click on Web and Mobile Apps.
- Click on Add app and the click on Add custom SAML app
- Fill out App name , Description, add App Icon if required.
- Click Continue
- Copy the SSO URL and also download the certificate.
- Click on Continue
- Go to Druva Cloud Admin page > Hamburger Menu > Druva Cloud Settings > Single Sign-On.
- Click Edit and paste the SSO URL under ID Provider Login URL.
- Under ID Provider Certificate, paste the content of the certificate that you downloaded before and click Save.
- Go back to the Google Admin page and continue with custom app creation.
On the next screen, enter values as specified below:
Assertion Consumer Service URL: https://login.druva.com/api/commonlogin/samlconsume
Entity ID: DCP-login
- Start URL and Signed Responses are not required here.
- Under Name ID, select Set Name ID Format as Email.
- Basic Information > Primary Email.
- Click on Continue
- Under Attributes, select Add New Mapping and enter the following values.
- Click on Finish. The app should now be published.
- Under User access make the app ON for everyone


The custom app is now configured successfully. Update the schema to enable the app to work as expected.
Update schema and authorization values for Google IdP
Google IdP does not allow entering a custom field value for their SAML apps. There are third-party applications that require an additional value in addition to SAML response to authenticate the SAML response.
Druva requires Single Sign-On (SSO) token to validate the SAML response. If the IdP is Google, there is no direct alternative to add the SAML token and the schema has to be extended for the IdP. In addition, the token value must be mapped for every user.
Update schema:
- Open the URL: https://developers.google.com/admin-sdk/directory/v1/reference/schemas/insert#try-it.
This opens the Schemas:insert page. - Enter customerId as my_customer.
- Enter the following content under Request body.
{
"displayName": "Druva",
"fields": [
{
"displayName": "Druva",
"fieldName": "DruvaAuth",
"fieldType": "STRING",
"multiValued": false,
"readAccessType": "ALL_DOMAIN_USERS",
}
],
"schemaName": "Druva"
}

- Click Execute. The output must be 200 OK. This means the execution was successful.
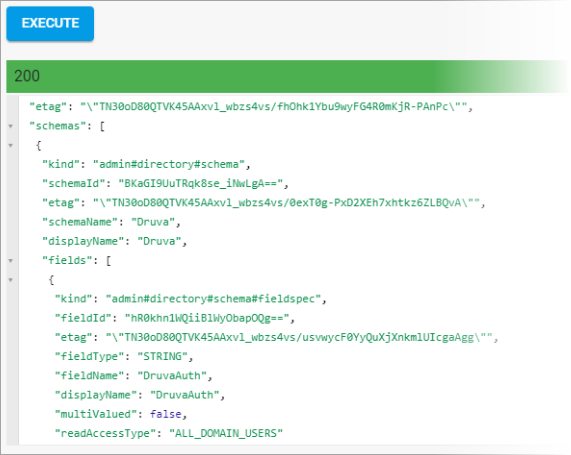
With the above steps executed, a new field name Druva is displayed under Basic Information Authorization.
Map token to user
- Go to Google Admin Home page (https://admin.google.com/AdminHome)
- Click Users and then click the concerned username.
- Click User Information and then under User details select Druva option.
Schema name Druva with a field to enter SSO token under Druva is displayed.

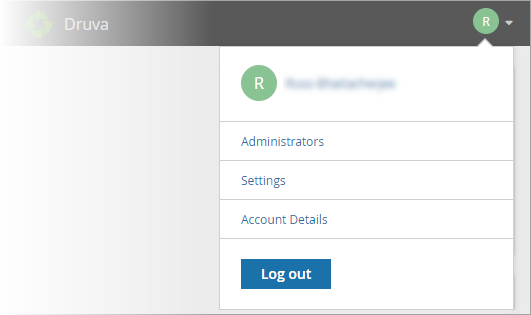
- On a separate browser, log on to Druva Cloud Platform Console and click
 > Settings > Single Sign-On.
 - Click Generate SSO Token.
- Copy the SSO token under Druva.
.png?revision=1)
- Click Update User.
The schema is now updated and the authorization field is also configured.
Update attribute mapping
To perform attribute mapping:
- Log on to https://admin.google.com with your Administrative credentials.
- Go to Apps > SAML Apps and select the custom application created for Druva.
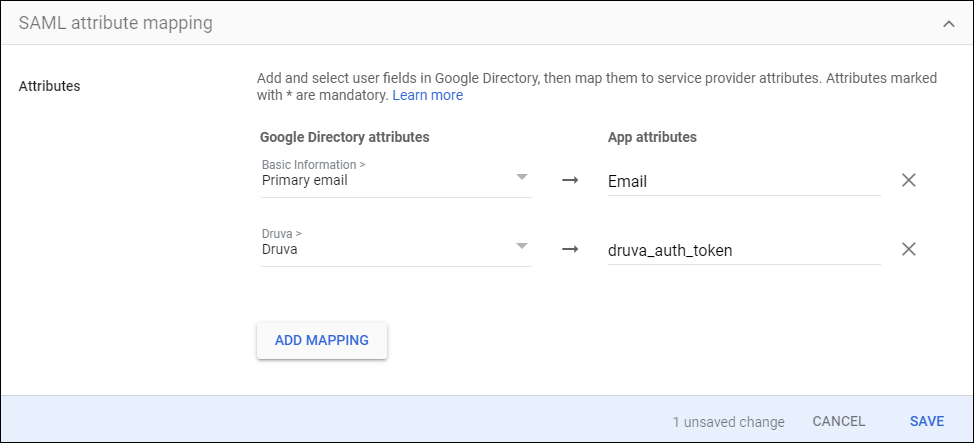
- Once the app opens, select Attribute Mapping and click Add New Mapping.
- Under Application Attribute, enter the value as – druva_auth_token.
- Under category, select Druva. (This value is populated after extending the schema).
- Under Select User Field, choose the value DruvaAuth (The value is populated after updating the Authorization page) and save the changes. The field must appear as below.
The app is now ready for use. In rare cases, the app may take up to 24 hours to get activated.
Enable SSO for administrators
- On the DCP console, go to Settings.
- On the Single Sign-On settings, click Edit. The Edit Single Sign-On Settings page opens.
- Select the Enable Single-On for Administrators. Failsafe for Administrators is enabled by default.
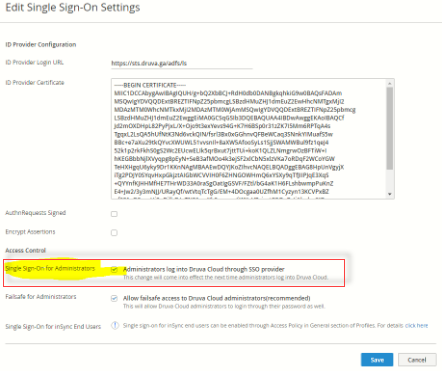
Druva recommends to enable Failsafe for Administrators so that they have to access the DCP console in case of any failures in IdP (ADFS). It also enables the admins to use both SSO and DCP password to access the DCP console. - Click Save.
This enables the access to Druva Cloud Platform using SSO.
Enable SSO for users
To enable SSO for users, enable SSO for an existing user profile. Alternatively, create a new profile and enable SSO for this profile. Subsequently, assign the users to this profile to enable access using SSO.
Step-1: Create a new profile or update an existing profile
Log in to the inSync Management Console and click Profiles on the menu bar.
- To create a new profile and enable SSO, see Create a profile.
- To enable SSO in an existing profile, see Update a profile.
Step-2: Assign users to the profile
- To assign uses to the profile with SSO enabled, follow the steps described in Update the profile assigned to users.