How to configure an inSync On-Premise Open LDAP lab
This article applies to:
- OS: Windows
- Product edition: inSync On-Premise
Overview
This article provides steps to configure inSync to import users from an open-LDAP server and map users to different profiles and storage.
The lab setup is as follows:
- inSync Master: IP Address – 172.16.53.123, Net Mask – 255.255.255.0
- Open-LDAP Server: IP Address - 172.16.53.130, Net Mask - 255.255.255.0
- inSync Master installed as described in Set up inSync Master
- Open LDAP server installed as described in the link: http://www.userbooster.de/en/support/feature-articles/openldap-for-windows-installation.aspx
Configure the open LDAP lab
Prerequisites:
- inSync master and LDAP server must communicate with each other.
- Enable the firewall on both the servers to allow incoming port numbers 443, 389, and 636.
The configuration is performed in the following order:
- Add LDAP server in the inSync Master.
- Create an inSync Profile.
- Create Groups and Users in LDAP server.
- Create AD Mappings with LDAP filters.
- Import Users to inSync and verify if the users are imported to inSync.
Add LDAP server in the inSync Master
- Login to the inSync Management Console using https://172.16.53.123/admin.
- On the menu go to Manage > Deployments > AD/LDAP.
- Open the Accounts tab and then click Register AD/LDAP Account.
- Enter the following settings:
Directory Service Type: LDAP (Others)
Host: 172.16.53.130
Port: 389
Username: cn=manager,dc=maxcrc,dc=com
Password: secret
Email: mail
inSync Username: cn
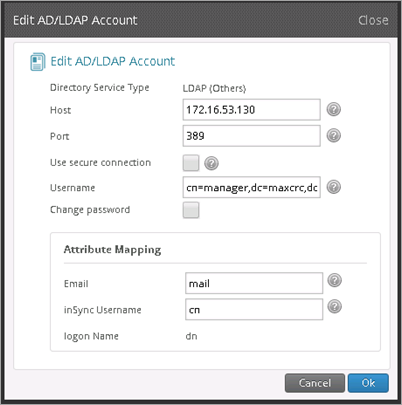
- Click OK.
Create inSync Profiles based on user functions or groups
inSync profiles control the configuration for the inSync users mapped to the profile. Refer Create a profile section of the product documentation to understand the configuration of all the profile settings. To address the objective of this procedure, create multiple inSync profiles with some settings changed to import users from LDAP server based on user’s functions/groups.
- Login to the inSync Management Console using https://172.16.53.123/admin.
- On the menu, go to Profiles and click Create New Profile.
- Create multiple profiles with the user-specific settings provided in the steps below.
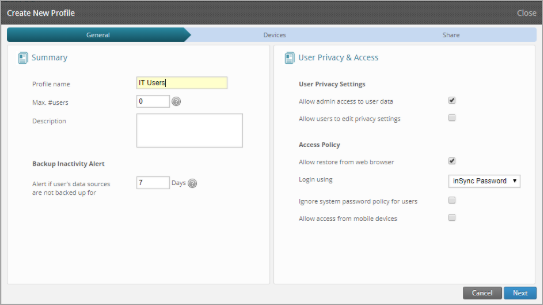
- Profile settings for IT users:
General:
Profile Name: IT Users
Login Using: AD/LDAP Account
AD/LDAP server host IP / FQDN: 172.16.53.130
AD/LDAP server port: 389
Click Next, Enable Device Backup, and Finish.
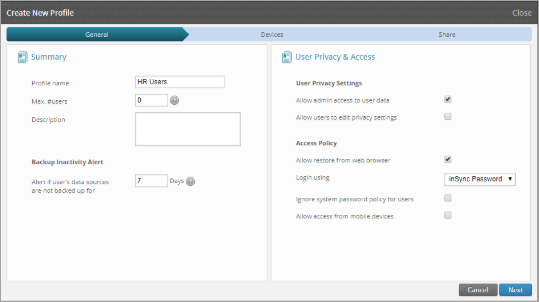
- Profile settings for HR users:
General:
Profile Name: HR Users
Description:
Login Using: AD/LDAP Account
AD/LDAP server host IP / FQDN: 172.16.53.130
AD/LDAP server port: 389
Click Next and Enable Device Backup.
Select the checkbox next to Email under Windows to enable email backup for HR users.
Click Next and Finish.
- Profile settings for IT users:
Create groups and users in LDAP server
Create two groups - one for IT users and the second for HR users with the steps specified below.
- Login to the LDAP server.
- Create a file named GoupsIT-HR.ldif with the following text:
# Groups
dn: cn=IT Users,ou=People,dc=maxcrc,dc=com
cn: IT Users
gidNumber: 721
objectClass: top
objectclass: posixGroupdn: cn=HR Users,ou=People,dc=maxcrc,dc=com
cn: HR Users
gidNumber: 800
objectClass: to
pobjectclass: posixGroup -
Save the GoupsIT-HR.ldif file under C:\OpenLDAP\ldifdata.
-
Launch the elevated command prompt and navigate to C:\OpenLDAP\ClientTools.
-
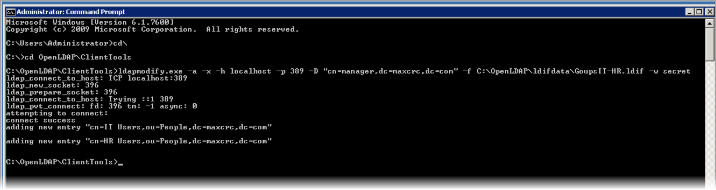
Run the following command to add the groups.
ldapmodify.exe -a -x -h localhost -p 389 -D

    "cn=manager,dc=maxcrc,dc=com" -f

    C:\OpenLDAP\ldifdata\GoupsIT-HR.ldif -w secret
-
Create a file named IT-HR-Users.ldif with the following text:
dn: cn=IT User1,ou=people,dc=maxcrc,dc=com
objectClass: inetOrgPerson
objectClass: posixAccount
objectClass: shadowAccount
cn: IT User1
sn: Druva
uid: ITUser1
uidNumber: 10121
gidNumber: 721
userpassword: SomePassword
carlicense: HISCAR 55555
homephone: 555-111-33333
mail: ituser1@test.local
description: IT Helpdesk
homeDirectory: /home/<uid>
ou: SOA
dn: cn=IT User2,ou=people,dc=maxcrc,dc=com
objectClass: inetOrgPerson
objectClass: posixAccount
objectClass: shadowAccount
cn: IT User2
sn: Druva
uid: ITUser2
uidNumber: 10122
gidNumber: 721
userpassword: SomePassword
carlicense: HISCAR 44444
homephone: 555-111-4444
mail: ituser2@druva.local
description: IT Admin
homeDirectory: /home/<uid>
ou: SOA
dn: cn=HR User1,ou=people,dc=maxcrc,dc=com
objectClass: inetOrgPerson
objectClass: posixAccount
objectClass: shadowAccount
cn: HR User1
sn: Druva
uid: HRUSer1
uidNumber: 10123
gidNumber: 800
userpassword: SomePassword
carlicense: HISCAR 3333
homephone: 555-111-3333
mail: hruser1@druva.local
description: HR Team
homeDirectory: /home/<uid>
ou: SOA
dn: cn=HR User2,ou=people,dc=maxcrc,dc=com
objectClass: inetOrgPerson
objectClass: posixAccount
objectClass: shadowAccount
cn: HR User2
sn: Druva
uid: HRUser2
uidNumber: 10124
gidNumber: 800
userpassword: SomePassword
carlicense: HISCAR 9999IT
homephone: 555-111-8888
mail: HRuser2@druva.local
description: HR Team
homeDirectory: /home/<uid>
ou: SOA -
Save the IT-HR-Users.ldif file under C:\OpenLDAP\ldifdata.
-
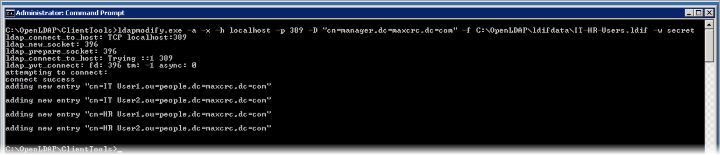
Run the following command to add the users.
ldapmodify.exe -a -x -h localhost -p 389 -D

    "cn=manager,dc=maxcrc,dc=com" -f

    C:\OpenLDAP\ldifdata\GoupsIT-HR.ldif -w secret
Create AD mappings with LDAP filters
Create AD mappings based on the group memberships. LDAP filters are used to scan the user attributes and import group-specific users. For example, if the gidNumber for IT users is 721 and HR users is 800, it becomes the common attribute based on which the group can be filtered.
- Login to the inSync Management Console using https://172.16.53.123/admin.
- On the menu, go to Manage > Deployments > AD/LDAP.
- Open the Mappings tab and click New Mapping each time to create each of the following mappings:
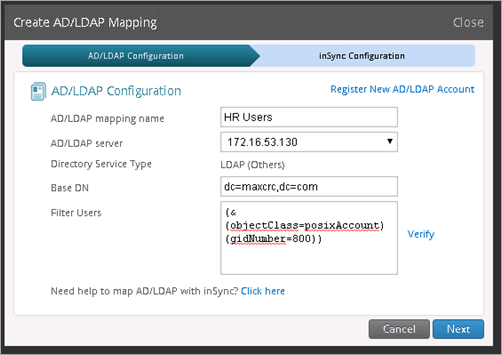
- AD mapping for IT users:
AD/LDAP Configuration:
AD/LDAP Mapping name: IT Users
AD/LDAP server: 172.16.53.130
Base DN: dc=maxcrc,dc=com
Filter Users: (&(objectClass=posixAccount)(gidNumber=721))
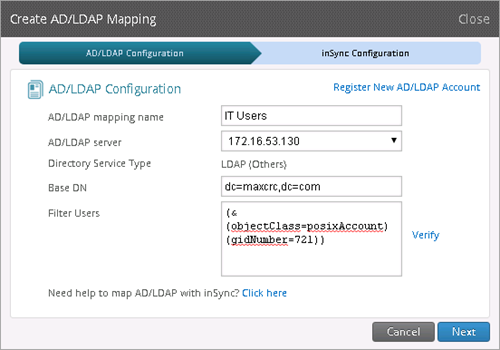
Click Verify and then click Next.
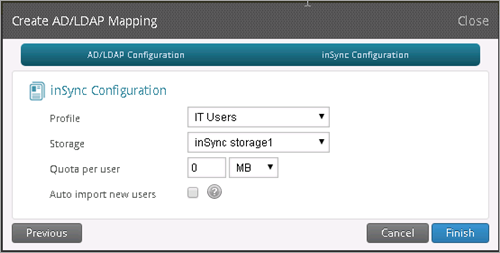
inSync Configuration:
Profile: IT Users
Storage: inSync Storage1
Quota: 0 MB
Click Finish.
- AD mapping for HR users:
AD/LDAP Configuration:
AD/LDAP Mapping name: HR Users
AD/LDAP server: 172.16.53.130
Base DN: dc=maxcrc,dc=com
Filter Users: (&(objectClass=posixAccount)(gidNumber=800))
Click Verify and then click Next.
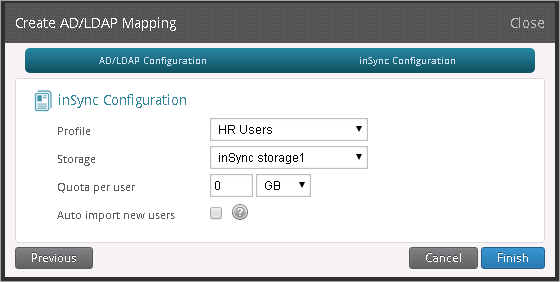
inSync Configuration:
Profile: HR Users
Storage: inSync Storage1
Quota: 0 MB
Click Finish.
- AD mapping for IT users:
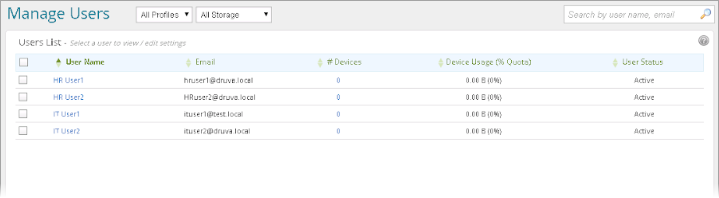
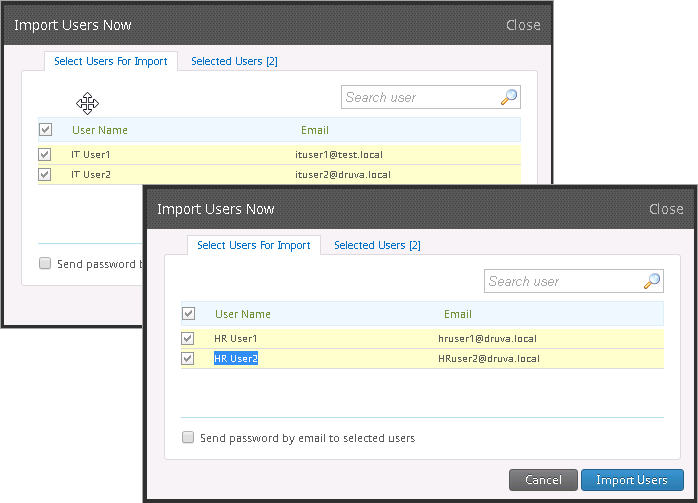
After creating the AD mapping to import the users based on the filters with objectClass=posixAccount and gidNumber, inSync uses the LDAP query to search the uses that match the attributes. For example, when importing new users for the AD/LDAP mapping created for HR users, inSync runs the filter (&(objectClass=posixAccount)(gidNumber=800)) and searches the users with attribute objectClass=posixAccount and gidNumber=800. HR User1 and HR User2 displayed in the list of imported users.
Import users
To import users:
- Login to the inSync Management Console using https://172.16.53.123/admin.
- On the menu, go to Manage > Deployments > AD/LDAP.
- Repeat the following steps to import IT and HR users:
- Select the AD/LDAP mapping for each user group and click Import New Users.
- Select the checkbox next to the username and click Import Users.
- On the Manage Users page, click the links under the User Name column to verify whether all users are listed.