How to configure SSO for Druva inSync On-Premise using Google as IdP?
Overview
This article describes how to configure SSO for Druva inSync On-Premise v5.8.1 and later using Google as IdP
Configure Druva to work with Google IdP
- Log in to Google IdP Admin Console (https://admin.google.com/AdminHome).
- Go to Apps page and Select SAML apps.
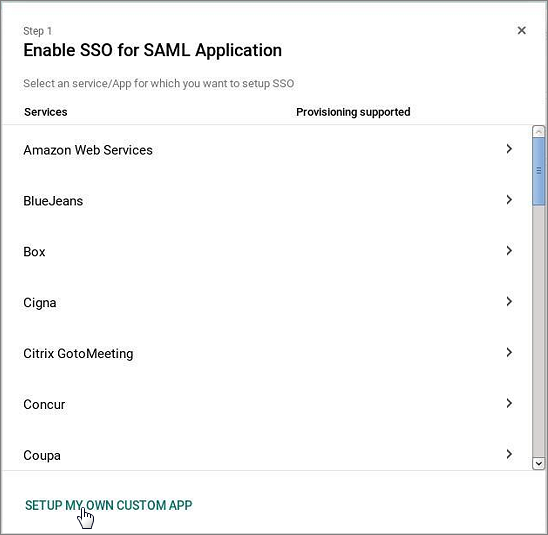
- Create a new app by clicking the + icon.
- On the new pop-up window, click Setup my own custom app.
- Copy the SSO URL and download the IdP metadata xml file. Keep this URL handy to use in the steps ahead.
- Log on to inSync Management Console and click
 > Settings > Single Sign On.
 - Click Edit and copy the SSO URL under ID Provider Login URL.
- Under ID Provider Metadata XML, copy the content of the file that you downloaded in Step 5. (You can open it in notepad).
- Click Save.
- Under ACS URL field, enter the IP/FQDN of the inSync Master Server as specified under Server IP/FQDN section. This IP/FQDN must be available from the client systems.
- Return to the Google Admin Page and resume the custom app creation process.
- On Basic information page, give the name as Druva inSync or any custom name.
- On the next screen, enter the following values:
ACS URL: https://[ip/fqdb]/wrsaml/consume (This will be the inSync Master Server IP/FQDN which is reachable from the client machines)
Entity ID: druva-cloudNote: If you are using both Cloud and On-premises, you would need to change the entity-id. Please contact Druva Support for assistance.
- Leave Start URL and Signed responses blank.
- Under Name ID, select Basic Information > Primary Email.
- Set Name ID Format as Email.
- Under Attribute Mapping, click Add New Mapping and enter the values for Email, Basic information, and Primary Email.

- Save the changes and do not publish the app.
- Select the three buttons for newly created app and select On for Everyone.
The custom app is now configured successfully. You need to update the schema for app to work as expected.
Extend Schema and authorization values for Google IdP
Google IdP does not allow you to enter a custom field value for their SAML apps. To authenticate the SAML response, there are third party applications that require additional value in addition to SAML response.
Druva inSync requires Single Sign-On (SSO) token to validate the SAML response. If the IdP is Google, there is no direct way to add the SAML token. Based on Google, you need to extend the schema for the IdP. In addition to this, the token value must be mapped for every user.
To extend schema:
- Open the following URL - https://developers.google.com/admin-sdk/directory/v1/reference/schemas/insert#try-it.
The link opens the Schemas: insert page. - Enter customerId value as my_customer on the Schemas: insert page.
- In the Request body, enter the following:
{
"fields": [
{
"fieldName": "inSyncAuth",
"fieldType": "STRING",
"multiValued": false,
"readAccessType": "ALL_DOMAIN_USERS",
}
],
"schemaName": "Druva"
}
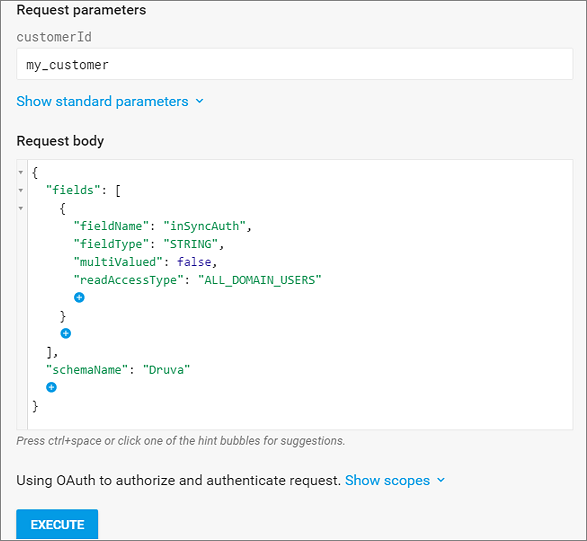
-
Click Execute. The output should be 200 OK. This means the execution was successful.
A new field name Druva will appear under Basic Information Authorization.
Map the token to user
- Open the Google Admin home page (https://admin.google.com/AdminHome).
- Click Users and then click the user name to which you want to map the token.
- Click Account and under Manage User Attributes, click Edit. The schema name Druva and a field to enter the SSO Token under inSyncAuth is displayed as shown in the image below.
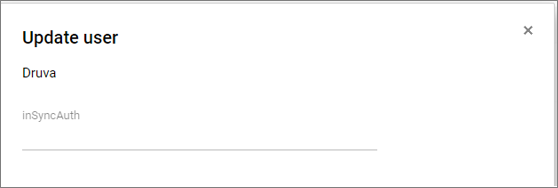
- Log on to inSync Management Console and click > Settings > Single Sign On.
- Click Generate SSO Token.
- Copy the SSO token and enter it in the field below inSyncAuth as shown in above screenshot.
- Click Update User.
To update token for multiple users, please contact Druva Technical Support.
Update attribute mapping
As the Schema is now extended and the authorization field is also configured, you need to update the Attribute Mapping.
- Log on to Google Admin home https://admin.google.com, with your administrative credentials.
- Select Apps > SAML Apps.
- Select the custom application created for Druva.
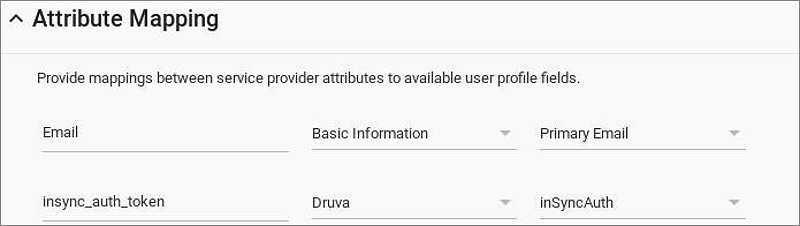
- Once the app opens, select Attribute Mapping, followed by Add New Mapping.
- Under Application Attribute, enter the value as – insync_auth_token.
- Under category, select Druva. This is the value populated after extending the schema.
- Under Select User Field, select inSyncAuth. This value is populated after updating the Authorization page. Attribute mapping field looks like the image below after you save the changes.
The App is now ready for use.Note: In some cases, the app might take up to 24 hours to activate.