Set Up Single Sign-On (SSO)
Overview
Single Sign-On (SSO) is a mechanism that allows users to access multiple resources using a single action of authentication and authorization. Druva supports SSO for administrators. By enabling SSO, administrators can access all Druva services without the need for a separate login. An SSO login validates usernames and passwords against your corporate user database, typically managed by your Identity Provider (IdP). A successful validation ensures that users and administrators can log on to Druva Cloud Platform Console, without the need for a Druva generated password.
- Only a Druva Cloud Administrator can set up Single Sign-On.
- If you have already configured MFA for your organization and want to configure Single Sign-On, MFA will be applicable only to Failsafe Druva Cloud Administrators and not for all the administrators across your organization.
- If you want to enable Single Sign-On for all the administrators across your organization then disable MFA. For more information, see Configure Multifactor Authentication.
How SSO works
Druva supports SSO by implementing federated authentication using Security Assertion Markup Language (SAML) version 2.0. Federated authentication allows Druva to skip the validation of passwords.
To enable SSO, an administrator must first work with an Identity Provider (IdP) to create a corporate database that includes all Druva administrators. If you already have an IdP, you can configure Druva to work with this IdP. The IdP maintains a record of all usernames and their subsequent passwords in an encrypted format.
If you created a corporate database with an IdP for the first time, administrators logging on for the first time are redirected to an IdP login details page that prompts the user for a one-time provision of passwords. The IdP redirects the user to the Druva Cloud Platform Console. The administrators can now access the Druva Cloud Platform Console without individual passwords.
However, if you use a preconfigured IdP or if this is a subsequent login, Druva uses SAML assertions in an HTTP POST profile to communicate with your IdP. For every login attempt, Druva sends SAML requests to the IdP login URL specified under  > Druva Cloud Settings > Access Settings > Single Sign-On > Edit. The IdP validates the SAML query, sets assertion in HTTP POST to True, and sends this response to Druva. Druva receives the assertion, which indicates that the administrator is validated, and allowed access to Druva Cloud Platform Console.
However, if the IdP does not find a match within its database, it sets assertion in HTTP POST to False, thus indicating that the administrator is not authorized to access Druva Cloud Platform Console. Upon receiving this response, Druva denies access to Druva Cloud Platform Console.
Supported Identity Providers (IdPs)
Druva integrates with the majority of the SAML IdPs. This section provides information on the SAML IdPs that Druva certifies and supports.
Support Levels Definition
Druva categorizes its IdP support levels as follows:
- Certified IdPs - A certified IdP is fully tested by Druva Quality Assurance (QA) team. Druva certifies these IdPs and performs regular testing with every cloud release to ensure the SSO functionality works as expected.
- Supported IdPs - A supported IdP is not tested by the Druva QA team with every cloud release, however, the SSO functionality should work as expected. Druva will provide support for such IdPs. Issues that require time and resources beyond commercial viability may not be addressed.
Certified IdPs
- Okta
- PingOne
- Active Directory Federation Services (ADFS)
- Windows Server 2012 R2 (64-bit) is certified to work with ADFS 3.0
- Windows Server 2008 R2 (64-bit) is certified to work with ADFS 2.0
Supported IdPs
All IdPs that support SAML 2.0.
Note: Contact Support for assistance to configure a IdP that is not listed under Certified IdPs.
SSO Configuration Workflow
This table describes the chronology that you should follow for enabling SSO for the administrator and user access.
| Task Number | Task | Description |
|---|---|---|
|
1 |
Before you enable SSO, you must first set up a corporate database with an Identity Provider (IdP). If your organization is using an IdP, you must work with your IdP to get details such as IdP URL and IdP certificate. Druva supports leading IdPs such as Okta, PingIdentity, OneLogin, and Active Directory Federation Services (ADFS). |
|
|
2
|
To enable SSO access for users and administrators you must configure Druva to recognize IdP details that you obtained when you performed Task 1. |
|
| 3 | After you configure Druva for Single Sign-On, the Druva Cloud Platform Console provides an option to generate SSO Token. To allow your IdP to recognize requests that Druva sends, you must first generate an SSO token, and then update your IdP configuration with this token. The SSO token uniquely identifies Druva login requests. For login attempts, Druva sends a request to the IdP (typically using HTTP POST). In its response, the IdP attaches this token, thereby indicating the validity of authentication requests. When Druva receives this response, it uses the SSO token ID to validate the authenticity of the IdP response. | |
| 4 | Update IdP details | To provide the authentication token to your IdP, you must update your IdP configuration to include this token. This establishes a connection between SAML and Druva or vice-versa. |
| 5 |
As the last step, you must configure Druva to enable SSO and Failsafe. |
Work With Your IdP
To enable SSO for users and administrators in your organization, you must work with your Identity Provider (IdP) to create a corporate database that contains usernames and passwords of Druva administrators. If your organization is using an IdP, you can configure Druva to recognize this IdP. The IdP maintains a record of credentials and validates a username against its password for each login attempt. Druva supports leading IdPs such as Okta, PingIdentity, OneLogin, and Active Directory Federation Services (ADFS).
Obtain IdP details
To configure Druva for SSO, you must obtain the following information from your IdP.
- ID Provider Login URL: The page to which Druva sends a SAML request to initiate a login.
- ID Provider Certificate: The authentication certificate that your IdP provides.
Configure the IdP for Single Sign-On
From the list of various IdPs, you can choose the preferred IdP that is supported in your organization and then configure the IdP to enable SSO for Druva Cloud Platform.
Based on the IdP that you have preferred, the following topics will guide you to configure the IdP for SSO.
- Configure Okta as IdP
- Configure PingFederate as IdP
- Configure JumpCloud as IdP
- Configure Azure AD as IdP
- Configure OneLogin as IdP
Configure Druva for Single Sign-On
If you are a Druva Cloud Administrator, you can configure SSO for your Druva account. At the time of configuration, you must provide IdP details that you obtained at the time of working with your IdP.
To configure Single Sign-On settings:
- Click to access the Global Navigation Panel > Druva Cloud Settings > Access Settings. The Access Settings window appears.
- In the Single Sign-On section, click Edit. The Edit Single Sign-On Settings window appears.
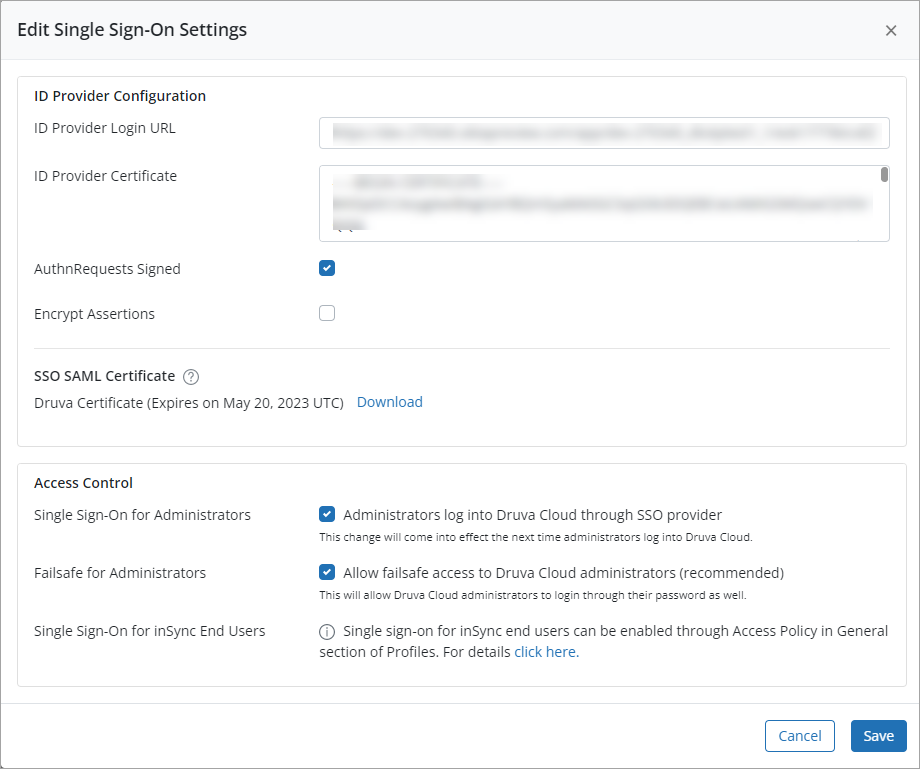
- Provide the appropriate information for each field.
| Field | Action |
|---|---|
|
ID Provider Login URL |
Type the identity provider's URL. The URL that you provide in this field points to the identity provider's authentication page. When the email is entered on the Druva Cloud Platform Console login page, the administrator is directed to the identity provider's authentication page. |
|
ID Provider Certificate |
Copy the content of the public key certificate that your IdP provided. This certificate ensures that the communication between Druva and your IdP is secure. |
|
AuthnRequests Signed |
Select this checkbox if you want to sign SAML Authentication Requests. By default, SAML Authentication Requests are not signed. |
|
Encrypt Assertions |
Select this checkbox, if you want to enable encryption for the SAML assertions. By default, encryption is disabled. |
| SSO SAML Certificate | Download the SSO SAML Certificate. |
| Access Control | |
| Single Sign-On for Administrators | Enable the Administrators log into Druva Cloud through SSO provider setting to let administrators use the SSO configuration to log in to Druva Cloud Platform Console and use Druva services. |
| Failsafe for Administrators | Enable the Failsafe for Administrators setting to provide Druva Cloud Administrators an option to use a password to log in to Druva Cloud Platform Console even if SSO is enabled for administrators. Only Druva Cloud Administrators get the privilege to use a password to log in to Druva Cloud Platform Console. By default, this setting is enabled, and Druva recommends that you DO NOT disable this setting. |
| Single Sign-On for inSync End Users | To let inSync end users log in using SSO configuration, enable the setting through the general section of their profile. |
Generate SSO token
To allow your IdP to recognize requests that inSync and Enterprise Workloads sends, you must first generate an SSO token, and then update your IdP configuration with this token. The SSO token uniquely identifies Druva login requests. For login attempts, Druva sends a request to the IdP (typically using HTTP POST). In its response, the IdP attaches this token, thereby indicating the veracity of authentication requests. When Druva receives this response, it uses the SSO token ID to validate the authenticity of the IdP response.
Note: You can generate the token multiple times, but till the time you update the newly generated token in IdP, the previously generated token will be used to authenticate sign-in requests.
If you have completed the configuration in the previous steps, do the following steps to generate an SSO token:
- Click to access the Global Navigation Panel > Druva Cloud Settings > Access Settings. The Access Settings window appears.
- In the Single Sign-On section, click Generate SSO Token. The Single Sign-On Token window appears.
- Click Copy. A message appears indicating that the token is copied to clipboard.
- Click Close.
- Save it as plain text using a text editor for later use.
- Update your IdP configuration to reflect the SSO token.
Update IdP Details
To allow your IdP to recognize requests that Druva sends, update your IdP configuration with the token you generated in the Generate SSO token section. The SSO token uniquely identifies Druva login requests. For login attempts, Druva sends a request to the IdP (typically using HTTP POST). In its response, the IdP attaches this token, thereby indicating the veracity of authentication requests. When Druva receives this response, it uses the SSO token ID to validate the authenticity of the IdP response.
Before updating IdP details, ensure that:
- You have the SAML_Identifier/entity ID parameter handy. The Single Sign-On settings page on the Druva Cloud Platform Console displays the entity ID for your account.
- You have access to the documentation for the Identity Provider that you are using. This article contains instructions that serve as a guide, and not as exact tasks that you must perform.
Unless otherwise noted, use the following procedure as a guide. Use the documentation provided by your IdP for the correct configuration procedure.
- Log on to the IdP administrator console with elevated rights.
For example, the Global Administrator role supported by PingOne provides full access to manage and control all aspects of the administrator console. - Create a SAML application.
- Provide the Assertion Consumer Service URL or the SSO URL.
The Assertion Consumer Service is a SAML-compliant URL that is hosted on your IdP. It acts as a receptor for form submissions and page redirects. The Assertion service URL or the SSO URL for the Druva Cloud Platform Console- For Public Cloud: https://login.druva.com/api/commonlogin/samlconsume
- For Governance Cloud: https://loginfederal.druva.com/api/c...in/samlconsume
- Provide the SAML_Identifier value as the entity ID. In Okta, this is the Audience URI field. In this field, provide:
Note: This value is case sensitive.
- DCP-login for Public Cloud
- DCP-loginfederal for Gov Cloud
In case your IdP requires a URL to be entered for SAML_Identifier, you can use https://dcp-login for Public Cloud and https://dcp-loginfederal for Gov Cloud.
You can also configure the IdP with a custom entity ID. To generate a unique entity ID click
 button and select Regenerate Entity ID.
 Generating a new entity ID allows configuring each SAML enabled account with a unique entity ID. This enables you to configure multiple SAML enabled accounts for your organization.
- In the Name ID format field, select EmailAddress.
- Leave the Default RelayState field blank.
- If the identity provider requires an application URL
- For Public Cloud, enter https://login.druva.com
- For Governance Cloud, enter https://loginfederal.druva.com
- Provide the Name ID Format, SSO token, and other details that your IdP mandates.
- In the SSO token section, enter the name as druva_auth_token.
- In the value field, paste the SSO token that you generated in Generate SSO token section.
- If you have enabled AuthnRequests Signed as per step 3 of the previous procedure, provide the following certificate in the applicable field on the IdP:
MIIIVjCCBz6gAwIBAgIQBuTeWFb84wD2ADzlAR52qjANBgkqhkiG9w0BAQsFADB1
MQswCQYDVQQGEwJVUzEVMBMGA1UEChMMRGlnaUNlcnQgSW5jMRkwFwYDVQQLExB3
d3cuZGlnaWNlcnQuY29tMTQwMgYDVQQDEytEaWdpQ2VydCBTSEEyIEV4dGVuZGVk
IFZhbGlkYXRpb24gU2VydmVyIENBMB4XDTIyMDcyMjAwMDAwMFoXDTIzMDgyMjIz
NTk1OVowgcYxEzARBgsrBgEEAYI3PAIBAxMCVVMxGTAXBgsrBgEEAYI3PAIBAhMI
RGVsYXdhcmUxHTAbBgNVBA8MFFByaXZhdGUgT3JnYW5pemF0aW9uMRAwDgYDVQQF
Ewc0ODI0NDY3MQswCQYDVQQGEwJVUzETMBEGA1UECBMKQ2FsaWZvcm5pYTESMBAG
A1UEBxMJU3Vubnl2YWxlMRMwEQYDVQQKEwpEcnV2YSBJbmMuMRgwFgYDVQQDEw9s
b2dpbi5kcnV2YS5jb20wggEiMA0GCSqGSIb3DQEBAQUAA4IBDwAwggEKAoIBAQDm
MpOVn2R8Y9AAUigJ3GwdaIBw8pR4Ez/7uokcGw5+hxBdNlylPoyHKBrtaZ1bDRaj
KpLm9a38VOOD0ftbhTWQJwHkgJZ1ALeGZArbcc8OPRPVAYx7ofLkqP7hnkKGlZrn
E317+7du2vrfyP3O5OrmBAprDgaLmcM5Y9B+Ce/n3euwWAEz/DkLn6HKHiz9mLXh
Pd4v6ChHuW2f9fRPCTW6zHCCztoWEpggk7ETAZQP+/dWV570O/0caJW/6DXUWq01
9TWQEFBIgne37NTsjHa9+FSsUjCZHkR0oci6fbCcnrdU/gs0zDsdzKnLoT3s9ycB
PR1YzSrICPpRxrIi0cI7AgMBAAGjggSOMIIEijAfBgNVHSMEGDAWgBQ901Cl1qCt
7vNKYApl0yHU+PjWDzAdBgNVHQ4EFgQUy9is/5NPZIBlGOIElH8NvuYJUL4wggE6
BgNVHREEggExMIIBLYIPbG9naW4uZHJ1dmEuY29tghFjb25zb2xlLmRydXZhLmNv
bYISZDFhdXRodjMuZHJ1dmEuY29tghVnb3ZkMWF1dGh2My5kcnV2YS5jb22CEmdv
dmxvZ2luLmRydXZhLmNvbYIUZ292Y29uc29sZS5kcnV2YS5jb22CFGRlbGwtbG9n
aW4uZHJ1dmEuY29tghZkZWxsLWNvbnNvbGUuZHJ1dmEuY29tgg5kZWxsLmRydXZh
LmNvbYIXZGVsbC1nb3Zsb2dpbi5kcnV2YS5jb22CGWRlbGwtZ292Y29uc29sZS5k
cnV2YS5jb22CEWdvdmRlbGwuZHJ1dmEuY29tghRnbG9iYWxhdXRoLmRydXZhLmNv
bYIXZ2xvYmFsZ292YXV0aC5kcnV2YS5jb20wDgYDVR0PAQH/BAQDAgWgMB0GA1Ud
JQQWMBQGCCsGAQUFBwMBBggrBgEFBQcDAjB1BgNVHR8EbjBsMDSgMqAwhi5odHRw
Oi8vY3JsMy5kaWdpY2VydC5jb20vc2hhMi1ldi1zZXJ2ZXItZzMuY3JsMDSgMqAw
hi5odHRwOi8vY3JsNC5kaWdpY2VydC5jb20vc2hhMi1ldi1zZXJ2ZXItZzMuY3Js
MEoGA1UdIARDMEEwCwYJYIZIAYb9bAIBMDIGBWeBDAEBMCkwJwYIKwYBBQUHAgEW
G2h0dHA6Ly93d3cuZGlnaWNlcnQuY29tL0NQUzCBiAYIKwYBBQUHAQEEfDB6MCQG
CCsGAQUFBzABhhhodHRwOi8vb2NzcC5kaWdpY2VydC5jb20wUgYIKwYBBQUHMAKG
Rmh0dHA6Ly9jYWNlcnRzLmRpZ2ljZXJ0LmNvbS9EaWdpQ2VydFNIQTJFeHRlbmRl
ZFZhbGlkYXRpb25TZXJ2ZXJDQS5jcnQwCQYDVR0TBAIwADCCAYAGCisGAQQB1nkC
BAIEggFwBIIBbAFqAHcA6D7Q2j71BjUy51covIlryQPTy9ERa+zraeF3fW0GvW4A
AAGCJkUijQAABAMASDBGAiEAtmogPsjEUPvW1juWJBd62X6h7bSum5J9JlW1FHHH
fp0CIQD+tFHl5J1gCMP0bEezg/sX8byju3WGFZptu1M13n3huQB3ADXPGRu/sWxX
vw+tTG1Cy7u2JyAmUeo/4SrvqAPDO9ZMAAABgiZFIdkAAAQDAEgwRgIhAJzdC6iJ
EcHZUURrrjAZ11vZoObWkBa9EyMyz1WUxd6zAiEAwrju2M/yZ+RPR2E4Ez4idpSx
uo4PxyYHQaOrOB39wfcAdgCzc3cH4YRQ+GOG1gWp3BEJSnktsWcMC4fc8AMOeTal
mgAAAYImRSIBAAAEAwBHMEUCIQCARvvi/98GlHMJf6OMFjpT2zS0E8QGOy9TBVYs
2NT/dwIgb1cc7b4rXfJuRPSVp3xEE07o75C12QrFCxRaCUAC6I4wDQYJKoZIhvcN
AQELBQADggEBAATc7FrT12dCRYuogdWffj4E8oHWY6ayfEq7HQU7gmx+m0PwbTWE
TVXX4itrnXBF9QXzcEl5u5FA3jeN+6yKlymyJUJXAgt9MbWmyPUuSyDfMArNhiIy
mlNyPUpw/yRVibWBQxEnHwNERDTjtZbpFccH9v1WfLrWZ3mcWU5iTEwWq7kFU6XF
zhPufkkU5IbI2TnseAjQO5S1XjVJsT53yEUe/Rl12Oh/RdPuLyztldnAbvluPHKl
33D7jMMyfl4R3DedgPLHjmsFSBC2UVI61/KTTP6DJIwYqbGTe47MT1MxL+Je4aAp
HlpBmD8QuwKE/O+WtJOiboG25mCjnkCFpDI= - If you have enabled Encrypt Assertions as per step 3 of the previous procedure, provide the following certificate in the applicable field on the IdP:
MIIIVjCCBz6gAwIBAgIQBuTeWFb84wD2ADzlAR52qjANBgkqhkiG9w0BAQsFADB1
MQswCQYDVQQGEwJVUzEVMBMGA1UEChMMRGlnaUNlcnQgSW5jMRkwFwYDVQQLExB3
d3cuZGlnaWNlcnQuY29tMTQwMgYDVQQDEytEaWdpQ2VydCBTSEEyIEV4dGVuZGVk
IFZhbGlkYXRpb24gU2VydmVyIENBMB4XDTIyMDcyMjAwMDAwMFoXDTIzMDgyMjIz
NTk1OVowgcYxEzARBgsrBgEEAYI3PAIBAxMCVVMxGTAXBgsrBgEEAYI3PAIBAhMI
RGVsYXdhcmUxHTAbBgNVBA8MFFByaXZhdGUgT3JnYW5pemF0aW9uMRAwDgYDVQQF
Ewc0ODI0NDY3MQswCQYDVQQGEwJVUzETMBEGA1UECBMKQ2FsaWZvcm5pYTESMBAG
A1UEBxMJU3Vubnl2YWxlMRMwEQYDVQQKEwpEcnV2YSBJbmMuMRgwFgYDVQQDEw9s
b2dpbi5kcnV2YS5jb20wggEiMA0GCSqGSIb3DQEBAQUAA4IBDwAwggEKAoIBAQDm
MpOVn2R8Y9AAUigJ3GwdaIBw8pR4Ez/7uokcGw5+hxBdNlylPoyHKBrtaZ1bDRaj
KpLm9a38VOOD0ftbhTWQJwHkgJZ1ALeGZArbcc8OPRPVAYx7ofLkqP7hnkKGlZrn
E317+7du2vrfyP3O5OrmBAprDgaLmcM5Y9B+Ce/n3euwWAEz/DkLn6HKHiz9mLXh
Pd4v6ChHuW2f9fRPCTW6zHCCztoWEpggk7ETAZQP+/dWV570O/0caJW/6DXUWq01
9TWQEFBIgne37NTsjHa9+FSsUjCZHkR0oci6fbCcnrdU/gs0zDsdzKnLoT3s9ycB
PR1YzSrICPpRxrIi0cI7AgMBAAGjggSOMIIEijAfBgNVHSMEGDAWgBQ901Cl1qCt
7vNKYApl0yHU+PjWDzAdBgNVHQ4EFgQUy9is/5NPZIBlGOIElH8NvuYJUL4wggE6
BgNVHREEggExMIIBLYIPbG9naW4uZHJ1dmEuY29tghFjb25zb2xlLmRydXZhLmNv
bYISZDFhdXRodjMuZHJ1dmEuY29tghVnb3ZkMWF1dGh2My5kcnV2YS5jb22CEmdv
dmxvZ2luLmRydXZhLmNvbYIUZ292Y29uc29sZS5kcnV2YS5jb22CFGRlbGwtbG9n
aW4uZHJ1dmEuY29tghZkZWxsLWNvbnNvbGUuZHJ1dmEuY29tgg5kZWxsLmRydXZh
LmNvbYIXZGVsbC1nb3Zsb2dpbi5kcnV2YS5jb22CGWRlbGwtZ292Y29uc29sZS5k
cnV2YS5jb22CEWdvdmRlbGwuZHJ1dmEuY29tghRnbG9iYWxhdXRoLmRydXZhLmNv
bYIXZ2xvYmFsZ292YXV0aC5kcnV2YS5jb20wDgYDVR0PAQH/BAQDAgWgMB0GA1Ud
JQQWMBQGCCsGAQUFBwMBBggrBgEFBQcDAjB1BgNVHR8EbjBsMDSgMqAwhi5odHRw
Oi8vY3JsMy5kaWdpY2VydC5jb20vc2hhMi1ldi1zZXJ2ZXItZzMuY3JsMDSgMqAw
hi5odHRwOi8vY3JsNC5kaWdpY2VydC5jb20vc2hhMi1ldi1zZXJ2ZXItZzMuY3Js
MEoGA1UdIARDMEEwCwYJYIZIAYb9bAIBMDIGBWeBDAEBMCkwJwYIKwYBBQUHAgEW
G2h0dHA6Ly93d3cuZGlnaWNlcnQuY29tL0NQUzCBiAYIKwYBBQUHAQEEfDB6MCQG
CCsGAQUFBzABhhhodHRwOi8vb2NzcC5kaWdpY2VydC5jb20wUgYIKwYBBQUHMAKG
Rmh0dHA6Ly9jYWNlcnRzLmRpZ2ljZXJ0LmNvbS9EaWdpQ2VydFNIQTJFeHRlbmRl
ZFZhbGlkYXRpb25TZXJ2ZXJDQS5jcnQwCQYDVR0TBAIwADCCAYAGCisGAQQB1nkC
BAIEggFwBIIBbAFqAHcA6D7Q2j71BjUy51covIlryQPTy9ERa+zraeF3fW0GvW4A
AAGCJkUijQAABAMASDBGAiEAtmogPsjEUPvW1juWJBd62X6h7bSum5J9JlW1FHHH
fp0CIQD+tFHl5J1gCMP0bEezg/sX8byju3WGFZptu1M13n3huQB3ADXPGRu/sWxX
vw+tTG1Cy7u2JyAmUeo/4SrvqAPDO9ZMAAABgiZFIdkAAAQDAEgwRgIhAJzdC6iJ
EcHZUURrrjAZ11vZoObWkBa9EyMyz1WUxd6zAiEAwrju2M/yZ+RPR2E4Ez4idpSx
uo4PxyYHQaOrOB39wfcAdgCzc3cH4YRQ+GOG1gWp3BEJSnktsWcMC4fc8AMOeTal
mgAAAYImRSIBAAAEAwBHMEUCIQCARvvi/98GlHMJf6OMFjpT2zS0E8QGOy9TBVYs
2NT/dwIgb1cc7b4rXfJuRPSVp3xEE07o75C12QrFCxRaCUAC6I4wDQYJKoZIhvcN
AQELBQADggEBAATc7FrT12dCRYuogdWffj4E8oHWY6ayfEq7HQU7gmx+m0PwbTWE
TVXX4itrnXBF9QXzcEl5u5FA3jeN+6yKlymyJUJXAgt9MbWmyPUuSyDfMArNhiIy
mlNyPUpw/yRVibWBQxEnHwNERDTjtZbpFccH9v1WfLrWZ3mcWU5iTEwWq7kFU6XF
zhPufkkU5IbI2TnseAjQO5S1XjVJsT53yEUe/Rl12Oh/RdPuLyztldnAbvluPHKl
33D7jMMyfl4R3DedgPLHjmsFSBC2UVI61/KTTP6DJIwYqbGTe47MT1MxL+Je4aAp
HlpBmD8QuwKE/O+WtJOiboG25mCjnkCFpDI=
- Save your changes.
The Single Sign-On is set up after all the steps are completed successfully, and administrators can log in to the Druva Cloud Platform Console by using SSO in your organization.
Enable Single Sign-On and Failsafe for Administrators
After SSO is enabled, Druva disables passwords for all product administrators, except the Druva Cloud Administrators and the administrators having the Legal Admin role. Once SSO is enabled, failsafe login is enabled for Druva Cloud Administrators and the administrators having the Legal Admin role.
What should you know about enabling SSO and failsafe:
- To enable SSO and failsafe, you must be a Druva Cloud Administrator.
- SSO is available optionally; you can enable SSO even if you did not use SSO before. Similarly, you can stop using SSO access at any time.
- To enable failsafe, you must first enable SSO.
- Enabling SSO ensures that the password policy for Druva is aligned with your organization's policy.
- Enabling Failsafe ensures that Druva Cloud administers can log into the Druva account even if SSO is not functional.
- You can explicitly disable SSO access using the Druva password (provided that you enabled SSO for all administrator accounts). For more information, see Disable SSO.
- You can disable the failsafe option. For more information Disable failsafe for administrator.
To enable Single Sign-On for administrators:
- Click to access the Global Navigation Panel > Druva Cloud Settings. The Settings window appears.
- In the Single Sign-On section, click Edit. The Edit Single Sign-On Settings window appears.
- Select Enable Single Sign-On for Administrators checkbox.
- Click Save.
Enable SSO for inSync End Users
You can enable SSO for inSync end users from the profiles section on the inSync Management Console. For more information, see Enable SSO for inSync users.
Disable Single Sign-On for Administrators
After you disable SSO, Druva enables passwords for all other administrators. To disable Single Sign-On for administrators:
- Click to access the Global Navigation Panel > Druva Cloud Settings. The Settings window appears.
- In the Single Sign-On section, click Edit. The Edit Single Sign-On Settings window appears.
- De-select Single Sign-On for Administrators checkbox.
- Click Save.
Note: Failesafe for administrators is mandatory if you have configured your IdP with a custom entity ID and cannot be disabled.
Key Points
After you set up SSO, as a result:
- Failsafe admins (Druva Cloud Administrators) receive an email with a password when Single Sign-On is enabled.
- The password is reset for all administrators when Single Sign-On is disabled.
- Password policy is enabled for Druva Cloud Administrators when Single Sign-On is enabled. After a Druva Cloud Administrators logs in using Single Sign-On, the Druva Cloud Platform Console prompts the administrator to reset the password.
- Administrators are not notified if the Failsafe for Administrators setting is disabled.