Restore Activity Report
Overview
Restore Activity Report provides a comprehensive list of all restore operations of the workloads performed for a specified duration. It gives insight into the status of each restore job run for the workloads in each organization. Based on the status of the restore, you can perform an analysis and take corrective actions. For example, if the restore operation fails because of insufficient storage on the destination server, you can provide adequate storage based on your data requirements.
Enterprise Workloads Administrators can view the Restore Activity Report depending on their access privileges. If you are a Cloud-derived administrator or a Data Protection Officer, you can view the report of restore activities of all the resources. If you are an Organization-derived administrator, you can view the report of restore activities of your resources specific to the organizations you have access to. If you are a Group-derived administrator, you can view the report of restore activities of your resources related to the administrative groups that you manage.
Procedure
-
Log in to the Druva Cloud Platform Console.
-
Go to the Global Navigation Panel > Reports > Hybrid Workloads. The Hybrid Workloads Reports page appears.
Click Restore Activity Report.
The report details page appears. By default, the Restore Activity report provides details of the restores that occurred in the last 30 days. By default, the report displays restore activity details for all workloads and organizations.
You can apply filters to the Restore Activity Report to fetch restore details as per your requirements. You can view the generated report, or send it through an email to the intended recipients. You can also download data in the widgets in the CSV and CSV-Summary formats. You can sort data in the Restore Activity Details table using single or multiple columns, and rearrange the columns in the table as per your requirement.
Note: The report data is refreshed every two hours. The last updated time recorded for the report is displayed next to the report title. This timestamp follows the administrator’s time zone. However, the timestamps of the data fetched in the report follow the UTC time zone.
The following screenshot depicts a sample Restore Activity Report.
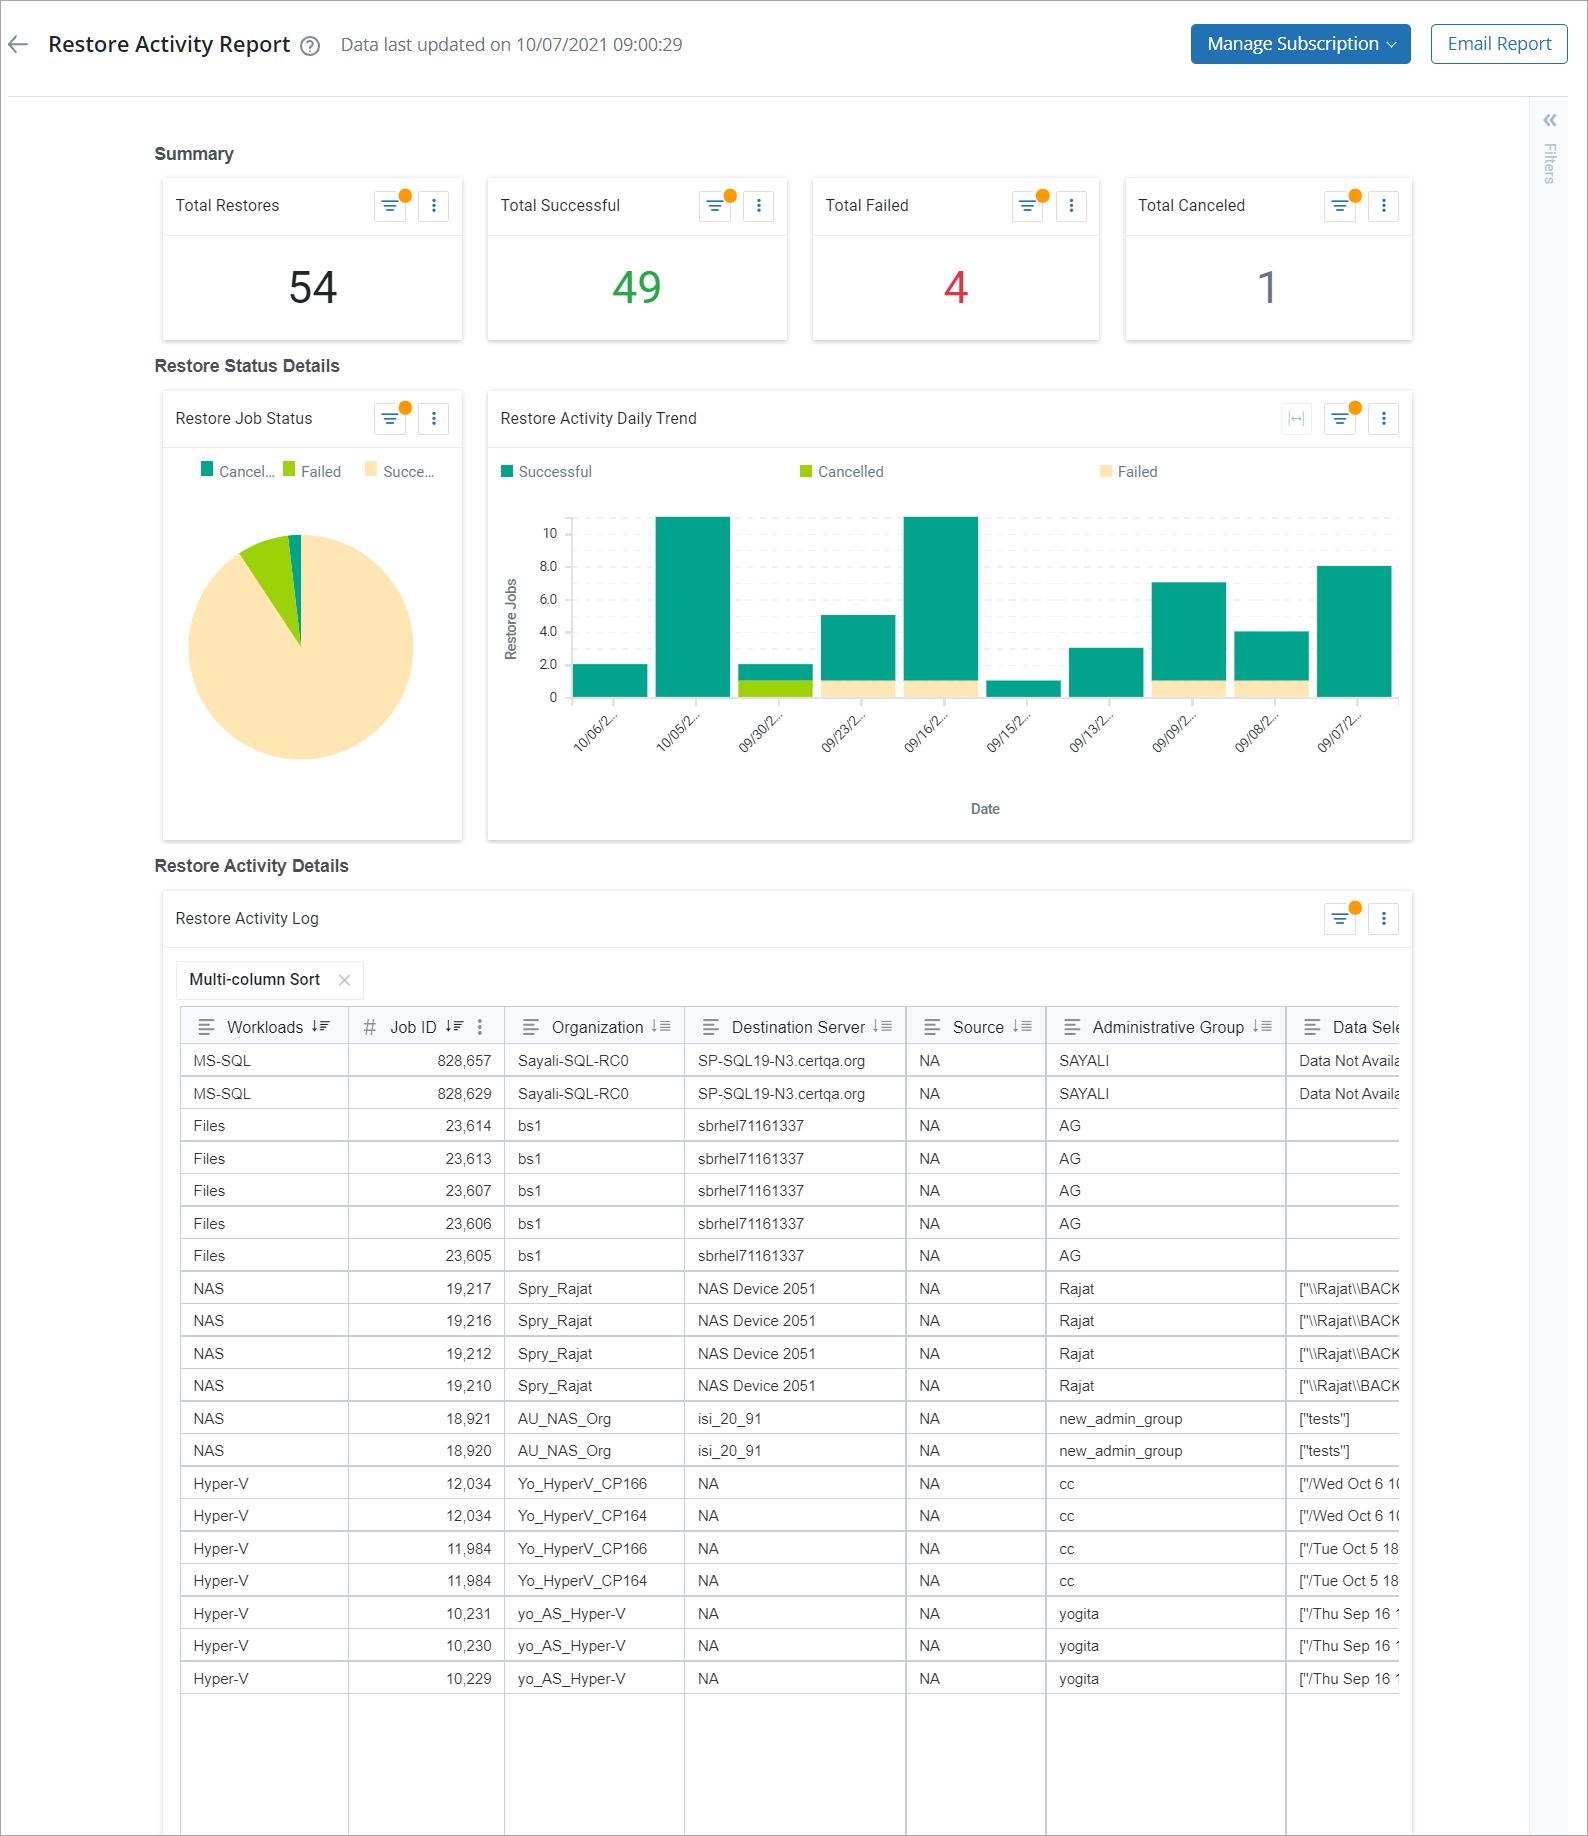
The following table describes the fields in the Restore Activity Report.
| Section | Field | Description |
| Summary | Total Restores | The total number of restore jobs triggered for the resources defined in the filter. |
| Total Successful | The number of restored jobs processed successfully without errors. | |
| Total Failed | The number of restored jobs failed for the resources. | |
| Total Canceled | The number of the canceled restore jobs for all resources. | |
|
Restore Status Details |
Restore Job Status |
The pie chart depicts various statuses of the restores performed for the selected resources of the organization, such as successful, failed, and queued. Hovering on the individual legends of the graph displays the count of the successful, failed, and queued restore jobs for the resources of the selected organization. |
| Restore Activity Daily Trend | The course of successful, failed, and queued restores for the selected resources each day for the selected duration. | |
| Restore Activity Details | The Restore Activity Details table lists all restore activities performed for resources based on the workloads they belong to. | |
| Job ID | The unique identification number associated with the restore job. | |
| Organization | The name of the organization under which the workload is configured. | |
| Destination Server | The name of the destination server or virtual machine on which data was restored. | |
| Source | The server or virtual machine on which a restore was initiated. | |
|
Source VM Location |
The Subscription name, Region, and Resource Group of the source Azure VM (separated by a slash ‘/') |
|
|
Destination VM Location |
The Subscription name, destination Region, and Resource Group of the restored Azure VM (separated by a slash ‘/') |
|
| Administrative Group | The name of the administrative group the workload is a part of. | |
| Data Selected for Restore | The name of the snapshot, or the folder selected for restore. | |
| Restore Location | The location on the destination server or destination hypervisor and data store where the data was restored. | |
|
Scheduled |
The timestamp of the restore operation scheduled for the server.
|
|
|
Started |
The timestamp when the restore operation started.
|
|
|
Ended |
The timestamp when the restore operation finished.
|
|
| Status | The status of the restore job. | |
| Details | The details of the restore job. | |
Actions
The following table lists the actions that you can perform on the Restore Activity Report page.
| Action | Description |
| Add filter | Creates filters to display restore activity data based on the filter’s selection. |
| Sort data | Sorts data in the Restore Activity Details table using one or more columns. |
| Rearrange columns | Changes the order of the columns in the Restore Activity Details table. |
Add Filter
You can apply filters to the Restore Activity Report to fetch backup details as per your requirements. You can view the generated report, download it, or send it through an email to the intended recipients.
Procedure
- On the Restore Activity Report page, click the filter icon.
The Filters widget appears. The Filters widget displays a default restore activity filter selected that lists restore activities performed in the last two months. You can define multiple filters based on your requirements. Druva will fetch report data based on the fields’ selection. Click the delete icon to remove filters. - Click Add Filter.
- On the Filter dialog, select a field or type the field name in the Column box, and use the filter options to create a combination of filters, and click Apply.
The Restore Activity Report page now displays data specific to the filter created. Similarly, you can further create more filters and apply them to display restore activity details.
For example, to fetch data for two organizations, ORGA and ORGB, respectively, select the Organization Name from the filter options, select the Equals option from the Is drop-down list, and select the check boxes for ORGA and ORGB, respectively. Click Apply.
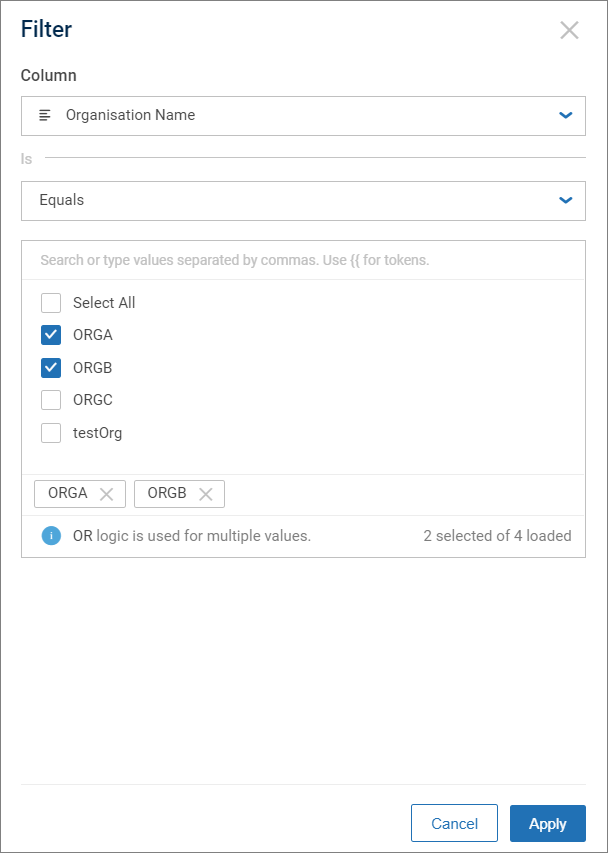
The report now displays restore data specific to the two organizations, ORGA and ORGB.

Sort data
Use the sort options to sort the report data in a single or multiple columns in an ascending or descending order.
Single-column Sort
- Click the
 icon to sort the data values in ascending or descending order.
 - Click the
 icon to disable the sorting option.


Multiple-columns Sort
The Apply Multiple-column Sort option allows you to sort report data using more than one column. The report data displays based on the order of columns selected. For example, you may want to fetch data restored for workloads deployed per organization with the successful status. To sort data, simply perform the following steps:
- In the Restore Activity Details table, go to the Organization column and click the More
 icon > click Apply Multi-column Sort.
 - Click the sort icon in the Status column.
The Restore Activity Details table displays report data sorted based on the selected order of columns.
Rearrange columns
You can change the order of the columns in the Restore Activity Details table. Simply drag a column and drop it to the required position within the table.