How to configure SSO for DCP GovCloud using JumpCloud as IdP
This article applies to:
- Product edition: Druva Cloud Platform (DCP)
This article is only applicable for inSync GovCloud.
Overview
This article provides the steps to configure SSO for Druva Cloud Platform (DCP) on Druva inSync GovCloud using JumpCloud as IdP.
Configuration steps:
Configure a custom Druva app for DCP on JumpCloud portal
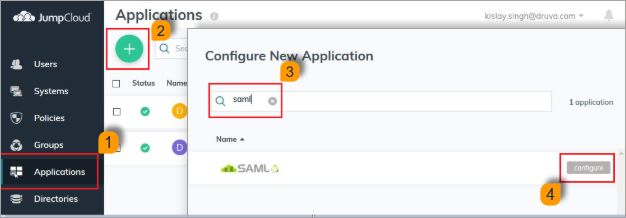
To configure a custom app:
- Log in to the JumpCloud Admin Portal: https://console.jumpcloud.com.
- Go to Applications and click + to configure a new application.
- Search for SAML
- Click Configure.
Configure JumpCloud Single Sign-On
Under the Configure SAML section, there are several configurable fields. Only the required configurations are specified below and the rest can be omitted with their default values.
Provide the values for the fields as described below:
- DISPLAY LABEL: Enter the name for the Application. For example, Druva or Druva App.
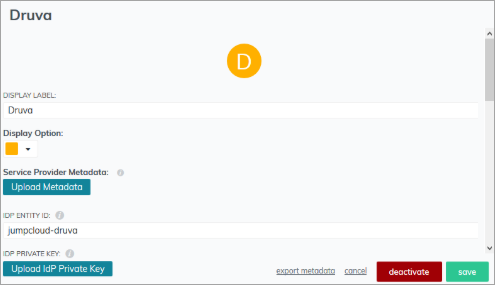
- IDP ENTITY ID: This is the unique, case-sensitive identifier used by JumpCloud for the service provider. This is a mandatory field, although the value supplied to this field is not required on the Service Provider end. For example, you can enter jumpcloud-druva.
- IDP PRIVATE KEY and IDP CERTIFICATE: Generate a public certificate and private key pair to connect Druva application to JumpCloud with the below steps.
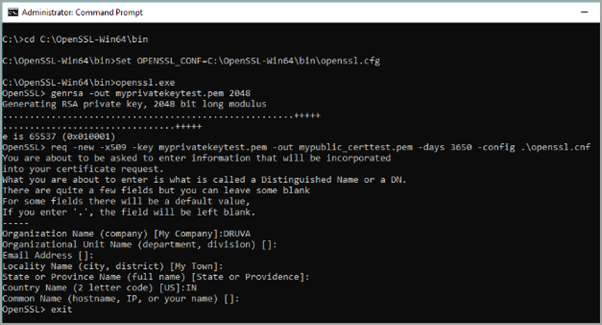
Windows users- To create a certificate, install OpenSSL. Download and install the latest version of OpenSSL (full installation) from: http://slproweb.com/products/Win32OpenSSL.html
OpenSSL requires Visual C++ 2008 redistributables, which are available from the same website. The bitness of Visual C++ depends on the bitness of the downloaded openSSL. - Once the OpenSSL is installed, navigate to OpenSSL directory and run the following command:
Set OPENSSL_CONF=c:\openssl-win64\bin\openssl.cfg
This command sets the location for OpenSSL configuration file. -
Download the openssl.cnf file using the link https://jumpcloud.desk.com/customer/portal/kb_article_attachments/144777/original.cnf?1565716806 and rename the downloaded file to openssl.cnf and then place it in the below path.
C:\<Installation path of Software>\openssl-win64\bin
- From the command prompt run openssl.exe
- From the OpenSSL> command prompt, run the following commands to generate a new private key and public certificate.
OpenSSL> genrsa -out myprivatekeytest.pem 2048


        OpenSSL> req -new -x509 -key myprivatekeytest.pem -out mypublic_certtest.pem -days 3650 -config .\openssl.cnf
- Fill out the form to complete the certificate creation. The form appears similar to the screenshot below:
This generates the key valid for 3650 days. Once it expires it has to be generated again.
This operation generates a key pair from which myprivatekeytest.pem can be used as IdP Private key and mypublic_certtest.pem can be used as IdP certificate.
- Click Upload IdP Private Key browse and select the myprivatekeytest.pem file from the directory C:\<Installation path of Software>\openssl-win64\bin and click Open .
- Click Upload IdP Certificate browse and select the mypublic_certtest.pem file from the directory C:\<Installation path of Software>\openssl-win64\bin and click Open.
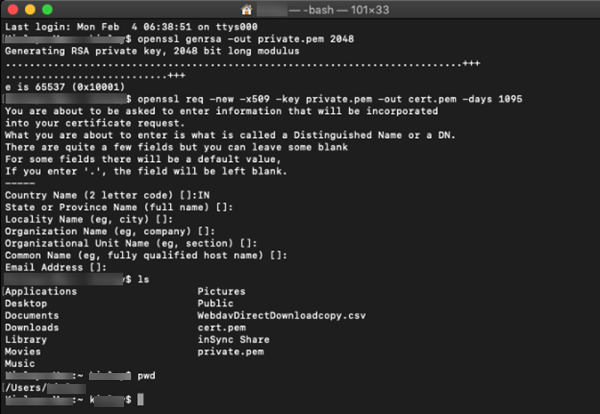
- Open the terminal for Linux or Mac and run the following commands:
openssl genrsa -out private.pem 2048


        openssl req -new -x509 -sha256 -key private.pem -out cert.pem -days 1095
- Fill out the form to complete the certificate creation. It will appear similar to the screenshot below:
This generates the key which is valid for 1095 days. Once it expires, it has to be generated again.
- Click Upload IdP Private Key browse and select the private.pem file and click Open.
- Click Upload IdP Certificate browse and select the cert.pem file and click Open.
- To create a certificate, install OpenSSL. Download and install the latest version of OpenSSL (full installation) from: http://slproweb.com/products/Win32OpenSSL.html
- SP ENTITY ID: Enter DCP-loginfederal in this field.
- ACS URL: Enter https://loginfederal.druva.com/api/commonlogin/samlconsume
- SAMLSUBJECT NAMEID & SAMLSUBJECT NAMEID FORMAT: Retain the default selection of email & urn:oasis:names:tc:saml:1.0:nameid-format:unspecified respectively.
- CONSTANT ATTRIBUTES: Click +add attribute button and add the constant attribute. In the Name field, enter the druva_auth_token and in the Value field enter the SSO token generated from the admin console. (How to generate an SSO token for DCP).

- GROUPS ATTRIBUTE NAME: Leave this field entry as memberOf.
- SIGNATURE ALGORITHM: Retain entry as RSA-SHA256.
- IDP URL: The default value of this field is https://sso.jumpcloud.com/saml2. Provide a unique name after this field as shown below.
https://sso.jumpcloud.com/saml2/<Please enter unique name>
Sample: https://sso.jumpcloud.com/saml2/druvasso
Configure DCP to use JumpCloud login
To configure Single Sign-on follow the below steps:
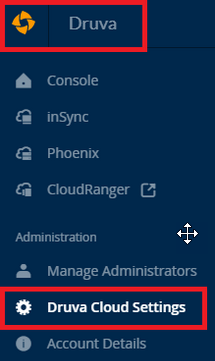
- Log in to https://loginfederal.druva.com and click the Druva logo.
- Click Druva Cloud Settings.
- On the Access Settings page, navigate to the Single Sign-On section and click Edit.
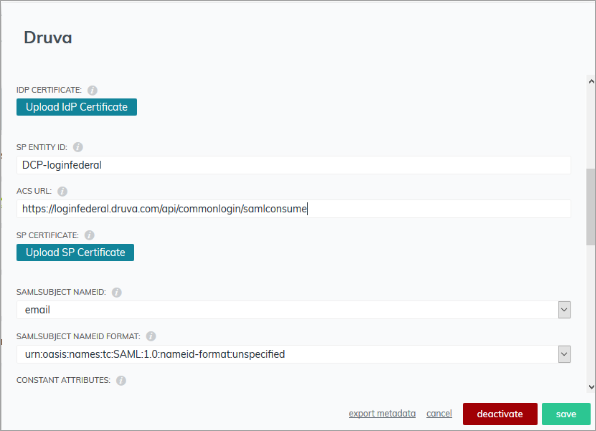
- On the Edit Single Sign-On Settings window, add the details as described below:
- ID Provider Login URL: Enter the URL created in the step 10 of the second section.
- ID Provider Certificate: Open your mypublic_certtest.pem in notepad and copy its content to this field. The file was generated in step 3 of the second section.
- Retain the default values in the remaining fields and click Save.
Assign Users/Groups in JumpCloud to use Druva app
Create a user (optional if not already created)
- Click Users in Jumpcloud console.
- Click the plus icon
 .
.
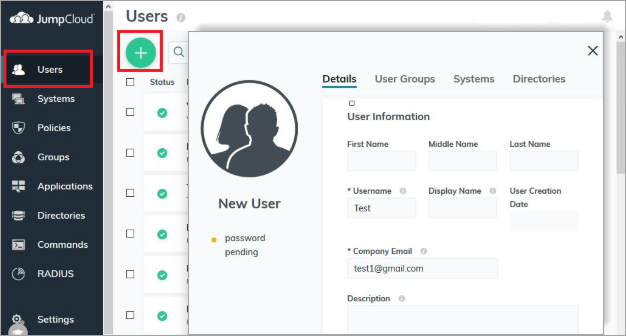
- Fill the mandatory details like Username and Company email address.
- Click Save user.
Create Groups (optional if not already created)
- Click Groups.
- Click the plus icon and select Create Group of Users.
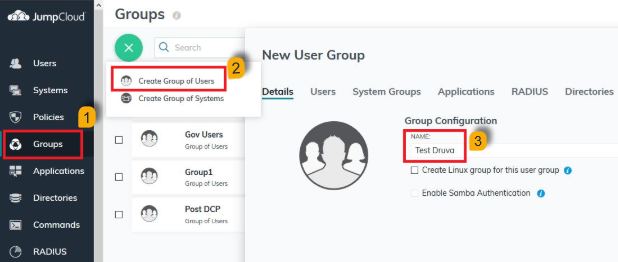
- Enter the name to the group.
- Open the Users tab.
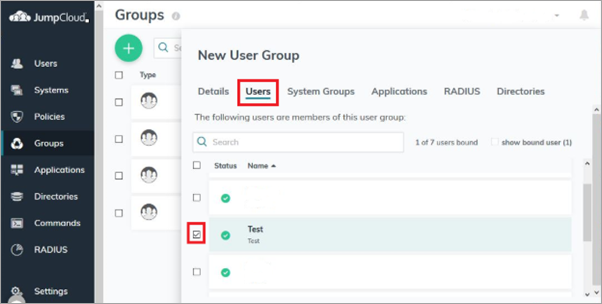
- Select the users you want to assign to this group.
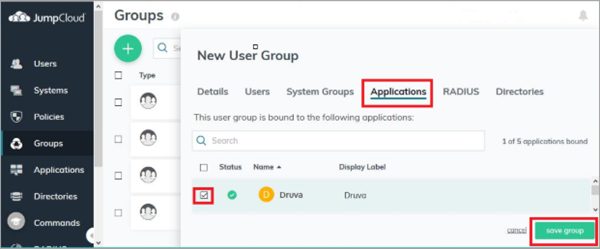
Assign Application to the users
- Open the group created before.
- Open the Applications tab.
- From the list of applications, select Druva.
Enable SSO for administrators
- Login to https://loginfederal.druva.com and click the Druva logo.
- Click Druva Cloud Settings on the left panel.
- On the Access Settings page, navigate to the Single Sign-On section and click Edit.
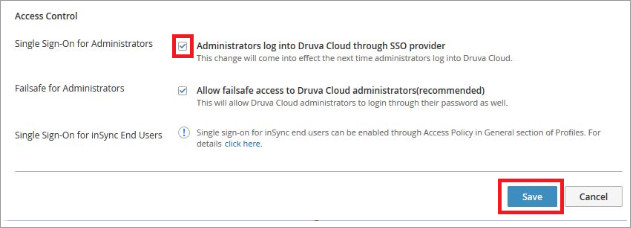
- In the Access Control section select Administrators log into Druva Cloud through SSO provider.
- Click Save.
Druva recommends enabling Failsafe for Administrators initially. This enables the Druva Cloud Administrators to use both SSO and DCP password to access the DCP Console. This ensures the administrator always has access to the DCP Console (inSync/Phoenix) even if SSO is impacted due to any change in the IdP.
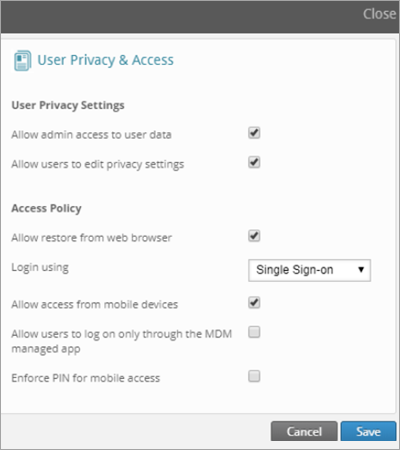
Enable SSO for Users
Login to Druva GovCloud portal and enable the option to login using “Single Sign On” for desired users (This can be only done at Profile level and not user level). It is necessary to have the users assigned to a specific profile who are privileged to use SSO instead of inSync Password or Active Directory.
- On the inSync Management Console, select the profile on which you want to configure SSO.
- In the General tab, under User Privacy & Access, select Single Sign-on as Login mechanism.