User Guide - Preparing the environment for successful Druva NAS Shares Backup
One-stop solution
This document provides a clear, step-by-step guide that focuses on how to prepare and configure backup of NAS Shares on the NAS Device Follow these instructions to effectively manage your backups using Druva NAS Proxy
Purpose
Prepare the environment for Druva NAS Proxy to have successful backup of NAS Shares
User Guide: NAS Share Backup
- ►1. What is a NAS Share?
-
- A network-attached storage (NAS) device stores and shares data for multiple servers that can be accessed remotely or can be mapped as a Shared drive.
- NAS handles unstructured data, such as audio, video, websites, text files, and documents.
- ►2. Why perform NAS Share backup?
-
- To protect business-critical data, which helps us in case of hardware failure, natural disasters, cyber attacks, or accidental deletion.
- Can restore a single file or folder from the complete backup to the same server or an alternate server.
- ►3. What does Druva back up from the NAS Share?
-
- Druva protects two types of “share types” - CIFS/SMB and NFS.
- CIFS/SMB for Windows
- NFS for Linux
- Druva can backup the below from the NAS Shares
- All folders
- Specific folders
- Specific file patterns
- File types supported for backup (Click Here)
- Druva can backup and restore empty folders. On SMB shares, the USN journal must be enabled to back up and restore an empty folder.
- The following can be excluded from the backup set.
- file extensions
- file patterns
- Druva protects two types of “share types” - CIFS/SMB and NFS.
- ►4. What are NAS backup capabilities?
-
For more detailed information on NAS backup capabilities, (Click Here)
- Auto-discovery of NAS shares
- Manual backup
- Backup empty folders
- Smart scan
- This is recommended if there are a lot of files on the NAS share that haven't changed recently.
- Advanced Smart Scan
- This uses a deterministic approach and performs file system scans efficiently.
- Pre-backup and post-backup scripts for NAS shares
- ►5. How does Druva backup the NAS Shares?
-
- Install NAS proxy (Click Here)
- Note: Phoenix initiates an automatic discovery of shares on the NAS device as soon as you add or edit the NAS device.
- Configure the NAS Share for backup (Click Here)
- Run the backup
- Note: Check for supported NAS vendors in the above article.
- Auto Discovery of NAS Shares
- Note: Select a Windows / Linux Server with Good Resources and install the software package.
- Activate the NAS proxy (Click Here)
- Add NAS device (Click Here)
- Install NAS proxy (Click Here)
- ►6. What is the Backup Workflow for the NAS Share?
-
For more information on the NAS Share backup workflow, see Workflow.
- ►7. What are the requirements before you run an installation for Druva NAS Proxy?
-
Before you begin with the agent installation, review the Prerequisites (Click Here)
- Software requirements for NAS proxy
- Hardware requirements for NAS proxy
- Software requirements for NAS devices
- Permissions for NAS share auto-discovery
- Note: The IPC$ share must be accessible with the provided device credentials.
- Druva supports valid UTF-8 encoded file names, file paths, and share names.
- Ports and communication protocols for Druva
- Firewall rules for data protection of NAS devices
- ►8. Where should I download the Druva NAS Proxy from?
-
- You can download the Windows installer using one of the following three methods:
- Downloads Page
- Settings Page

-
Management Console -> Protect -> NAS -> All Devices - > Add Proxy
- You can download the Windows installer using one of the following three methods:
- ►9. How do I install the Druva NAS Proxy?
-
- Copy the downloaded setup file to the server where you want to install it.
- Installation of NAS Proxy as per share type.
- CIFS/SMB: Installing the NAS proxy on a Windows server (Click Here)
- NFS: Installing the NAS proxy on a Linux server (Click Here)
- Once installed, verify that the result of service is running
- Windows: “Hybrid Workload Agent.” (start-run-services.msc)
- Linux: “Phoenix” (/etc/init.d/Phoenix status
- ►10. How do I activate Druva NAS Proxy ?
-
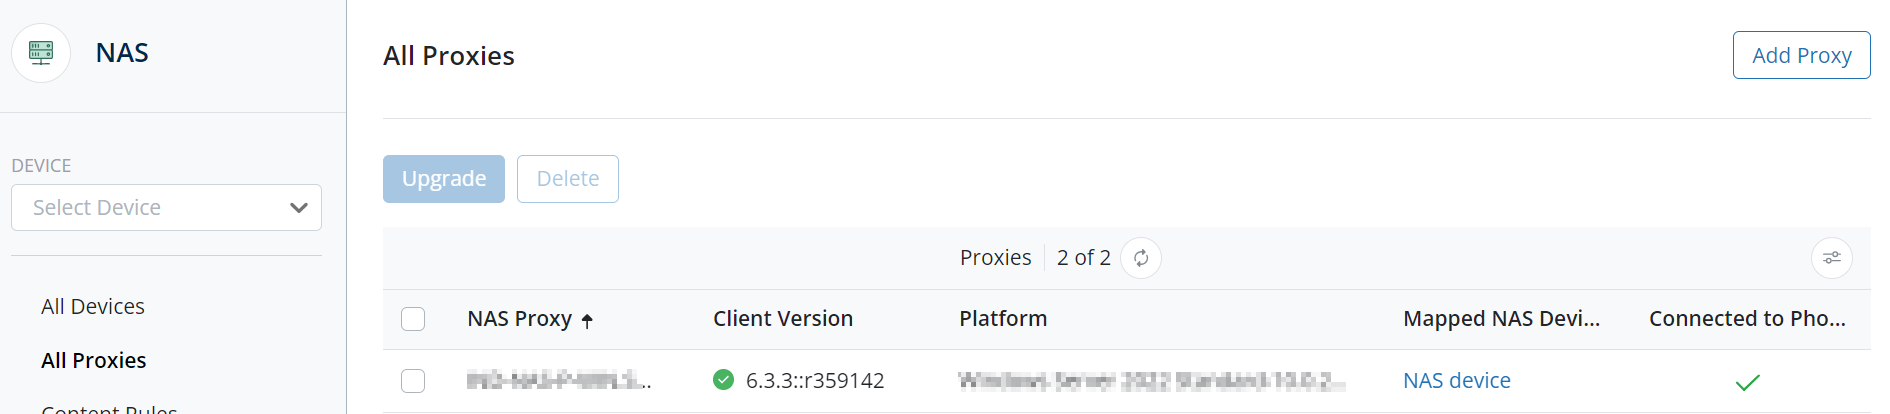
- The step-by-step process is outlined in the Activation article.
- Once activated, the NAS Proxy is as show in below screenshot
(Management Console - Protect - NAS - All Proxies)
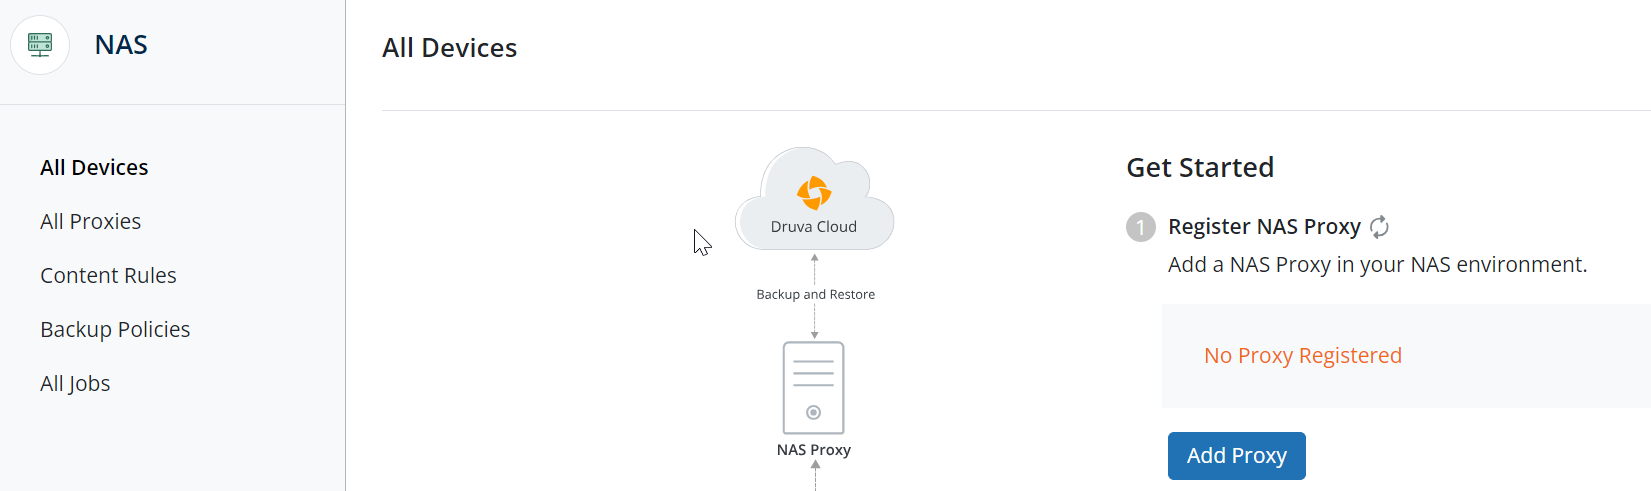
- Now you need to add an NAS Device
- ►11. How do I add the NAS Device?
-
- Once NAS proxy is activated and available on Druva Console, you need to add the NAS Device using the step-by-step process outlined in the article
- Phoenix initiates an automatic discovery of shares on the NAS device as soon as you add or edit the NAS device.
- ►12. How do I add the NAS Shares manually?
-
- To manually add the NAS shares, (Click Here)
- Once the shares are added, we need to configure them for backup.
- ►13. How do I configure NAS Shares for backup in Druva?
-
-
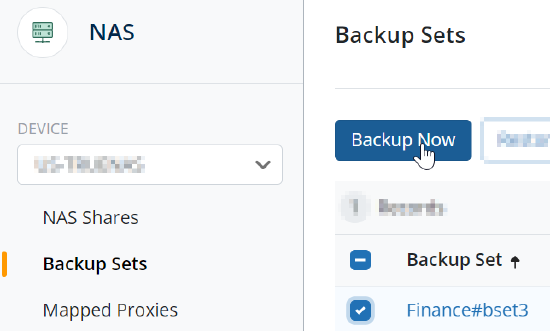
The NAS Shares appear on the All Devices page→Select the NAS Device →NAS Shares→ Select the check box next to the Share name, and click Create File Backup Set.

- Backup Set: Define content rules and backup policy.
- Content Rule: What do you want to back up (E:\ or specific folders)?
- Backup policy: How to back up (Backup Window, Schedule, Frequency, Retention, Bandwidth, Pre/Post scripts)
Now you are ready to run NAS Share backups.
-
- ►14. What are the prerequisites before you start a backup of configured NAS Share in Druva?
-
Verify the pre-checks on the server where the FS agent is installed.
- Connection
- Verify the connection between the server and Druva.
(Use command prompt or powershell)
- Verify the connection between the server and Druva.
- Service
- The service “Hybrid Workloads Agent or Phoenix” should be in Running mode. (start-run-services.msc ) | (/etc/init.d/Phoenix status)
- UI Status
- The status of the NAS proxy on Druva console should show “Connected”.
- The status of the NAS proxy on Druva console should show “Connected”.
- Anti-Virus
- Druva executables should be added to the exclusions of Anti-virus.
(If not done, the anti-virus keeps the .exe on HOLD and the backup will stay in Queued state)
- Druva executables should be added to the exclusions of Anti-virus.
- Operating System checks
- A NAS Proxy must have at least 10% free space.
- (This is a minimum requirement for the OS to run any operation smoothly).
- Verify that you are able to map/ mount the NAS Share on the NAS proxy
- Linux: (Click Here)
- Windows: Right Click on “This PC” - “Map network drive.”
- UI
- Do not cancel the job as
- The first backup job will take time - It does a Full scan of the data.
- There might be a large number of small files to scan.
- The first job will run until it is completed (It will not honor the Backup Window).
- Do not cancel the job as
- Scenarios where backup might complete with “Successful with errors”.
- If Encrypted files are scheduled for backup.
- If an application has an exclusive lock.
- FAQs - General questions about NAS Shares
- Connection
- ►15. How do I run a backup of configured NAS Shares in Druva?
-
- Scheduled Backup
- Backups will run as per the backup schedule set in the backup policy.
- Manual backup
- To run manual backup, use the Backup Now option.
- Management Console -> Protect -> NAS -> NAS Device - > Backup Sets
- select the Backupset Name -> Backup Now
- Scheduled Backup
- ►16. What are the commonly encountered issues with Druva NAS Proxy during backup?
- ►17. Do / Don’ts for NAS Share backup
-
- You cannot configure a NAS Proxy in multiple organizations
- Druva stops supporting versions of the Hybrid Workload agents that are more than a year old from the date they were released, and no fixes will be made available. Review the Hybrid Workloads EOS policy.
- The new feature support and agent enhancements are documented in the Release notes.