How to configure Azure File Share as a NAS Share with Druva Phoenix
Overview
This article describes the procedure to onboard Azure file share as NAS share on Phoenix UI.
Steps to set up Phoenix to back up Azure File Share as NAS shares
-
Check prerequisites for the NAS proxy.
-
Download, install and activate the NAS proxy on a Windows based OS hosted as a Azure VM.
-
To use an Azure file share with Windows, it must be accessed via its UNC path.
a) Check the Azure file share is accessible with File Explorer:
i) Open File Explorer.
ii) Navigate to This PC and select Map network drive.
iii) Select the drive letter and enter the UNC path: For example: \\anexampleaccountname.file.core.windows.net\example-share-name.
iv) Use the storage account name prepended with AZURE\ as the username and a storage account key as the password.
v) Select/Create credential and use the storage account name prepended with AZURE\ as the username and a storage account key as the password.
b) Process to capture Username and Password (Account key):
i) Open Azure portal.
ii) Open Storage Account blade.
iii) Select File shares.
iv) Select the file share you'd like to mount.
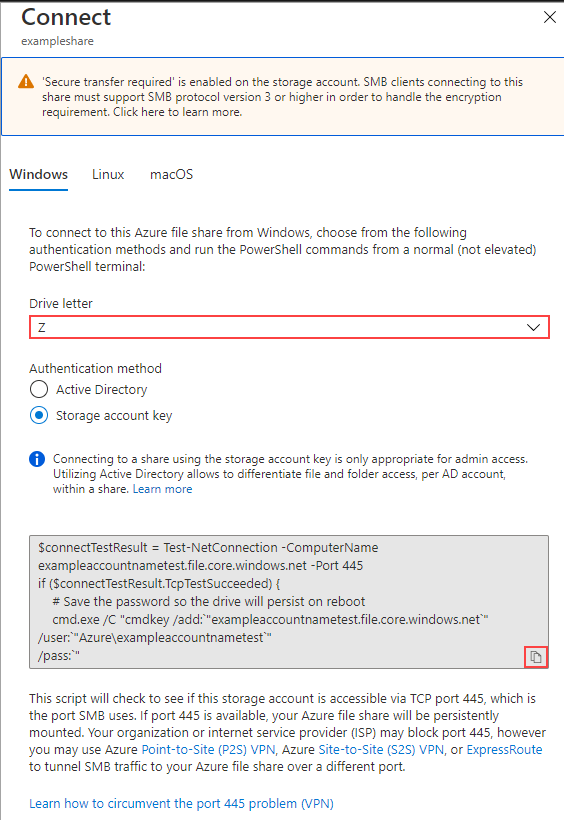
v) Select Connect.
vi) Select the drive letter to mount the share to. This would be the same drive letter you would use for mapping a drive in above steps.
vii) Copy the Password from the provided script under the “/pass” section without quotes.
Note:
-
Domain credentials cannot be used to access Azure File Share. It will be file share name prepended with AZURE\ as the username and a storage account key as the password.
-
Once confirmed the file share is accessible by UNC path via mapped drive. You can safely disconnect the map drive to avoid any confusion.
-
Open Druva Phoenix UI.
-
Go to Hybrid Workloads.
-
Select Specific Organization (If you have multiple organizations)
-
Click Protect and Select NAS
-
Click on Add NAS Device.
-
Enter Storage account FQDN as Device IP/FQDN
-
Select/Create credential and use the file share name prepended with AZURE\ as the username and a storage account key as the password.
-
Discover shares or manually add them.
-
Create a backup set for the NAS share.


