Manage Content Rules in NAS
 Business Enterprise Elite
Overview
Content rules in NAS define the content to be backed up from NAS shares. A content rule can be saved for reuse by other NAS shares. After a backup set is created for a NAS share, data from the share is backed up according to the backup policy and content rule defined in the backup set. For new NAS configurations, Druva creates a default content rule. The default content rule is configured to backup all folders with some subfolders excluded by default. The default content rule also excludes image, audio, video, executable, database, backup, and disk image file types from backups. The default content rule can be assigned to one or more NAS shares. This rule can be updated or deleted. The default content rule is not available for existing NAS users.
Best practices for creating content rules
- Create a content rule when you have backup sets on different NAS shares that backup the same content.
- Ensure that content rules do not overlap in terms of backup content. This ensures that the same content is not backed up as part of different backup sets.
Add a Content Rule
Content rules can be added while creating a backup set for the NAS share or from the Content Rules page.
From the Content Rules page
- Log in to the Management Console.
- Select the workload from the Protect menu. Note that if the All Organizations menu is enabled, you have to first select an organization that has your NAS device and then select the workload.
- In the generic navigation pane on the left, click Content Rules.
- In the right pane, click Create Content Rule.
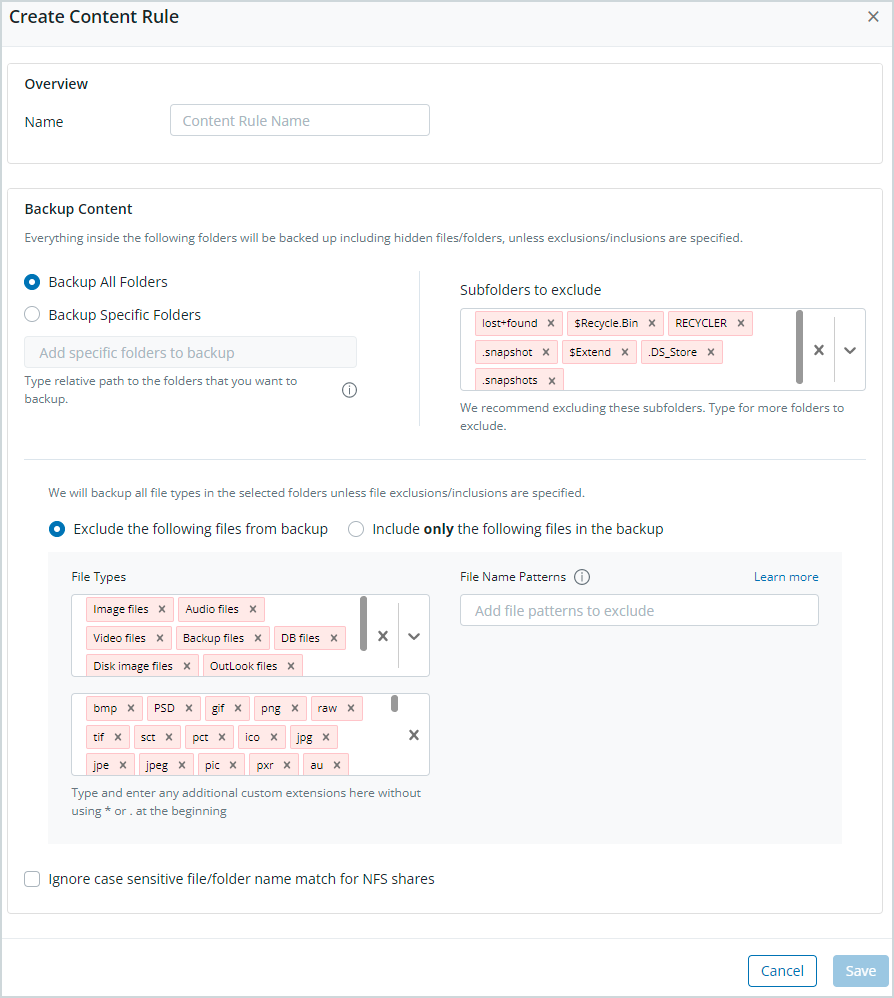
- In the Create Content Rule dialog box, enter the following details:
| Field | Description |
|---|---|
| Overview | |
| Name | Enter a unique name for the content rule. |
| Backup Content | |
| Backup All Folders | Select this option if you want to backup all files and folders, including hidden files and folders. The folders under Subfolder to exclude are excluded from backups. |
| Subfolder to exclude |
Druva excludes a few folders from backup by default. For more information, see Folders excluded from NAS share backup. The subfolder exclusions apply whether you choose to backup all folders or specific folders. Enter the relative path (relative to the root share directory) of the subfolders that should be excluded from backups. Type the path of the subfolder, and then press Enter. The path gets added to the list below. To remove a subfolder from this list, click the cross icon next to the path. Consider the following example to understand subfolder exclusions: Suppose an NFS share vol0 has the folders security/users/groups/admins To exclude the groups folder from the backup of the vol0 share, enter the path as security/users/groups and not just groups. Moreover, if you have configured security for backup, Druva backs up security and its subfolders if any but excludes groups. |
| Backup Specific Folders |
Select this option to backup specific folders on the NAS share. Type the relative path( relative to the root share directory) of the folder in the corresponding box and press Enter. You can also click Add <entered folder path> to add the folder. In folder paths, use backward slash (\) for SMB shares and forward-slash (/) for NFS shares. You can add multiple folder paths. Use the following formats while entering absolute paths:
Consider the following example to understand backup specific folder: SMB share
NFS share
|
|
Specify File Exclusions or Inclusions If this option isn’t selected all file types, file extensions, and file patterns in the folders selected under Backup Content are backed up. |
|
| Exclude the following files from backup |
Exclude the specified file types or file patterns from the backups of the folders selected under Backup Content.
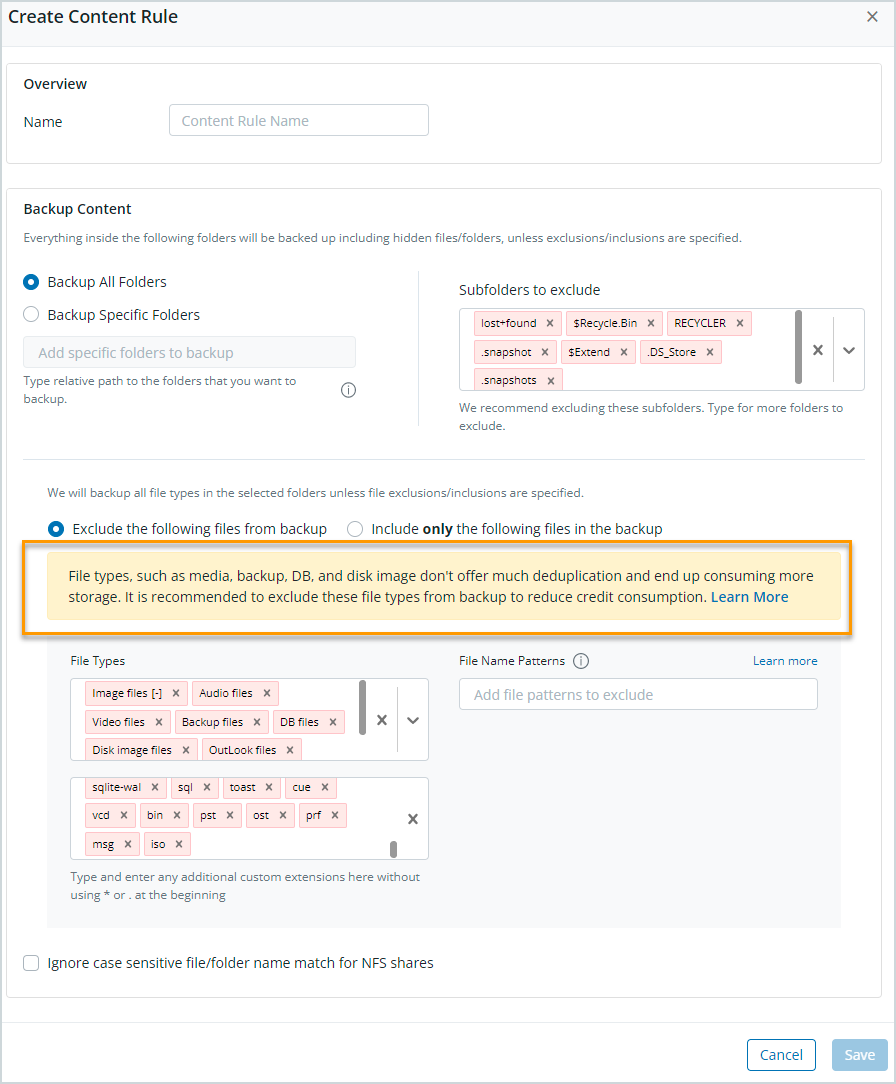
If you remove any file type that is excluded from backup, a pop-up message is displayed on the screen.
|
| Include only the following files in the backup | Include the specified file types or file patterns in the backups of the folders selected under Backup Content. |
| File Types |
Select file types to exclude/include Select predefined file types that must be excluded from or included in the backup of folders specified under Backup Content. |
|
Enter extensions to exclude/include This field displays the file extensions associated with the selected file types. You can enter custom extensions if you do not find your extensions under any predefined file types.
|
|
| File Name Patterns |
Enter file patterns that must be excluded from or included in the backup of folders specified under Backup Content. File patterns start with an asterisk * and can contain * *.string* or *.*string in the pattern string. Enter patterns like *.ext in the format ext in the file extension field under File Types. |
| Ignore case sensitive file/folder name match for NFS shares |
By default, this option is deselected. With this option deselected, the file and folder names entered in the Backup Specific Folders, Subfolder Exclusions, File extensions, and File Patterns fields are accepted as is, in whatever case you enter them. For NFS shares, this means that the entered text is case-sensitive. If this option is selected, Druva ignores the case of the files and folder names in these fields. For NFS shares, this means that the entered text becomes case-insensitive.
|
-
On the Create Content Rule page, click Save. The Content Rules page displays the newly added content rule.
Note: The Save button is disabled if:
- You don't enter a content rule name.
- You select Specify Custom Content and then Backup Specific Folders but don't enter any relative folder paths.
- You enter an unsupported file extension or file pattern.
Correct the error and then click Save.
While creating a backup set for a NAS share
- Log in to the Management Console.
- Select the workload from the Protect menu. Note that if the All Organizations menu is enabled, you have to first select an organization that has your NAS device and then select the workload.
- In the DEVICE drop-down, select the NAS device that has the NAS share that you want to backup.
-
On the NAS shares page, select the NAS share and click Create Backup Set.
-
In the Create Backup Set page, enter the details as described in the Configure backup set for NAS share article.
-
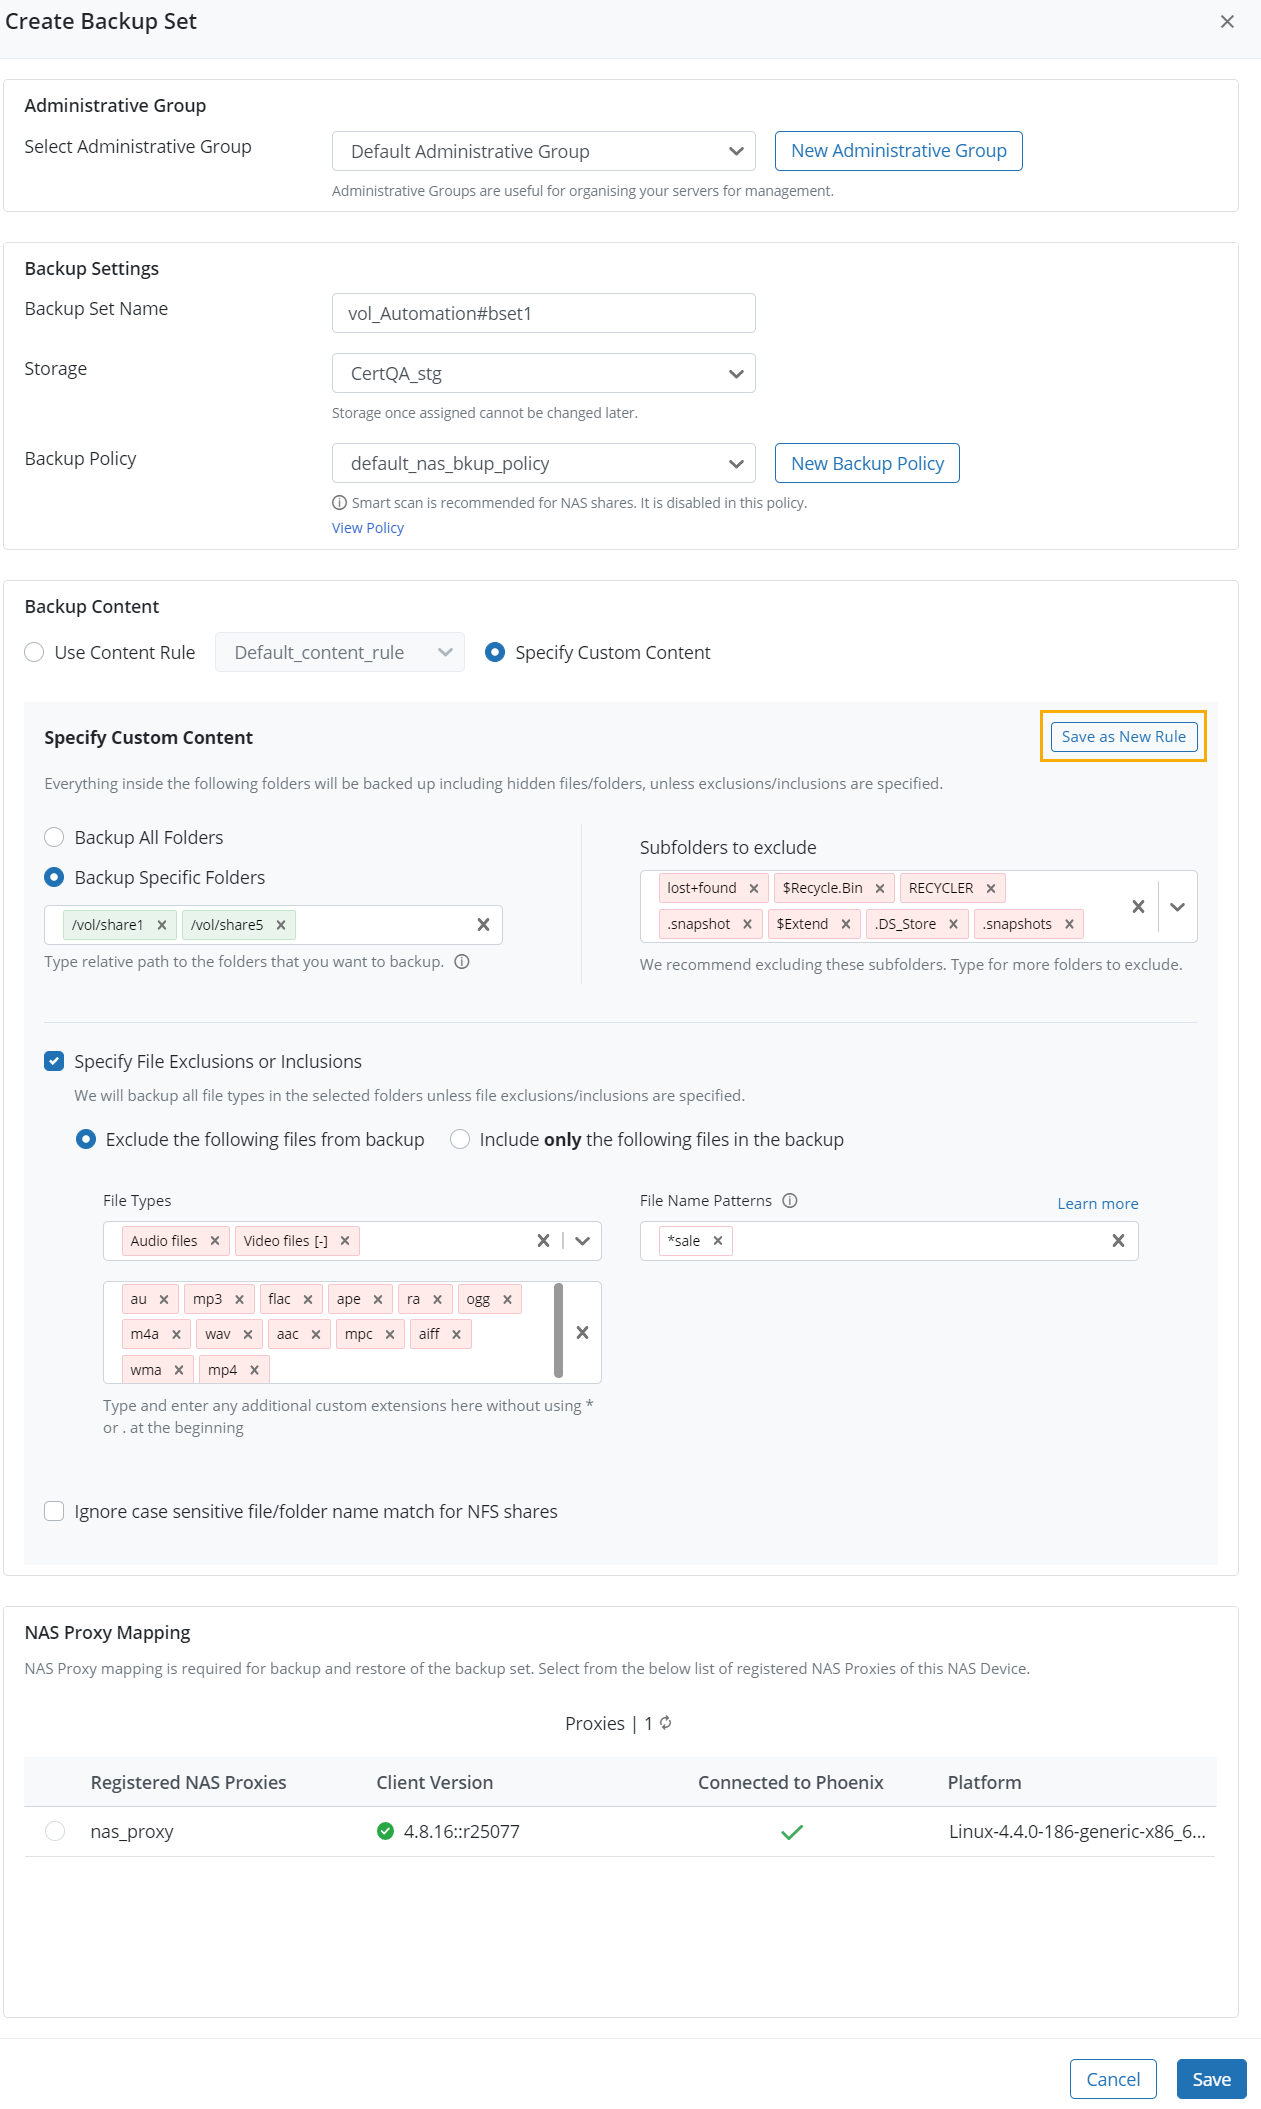
In the Backup Content section perform the following tasks:
| Field | Description |
|---|---|
| Use Content Rule |
Select the Use Content Rule option to use an existing, pre-created content rule to back up files and folders on your NAS share. When you select an existing content rule, the Content Rule Details section displays the folders included and subfolders excluded from backups. The Content Rule Details section also shows the included/excluded File Types, File extensions, and File Name Patterns. If you have selected the Ignore case sensitive file/folder name match for NFS shares option, the Content Rule Details section, displays it with a green tick. If this option is deselected, the Content Rule Details section displays it with a red cross.
|
| Specify Custom Content | Select the Specify Custom Content option to select the folders, file types, and file name patterns to be included in or excluded from the NAS share backups. You can save the selected folders, excluded subfolders, and included/excluded file types, extensions, and file patterns as a new content rule. |
| Backup All Folders | Select this option if you want to backup all files and folders, including hidden files and folders. The folders under Subfolder to exclude are excluded from backups. |
| Subfolder to exclude |
Druva excludes a few folders from backup by default. For more information, see Folders excluded from NAS share backup. The subfolder exclusions apply whether you choose to backup all folders or specific folders. Enter the relative path (relative to the root share directory) of the subfolders that should be excluded from backups. Type the path of the subfolder, and then press Enter. The path gets added to the list below. To remove a subfolder from this list, click the cross icon next to the path. Consider the following example to understand subfolder exclusions: |
| Backup Specific Folders |
Select this option to backup specific folders on the NAS share. Type the relative path( relative to the root share directory) of the folder in the corresponding box and press Enter. You can also click Add <entered folder path> to add the folder. In folder paths, use backward slash (\) for SMB shares and forward-slash (/) for NFS shares. You can add multiple folder paths. Use the following formats while entering absolute paths:
Consider the following example to understand backup specific folder:
NFS share
|
|
Specify File Exclusions or Inclusions If this option isn’t selected all file types, file extensions, and file patterns in the folders selected under Backup Content are backed up. |
|
| Exclude the following files from backup | Exclude the specified file types, file extensions, and file patterns from the folders selected above. |
| Include only the following files in the backup | Include the specified file types, file extensions, and file patterns in the folders selected above. |
| File Types |
Select file types to exclude/include Select predefined file types that must be excluded from or included in the backup of folders specified under Specify Custom Content. |
|
Add file extensions to exclude/include This field displays the file extensions associated with the selected file types. You can enter custom extensions if you do not find your extensions under any predefined file types.
|
|
| File Name Patterns |
Enter file name patterns that must be excluded from or included in the backup of folders specified under Backup Content. File patterns start with a * and can contain * *.string* or *.*string in the pattern string. Enter patterns like *.ext in the format ext in the file extension field under File Types. Note: The filename patterns File* and File*.extension are unsupported. For example, do not use a filename pattern like img* to include/exclude all files that start with img. Use *img* instead. Do not use a filename pattern like img*.jpg to include/exclude all files that end with the extension jpg. Enter the file extension jpg under File Types instead. |
| Ignore case sensitive file/folder name match for NFS shares | By default, this option is deselected. With this option deselected, the file and folder names entered in the Backup Specific Folders, Subfolder Exclusions, File extensions, and File Patterns fields are accepted as is, in whatever case you enter them. For NFS shares, this means that the entered text is case-sensitive. If this option is selected, Druva ignores the case of the files and folder names in these fields. For NFS shares, this means that the entered text becomes case-insensitive. Note: This option applies to NFS shares since file and folder names are case-insensitive in SMB shares. |
| NAS Proxy Mapping |
Select a NAS proxy from the list of registered NAS proxies for the backup and restore of data from the NAS share. Map the backup set to a Windows proxy if you want to backup SMB shares or a Linux proxy if you want to backup NFS shares. Druva displays the NAS proxies based on the share type (SMB or NFS) you plan to back up. Note: You can only map to a single proxy in a backup set. |
Note: To save the custom content as a new rule, click Save as New Rule.
-
In the Create Backup Set dialog box, click Save. This completes adding and configuring a NAS share on Management Console.
Note: The Save button is disabled if:
- You select Specify Custom Content and then Backup Specific Folders but don't enter any relative folder paths.
- You enter an unsupported file extension or file pattern.
Correct the error and then click Save.
View a content rule
To view a content rule, perform the following tasks:
- Log in to the Management Console.
-
Select the workload from the Protect menu. Note that if the All Organizations menu is enabled, you have to first select an organization that has your NAS device and then select the workload.
-
In the navigation pane on the left, click Content Rules. The right pane lists all content rules created for NAS.
-
Click a content rule to view content rule details. The Summary tab lists all the included and excluded folders. It also lists all the included and excluded File Types, File Extensions, and File Patterns. Hovering over a file type marked with the [-] icon reveals the extensions removed from the Content Rule. The Summary page also shows whether the Ignore case sensitive file/folder name match for linux servers is selected or not.
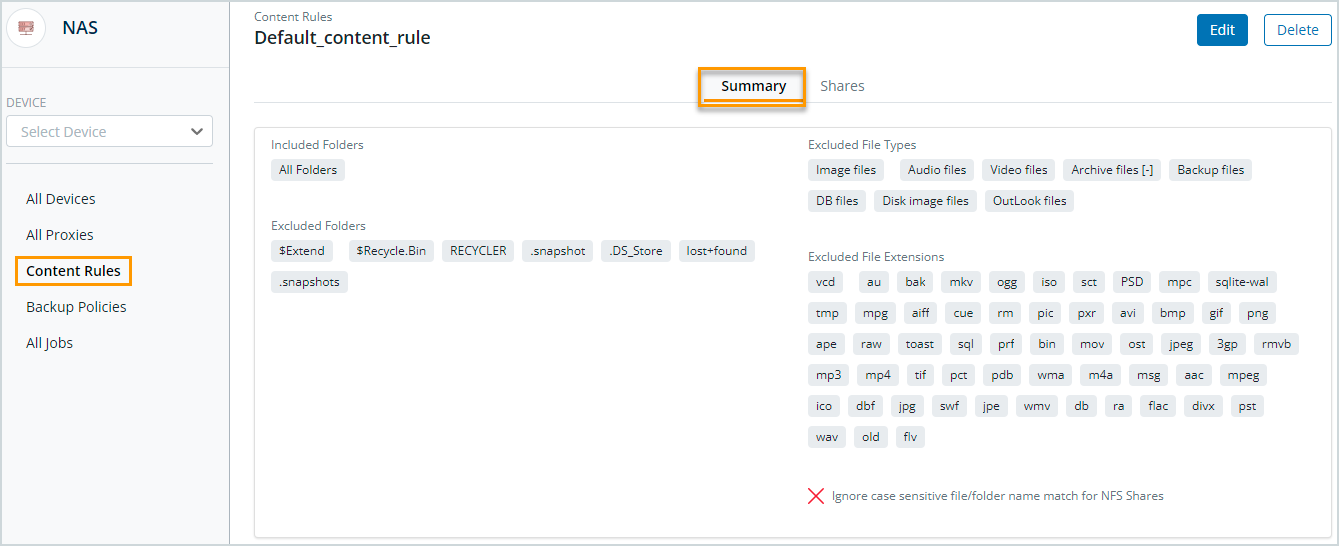
The Shares tab lists all the NAS shares that use the content rule.

Edit a content rule
To edit a content rule, perform the following tasks:
- Log in to the Management Console.
- Select the workload from the Protect menu. Note that if the All Organizations menu is enabled, you have to first select an organization that has your NAS device and then select the workload.
- In the navigation pane on the left, click Content Rules.
- Click the content rule that needs to be edited. In the content rule details page, in the top click Edit.
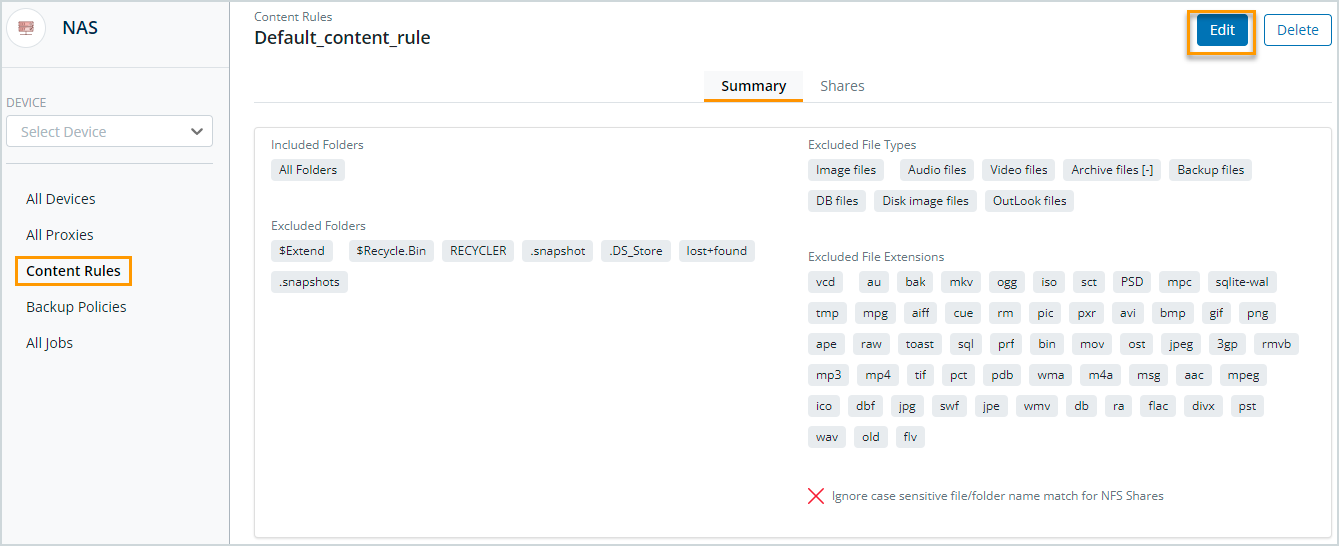
- Change the name of the content rule, or the folders to be included or excluded. You can also change the file types, file extensions, and file patterns to be included in or excluded from the backup. For more detailed field descriptions, see the Add Content Rule section.
7. Click Save.
Note: The Save button is disabled if:
- You don't enter a content rule name.
- You select Specify Custom Content and then Backup Specific Folders but don't enter any relative folder paths.
- You enter an unsupported file extension or file pattern.
Correct the error and then click Save.
Delete a content rule
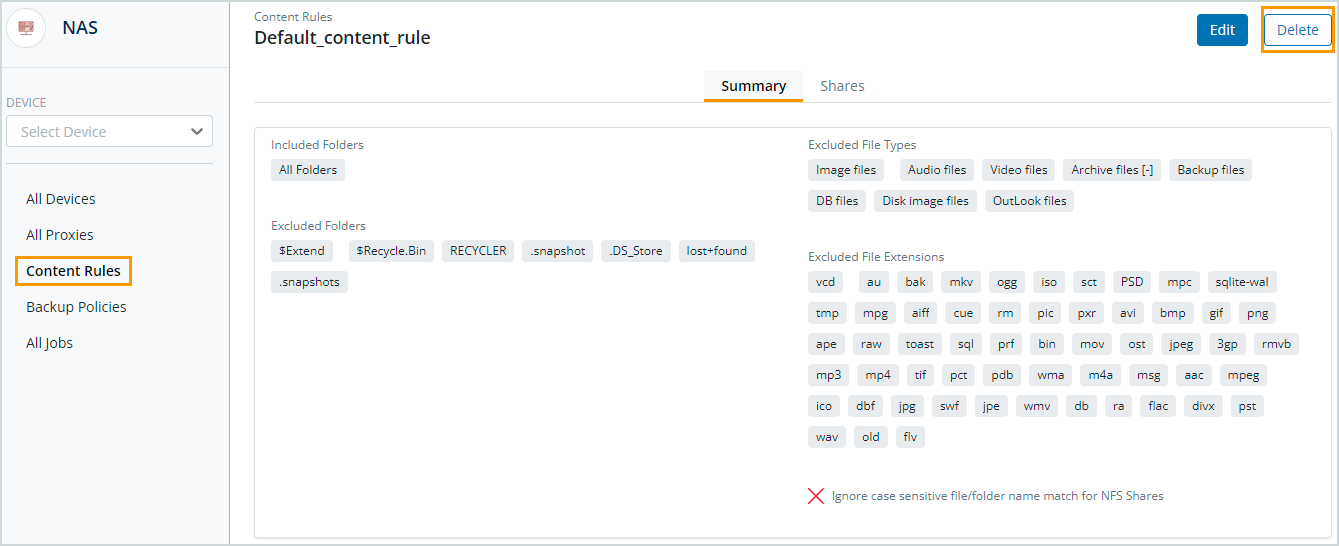
You can delete a content rule only after 7 days of the deletion of the last backup set mapped to the rule.
To delete a content rule, perform the following tasks:
- Log in to the Management Console.
- Select the workload from the Protect menu. Note that if the All Organizations menu is enabled, you have to first select an organization that has your NAS device and then select the workload.
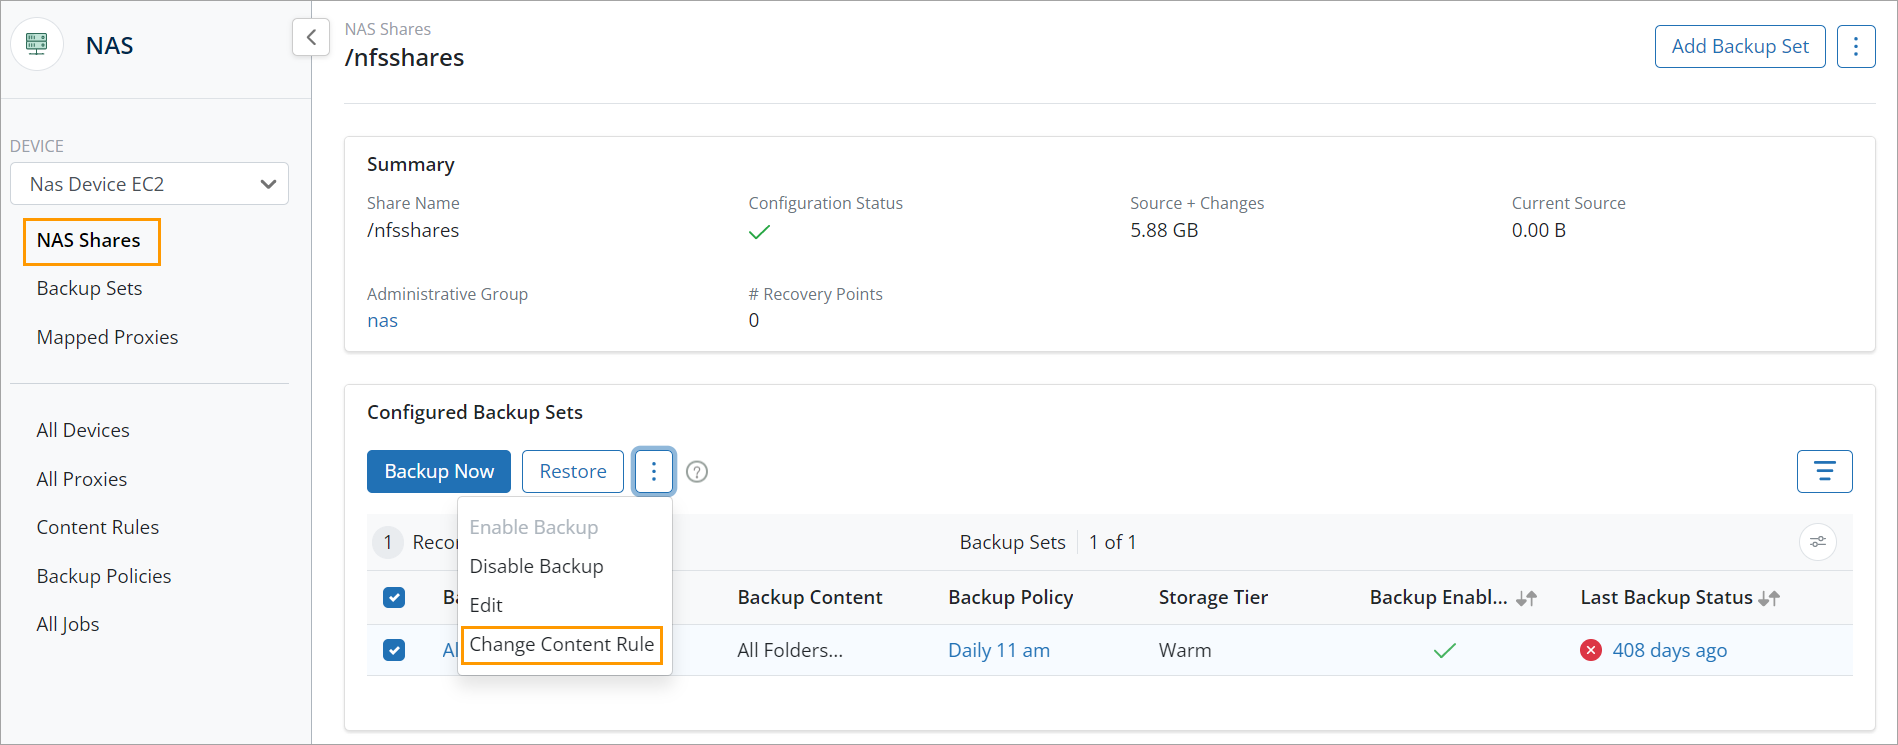
- In the navigation pane on the left, click Content Rules. You cannot delete a content rule associated with one or more backup sets. To delete the content rule, associate the backup sets with other content rules. Click the Shares tab to see if any shares use this content rule.
If there are shares that use this content rule, click the share name to view the NAS share details. From the NAS share details page, select all backup sets that use the content rule, click more options, and then click Change Content Rule. You can then delete the content rule.
For more information on editing a backup set, see Edit a backup set.
- In the generic navigation pane on the left, click Content Rules. Click the content rule that needs to be deleted, and in the top right corner click Delete.