About NAS share restore
 Business Enterprise Elite
Workflow to restore on the source NAS share

Workflow to restore on a different NAS share
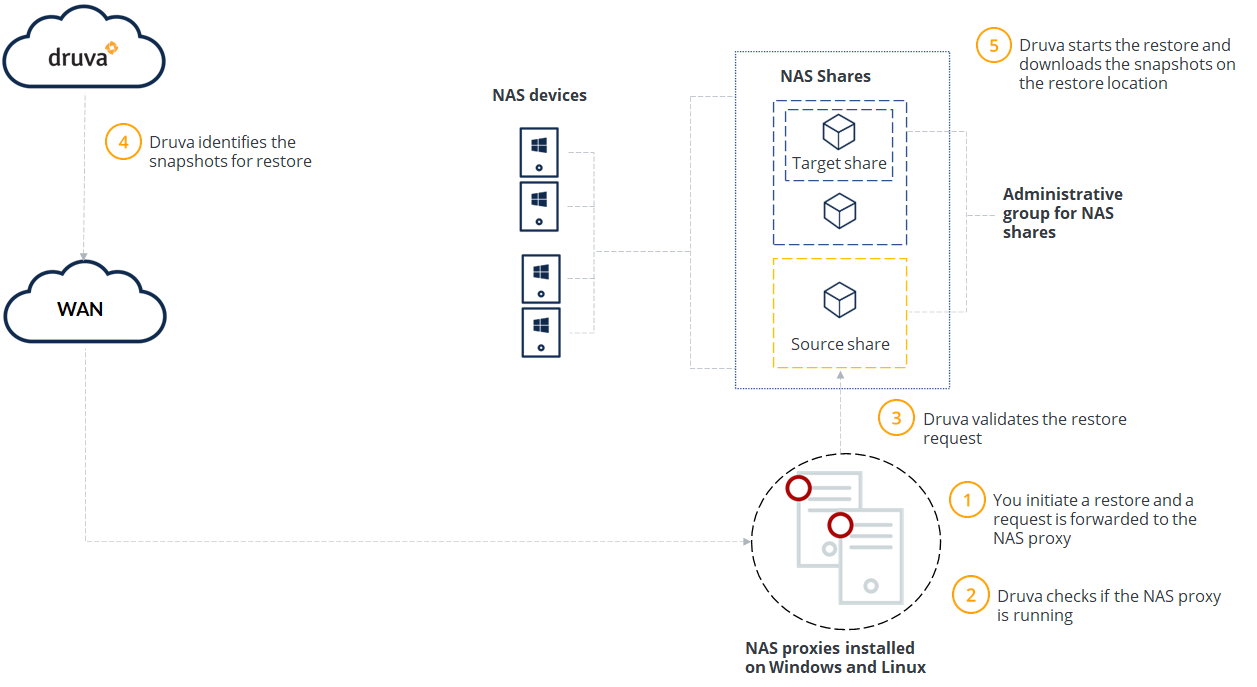
Steps to restore a NAS device
| Step | Operation |
|---|---|
|
Step 1 |
You initiate a restore operation. You can select the destination share for the restore of the selected NAS recovery point. For example, SMB share for a Windows restore and NFS share for a Linux restore. |
|
Step 2 |
Druva checks if the NAS proxy is running.
|
|
Step 3 |
Druva checks whether the share type of the restore destination is same as the sources and validates the restore request. |
|
Step 4 |
Druva identifies the recovery points to restore. |
|
Step 5 |
Druva starts the restore operation and sequentially downloads the recovery points to the restore destination. |
Note: For more information about restoring a NAS share, see Restore a NAS share.
What you must know about NAS share restore
This section highlights the important considerations of the NAS share restore:
- Hot recovery points reside on the CloudCache for the period specified in the CloudCache configuration. See Configure CloudCache for information on the configuration.
- If you are a group administrator, you can restore data only to the NAS share that belongs to the administrative group that you manage. Cloud administrators and data protection officers can restore data to shares across all administrative groups.
- You can restore data only to a share that has the same operating system as the source share.
- In the event of a network connection failure during restore, the NAS proxy attempts to connect to the Druva Cloud. After the network connection is restored, the NAS proxy restarts the restore from the state where it was interrupted.
- If you restart or reboot the NAS device during a restore, the restore operation is aborted.
- If you choose to restore data to the same location, the existing data at that location is overwritten unless a different restore setting is configured.
- The time zone for the recovery point timestamp and the file/ folder timestamp may differ if the NAS proxy and NAS shares are in different time zones.
- Long file and folder names are now visible in the Restore Data page. The Date Modified and Size information is visible on the next line.
- Restores are not supported to mapped drives.
- For CIFS/SMB shares:
- The following file attributes are supported:
- Not content-indexed
- Read-only
-
The following Access Control Lists (ACLs) are backed up and restored:
- Owner name
- Create time (ctime) of a file
- Modified time (mtime) of a file
- Primary group that the owner of the file belongs to
- System Access Control List (SACL)
- Discretionary Access Control List (DACL)
- The following file attributes are supported:
- For NFS shares,
- File permissions for file owners, groups, and users are restored.
- File attributes are not supported.
- The following Access Control Lists (ACLs) are backed up and restored:
- Owner name
- Modified time (mtime) in nanoseconds
- During restore to an alternate location, Druva honors the settings provided at the destination location. If inheritance is enabled on the file/directory to be restored, then the restored file/directory will have the inherited Access Control Lists (ACLs) from the parent of the destination directory. You must consider this behavior while choosing and configuring a destination directory, as Druva honors the destination's permissions.
- The following special permissions for files and folders are not supported:
- Sticky bit
- Backup and restore can run simultaneously on the same agent.
- The backup request triggered while a restore is in progress will be queued.
- Full scan restore will be marked with an
 icon.
icon.