Manage your NAS device
 Business Enterprise Elite
NAS devices integrate with the credential store. Credentials stored in the credential store can be used for multiple NAS devices and NAS shares. This article describes the procedure to edit a NAS device. It also describes how to remove a NAS device from the Management Console.
Only a cloud administrator can delete a NAS device from the Management Console. If you are a group administrator, you can delete a NAS device that belongs to the administrator group that you manage. After you delete a NAS device, Druva purges the backup data of that device from the warm storage, thus freeing up space.
Edit a NAS device
You can edit the NAS device to change the IP/FQDN of the NAS device, the NAS device credentials, and the display name of the device. You can also change the proxies mapped to this device.
- Log in to the Management Console.
- Select the workload from the Protect menu. Note that if the All Organizations menu is enabled, you have to first select an organization that has your NAS device and then select the workload.
- The right pane displays a list of all the NAS devices. Select the NAS device that you need to edit, and click Edit Device.

- On the Edit Device page, you can edit the following details:
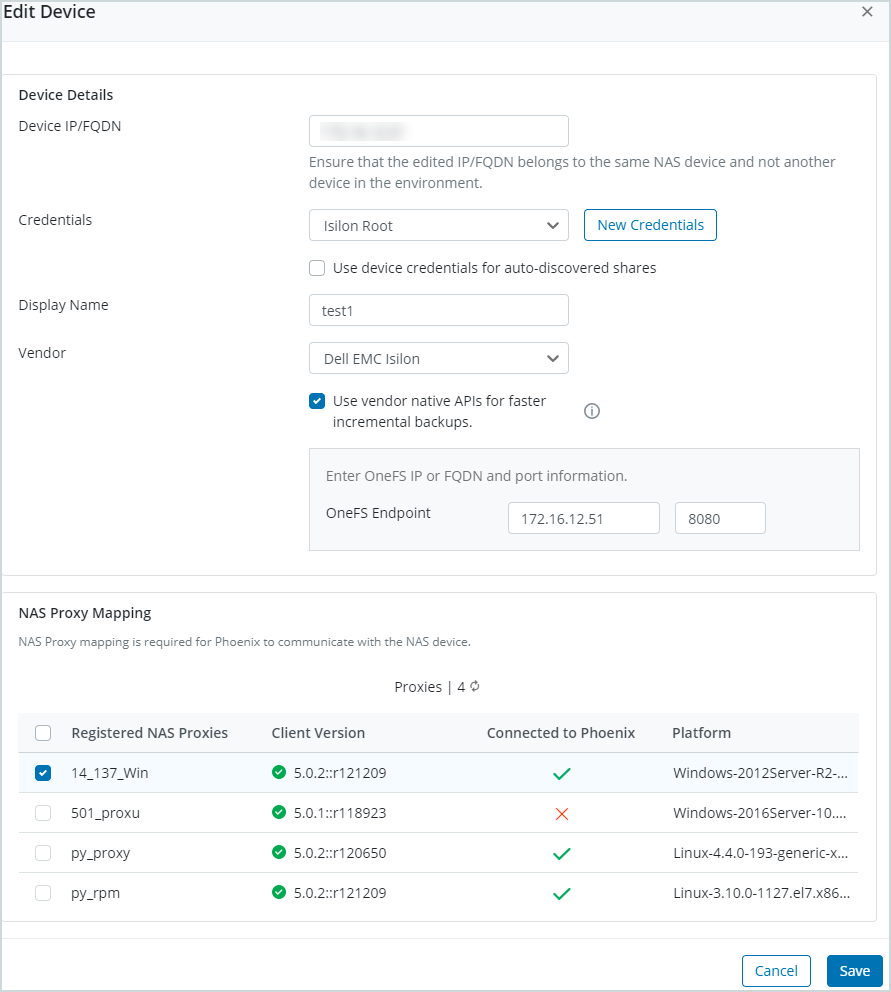
Fields that can be edited Description Device IP/FQDN
Enter an updated IP address or FQDN of the NAS device.
Note: Ensure that the edited IP/FQDN belongs to the same NAS device and not another NAS device in your environment.
Credentials
Select pre-existing credentials from the dropdown or, click New Credentials to create new credentials.
Click Use device credentials for auto-discovered shares to use NAS device credentials to backup SMB shares that are discovered automatically.
Note: For more information on Dell EMC Isilon credentials and validations, see NAS Device Validations.
Display Name Change the display name of the NAS device. Vendor
Change the NAS vendor from the drop-down. The values are:
- Dell EMC Isilon
- Netapp
- Hitachi Vantara (HNAS)
- PureStorage FlashBlade NAS
- Synology
- Qnap
- HPE
- Storeasy
- Qumulo
- Others
You can select Others to enter the name of the vendor of your choice. This field is mandatory. By default, the value in this field is freeNAS.
Note: Currently, Druva supports additional features for Dell EMC Isilon devices only, that is, recovery point based approach for backup and skipping stubs.
When you select Dell EMC Isilon, and need these features, then select the Use vendor APIs for faster incremental backups option.
Enter OneFS IP or FQDN and port information in the OneFS Endpoint field.
Note: OneFS is the API interface for Isilon. Based on vendor specific APIs, the above mentioned additional features are supported.
NAS Proxy Mapping Change the NAS proxies mapped to the NAS device.
Note: You cannot deselect (unmap) a NAS proxy if the proxy you are trying to unmap is associated with a backup set(s).
-
On the Edit Device dialog box, click Save.
Validation checks are performed and the Device Validation window is displayed with the results.
Note: When the agent proxy discovers that a vendor is configured with native APIs, it runs vendor-specific validations that verifies all the privileges on the credentials. For more information on validations, see NAS Device Validations.
- If both basic and vendor-specific (Isilon) validations are successful, then click Done. The NAS device is updated. Druva performs backup using the recovery point-based approach. It also identifies and skips the stub files.
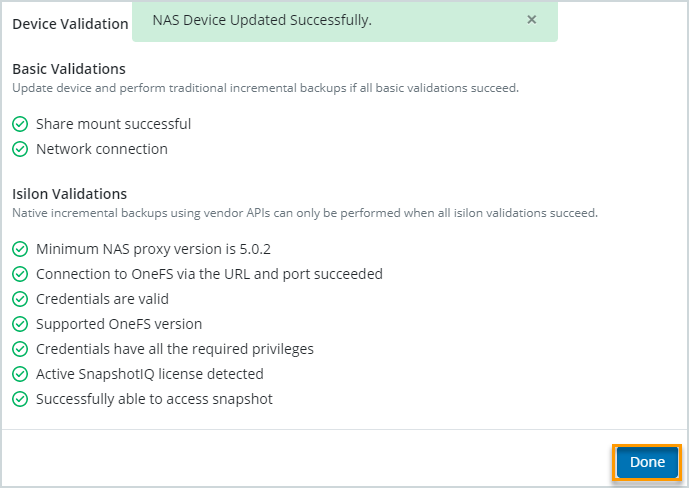
Note: If all the Isilon validations are successful, then the vendor specific APIs are supported. OneFS API performs a check for all the stub files in the directory. If a stub file is found, it is skipped during backup. Also, a changelist is created from the recovery points, which helps to achieve faster incremental backups.
- If the Isilon validation is not successful, then click Update Device on the Device Validation window. The NAS device is updated and traditional backups will be performed.
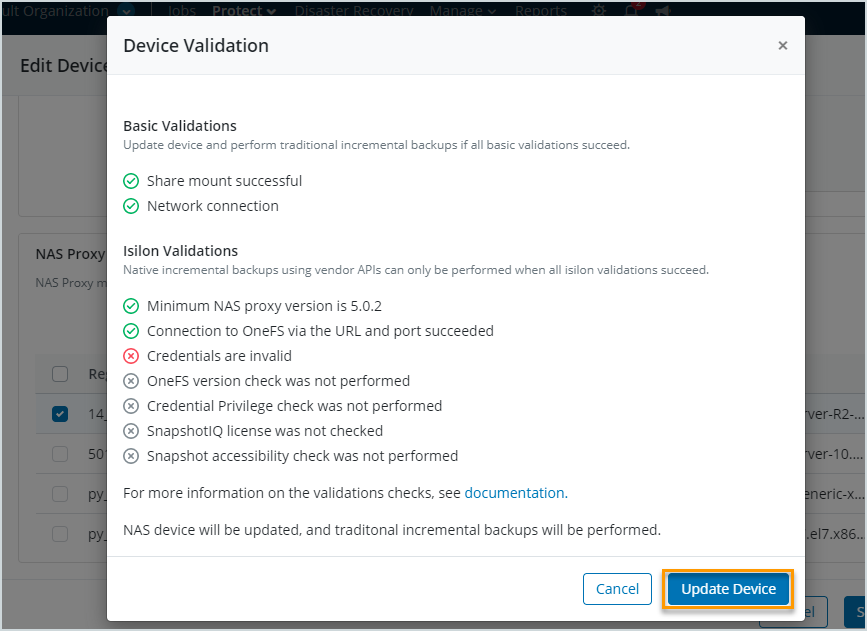
Note: Basic Validations are performed first and then Isilon Validations are performed. If any Isilon validation fails, then the vendor's APIs are not supported and the Isilon backups will be performed by the traditional approach, and the stub files are processed as regular files.
For more information, see NAS Device Validations.
You cannot edit a NAS device when:
- The entered IP/FQDN belongs to another NAS device for the same customer and site.
- All the NAS proxies mapped to the NAS device are either disconnected or unreachable.
- The NAS device credentials are incorrect, and none of the mapped NAS proxies could validate them.
- The NAS device credentials could not be validated because either:
- All the NAS proxies mapped to the NAS device were unreachable, or
- The NAS device IP or FQDN is incorrect.
Delete a NAS device
Some of the scenarios that may require deleting a NAS device are as follows:
- You configured the NAS device during the evaluation, and you now want to reclaim the storage consumed.
- You are planning to deprecate the NAS device, and you no longer need to keep the data.
- You are planning to replace the NAS devices, and a backup of the replacement servers might consume additional storage for the same data.
- You no longer want to back up a NAS device.
Ensure the following when you delete a NAS device:
- Remove all the shares from the NAS device. See Manage your NAS shares.
- Remove all the proxies attached to the device. See Manage NAS proxies for NAS devices.
To delete a NAS device:
-
Login to the Management Console.
-
Select the workload from the Protect menu. Note that if the All Organizations menu is enabled, you have to first select an organization that has your NAS device and then select the workload.
-
In the navigation pane on the left, click All Devices.
- The right pane displays a list of all the NAS devices. Select the NAS device that needs to be deleted, click more options, and then click Delete.

- Click Yes in the Delete Confirmation dialog box.
Note: A NAS device can be deleted even if a NAS share auto-discovery is in progress.
This deletes the NAS device from the Management Console.