Druva support for Amazon FSx for Windows and Amazon EFS
 Business Enterprise Elite
Overview
Druva supports Amazon FSx for Windows and Amazon EFS shares for backups and restores. You can protect Amazon FSx shares using a Windows proxy, and protect Amazon EFS shares using a Linux proxy.
Amazon FSx for Windows File Server
Amazon FSx for Windows is a service that runs on Amazon’s public cloud. It gives you a fully managed network file storage in the AWS cloud. The hardware provisioning and configuration are managed by Amazon. You can access this storage over the SMB protocol from Windows and Linux servers. You can also map the Amazon FSx file shares to Amazon EC2 instances, Amazon WorkSpaces instances, Amazon AppStream 2.0 instances, and VMware Cloud on AWS VMs. You can access your file shares from on-premises compute instances using AWS Direct Connect or AWS VPN. Amazon FSx for Windows can authenticate with an Amazon Managed Active Directory, or a user managed active directory. For more information, see the Amazon FSx for Windows File Server guide.
Druva prerequisites for Amazon FSx for Windows
Here is what you will need to protect Amazon FSx for Windows:
- An AWS IAM role with AmazonSSMManagedInstanceCore and AmazonSSMDirectoryServiceAccess policies. This role is attached to the EC2 instance.
- An Amazon EC2 instance running Windows in the VPC based on the Amazon VPC service that you want to associate with your Amazon FSx for Windows file system.
- An internet gateway (IGW) in the VPC hosted on the EC2 instance.
-
Amazon Managed Active Directory, or user managed Active Directory.
-
Security groups with ports described here open File System Access Control with Amazon VPC.
Configure Amazon FSx for Windows for Druva backups
To protect Amazon FSx for Windows in Druva, you'd need to perform the following tasks:
- Configure Active Directory: Configure Active Directory for use with Amazon FSx for Windows.
- Configure AWS Managed Microsoft Active Directory. For details, see Getting Started with AWS Managed Microsoft AD.
- You can also use an on-premise Microsoft Active Directory. For details, see Getting Started with AD Connector.
- Create an Amazon FSx File system: Create an Amazon FSx for Windows file system. For details, see Create your file system.
- Join Windows EC2 instance for the NAS proxy with Active Directory: Ensure that the EC2 instance is in the same VPC and security group as the VPC associated with the Amazon FSx file system. For details, see Seamlessly Join a Windows EC2 Instance
-
Map Amazon FSx file system to the EC2 Windows instance. Map the Amazon FSx for Windows file system to the Windows EC2 instance. This is to ensure that the setup is working correctly. You can unmount the file system later. For details, see Map your File Share to an EC2 instance running Windows server.
-
Download, install and activate the NAS proxy on the Windows EC2 instance. For details, see Add and activate a NAS proxy.
-
Add a NAS device. For detailed instructions, see Add a NAS device. While adding a NAS device, enter the following information in the IP/FQDN and Credentials field:
-
IP/FQDN: Enter the DNS name. You can get the DNS name from the FSX file system details page in the Amazon Management Console as illustrated below.

-
Credentials: Enter credentials for an Active Directory user. The Active Directory is the Active Directory in use by the Amazon FSx file system for Windows.
Note: For Windows, you must enter the device credential username in the domain\username format.
-
-
Druva automatically discovers the Amazon FSx for Windows shares. You can then create backup sets, and perform backups and restores.
Note: Advanced Smart Scan backup is not supported. For more information, see About data protection for NAS shares and Scanning methods in NAS.
Do not change network throughput on FSx while backups are in progress.
Amazon EFS
Amazon EFS (Elastic File System) is a fully managed elastic NFS file system that can be used with AWS cloud services and on-premise resources. With Amazon EFS, you can persist data and state from containers. You can mount EFS file systems on EC2 instances or on-premise servers with NFSv4. Amazon EFS file systems are highly scalable without requiring you provision storage. Several Amazon EC2 instances can simultaneously access the EFS file system. For more information, see Getting Started with Amazon Elastic File System.
Druva prerequisites for Amazon EFS
An AWS account with permissions to create an Amazon EFS file system and EC2 instance.
Configure Amazon EFS for Druva backups
To protect Amazon EFS in Druva, you'd need to perform the following tasks:
- Create the Amazon EFS file system. For details, see Create Your Amazon EFS File System
- Create an EC2 instance and mount the EFS file system. For details, see Create Your EC2 Resources and Launch Your EC2 Instance
- Navigate to https://downloads.druva.com/phoenix . In the Select Agent drop-down, select NAS. Select your cloud.
- In the Agents for Phoenix Cloud/GovCloud section, right click the Download button next to Linux, and select Copy Link Address.
- On the EC2 instance, issue the following curl command
curl <copied download link URL> -o <druva client name>.rpm - Install the NAS proxy on the EC2 instance. Use the following command
sudo rpm -ivh <druva client name>.rpm -
Change to the root user using the following command
sudo bash -
Navigate to the Druva executables folder
cd /opt/Druva/Phoenix/bin (for agent version prior to 7.0.0)
cd /opt/Druva/EnterpriseWorkloads/bin (for agent version 7.0.0 and later) -
In the Management Console, register a new NAS proxy and get an activation token.
-
Activate the NAS proxy on the EC2 instance using the following command
PhoenixNasActivate activate <activation token>
For more information, see Activating the NAS proxy on a Windows Server and Activating the NAS proxy on a Linux Server. -
Assign a security group to enable access to the EFS share. The security group must allow inbound and outbound traffic to the NFS port (2049) and outbound traffic on HTTPS port (443). For more details, see Controlling Network Access to Amazon EFS File Systems for NFS Clients.
-
Create a mount point using the following command
sudo mkdir /efs-test
Verify that you can mount the EFS share using the following NFS command
sudo mount -t nfs4 -o nfsvers=4.1,rsize=1048576,wsize=1048576,hard,timeo=600,retrans=2,noresvport fs-c679506c.efs.us-west-2.amazonaws.com:/dir-00 /efs-test
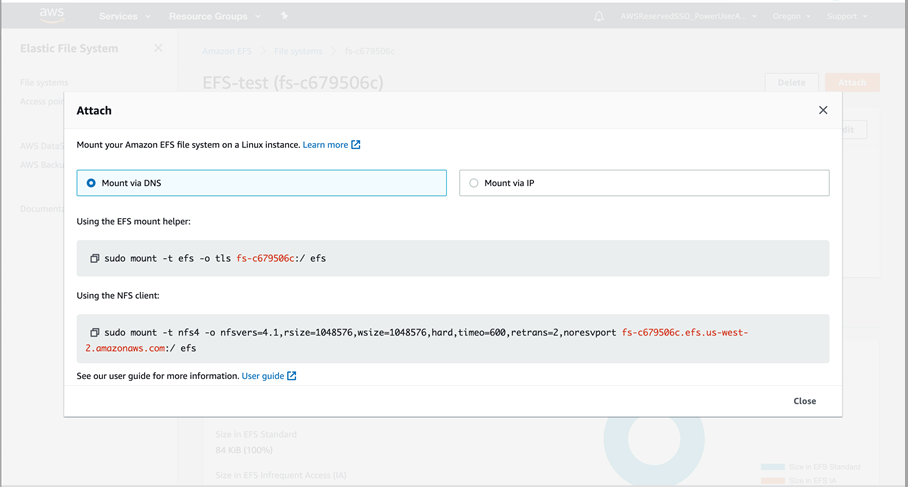
Where:
- fs-c679506c.efs.us-west-2.amazonaws.com is the EFS device that you can add as a NAS device in the Management Console. You can also mount the file system via IP.
- dir-00 is the directory which has to be added as a NAS share in the Management Console.
- efs-test is the mount point.
- Fs-c679506c is the file system ID
- Unmount the EFS share using the following command
sudo umount /efs-test - Add EFS shares (dir-00 in the example above) manually in the Management Console. EFS shares are not automatically discovered.
- Configure backups and restores for the EFS shares.
Note: Advanced Smart Scan backup is not supported. For more information, see About data protection for NAS shares and Scanning methods in NAS.