Protect Google Shared Drives data using Druva inSync
Overview
Google Shared Drives enables users working together - teams, to easily store, search, and access common files in a secure and easy-to-manage workspace. Any files added to the Shared Drives are owned by the team.
Using inSync, organizations can protect the Shared Drives data and help users or teams to restore or recover their data in case of loss due to any error, malicious activities, accidental deletion, and so on.
This feature is currently available in select AWS regions. Contact your Sales representative or Support to know the availability or to request this feature in your AWS region.
Supported Google Workspace Editions
inSync supports the following Google Workspace editions:
- Enterprise
- Business
- Basic
Data backed up by inSync for Shared Drives
The following data is backed up for Shared Drives:
-
Shared Drives
-
Name of the Shared Drives
-
The following information for each of the team member
-
User Id
-
Name of the team member
-
Access rights of the team member
-
Account creation date of the team member
-
Active period of the team member account
-
-
Themes
-
Images
-
Settings
-
Trash
-
-
Shared Drives Content
-
Files
-
Supported MIME Types
-
File metadata
-
File sharing settings for both, internal as well as external users
-
-
Folders and sub-folders
-
Folder metadata
-
Details and activities that occur inside the folders.
-
-
inSync does not back up certain files and folders in Shared Drivess due to Google API and Shared Drivess limitation. For the entire list, see known issues withShared Drives.
Workflow to configure and protect Shared Drives
Workflow for new customers:
- Configure inSync to integrate with Google Workspace.
- Configure Shared Drives for backup and restore.
Workflow for existing customers:
Note: If you configure Google Workspace with an unlicensed super administrator, the Shared Drives cannot be auto-discovered or manually added. Ensure to configure Google workspace with a licensed super administrator to auto-discover or manually add Shared Drives.
Configure Shared Drives for backup and restore
You can configure using the auto-configuration or custom configuration option.
Note: You must have at least one active member or a Group with at least one active member in your Shared Drive for a successful backup.
Auto Configuration of Shared Drive for backup
The settings that you define automatically applies to all subsequent auto-discovered Shared Drives. You can also change the settings of any auto-discovered Shared Drives.
- Sign in to Druva Cloud Platform Console and navigate to Google Workspace.
The Google Workspace Overview page appears. - Click Shared Drives.
- Click Auto Configuration. The Auto Configuration Settings window appears.
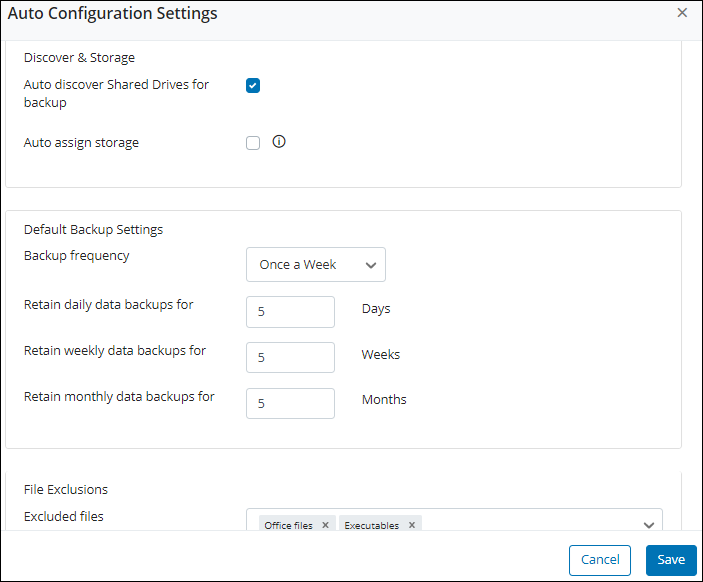
6. Enter the following details and click Save. inSync starts discovering Shared Drives.
| Field | Description |
|---|---|
| Auto discover Shared Drives for Backup | Select this check box if you want inSync to automatically discover new Shared Drives added to Google Workspace setup of your organization. inSync runs the discovery process every 24 hours. This setting is enabled by default. |
|
Auto-assign storage |
Select this check box if you want inSync to automatically assign a storage for any newly discovered Shared Drives. It is mandatory for a Shared Drives to be assigned a storage for inSync to back it up. |
| Assign Storage |
Displays all the configured storage regions. Select a storage from the list. Storage once assigned cannot be changed later. |
| Default Backup Settings | |
|
Backup frequency |
Select the frequency of backups for Shared Drives. |
| Retain daily data backups for |
Type the number of days that you want to retain all backups. At the end of the backup period, inSync will delete the data from the storage. For example, if you specify that you want to retain all backups for 5 days and inSync completed the backup operation on January 6, 2019, inSync will delete the backup data from the storage on January 11, 2019. |
| Retain weekly data backups for |
Type the number of weeks that you want to retain all backups. At the end of the weekly backup period, inSync deletes the data from the storage. Note: The weekly backup is the last backup in a calendar week. The calendar week starts on Sunday. |
| Retain monthly data backups for |
Type the number of months that you want to retain all backups. At the end of the monthly backup period, inSync deletes the data from the storage. Note: The monthly backup is the last backup in a calendar month. |
|
Exclusions |
In the Files box, type the file types that you want to exclude from the backup of a Shared Drives. The file extensions are automatically added to the below field. In the Folders box, enter the absolute folder paths that you want to exclude from the backup of a Shared Drives. Separate each path using a comma. For example, if you want to exclude 2015 Sales report from the Sales Shared Drives folder, enter the following: Sales/Reports/Yearly Reports/2015 Sales report |
Note: To retain the backups for an unlimited period, enter 0 as the value for all daily, weekly and, monthly retention settings.
After you define the settings, inSync starts auto-discovering Shared Drives.
Custom configuration of Shared Drive for backup
Use the custom configuration option to provide a different configuration and backup settings for each of the discovered Shared Drives.
- Sign in to Druva Cloud Platform Console and navigate to Google Workspace.
- Click Shared Drives. A page that lists all the discovered Shared Drives appears.
The status of all the discovered Shared Drives by default is set as Not Configured.
- Click the Shared Drives name that you want to configure for backup and restore. The Configure Shared Drives Backup page appears.
- You can choose to use the Use Default option or the Custom option. See the table in the Add Shared Drive section for details on how to configure further.
Discover Shared Drives manually
If the Auto-discover Shared Drives option is enabled, inSync auto-discovers new Shared Drives every 24 hours. If you want inSync to discover any new Shared Drives before the next auto-discovery process runs, follow this procedure:
- Sign in to Druva Cloud Platform Console and navigate to Google Workspace.
The Google Workspace Overview page appears. - Click Shared Drives.
- Click
 and then click Discover Shared Drives. inSync discovers the Shared Drives added to the Google Workspace setup of your organization after the last auto-discovery process. If the Auto-assign storage option is enabled, inSync assigns the selected storage and the default backup and retention policies to the Shared Drives. The Shared Drives appears in the Shared Drives list with Site Status as Enabled. If the Auto-assign storage option is disabled, the Shared Drives status is Not Configured.
 - (OPTIONAL) Click the Shared Drives that you want to configure. The Configure Shared Drives Backup window appears.
- (OPTIONAL) Enter the required details and click Save. When the Shared Drives is successfully configured the Shared Drives Status changes to Enabled.
Add a Shared Drive manually
- Sign in to Druva Cloud Platform Console and navigate to Google Workspace.
The Google Workspace Overview page appears. - Click Shared Drives.
- Click and then click Add Shared Drives. The Add Shared Drives window appears.
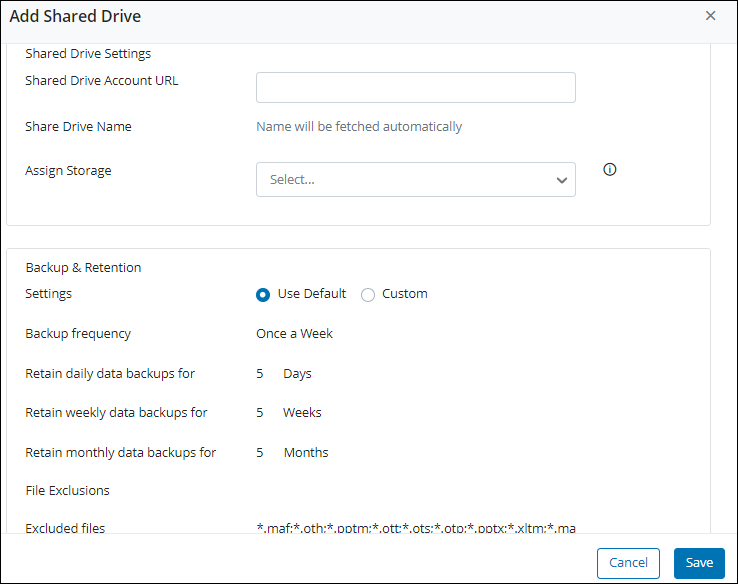
6. Enter the following details and click Save.
| Field | Description |
|---|---|
| Shared Drives Account URL | Type the account URL. You can get this URL from the G Drive account of your organization. |
|
Shared Drive Name |
Displays the name of the Shared Drives. |
| Assign storage |
Displays all the configured storage regions. Select storage from the drop-down list. Storage once assigned cannot be changed later. |
|
Backup & Retention |
Displays the backup and retention policy settings that you want to apply to this site collection. The following options are available:
|
|
Backup frequency |
Select the frequency of backups for Shared Drives. For scheduled backups, at least one AD Connector should be registered and connected to inSync Cloud. For more information see Prerequisites to back up Cloud Apps data. |
|
Retain daily data backups for |
Type the number of days that you want to retain all backups. At the end of the backup period, inSync will delete the data from the storage. For example, if you specify that you want to retain all backups for 5 days and inSync completed the backup operation on January 6, 2019, inSync will delete the backup data from the storage on January 11, 2019.
|
| Retain weekly data backups for |
Type the number of weeks that you want to retain all backups. At the end of the weekly backup period, inSync deletes the data from the storage. Note: The weekly backup is the last backup in a calendar week. The calendar week starts on Sunday. |
|
Retain monthly data backups for |
Type the number of months that you want to retain all backups. At the end of the monthly backup period, inSync deletes the data from the storage. Note: The monthly backup is the last backup in a calendar month. |
|
Exclude files |
In the Files box, type the file types that you want to exclude from the backup of a Shared Drives. The file extensions are automatically added to the below field. |
|
Excluded Folders |
In the Folders box, enter the absolute folder paths that you want to exclude from the backup of a Shared Drives. Separate each path using a comma. For example, if you want to exclude 2015 Sales report from the Sales Shared Drives folder, enter the following: Sales/Reports/Yearly Reports/2015 Sales report |
| Data Lock |
Enables the Data Lock feature. For more information, see Data Lock. To enable the Data Lock feature, select the Enable Data Lock checkbox and on the confirmation window, click Yes. On the summary page, the Data Lock status is displayed as enabled. These details will be captured in the Admin Audit Trail for auditing purposes.
|
Note: To retain the backups for an unlimited period, enter 0 as the value for all daily, weekly and, monthly retention settings.
The new Shared Drives will be added to the Shared Drivess list.
Edit Shared Drives settings
- Sign in to Druva Cloud Platform Console and navigate to Google Workspace.
The Google Workspace Overview page appears. - Click Shared Drives.
- Click the Shared Drives name that you want to edit.
- In the Summary tab ->Shared Drive Settings click the Edit button.
- Edit the required details and click Save. You can edit only custom settings. See the table in the Add Shared Drive section for reference.
On-demand backup of Shared Drives
- Sign in to Druva Cloud Platform Console and navigate to Google Workspace.
The Google Workspace Overview page appears. - Click Shared Drives.
- Click the Shared Drives that you want to backup. The Shared Drives page appears if you select an enabled Shared Drives. If the Shared Drives is not configured, you need to configure the Shared Drives settings first and then trigger the backup activity.
- Click and then click Backup Now to trigger the backup. After the backup activity is completed, the Backup Status on the Shared Drives page will change to Backed Up Successfully.
Restore Shared Drives data
- Sign in to Druva Cloud Platform Console and navigate to Google Workspace.
The Google Workspace Overview page appears. - Click Shared Drives.
- Click the Shared Drives name that you want to restore. The Shared Drives appear if you select an enabled Shared Drives.
- Click Backups tab to view the snapshots.
Note: The quarantined snapshot is marked with the
icon, and the latest unquarantined (clean) snapshot is marked with the
icon that you cannot delete. For more information, see Ransomware Recovery for Google Workplace.
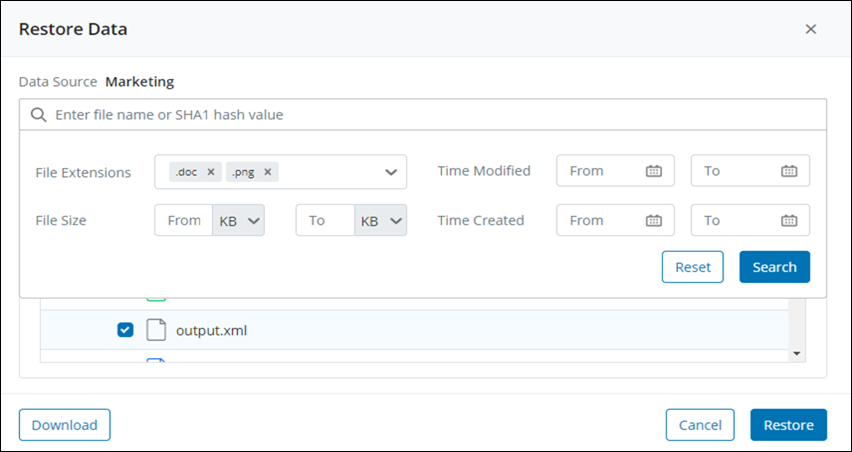
- Click Restore. The Restore Data window appears.
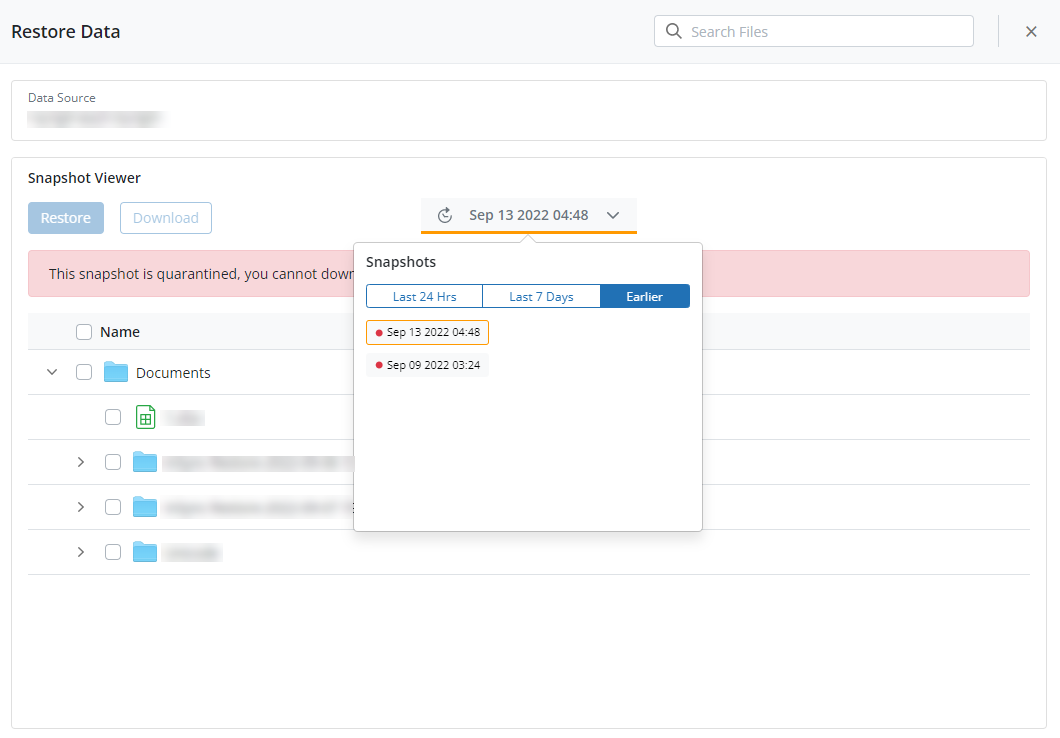
- On the Restore Data window, select the snapshot from which you want to restore data.
Note: The quarantined snapshot is marked with
icon and you cannot restore or download data from the quarantined snapshot.
- Browse and select the folders and files that you want to restore.
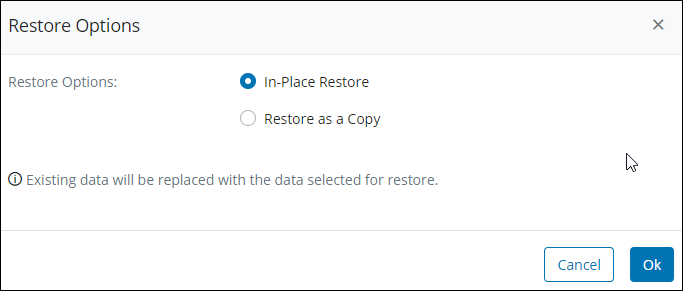
- Click Restore. The Restore window appears.
- Select a restore option:
- In-place Restore - existing data present in your Shared Drives is overwritten with the data selected for restore.
- Restore as a Copy - a new Shared Drives is created under Shared Drives and the data is restored to this Shared Drives. During the restore activity, inSync creates a new inSync-restore-<date stamp>-<time stamp> Shared Drives inside Shared Drives.
Alternatively, you can use Search Files, located at the top for files across your backed-up Shared Drives.
- To use Search Files, type the name of the file you are looking for in the box or the SHA1 hash value.
- Use the following filters to refine your search criteria:
- File Extensions - Select the file type of the document.
- File Size - Select the range to get the list of files modified within the mentioned file size range.
- Modified between/Time Modified - Select the time range to get the list of files modified during a particular time range.
- Click Search. A list of files matching your search criteria is displayed.
If the Federated Search feature is enabled for your organization, you can filter your search results using different metadata attributes or by typing the name of the specific file name. For more information, see Search backed up data to restore.
11. Click Ok.
Restore is not supported for Themes and Images backed up from Shared Drives due to an internal error.
Download Shared Drives data
- Sign in to Druva Cloud Platform Console and navigate to Google Workspace.
The Google Workspace Overview page appears. - Click Shared Drives.
- Click the Shared Drives name whose data you want to download. The Shared Drives appears if you select an enabled Shared Drives.
- Click Backups tab to view the snapshots.
Note: The quarantined snapshot is marked with the
icon, and the latest unquarantined (clean) snapshot is marked with the
icon that you cannot delete. For more information, see Ransomware Recovery for Google Workplace.
- Click Restore. The Restore Data window appears.
- On the Restore Data window, select the snapshot whose data you want to download.
The list of files and folders present in the Shared Drives are displayed.
Note: The quarantined snapshot is marked with
- Select the files and folders that you want to download, and click Download.
The file is downloaded on your device. If you downloaded a folder, it is downloaded in a <folder name>.zip format.
Disable Shared Drives
- Sign in to Druva Cloud Platform Console and navigate to Google Workspace.
The Google Workspace Overview page appears. - Click Shared Drives.
- Click the Shared Drives name that you want to disable. Click and then click Disable. A confirmation dialog box appears.
- Click Yes to disable the Shared Drives.
Enable Shared Drives
- Sign in to Druva Cloud Platform Console and navigate to Google Workspace.
The Google Workspace Overview page appears. - Click Shared Drives.
- Click the Shared Drives name that you want to enable. Click and then click Enable. A confirmation dialog box appears.
- Click Yes to enable the Shared Drives.
Delete Snapshots
You can delete maximum 20 snapshots at a time. Snapshots in the data locked user profile cannot be deleted.
- Sign in to Druva Cloud Platform Console and navigate to Google Workspace.
- The Google Workspace Overview page appears.
- Select Shared Drives and click the user of which you want to delete the snapshot.
- Go to the Backups tab, select the snapshot(s) that you want to delete and then click the Delete Snapshot button.
- Enter the reason for deletion and click Delete. (The reason is mandatory with a character limit between 10-150. The reason for deletion will be captured in the Admin Audit trail for auditing purposes.)
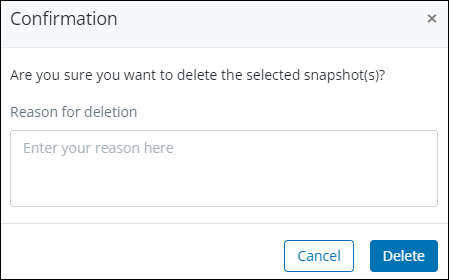
Snapshot(s) deleted successfully message displays.
Notes:
- The Shared Drives snapshot(s) will be deleted temporarily. You can rollback the deleted Shared Drives snapshot(s) within a configurable rollback window. After the rollback window expires, the Shared Drives snapshot(s) will be deleted permanently. See Rollback Actions for details.
- To use Rollback Actions, you need the Security Essentials license. Contact Support to obtain the license. Currently, this feature is available only for Druva Public Cloud customers.
Delete Shared Drives
Note: You cannot delete a Shared Drive if it is enabled with Data Lock.
- Sign in to Druva Cloud Platform Console and navigate to Google Workspace.
The Google Workspace Overview page appears. - Click Shared Drives.
- Select the Shared Drives name that you want to delete.
- Click Delete.
-
On the confirmation window, specify the reason for deletion (the reason is mandatory with a character limit between 10-150). The reason for deletion will be captured in the Admin Audit trail for auditing purposes.
- Click Delete. The Shared Drives will be deleted temporarily. You can rollback the deleted Shared Drives within a configurable rollback window. After the rollback window expires, the Shared Drives will be deleted permanently. See Rollback Actions for details.
To use Rollback Actions, you need the Security Essentials license. Contact Support to obtain the license. Currently, this feature is available only for the Public Cloud customers.
Rollback Considerations:
-
If you delete the Shared Drives , discover it while the deleted Shared Drives resides in the Rollback Actions, and delete it again, the Shared Drives will be deleted permanently.
-
You cannot rollback Shared Drives if you delete it, add the same Shared Drives (through auto-discovery or another method) while the deleted Shared Drives resides in Rollback Actions, and try to rollback the deleted Shared Drives .
Related activities
| Activity | Description |
|---|---|
|
Monitor Shared Drives activities |
To monitor Shared Drives activities, on the Google Workspace Overview page, navigate to Shared Drives tab and click the required Shared Drives name. Click the Activity Stream tab to view the activity details. These activities are also displayed under Recent Activities area. |
|
View site collection audit trail |
To view Shared Drives audit trails, on the Audit trails page, navigate to Admin Audit Trail and select Google Shared Drives under Activities Type. |
|
View Live Activities |
To view backup or restore progress of Shared Drives, click |
| View Storage details | To view Shared Drives storage details navigate to Manage > Storage List. |
| View Shared Drives Backup and Restore report | To view and download the Shared Drives Backup and Restore Report, on the inSync Management console, navigate to Reports >Shared Drives Backup and Restore Report. For more information see Shared Drives Backup and Restore Report. |
| Configure alerts for SharePoint | To view the Shared Drives Backup failed or Shared Drives Restore status alerts, navigate to |