Configuring Salesforce App Settings
Overview
A default organization, project, and administrator profile are created within your Salesforce App environment after account activation.
You can use the default organization or switch to another organization from the Settings page. You can customize the settings of the Salesforce App to best suit your business requirements.
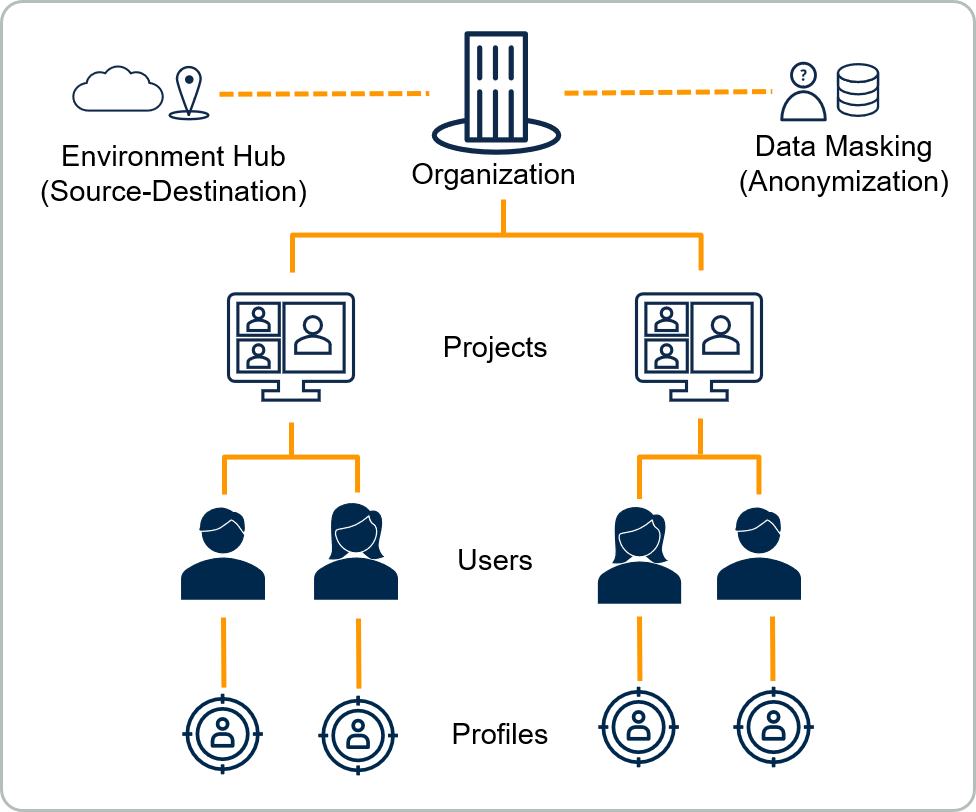
The following diagram illustrates the relationship between the global constructs:
As a prerequisite, each of these settings requires specific profile permissions to proceed with the modifications. For more information, see Profiles and Profile Permissions.
The following table lists the modifiable settings from the Salesforce App -> Settings page:
| Settings | Description | Required Permissions |
|---|---|---|
| Organization | Displays your Salesforce organization details. |
|
| Projects | Manages your data templates and users in one place. |
|
| Data Mask | Anonymize sensitive information with fully functional data when copying data from a production environment to a non-production environment. |
|
| User Management | Manage users, invite users to the organization, and manage profile permissions. |
|
| User Management -> Profiles | Manage permissions for each user profile. |
|
| License | Manage licenses to register a Salesforce organization to the licenses. |
|
Organization
A Salesforce organization represents customer data within an instance, which comprises elements, such as, objects, fields, and records. You can check basic details about your organization from the Settings -> Organization page.
To switch organization, click the gear icon and select Switch Organization.

Projects
Projects are the organization tools to collect all of the data templates and users associated with one project in one place.
Creating a Project
- On the Salesforce App console, click Settings and click Projects.
- Click New Project. The New Project window appears.
- Enter information for the following fields:
| Field | Description |
|---|---|
| Project Name | Specify a unique name for the project within the organization. |
| Preferred region |
Specify the preferred storage region for your project.
|
| User | Add users to this project, who are already a part of the organization. |
| User Profiles |
Assign a profile to the user. For more information about Profiles, see Profiles. |
| Associated Users | By default, your user account is listed here. To grant project access to additional users, select their name from the User dropdown list and click Add. |
4. Click Save to create the project.
Inviting External Users
You can invite external users who are not a part of the current organization using the following steps.
- On the Salesforce App console, click Settings.
- Click Projects on the left sidebar. A list of existing projects appears on the right pane.
- Click the dropdown arrow on the right of a specific project and click Invite Users. The Invite Users window appears.
- Enter the email address and select a user profile.
- Click Add. The Users to invite list displays the user.
- Click Send Invite.
Note: The invited user has access to the selected project only.
You can view the user invites in the Settings -> User Management -> View Invites page.
For best practices around inviting users to a project, see Inviting users to a project.
Data Mask
You can anonymize sensitive information with fully functional data when copying data from a production environment to a non-production environment. Data masking ensures that the original sensitive data cannot be retrieved or accessed outside of the production environment. However, data masking still ensures that the anonymized records are fully functional in a development and test environment.
The Salesforce App enables you to mask data at the organization level, the project level, and/or the data template level. As a best practice, apply a data masking definition at the organization level to mask commonly regulated data. This also ensures the consistent masking of sensitive data across the entire organization.
Data mask definitions created at the organizational or project level take precedence over those created within the current data template. Consider the following example:
- The administrator of an organization creates a data mask definition to mask Social Security Number fields using a regular expression pattern or substitution values.
- A developer also adds a data mask definition to mask Social Security Number fields with a different regular expression pattern or substitution values.
- In this scenario, the data mask definition created by the administrator is applied as it is created at an organization level.
For more information about data masking, see Data Masking.
This section covers the steps to create a data mask at the organization or project level.
For more information about creating a data mask for a data template, see Creating a Data Mask.
Applying Data Mask to a Project or Organization
- On the Salesforce App console, click Settings.
- Click Data Mask.
- Select the project or organization to which you would like to create a data mask definition from the Applies To dropdown list.
Note: This data mask definition applies to any data templates created within the organization or project.
4. Click Create. The Data Mask wizard appears.
5. Enter the following information:
Select Object.Field
Select the fields associated with an object for data masking.
Enter the following information:
| Field | Description |
|---|---|
| Projects | Select a project for the data mask. |
| Environments | Select a source environment from the dropdown list. The list displays all environments configured in the Environment Hub. |
| Search By Field Name | Enter the search criteria in the search box and press the Enter key to populate search results. |
| Search Result |
Select the field you would like to include from the Search Result box and add it to the Selected Object.Field box using the ▶ arrow. To deselect a field from the Selected Object.Field box, use the ◀ arrow. |
| Selected Object.Field | Confirm if the selected fields are added to this box. |
Mask Type
Choose from the following four data mask types:
Regular Expression
You can use regular expressions to search for a pattern in the data set and apply data masking to the results.
Perform the following steps to apply a data mask using regular expressions.
- Enter a custom regular expression pattern in the Regular Expression text box. Alternatively, click Browse Library to select from a list of predefined regular expressions. The list includes patterns for Credit Card, Social Security Number, and Email. For more information on creating regular expressions, see Using Regular Expressions.
- Click Apply.
Adding substitutions to regular expressions
If groupings apply to a regular expression, the same number of input field substitutions are applicable.
Consider the following example.
- The format for Social Security Numbers is AAA-GG-SSSS format.
- The format includes three groupings which represent area number, group number, and serial number.
- As a result, three field inputs are applicable for adding substitutions.
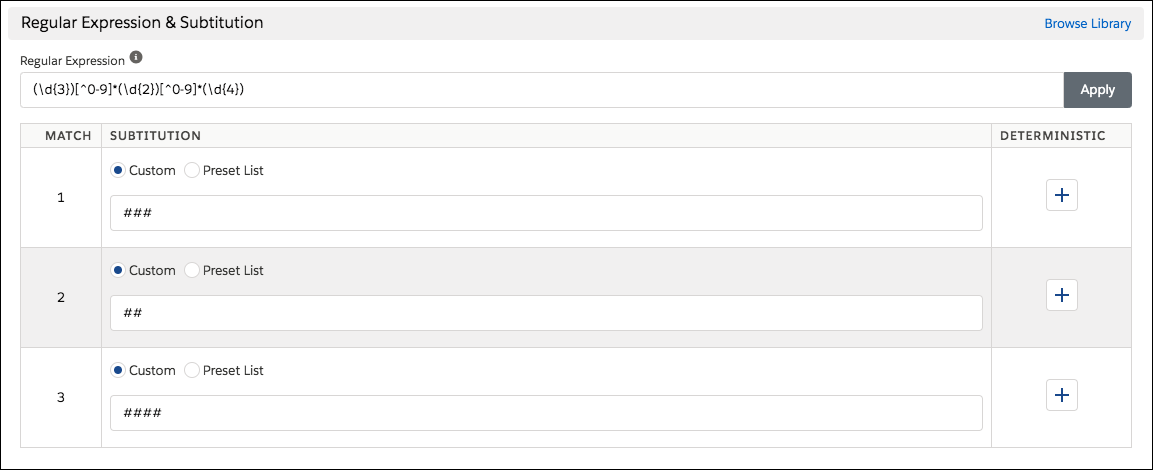
-
Select Custom or Preset List to select a custom value or add values from a predefined list.
Use the @ and # characters in the substitutions fields when selecting patterns from the predefined regular expressions library. The @ symbol represents alpha characters, which denotes uppercase or lowercase characters. The # symbol represents all the whole numbers.
-
Click the
 icon if you want values with deterministic masking. For more information, see Deterministic and Non-Deterministic Masking.
Navigate to Settings -> Data Mask -> Creating List Values to create and manage predefined lists. For more information about creating and managing list values, see Creating List Values.
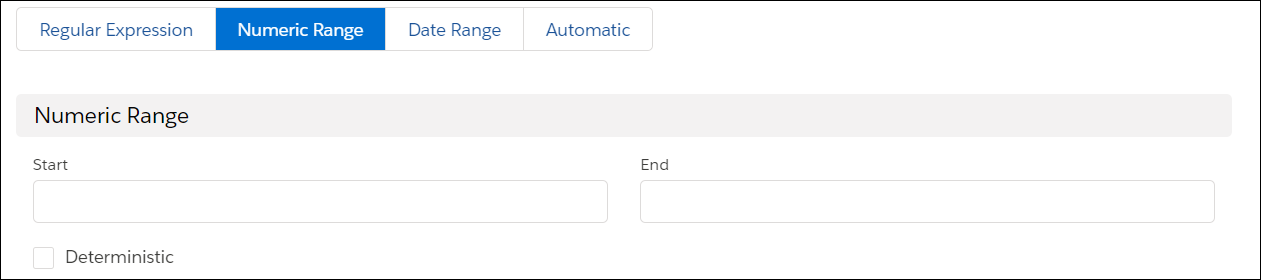
Numeric Range
Limit the range of numbers for data masking using the Start and End text boxes. Choose whether data should be deterministic using the Deterministic checkbox.
For more information, see Deterministic and Non-Deterministic Masking.
Date Range
Limit the date range for data masking using Start and End date inputs fields. Choose whether data should be deterministic using the Deterministic checkbox.
For more information, see Deterministic and Non-Deterministic Masking.

Automatic
If you select the Automatic data mask type, the Salesforce App applies random mask values to the fields based on the field type.
The following table displays the applicable mask values as per the field types:
| Field | Description |
|---|---|
| Boolean | True or false value. |
| A string value with 1-20 characters before the @ symbol and 1-20 characters for the domain name. | |
| Currency |
A value based on decimal places specified for the field.
|
| Date | A value between January 1, 1970, and January 1, 2090, in YYYY-MM-DD format. |
| Date Time | A value between January 1, 1970, and January 1, 2090, in YYYY-MM-DDThh:mm:ssZ format. |
| Double | A value based on decimal place and length specified for the field. |
| Encrypted string | A value based on 2 characters, which comprises lowercase and uppercase alphabetical characters. |
| Number |
A value based on the number of digits specified (length), using negative numbers for the starting range and negative numbers for the ending range. For example, if the length specified is 3, numbers would be generated between -999 and 999. |
| Location | A value based on valid range for latitude (-89 to +89) and valid range for longitude (-179 to +179). |
| Multi-Picklist |
A value from 1 to N from active picklist values. For example, for a favorite color picklist, one result can be the following: Red;Yellow;Blue; |
| Percent | A value based on decimal places specified for the field. |
| Phone | A value based on numbers formatted as XXX-XXX-XXX. |
| Picklist |
A value based on active picklist values.
|
| String/Text Area | A value of alphabetical characters based on the specified field length. |
| Time | A value based on minimum date time to maximum date time, or within 24 hours, in YYYY-MM-DD hh:mm:ss format. |
| URL | Domain name value, which is a string between 3-20 characters. For example, http://www.example.com. |
Note: Ensure that you test the selected data mask type in the Test section at the bottom of the wizard to ensure the desired output.
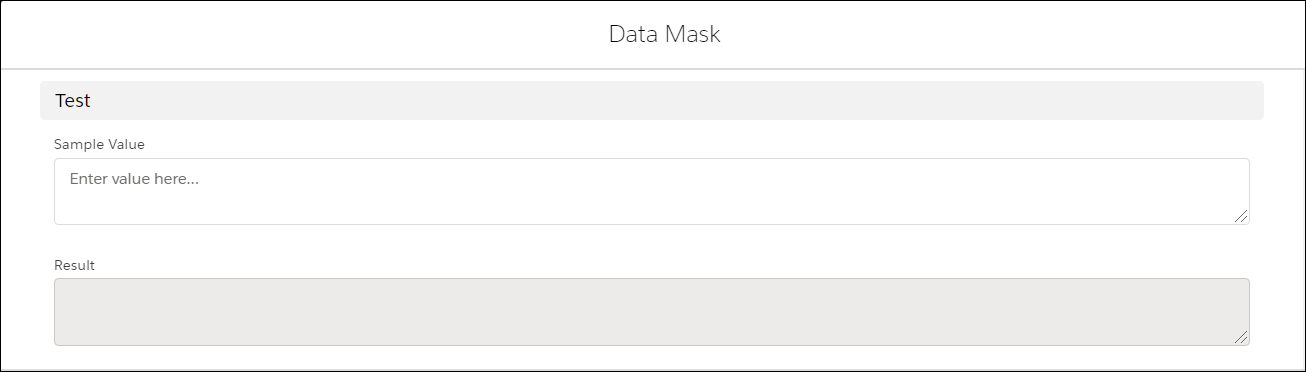
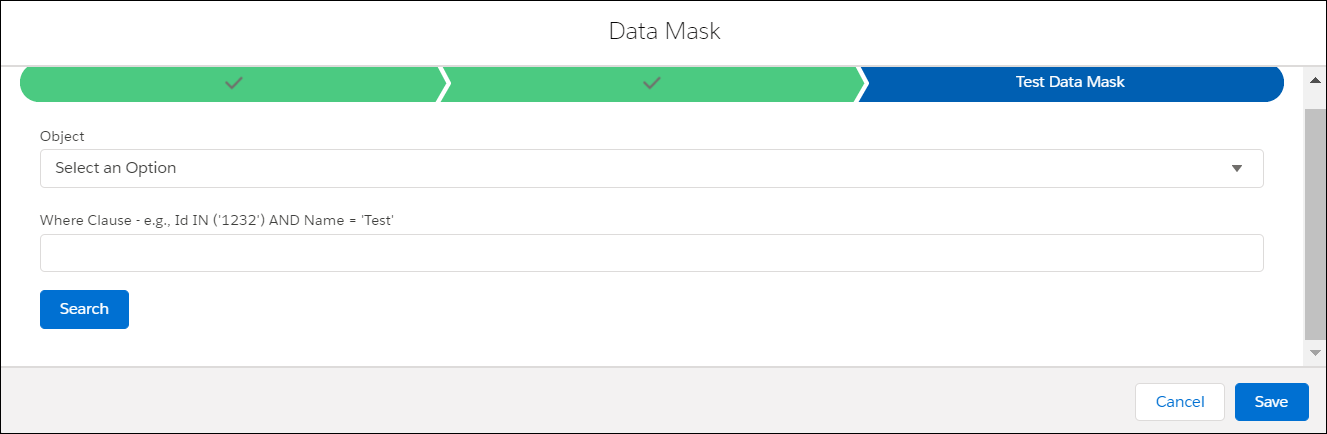
Test Data Mask
Select an object from the dropdown list and provide a WHERE clause. The original values from the source org and the masked values appear side by side. Confirm if this is correct and click Save.
List values enable you to import custom values for substitution in data translations or data masks.
For example, you may create a RegEx pattern to match a certain data set and use a list of values to substitute for the match.
Note: This functionality is available from the Settings -> Data Mask page only.
The following procedure helps you to create and manage lists.
- On the Salesforce App console, navigate to Settings->Data Mask.
- Click List Values. The Data Mask List window appears.
- Click the
 icon to specify a list name.
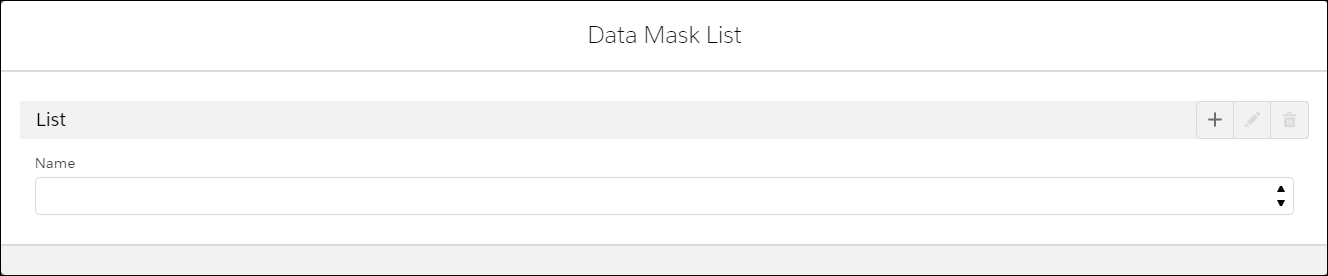
4. Click the  icon to continue.
5. Click the  icon on the right to edit the list name or click the
  icon to delete a list. The Import Values section appears after adding a list.
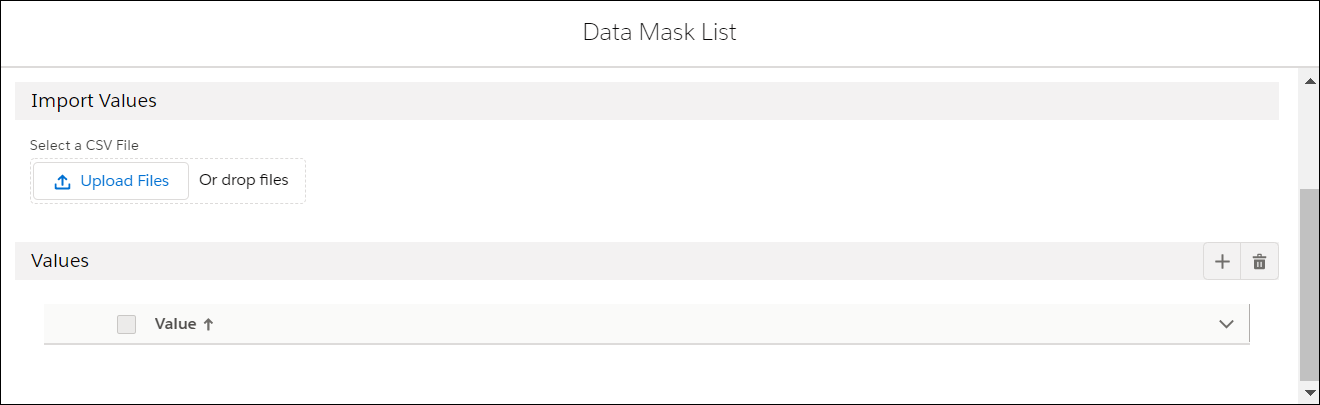
There are two ways to import values to the list:
Option 1 - Import Values
Click Upload Files. A single import operation supports a maximum of 3,000 values. The supported file format is .csv with the following formatting:
| Sample File Name | Required formatting |
|---|---|
| myFirstImport.csv |
\w,test \s,fefe |
| OR | |
| myFirstImport.csv | \w,test,\s,eit |
Note: Each file name must match the object API name. The API name is the label name with any spaces converted to underscores (_) and suffixed with __c. The file extension should be .csv.
For example, a file containing Ids for Accounts (a standard object) would be named Account.csv. A file containing Ids for MyCustomObjects (custom objects) would be named MyCustomObject__c.csv.
Option 2 - Add Manually
- Click the
 icon on the right from the Values section.
 - In the empty row, click the
 icon on the right to add or edit the value.
 - Press the Enter key to save.
- Click Save after adding the required values.
Delete a Project from Salesforce App
You can delete a project you no longer require. Deleting a project also deletes the following entities associated with the project -
-
Archival definitions
-
Backup definitions
-
Data Templates
The external users who are invited and associated with only this project lose access to the project.
Before you begin
Ensure no tasks associated with the project, that is, associated with archival and backup definitions that you plan to delete are running. You can view the tasks in various stages by visiting Tasks. For more information, see Managing Tasks.
Procedure
-
On the Salesforce App console, click Settings and click Projects.
-
Locate the project that you want to delete and click the dropdown arrow on the right beside the project and select Delete. A confirmation window appears.
-
Provide a valid Reason for deletion.
-
Click Delete.
An email is triggered to the Salesforce App administrator with the deleted project details and the reason for deletion.
Delete a Data Template
You can delete a data template you no longer require. The same template then will not be available for data copy, data restore, or archival restore.
Before you begin
Ensure no data copy, data restore, or archival restore tasks associated with the data template you plan to delete are running. You can view the tasks in various stages by visiting Tasks. For more information, see Managing Tasks.
Procedure
-
On the Salesforce App console, click Data Template.
-
Select the Project from the list. A list of associated Data Templates is displayed.
-
Locate the Data Template that you wish to delete and click the dropdown arrow on the right beside the Data Template and select Delete. A confirmation window appears.
-
Provide a valid Reason for deletion.
-
Click Delete.
An email is triggered to the Salesforce App administrator with the deleted Data Template details and the reason for deletion.
User Management
You can view all users located in your organization from the Salesforce App -> User Management -> Users page.
Note: As part of the licensing association, the Salesforce App considers active users with Standard Salesforce user type. This user type also includes Salesforce Platform and Salesforce Platform One user licenses.
Deleting a User
You can anytime delete a user from the Salesforce App.However, you must plan and carefully take action before user deletion.While deleting a user from inSync or the Salesforce App, you have the following options:
-
Delete the user and associated definitions - The user can be deleted from Salesforce App, and their associated configurations like backup definitions, archival definitions, and data templates are also deleted.This completely stops the backup and archival, and related restore and data copy of Salesforce organization based on the user-defined entities.
OR -
Delete and replace the user with another user - Using this option, you can assign the associated user configurations to another Salesforce user and ONLY delete the original user. This helps in retaining the user-defined configuration and continuing with the org backup. Only the deleted user name is replaced with the new user who is replaced, in the associated Task.
Before you begin
Ensure no tasks associated with the user that you plan to delete are running. You can view the tasks in various stages by visiting Tasks. For more information, see Managing Tasks.
Procedure
To delete a user in an organization,
-
On the Salesforce App console, click Settings.
-
Under User Management on the left-hand side panel, locate the user.
-
Click the dropdown arrow on the right beside the user listing and select Delete. A confirmation window appears.
-
On the confirmation window, select any one of the options judiciously:
-
Delete and replace with existing user - To replace the user with another user and assign the associated user configurations to another Salesforce user. This helps in retaining the user-defined configuration and continuing with the org backup.
-
If you select this option, select the user from the Select User drop-down list who should replace the user being deleted.
-
Select the following check box if you also want to replace the user name in the existing user tasks of associated activities.
-
OR
-
Delete the user and its associated definitions - To delete the user from the Salesforce App and also delete the associated configurations like backup definitions, archival definitions, and data templates. This completely stops the backup and archival of Salesforce organization based on the user-defined entities.
-
Provide the Reason for the deletion of the user. It is helpful for the administrator to understand the deletion of the user and its purpose.
-
Click Delete.
An email is triggered to all the administrators in the organization with the deleted user details and the reason for deletion.
User Profiles
By default, the Salesforce App includes four user profiles:
- Administrator
- Developer
- Project Manager
- Tester
Each user profile contains default permissions.
For more information about permissions, see Understanding Permissions.
For more information about profile types and default permissions for each profile, refer to Profile Types and Default Permissions.
Creating a User Profile
- On the Salesforce App console, click Settings.
- Click Profiles.
- Click New Profile. The New Profile window appears.
- Enter a unique name and click Save.
Assigning Permissions to Profiles
- Select the created profile from the Profile dropdown list.
- Select or deselect the checkbox for each permission to enable or disable it for this profile respectively.
- Click Save Permission.
The following table helps you to understand the permissions associated with each operation, such as data backup, data template, environment, and settings.
| Operation | Permission | Description |
|---|---|---|
| Global Permissions | View All Organization Users Tasks | Enables you to view other users’ tasks in an org. |
| Data Backups | Manage Data Backups | Enables you to create, edit, and delete data backup jobs in the organization. This includes the Subject Access Request. |
| View Data Backups |
Enables you to view the data backup dashboards on the Data Backup page for the selected backup definition. The dashboard includes the following charts:
Also, a table displays the list of created, updated, and deleted records for each backup activity. |
|
| Modify Backup Definition User | Enables you to run backup definitions on another user's behalf from the same project. | |
| Data Templates | Manage Data Templates | Enables you to create, delete, and update data templates in the organization. |
| Perform Data Copy |
Enables you to perform a data copy operation from the data template listing on the Data Templates page. If this permission is set, then users can see the Start Data Copy option from the Data Templates listing using the row actions. |
|
| Environments | Manage Environments |
Enables you to create, delete, share and update environments in the Environment Hub.
|
| Modify Production | Enables you to set the production organization as the destination organization. | |
| Share Environment | Allows you to share the environment with other users in the Environment Hub. | |
| Settings | Manage Profiles | Enables you to create, update, and delete permissions for existing user profiles. You can also create new user profiles. |
| Manage Global Data Masks | Enables you to create, edit, and delete data masks. | |
| Manage Projects | Enables you to create, edit, delete, and invite users to projects from outside the organization. | |
| Manage License | Enables you to authenticate the license to the assigned Production org. | |
| Manage Settings | Enables you to manage settings from the Settings page. This includes the ability to configure Organizations, Projects, Data Mask, Users, Licenses, and Profiles. | |
| Manage Organizations | Enables you to edit organization details, such as name, address, and phone number. | |
| Manage Users | Enables you to activate or deactivate other users. |
Understanding Profile Types and Default Permissions
The default permissions for each profile type are listed as follows.
| Profile | Description | Default Permissions |
|---|---|---|
| Developer | A developer is an API integration and code expert. Typically, developers create complex workflows, triggers, Apex development, complex validation rules, AppExchange, and legacy platform integrations. |
|
| Project Manager | A project manager understands Salesforce and its application within a business. They typically work with developers and consultants on different projects and set the expectations and delivery timeline that will meet the business requirements. |
|
| Tester | A tester defines the test data set to develop and test against for the developer. | Manage Projects |
| Administrator | An administrator provides value to the business by automating complex business processes, making sure the system is clean and efficient. |
|
License
The Salesforce App provides features that are available with a license type. The following license matrix illustrates the features available as per the licensing considerations.
For more information on licensing, contact Support.
|
Feature |
Enterprise License for Backup |
Elite License for Backup |
Sandbox Seeding License |
Archiver |
|---|---|---|---|---|
|
Restore Data using Data Restore Template |
* Limited to Backup Restore template |
* Limited to Backup Restore template |
* Limited to Data Copy template |
* Limited to Archival Restore template |
|
Data Masking using Data Restore Template settings |
|
|
|
|
|
Copy Data using the Data Copy Template |
|
|
|
|
|
Multi-region support |
|
|
|
|
|
Subject Access Requests for GDPR Compliance |
|
|
|
|
|
High-Frequency Backup |
|
|
|
|
|
Retention Period |
1 Year |
Unlimited |
- |
Unlimited |
|
Archiver Content SOQL Query Builder |
|
|
|
|
|
Data Deletion of Archived Records form source org |
- |
- |
- |
|


For more information about supported regions, contact Support.
You can view and manage the license details from the License page. You can see the following information:
| Column | Description |
|---|---|
| License edition |
Specifies the type of license, which are as follows:
Click the arrow adjacent to the license edition listing to view the associated organizations and allocated users with a license. |
| Expiration date | Specifies the license expiration date. |
| Assigned production organization | Specifies the assigned production organization to the Salesforce App environment. |
| Total allowed users |
Specifies the number of users associated with the license type.
|
| Feature type | Specifies the particular feature type of the associated license. |
Authenticate Production Organization
As a Salesforce App administrator, you can configure a production organization to a specific license. The Salesforce App connects your Salesforce org using OAuth 2.0. For more information about OAuth 2.0, see Using OAuth 2.0.
The following steps explain how to authenticate and associate a production organization to a specific license.
- On the Salesforce App console, click Settings.
- Click License on the left navigation bar.
- Click Manage License. The Manage Licenses window appears.
- Click Add Organization.
- Enter the Organization Name.
Note: The organization name can be the same as your environment or can be an alias. This name must be unique within your account.
6. Select the environment from the Environment dropdown list.
The following table helps you to determine which setting to use for each type of Salesforce environment:
| Salesforce Environment Type | Environment Setting |
|---|---|
| Production | Production |
| Sandboxes - Developer (Dev), Developer Pro (Dev Pro), Partial Copy (Partial), Full | Sandbox |
| Scratch Orgs | Sandbox |
| Developer Edition | Production |
| Trialforce / Partner Developer Edition | Production |
7. Select a group from the Group dropdown list.
Note: Groups are used to categorize environments, such as Production, QA, or Development. You can either create a new group or use an existing group. Click Add Group to configure an additional group for the organization.
8. Click Authenticate. The Salesforce login page appears.
Note: You can associate a license to a different production organization only after completing 14 days of association with the current production organization.
9. Log in to your Salesforce org. The page requesting access to your Salesforce org appears.
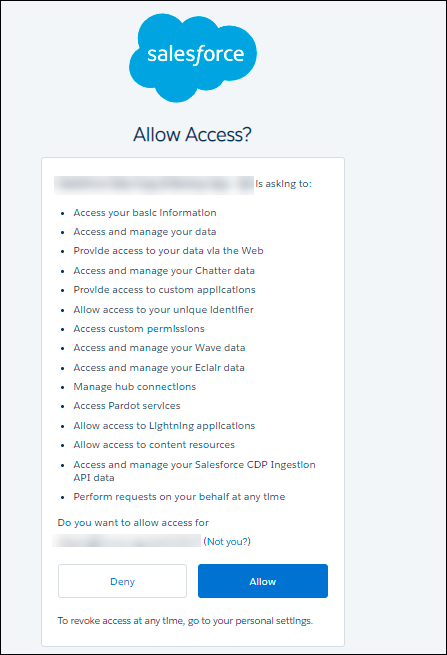
10. Click Allow.
Note:
- The Salesforce App connects your Salesforce org using OAuth 2.0. The OAuth 2.0 authentication and authorization framework requires access to your Salesforce org to ensure adequate permissions are in place for application features.
- When connecting to a Salesforce org, enable the Profile settings on the Salesforce User Account to use associated features. For more information, see Connecting your Salesforce Organization.
Remove or Re-authenticate Organization Association
The following steps explain how to remove an organization association from a specific license.
- On the Salesforce App console, click Settings.
- Click License on the left navigation bar.
- Click Manage License. The Manage Licenses window appears with the list of organizations associated with the license.
- Click the dropdown arrow on the right from the organization listing.
- Click Remove to remove the organization association.
Note: You can re-authenticate an organization with authentication status as Failed Auth. Click Re-authenticate Org from the dropdown arrow on the right.