Configuring Backups
Overview
Backups are critical to any business data. Data protection helps to protect data from user-inflicted loss or corruption.
The Salesforce App’s backup solution performs a daily backup of your Salesforce data to capture updates to metadata and any created, updated, and deleted records, enabling you to capture every change from Salesforce.
You can leverage automated backups or also trigger on-demand backups from the Salesforce App. You can also check dashboards that summarize the backup history and provide critical insights into the backed-up data.
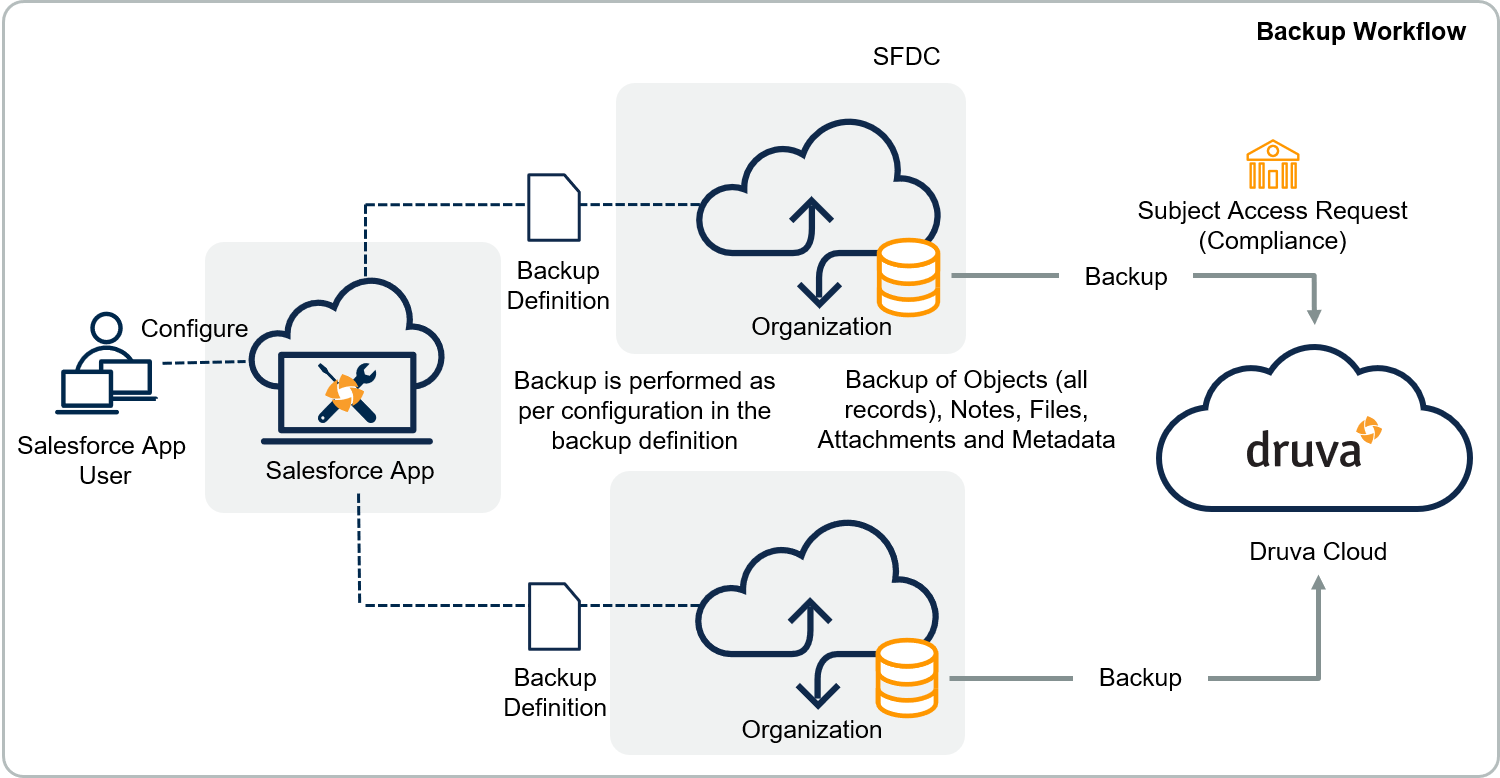
The Salesforce App stores all backup files in an Amazon S3 bucket.
The following diagram illustrates the backup workflow.
Backup Components
A backup of data within your Salesforce Org includes the following components:
- Standard package objects
- Custom package objects
- Managed package objects
- Attachments
- Content
- Knowledge articles
- Chatter
The Salesforce App excludes system objects from the backup by default. For more information about including excluded objects in your backup, see Backup Definition Settings. For a detailed list of objects excluded from backup, see Understanding Backup Exclusions.
Backup Capabilities
The Data Backup page from the Salesforce App enables you to perform the following tasks:
- Create and edit backup definitions
- Trigger manual backups
- Configure Subject Access Requests for GDPR Compliance
- View backup dashboards
The best time to run data backup is when user activity is low, such as non-operational hours, to prevent slow performance.
Backup Definition
A backup definition specifies the configuration requirements for your backup, which includes the following:
- Scheduling information
- Alerts configuration
- Exclude objects and fields from backup
- Notifications configuration
- Metadata backup configuration
- Required Salesforce permissions
You can create multiple backup definitions, which support full or partial backups for your Salesforce organization.
Create New Backup Definition
Ensure that you authenticate the organization you are backing up to a license from the Environment Hub page. For more information, see Authenticate Production Organization.
Perform the following steps to create a backup definition.
- On the Salesforce App console, click Data Backup.
- Select a project from the Project dropdown list.
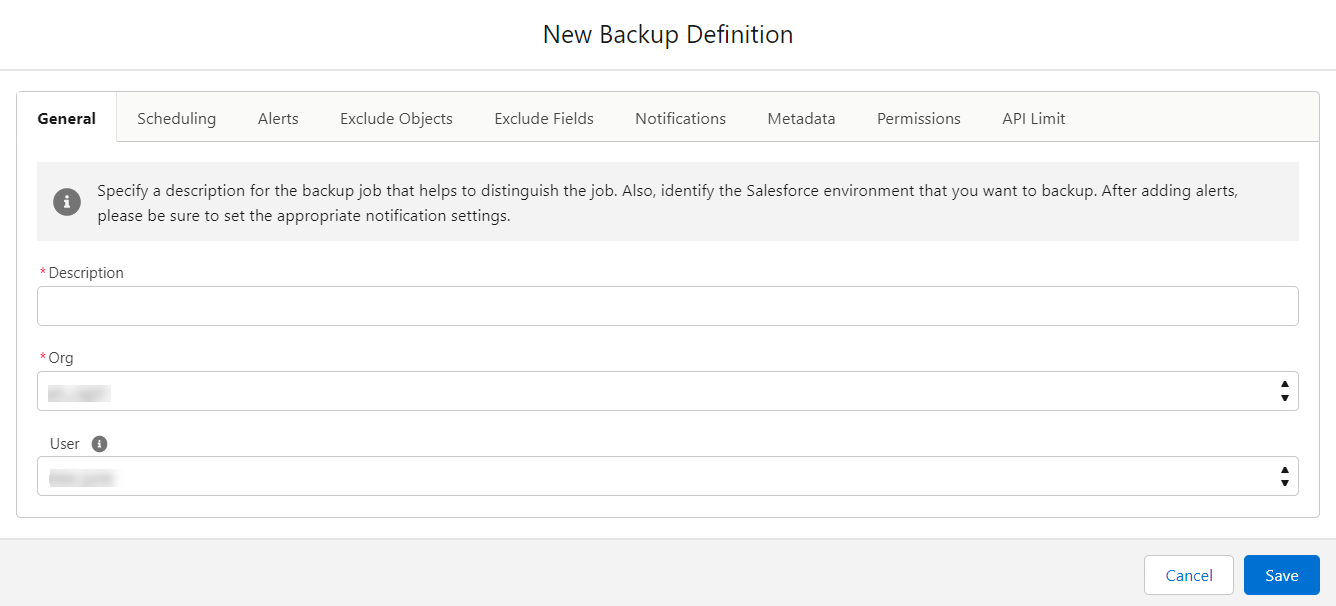
- Click New. The New Backup Definition window appears.
4. Enter information in the following tabs:
- General
- Scheduling
- Alerts
- Exclude Objects
- Exclude Fields
- Notifications
- Metadata
- Permissions
- API Limit
Salesforce App disables the metadata backups by default. Ensure that you enable metadata backups from the Metadata tab.
For more information about backup definition settings, see Backup Definition Settings.
5. Click Save after configuring the required information in the respective tabs.
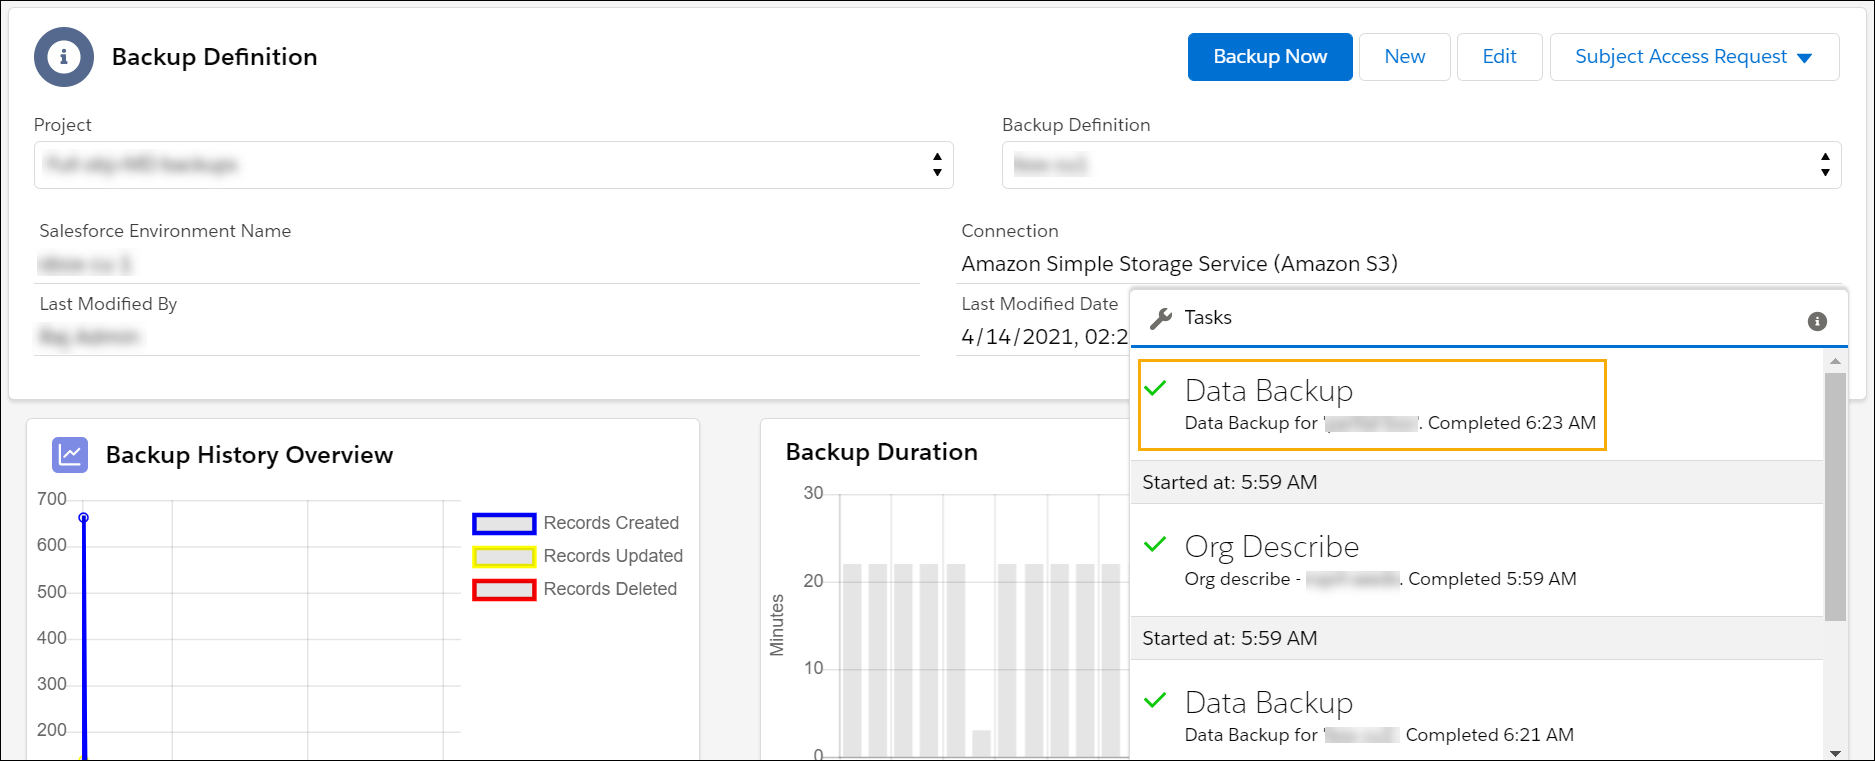
Your data backup is now ready to run at the scheduled time.
The backup task appears in the Tasks tab on the right. Click Stop Task to stop an ongoing task. If you click on the backup task listing, the application redirects you to the Tasks page. The Tasks page provides additional information to help troubleshoot any issues.
For more information, see Managing Tasks.
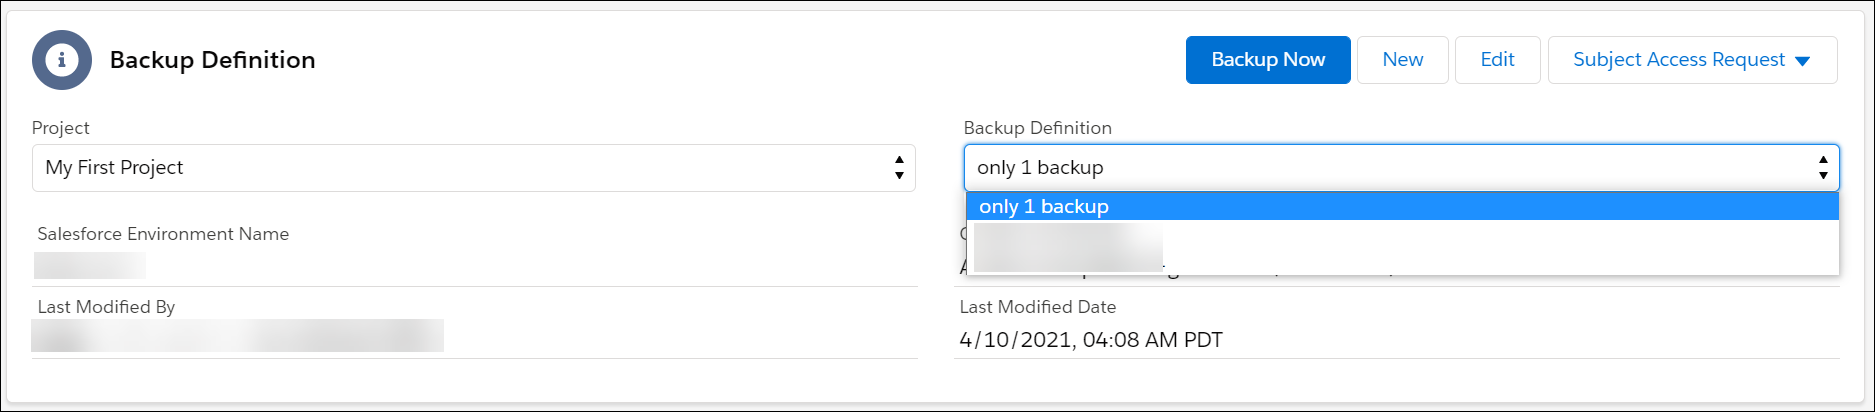
You can check the created backup definition in the Backup Definition dropdown list on the Backup Definition page.
Backup Definition Settings
General
1. Enter the name or description to describe the job.
Specify the org name and region to identify your backup definition uniquely.
2. Select the source organization for backup from the dropdown list.
Note: If your source organization is not listed, configure the organization from the Environment Hub page. For more information about configuring environments, see Configure Environment Hub.
3. Select a user from your project to run the backup definition.
Suppose the Modify Backup Definition User permission from the Settings -> Profiles page is enabled. In that case, you can run a backup definition on another user's behalf, ensuring interoperability between users in a project. Check the permissions list here.
Scheduling
The Salesforce App performs a daily backup of your Salesforce data. The full backup activity runs the first time and each quarter periodically.
The incremental backup activity runs every day after the initial full backup. The incremental backups capture the created, updated, and deleted records.
Note: A deleted record means deletion from both Salesforce organization's Recycle Bin and Salesforce user’s Recycle Bin.
Perform the following steps to schedule a backup job.
-
On the Scheduling tab, select the type of backup frequency. You can select one option from the following:
- Daily Backups - Specify backups to run once per day.
- High Frequency - Specify backups to run more than once a day.
Note: High Frequency backups are available with the Salesforce Elite Backup License.
2. Configure the following fields.
| Field | Description |
|---|---|
| Date | Select the date for the initial full backup to run. |
| Time | Select the time for the backups to run daily. |
| Backup Files Retention Period |
Specify the retention period to retain your backup files. You can opt for a backup retention period ranging from 1 year to 10 years. You can also choose to retain backup files forever.
|
| Increment Backup Interval |
If you select High Frequency, specify the backup interval to run a backup more than once a day. The options include:
|
Alerts
Alerts enable notifications in case of significant changes to specified objects or a data loss incident. You can restore data quickly with limited downtime.
- On the Alerts tab, enter an object name in the Alert Object search box.
- Select the Type of change. You can configure an alert for the selected object when it is:
- Created
- Updated
- Created and Updated
- Deleted
- Created, Updated, and Deleted
3. Select the quantifier for the alert. Quantifiers are the trigger conditions to generate an alert, considering the number or percentage of created, updated, and deleted records. You can configure alerts if the quantifier is:
- Greater than X Percent
- Less than X Percent
- Greater than X Number of Records
- Less than X Number of Records
Note: In this case, X denotes the percentage or number of records configurable in the next step.
4. Enter the percentage or number of records to specify the trigger condition for the alert.
5. Click Add Alert.
6. Repeat the steps for all required objects.
Once you have created an alert, configure the notifications for any triggered alerts from the Notification tab. For more information, see Notification.
Exclude Objects
The Salesforce App enables you to perform partial backups by excluding certain objects. You can exclude objects which you do not wish to backup. A good example can be when conforming to the privacy of individuals for Personally Identifiable Information (PII). You would like to exclude objects from the backup identified as personal data.
Note: The Salesforce App excludes specific system objects by default. Some of these system objects are read-only. If you are including any of these objects in the backup definition, ensure that the required Salesforce permissions are set from the Permissions tab. For a detailed list of objects excluded from backup, see Understanding Backup Exclusions.
Procedure
-
On the Exclude Objects tab, enter the object name or the search criteria to filter from the listed object names.
-
Click Exclude.
Click on the Excluded column header to filter the excluded objects at the top of the list.
Exclude Fields
You can also exclude fields associated with objects from the backup.
Note: The Salesforce App excludes specific fields by default. If you are including any of these fields in the backup definition, ensure that you set the required Salesforce permissions from the Permissions tab. For a detailed list of fields excluded from backup, see Understanding Backup Exclusions.
Procedure
1. On the Exclude Fields tab, enter an object name in the search box. The following search options are available.
| Option | Description |
|---|---|
| Search by object | Search a field by a specific object name. |
| Search across objects | Search a field across objects. |
| Show all excluded fields | Displays a list of all excluded fields. |
2. Select the desired field and click Exclude.
Click on the Excluded column header to filter the excluded objects at the top of the list.
Notifications
You can enable notifications for events, such as backup, restore, alerts, or data copy activity. You can also opt to receive notifications via email or SMS. Activate the following fields from the Notifications tab for users of the application.
| Toggle | Description |
|---|---|
| Notify on Failure | Notifies you in case of any failures with backup, restore, or data copy activity. |
| Notify on Success | Notifies you of successful backup, restore, or data copy activity. |
| Notify on Restore | Notifies you in case of successful data restore completion. |
| Notify on Alerts | Notifies you about any triggered alerts. |
| Notify via SMS | Provides you with an option to opt for notifications through SMS. |
| Notify via Email | Provides you with an option to opt for notifications through email. |
Metadata
Salesforce App disables the metadata backups by default. You can enable metadata backups to back up all files for the selected metadata during each backup cycle.
Procedure
- On the Metadata tab, switch the Enable Metadata Backups toggle. A list of metadata types appears.
- Select the metadata types you wish to backup from the list.
Permissions
You can assign recommended Salesforce permissions to a user account associated with an organization with configured backups; this ensures data backup covering the required fields and associated records.
From the Permissions tab, configure the following permissions.
| Permission | Description |
|---|---|
| Query All Files |
Configure the backup definition to query all files during a backup to retrieve all files within your org, including files from unlisted groups and non-member libraries. For more information about the Query Files Permission, see Query All Files. |
| View All Data |
Configure the backup definition to view all data files. The View All Data permission allows users to view all apps and data, including ones not shared with them. For more information about the View All Data Permission, see View All Data. |
| Make all files readable | Specify if all associated files can be readable for a backup. |
Validate the permission set deployment
You can validate the deployment of the permission set to ensure that all data is backed up (all fields and records). To update the permission for the user account, see enable and modify permissions in Salesforce.
API Limit
You can configure API consumption for a backup definition to ensure a backup job consumes only the specified APIs. On the API Limit tab enter the maximum API limit per day.
Note:
- You cannot set a 0 (zero) value or any value greater than the daily API limit. The default value is the API limit for the configured Salesforce Org in the backup definition.
- If the defined API limit is consumed for a particular backup definition,
- Any backups that are currently running will be paused and no new backups will start.
- You cannot start backups on the same day using both a scheduled backup and a manual backup.
- New backups are initiated as per the defined schedule starting next day. You can also initiate a manual backup next day.
- The same behavior applies if you have reached the API limit set by Salesforce.
Trigger Manual Backup
The Salesforce App enables you to perform manual backups. As a best practice, you can take a backup before a deployment or significant data migration to protect existing data from any operational issues.
Ensure that you authenticate the organization you are backing up to a license from the Environment Hub page. For more information, see Authenticate Production Organization.
- On the Salesforce App console, click Data Backup.
- Select the project associated with the backup definition from the dropdown list.
- Select the Backup Definition from the dropdown list to perform a backup of your current job.
- Click the Backup Now button, a drop-down appears.
- Choose the backup type (Incremental or Full backup) to start the backup.
The Backup task appears in the Tasks tab on the right. Click Stop Task to stop an ongoing task. If you click on the backup task listing, the application redirects you to the Tasks page. The Tasks page provides additional information to help troubleshoot any issues.
For more information, see Managing Tasks.
View Records and Metadata
Navigate to the Salesforce App console -> Data Backup -> View, Compare, and Restore Snapshots area. This table displays the count for created, updated, and deleted records for each daily backup.
Note: A deleted record means deletion from both Salesforce Organization's Recycle Bin and Salesforce User’s Recycle Bin.
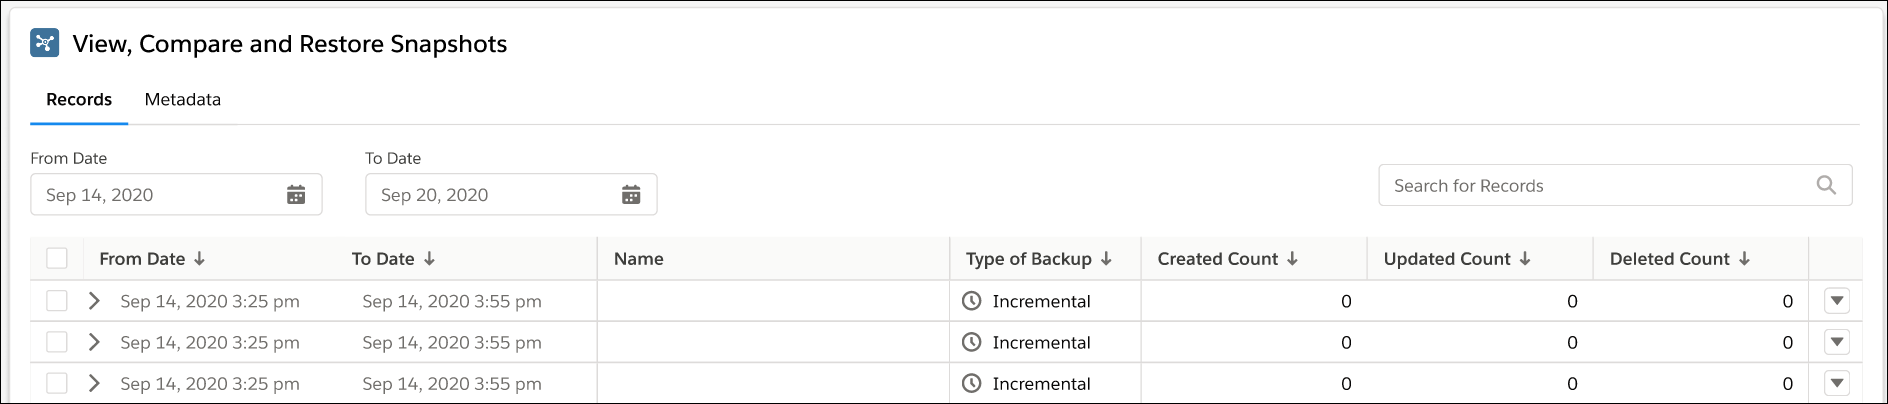
You can view the snapshot details for backup activities performed during a specified duration. The Salesforce App displays the snapshot details for records and metadata in the Snapshots and Metadata table views.
These table views help you compare snapshots as per any updates to records and metadata. In addition, based on the comparison results, you can selectively restore and download only the relevant data as per your requirements.
For more information, see Compare and Restore Records and Compare and Restore Metadata.
View Backup History of a Record
You can select a record and specify the snapshots to see updates to the record. This enhancement enables you to:
-
View modified fields of a record with its old and new values
-
Review changes or lookup field values
-
Analyze the changes to data and decide whether you want to restore a specific snapshot
Procedure
- On the Salesforce App console, click Data Backup.
- In the View, Compare and Restore Snapshots area, select Records.
- Enter an object name or a query in the search box to search for records associated with an object.
- Select a record and then click View Backup History.
- Enter the From Date and To Date date fields to view the backup history of the selected record in the last 90 days time frame.
A table displays the old and new values for fields associated with a record as per the listed snapshot.
Edit Backup Definition
You can edit a backup definition for any modifications.
- On the Salesforce App console, click Data Backup.
- Select the project associated with the backup job from the dropdown list.
- Select the required Backup Definition from the dropdown list.
- Click Edit.
- Edit the information as per your requirements.
Note: You can edit the start date and start time if a backup job hasn't run yet for the respective backup definition.
- Click Save.
Click Delete Backup Definition to remove the backup definitions you no longer require.
Note: Administrators with Manage Backups permission only can delete a backup definition. A deleted backup definition will be in the soft-deleted state in the backend for some time.
Delete a Backup Definition
You can delete a backup definition you no longer require. When you delete a backup definition, in addition to the backup definition settings, the associated Data Templates and snapshots are also deleted. You will not be able to restore or able to create any new restore template using the deleted backup definition.
You can download and evaluate the Data Templates and Snapshots that will be deleted before deleting a Backup Definition.
Before you begin
-
Only Administrators with Manage Backups permission can delete a backup definition.
-
Ensure no tasks associated with the user that you plan to delete are running. You can view the tasks in various stages by visiting Tasks. For more information, see Managing Tasks.
Procedure
To delete a backup definition,
-
On the Salesforce App console, click Data Backup.
-
Select the project associated with the backup job from the dropdown list.
-
Select the required Backup Definition from the dropdown list.
-
Click Edit.
-
Click Delete Backup Definition. A confirmation window appears.
-
On the confirmation window, Download and evaluate the Data Templates and Snapshots that will be deleted before deleting a Backup Definition.
-
Provide a valid Reason for deleting the Backup Definition.
-
Click Delete.
An email is triggered to the Salesforce App administrator with the deleted backup definition details and the reason for deletion.
A deleted backup definition will be in the soft-deleted state in the backend for some time.