Quickstart guide and workflow for restore
When you perform a restore, you can:
Restore data (object/record)
- Directly restore from a snapshot using different selection criteria or SOQL queries.
- Compare the differences between records of a single object from two snapshots. You can selectively restore the records.
Restore Metadata
- Directly restore from a snapshot by selecting the metadata type
- Compare the differences between metadata types from two snapshots. You can selectively restore the metadata.
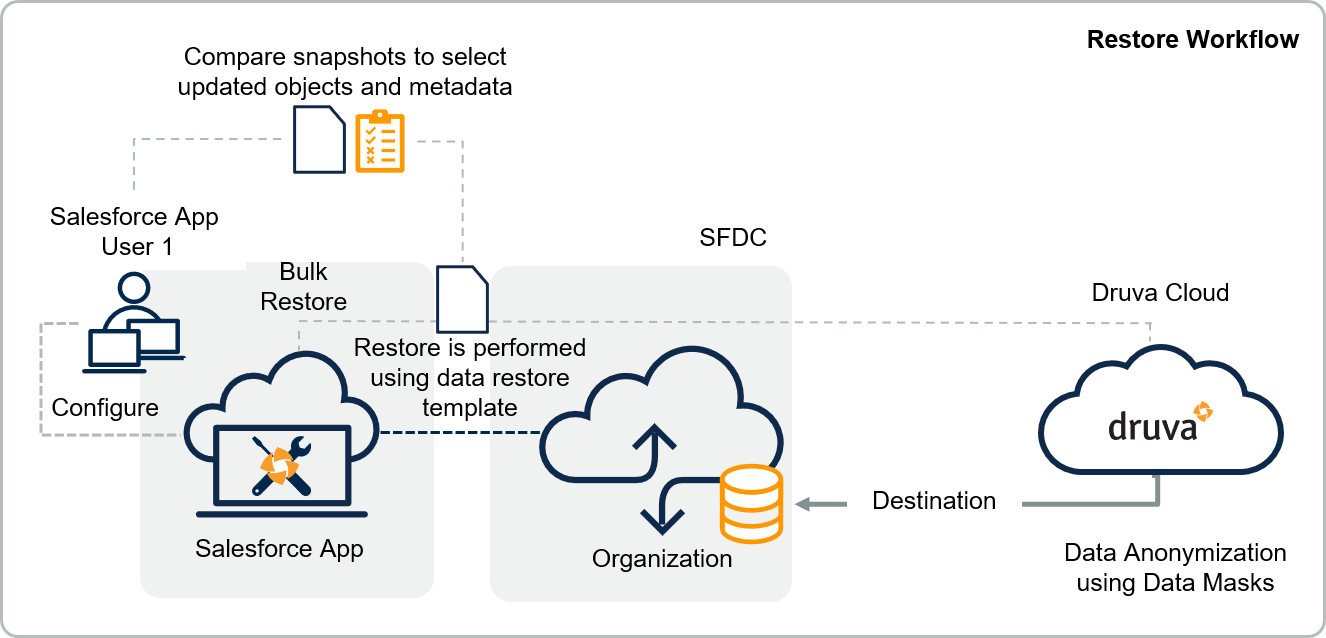
Workflow
The following diagram illustrates the restore workflow.
Before you begin
Ensure the following:
- Source and Destination Environments are added in the Environment hub. For more information, see Configuring Environment Hub.
- You have the required permissions. For more information, see Permissions.
Step 1: Select the type of restore you want to perform
-
Compare and restore: You can select records or metadata from a snapshot and restore them to the same or different Salesforce organization. You can also restore records using a comparison view of the created, updated, and deleted records. For more information, see Compare and Restore Records and Compare and Restore Metadata.
-
Bulk restore: You can also perform a direct restore of records from a snapshot as described in Step 3.
Step 2: Create a data template
In a data template, for a given project, you select the source and destination along with the data and related settings.
For more information, see Creating Data Template.
Step 3: Select records to restore (only for bulk restore)
Select how you want to identify the data you want to restore into your destination org.
For more information, see Record Selection.
Following options are available:
|
Selection |
Description |
|---|---|
|
Record Selection |
Select specific records to restore. |
|
Query-based Selection |
Select records dynamically by creating a query. |
|
Percentage-based Selection |
This selection applies to a data copy task. Use this option when you want to restore a specific percentage of data from the data set. |
Step 4: Configure data masks and other data template settings
After you have identified the records you want to restore, you can configure the following settings for the data restore:
For more information, see Configuring Data Template.
|
Setting |
Description |
|---|---|
|
Overview |
Each object in the source environment, and its true or false configuration for settings. |
|
External ID |
Specify fields the application should use when trying to determine if the record already exists on the destination org. This is useful if users manually created records on the destination org or used another application to load data into the destination org. If the data was created through a sandbox refresh (i.e. Partial or Full Sandbox), or by the Salesforce App, you do not have to define external ids since the id mapping between the source and destination is automatically tracked internally by the application. |
|
Exclude Objects |
Select objects to exclude or include.
|
|
Exclude Fields |
Select fields of an object to exclude or include.
|
|
Data Translations |
Modify field values prior to writing them to the destination org. Use this if you need to alter the value of a field without having to directly modify the value on the source org. You can use either Regular Expressions or plain text. |
|
Data Mask |
Mask object fields using custom values for the following types: Regular Expression, Numeric Range, and Date Range. Alternatively, you can select the Automatic data mask type and random values will be generated for each field type.
|
|
Validations |
By default, Salesforce App will disable all validation types (e.g. Triggers, Workflows, Required Fields, etc.). Use this section to keep specific validation types and definitions enabled. |
|
Batch Size |
You can specify the batch size of records for copying data to a destination organization. The Salesforce App loads a maximum of 200 records by default. |
|
Object Child Discovery |
You can discover the child objects for a parent object when working with junction objects. Junction objects are used to create many-to-many relationships between two objects in Salesforce. |
Step 5: Initiate data restore
- On the Salesforce App console, click Data Backup.
- Specify the source and destination environments in the Source and Destination dropdown lists.
- Click Start Data Copy in the top-right corner. A Data Copy Confirmation window appears.
For more information, see Restore Data.
Step 6: Monitor restores
You can check the progress of the data restore from the Task page.
For more information, see Managing Tasks.
Also, as an inSync Cloud Administrator, you can view data restore details available through a report. For more information about the generated report, see Salesforce Backup and Restore Report.