Configure Druva inSync to protect Teams data
Before you begin
Before you begin, consider the following:
- Some of the Teams Metadata and Private Channel APIs are in Beta state. See, Microsoft Graph API to work with Microsoft Teams.
- Before you initiate inSync configuration to protect Teams data, ensure that you have a Microsoft 365 global administrator account with a valid Microsoft 365 license.
- If your organization uses Azure AD Conditional Access policies for authenticating and providing conditional access to users, the app configuration step adheres to these policies. For more information, see Support for Azure Active_Directory (AD) Conditional Access policies.
If the conditions in the access policies are not satisfied, the token-based authentication fails "Microsoft 365 configuration failed" error.
Step 1: Provide inSync permissions to access Teams data
To begin with Teams data backup, you need to authorize inSync with Teams app data access. For procedure with screenshots, see Configure Druva inSync for Microsoft 365.
Once you initiate app configuration from the inSync Management Console, the application redirects you to the Microsoft 365 login page. Log in as a Global Administrator to review the requested app permissions and grant access to the app data. To know more about the requested permissions and their purpose, check the Microsoft 365 App Permissions for Druva App article.
inSync communicates with Microsoft 365 services using OAuth 2.0, an open protocol for token-based authentication and authorization. For more information, see the OAuth website.
Step 2: Get data encryption key (ekey)
To ensure that the Microsoft 365 data that is backed up is secure, you must configure inSync to get the data encryption key(ekey). inSync requires access to the ekey to initiate the scheduled backup of any Microsoft 365 app data. The ekey is used to encrypt the data when it is being backed up to the inSync Cloud. This is part of the digital envelope encryption process that Druva strictly adheres to. Druva does not store ekey of the users and has no access to the data.
Use one of the following methods to enable inSync to get the data encryption key(ekey):
- inSync Connector: inSync Connector acts as a SaaS Apps connector to provide the ekeys without requiring users to have their devices connected for the SaaS Apps backup . See, Integrate inSync user management with AD/LDAP.
- Key Management for SaaS Apps: The Cloud Key Management feature is a secured method to backup the SaaS Apps data and is an alternative method to the inSync AD Connector based deployment. See, Configure Cloud Key Management for Cloud Apps.
Step 3: Configure Teams for backup and restore
You can configure Teams for backup and restore in the following ways:
- Auto Configuration: Use this method to automatically detect any new Teams and to apply the global or same backup schedule to each of the newly discovered and configured Teams.
- Manual Configuration: The status of all the discovered Teams by default is set as Not Configured. After configuration, the status is updated to Enabled. For more information about the status of discovered Teams, see Teams Status.
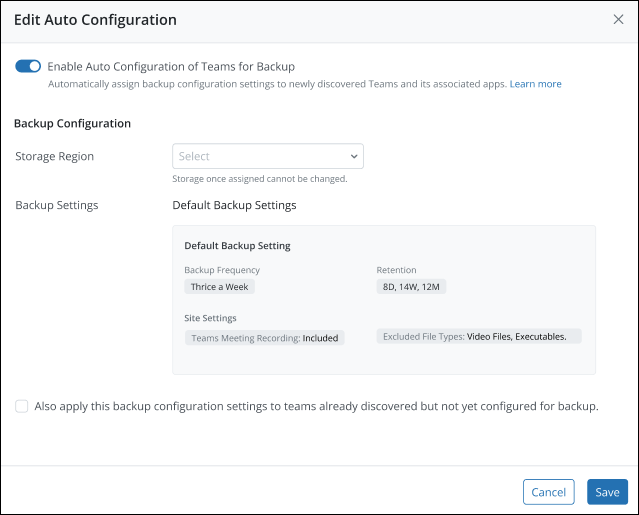
Auto configuration
Use this method to automatically assign backup configuration settings to the Teams that are newly discovered and that are already discovered but not yet configured for backup. Refer to the following video for a quick preview.
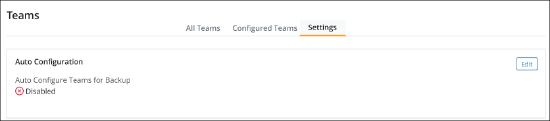
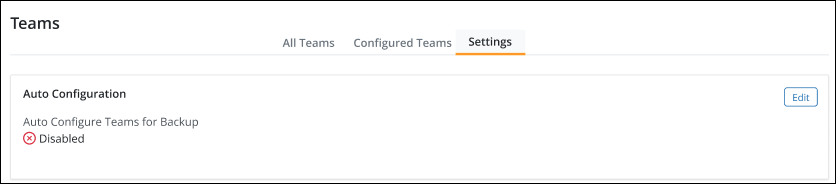
- Sign in to Druva Cloud Platform Console and navigate to Microsoft 365 > Teams.
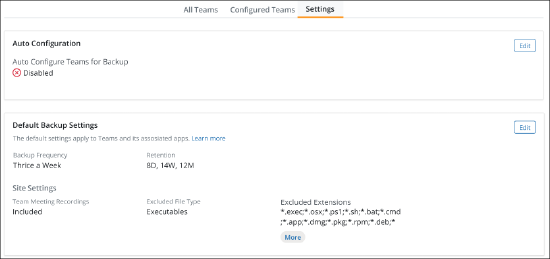
A list of all the discovered Teams is displayed. - Go to the Settings tab. From the Auto Configuration section, click Edit.
The Edit Auto Configuration popup is displayed.
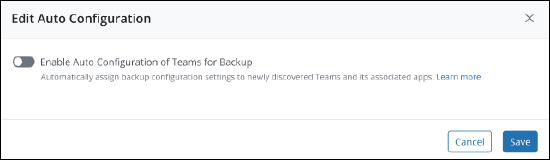
- Turn on the Enable Auto Configuration of Teams for Backup option if you want to automatically assign backup configuration settings to newly discovered Teams and its associated apps.
The Edit Auto Configuration window is displayed.
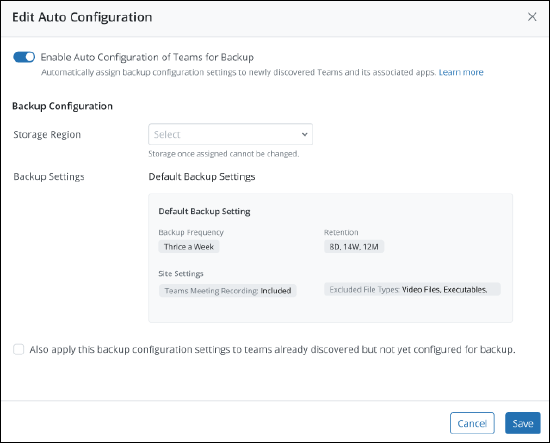
- Select the storage to be assigned to the discovered Teams.
Note: The default backup settings from the profile will be applied. - Select the checkbox if you want to apply these backup configuration settings to Teams already discovered but not yet configured for backup.
- Click Save.

Manual configuration
Use this method to manually assign backup configuration settings to Teams and its associated apps. Refer to the following video for a quick preview.
- Sign in to Druva Cloud Platform Console and navigate to Microsoft 365 > Teams.
A list of all the discovered Teams is displayed. - Select the Team(s) that you want to configure for backup and click Configure for Backup.
- Enter the name or email address of the Team(s) to be backed up.
- Select the storage region. Storage once assigned cannot be changed.
- Use either default or custom backup settings.
- Default backup settings - Default settings are already defined in the profile. To edit the default backup settings, see Edit default backup settings.
- Custom backup settings
- Backup Frequency - Select the frequency of backups for Teams. For scheduled backups, at least one AD Connector should be registered and connected to inSync Cloud. For more information see Prerequisites to back up SaaS Apps data.
- Retain daily data backups for - Type the number of days that you want to retain all backups.
At the end of the backup period, inSync will delete the data from the storage.
For example, if you specify that you want to retain all backups for 5 days and inSync completed the backup operation on January 6, 2023, inSync will delete the backup data from the storage on January 11, 2023.
-
Data Lock - Enables the Data Lock feature. For more information, see Data Lock.
Note: Only Cloud Administrators can enable the Data Lock feature.
To enable the Data Lock feature, select the Enable Data Lock checkbox and on the confirmation window, click Yes. On the summary page, the Data Lock status is displayed as enabled. These details will be captured in the Admin Audit Trail for auditing purposes.
Note: Once you enable the Data Lock feature, you cannot:
- Delete the snapshots.
- Edit the retention period.
- Disable the Data Lock setting.
- Go back to default settings.
- Site Settings
- Exclude Teams Meeting Recordings -
The backups will exclude all files from the default folder path of Teams Meeting Recordings (TMR) by default. This setting applies to Teams sites only.
The default folder path is /Channel name/Documents/Recordings.
If you want to back up TMR files, enable this setting.
Notes:
- The first backup after disabling the exclusion setting will be a full scan backup.
- To avoid a full scan backup of all configured sites, disable the exclusion setting only for those sites where you have a requirement to back up TMR files.
For more information, see Exclusion of Teams Meeting Recordings from backups.
-
Exclude File Types and Extensions - Type the file types that you want to exclude from the backup of a SharePoint site collection. The file extensions are automatically added to the adjacent field. If you want to remove a file type, click the file type.
-
Exclude Relative URL Paths - Specify the relative URL path of a subsite, Document Library, or List separated by a semicolon to exclude the specified paths from SharePoint backup.
- Exclude Teams Meeting Recordings -
- Click Save.
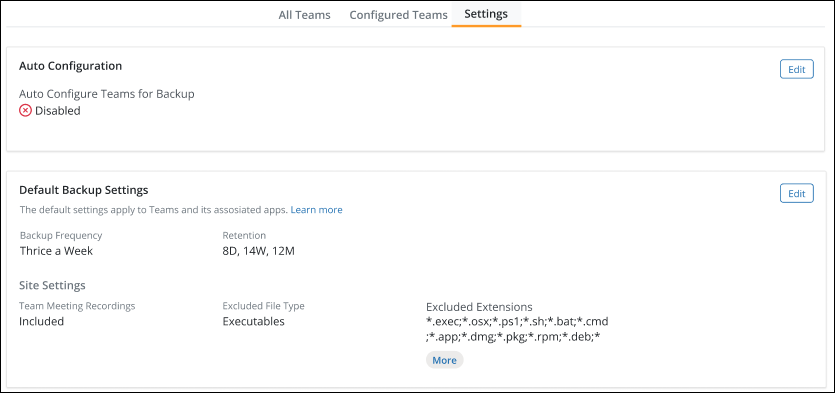
Edit default backup settings
Edit the default backup settings to change the backup and retention settings from the default profile. To do that:
- Go to the Settings tab.
- From the Default Backup Settings section, click Edit.
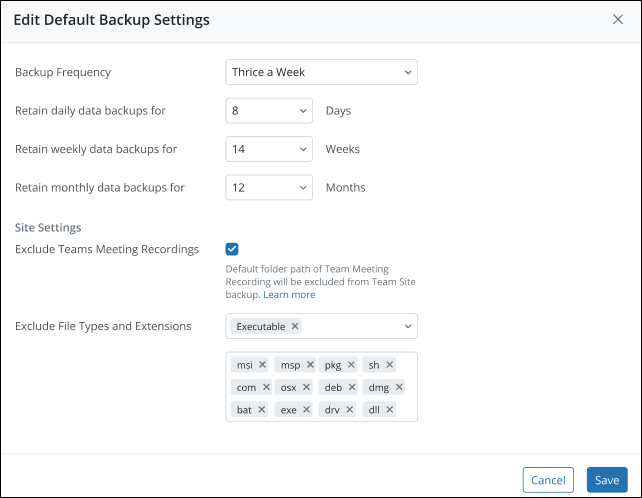
The Edit Default Backup Settings window is displayed.

- Select the frequency of backups. By default, it is once a day. You can change it to Twice a Day, Thrice a Week, Twice a Week, or Once a Week. For more information, see Define backup interval for SaaS Apps.
- In the Retain daily data backup for fields, specify the number of days, weeks, or months for which you want to retain all backups. At the end of the backup period, inSync will delete the data from the storage. For example, suppose you specify that you want to retain all backups for five days and inSync completed the backup operation on January 6, 2022. In that case, inSync will delete the backup data from the storage on January 11, 2022.
Note: To retain the backups for an unlimited period, enter 0 as the value for all daily, weekly, and monthly retention settings.
- Select the Exclude Teams Meetings Recordings checkbox to exclude the default folder path of Teams Meeting Recordings (TMR) from the backup.
- In the Exclude File Types and Extensions field, specify the file types that you want to exclude from the backup of a SharePoint site collection. The file extensions are automatically added to the adjacent field. If you want to remove a file type, click the file type.
- Click Save.