Configure Druva inSync to protect Public folder data
The availability of this feature may be limited based on the license type, region, and other criteria. To access this feature, contact your Account Manager or Support.
Before you begin
Before you initiate inSync configuration to protect Public folder data, ensure that you have the following accounts created.
Microsoft 365 global administrator account with a valid Microsoft 365 license.
Log into inSync Management Console as a inSync Cloud administrator and perform the following steps to set-up inSync to protect Public folder.
Step 1: Provide inSync permissions to access Public folders data
To begin with Public folder data backup, you need to authorize inSync with Public folder app data access. For procedure with screenshots, see Configure Druva inSync for Microsoft 365.
Once you initiate app configuration from the inSync Management Console, the application redirects you to the Microsoft 365 login page. Log in as a Global Administrator to review the requested app permissions and grant access to the app data. To know more about the requested permissions and their purpose, check the Microsoft 365 App Permissions for Druva App article.
inSync communicates with Microsoft 365 services using OAuth 2.0, an open protocol for token-based authentication and authorization. For more information, see the OAuth website.
Support for Azure Active Directory (AD) Conditional Access policies
If your organization uses Azure AD Conditional Access policies for authenticating and providing conditional access to users, the app configuration step will adhere to these policies. For more information, see Support for Azure Active_Directory (AD) Conditional Access policies.
After you complete the configuration of inSync with Microsoft 365 app, you can use the Verify Configuration option to check if inSync can access your users. For information about verifying configuration, see Configure Druva inSync for Microsoft 365.
Step 2: Get data encryption key (ekey)
To ensure that the Microsoft 365 data that is backed up is secure, you must configure inSync to get the data encryption key (ekey). For information about configuring inSync to get the data encryption key, see Configure Druva inSync for Microsoft 365.
Step 3: Configure Public folders for backup and restore
The settings that you define automatically applies to all subsequent auto-discovered Public folder. You can also change the settings of any auto-discovered Public folder.
You can configure Public folder for backup and download in the following ways:
Note: Microsoft has a size limit of 100 GB for Public folder. If the Public folder size exceeds 100 GB, the backup might have some issues. For information about supported limits for Public folder, see Microsoft documentation.
3.1 Auto Configuration of Public folders
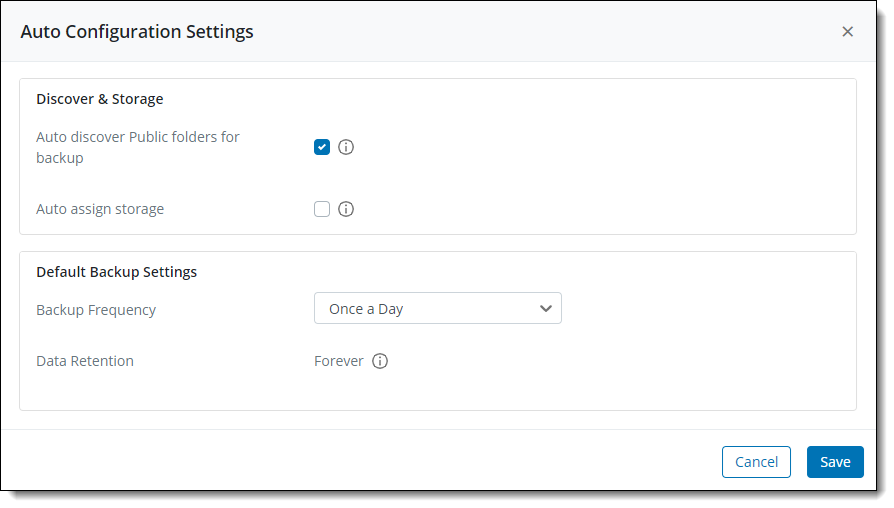
Use the Auto Configuration Settings (Default) option to automatically detect any new Public folder and to apply the global or same backup schedule to each of the newly discovered and configured Public folder.
- Sign in to Druva Cloud Platform Console and navigate to Microsoft 365 > Public folder.
A page that lists all the discovered Public folder appears.
The status of all the discovered Public folder by default is set as Not Configured.
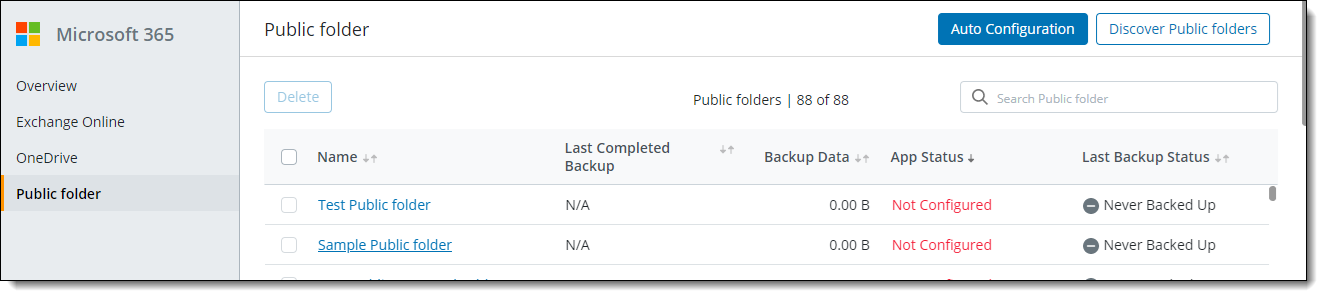
- Click Auto Configuration. Enter the following details in the Auto Configuration wizard and click Save.
| Field | Description |
|---|---|
| Discover & Storage | |
| Auto discover Public folders for backup |
Select this checkbox if you want inSync to automatically discover new Public folder added to the Public folder setup of your organization. inSync runs the discovery process every 24 hours. This setting is enabled by default.
|
| Auto assign storage |
Select this checkbox if you want inSync to automatically assign storage for any newly discovered Public folder. It is mandatory for a Public folder to be assigned storage for inSync to back it up. |
| Select Storage |
Displays all the configured storage regions. Select storage from the list. Storage once assigned cannot be changed later. |
| Default Backup Settings | |
|
Backup frequency |
Select the frequency of backups for Public folder. By default, it is once a day. You can set the frequency as per your need. |
|
Data Retention |
By default, data retention is set to Forever that is, unlimited retention. |
3.2 Custom configuration of Public folders for backup
Use the custom configuration option to provide a different configuration and backup settings for each of the discovered Public folder.
- Sign in to Druva Cloud Platform Console and navigate to Microsoft 365 > Public folder.
A page that lists all the discovered Public folder appears.
The status of all the discovered Public folder by default is set as Not Configured.
For more information about the status of discovered Public folder, see Public folder status.
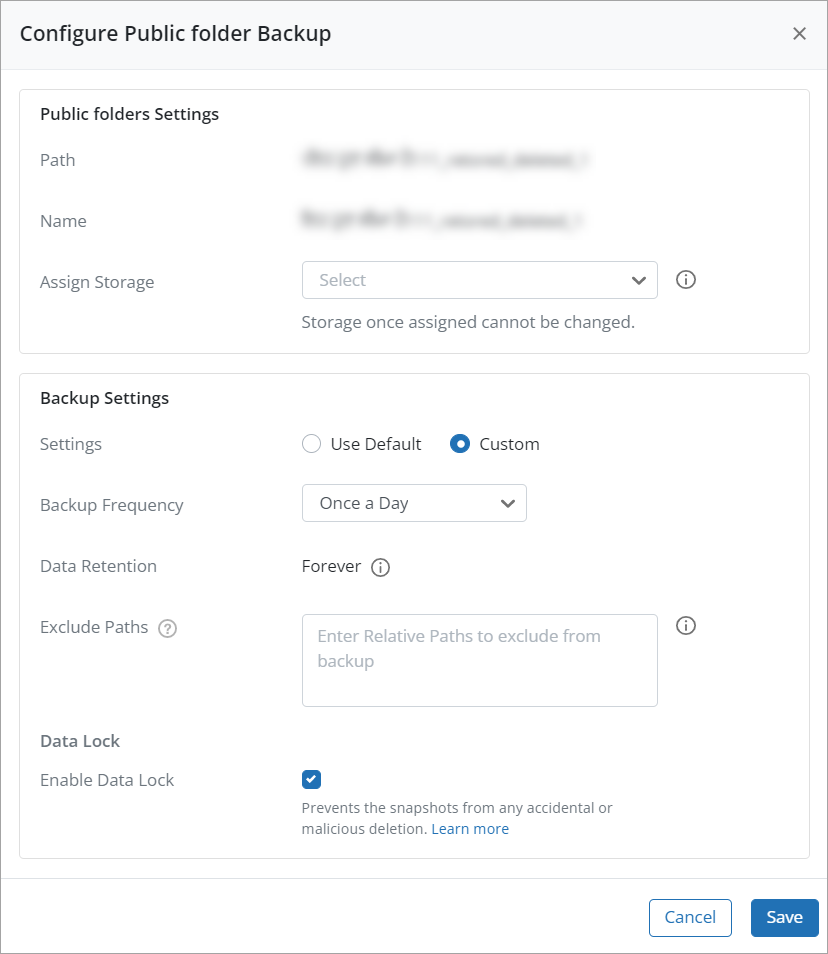
- Click the Public folder name that you want to configure for backup and restore. The Configure Public folder Backup page appears.
- If you choose to use the Use Default option, review the details, and click Save. If you have selected the Custom option, enter the following details, and click Save.
| Field | Description |
|---|---|
| Summary | |
| Path | \<Public folder name> |
| Name | Displays the name of the Public folder. |
| Assign storage |
Select storage from the drop-down list. Storage once assigned cannot be changed later. |
| Backup Settings | |
| Settings |
Displays the backup and retention policy settings that you want to apply to this Public folder. The following options are available:
|
|
Backup frequency |
Select the frequency of backups for the Public folder.
If you have selected Custom, then you have the option to select and set the desired backup frequency.
|
|
Data Retention |
By default, data retention is set to Forever that is, unlimited retention. |
|
Exclude Paths |
This option is displayed only if you have selected Custom settings for backup and retention. In the Exclude Paths box, specify the relative URL path of a Public folder separated by a semicolon to exclude the specified paths from Public folder backup.
|
| Data Lock |
Enables the Data Lock feature. For more information, see Data Lock. To enable the Data Lock feature, select the Enable Data Lock checkbox and on the confirmation window, click Yes. On the summary page, the Data Lock status is displayed as enabled. These details will be captured in the Admin Audit Trail for auditing purposes.
|
Congratulations! You have completed the configuration successfully.
Related topics