Manage Site Collections for SharePoint Online
Overview
Configure inSync to automatically discover any new site collections. Alternatively, you can manually define SharePoint site collection discovery and configuration settings.
Discover Sites manually
To start using filters, discover sites again. Note that this action will not impact any of your existing backup and restore settings.
If the Auto discover sites for backup option is enabled, inSync auto-discovers new site collections every 24 hours. If you want inSync to discover any new site before the next auto-discovery process runs, follow this procedure:
- Sign in to Druva Cloud Platform Console and navigate to Microsoft 365 > SharePoint.
- Click
 to discover sites.
inSync discovers the sites added to the SharePoint Online setup of your organization after the last auto-discovery process.
If the Multi-Geo feature is enabled for the Microsoft 365 tenant and if there are sites discovered with new geo locations, a notification message is displayed. For more information, see Multi-Geo support for SharePoint Online and Teams.
When a particular SharePoint site is deleted from Microsoft 365, the App Status of that site changes to Disabled in inSync. ESITENOTFOUND error is displayed in Status Details when you initiate a backup for this site. The discovery and scheduled backups for these sites are excluded in the subsequent discovery and backup cycle. However, you can perform a restore of these sites.
Edit Site Collection
- Sign in to Druva Cloud Platform Console and navigate to Microsoft 365 > SharePoint.
- Click a configured site collection that you want to edit.
- On the Summary tab under Site Settings, click Edit. The Edit Site Collection window appears.

- Edit the required details and click Save.
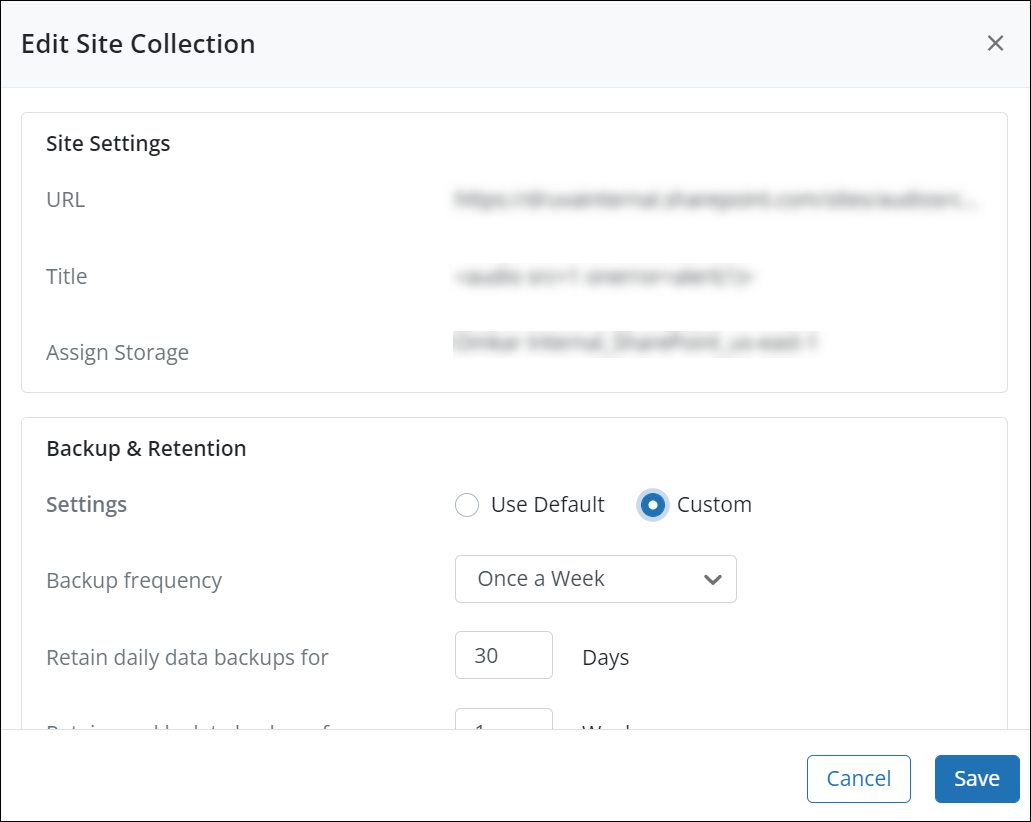
If you have selected Custom as the option for backup and retention settings, use the Relative Paths URL option to exclude any specific subsites, Document Libraries, List, or Folder nested under a subsite from getting backed up.
Edit default backup settings
Edit the default backup settings to change the backup and retention settings from the default profile. To do that:
- Go to the Settings tab.
- From the Default Backup Settings section, click Edit.
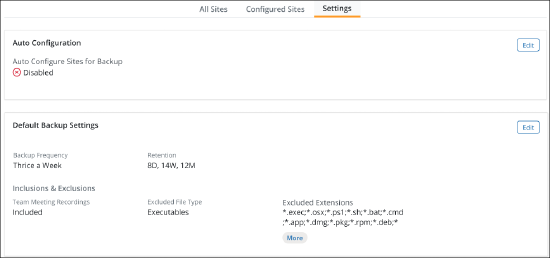
- The Edit Default Backup Settings window is displayed.
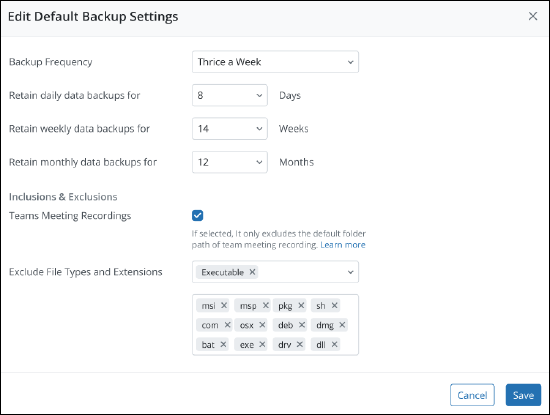
- Select the frequency of backups. By default, it is once a day. You can change it to Twice a Day, Thrice a Week, Twice a Week, or Once a Week. For more information, see Define backup interval for SaaS Apps.
- In the Retain daily data backup for fields, specify the number of days, weeks, or months for which you want to retain all backups. At the end of the backup period, inSync will delete the data from the storage. For example, suppose you specify that you want to retain all backups for five days and inSync completed the backup operation on January 6, 2022. In that case, inSync will delete the backup data from the storage on January 11, 2022.
Note: To retain the backups for an unlimited period, enter 0 as the value for all daily, weekly, and monthly retention settings. - Select the Teams Meetings Recordings checkbox to exclude the default folder path of Teams Meeting Recordings (TMR) from the backup.
- In the Exclude File Types and Extensions field, specify the file types that you want to exclude from the backup of a SharePoint site collection. The file extensions are automatically added to the adjacent field. If you want to remove a file type, click the file type.
- Click Save.

Change the data retention policy for a SharePoint site
Note: You cannot edit the data retention policy for a site if it is enabled with Data Lock.
- Sign in to Druva Cloud Platform Console and navigate to Microsoft 365 > SharePoint.
- Click the site name for which you want to configure the data retention.
- In the Site Settings section, click Edit.
- In the Backup & Retention section, for Settings select Custom and provide the appropriate information for each field.
| Field | Description |
|---|---|
| Retain daily data backups for |
Type the number of days that you want to retain all backups. At the end of the backup period, inSync will delete the data from the storage. For example, if you specify that you want to retain all backups for 5 days and inSync completed the backup operation on January 6, 2017, inSync will delete the backup data from the storage on January 11, 2017. |
| Retain weekly data backups for |
Type the number of weeks that you want to retain all backups. At the end of the weekly backup period, inSync deletes the data from the storage. Note: The weekly backup is the last backup in a calendar week. The calendar week starts on Sunday. |
| Retain monthly data backups for |
Type the number of months that you want to retain all backups. At the end of the monthly backup period, inSync deletes the data from the storage. Note: The monthly backup is the last backup in a calendar month. |
For the default data retention settings for Sharepoint Sites, see Auto configuration of SharePoint sites.
Disable backup for Site Collections
As an administrator, you can disable backups of Site Collections that are configured for backup.
When you disable backup of Site Collections, inSync stops backing up data for those sites and retains the previously backed-up data.
If a backup is in progress, inSync completes the backup and then disables backup for those site collections.
- Sign in to Druva Cloud Platform Console and navigate to Microsoft 365 > SharePoint.
A page that lists all the discovered sites appears. - Select the site title that you want to disable. Click the
 icon and click Disable. A confirmation dialog box appears. Click Disable.
When a particular SharePoint site is deleted from Microsoft 365, the App Status of that site changes to Disabled in inSync. ESITENOTFOUND error is displayed in Status Details when you initiate a backup for this site. The discovery and scheduled backups for these sites are excluded in the subsequent discovery and backup cycle. However, you can perform a restore of these sites.
Enable backup for Site Collection
By default, when you configure SharePoint for backup, it is automatically enabled for backup.
- Sign in to Druva Cloud Platform Console and navigate to Microsoft 365 > SharePoint.
A page that lists all the discovered sites appears. - Select the disabled site title that you want to enable. Click the icon and click Enable. A confirmation dialog box appears. Click Enable.
Delete Snapshots
You can delete maximum 20 snapshots at a time. Snapshots in the data locked user profile cannot be deleted.
- Sign in to Druva Cloud Platform Console and navigate to Microsoft 365 > SharePoint Online.
- Click the user of which you want to delete the snapshot.
- Go to the Backups tab, select the snapshot(s) that you want to delete and then click the Delete Snapshot button.
- Enter the reason for deletion and click Delete. (The reason is mandatory with a character limit between 10-150. The reason for deletion will be captured in the Admin Audit trail for auditing purposes.)
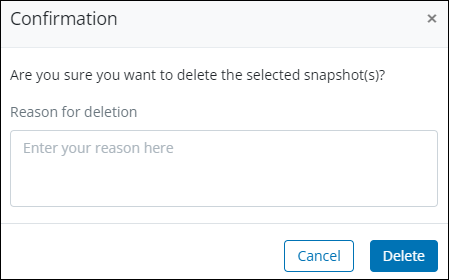
Snapshot(s) deleted successfully message displays.
Notes:
- The SharePoint Online snapshot(s) will be deleted temporarily. You can rollback the deleted SharePoint Online snapshot(s) within a configurable rollback window. After the rollback window expires, the SharePoint Online snapshot(s) will be deleted permanently. See Rollback Actions for details.
- To use Rollback Actions, you need the Security Essentials license. Contact Support to obtain the license. Currently, this feature is available only for Druva Public Cloud customers.
Download Failed Item List
Procedure:
-
Sign in to Druva Cloud Platform Console and navigate to Microsoft 365 > SharePoint Online.
-
Under the Last Backup Status column, click backed up with errors.
-
On the activity details page, click the Download Failed Items List.
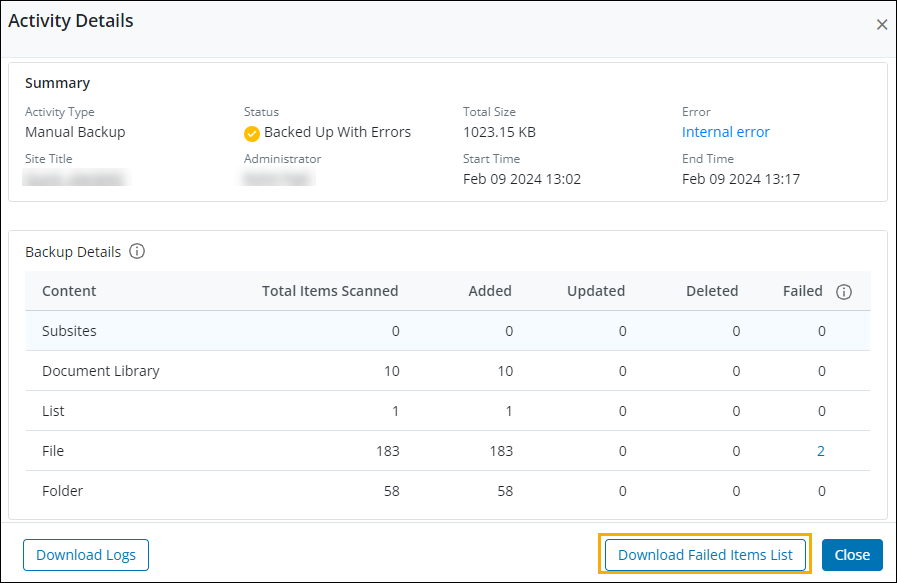
It downloads the document containing the list of failed items.
Delete Site Collection
Deleting a site collection will stop any ongoing backup, restore, or download tasks.
Note: You cannot delete a site if it is enabled with Data Lock.
- Sign in to Druva Cloud Platform Console and navigate to Microsoft 365 > SharePoint.
A page that lists all the discovered sites appears. - Select the site title that you want to delete. Click Delete. A confirmation dialog box appears.
-
On the confirmation window, specify the reason for deletion (the reason is mandatory with a character limit between 10-150). The reason for deletion will be captured in the Admin Audit trail for auditing purposes.
- Click Delete. The SharePoint site will be deleted temporarily. You can rollback the deleted site within a configurable rollback window. After the rollback window expires, the SharePoint site will be deleted permanently. See Rollback Actions for details.
To use Rollback Actions, you need the Security Essentials license. Contact Support to obtain the license. Currently, this feature is available only for the Public Cloud customers.
Rollback Considerations: You cannot rollback a Sharepoint site if you delete it, add the same site (through auto-discovery or another method) while the deleted site resides in Rollback Actions, and try to rollback the deleted site.