Manage Public folder
The availability of this feature may be limited based on the license type, region, and other criteria. To access this feature, contact your Account Manager or Support.
Overview
Configure inSync to automatically discover any new Public folder. Alternatively, you can manually define Public folder discovery and configuration settings.
You can perform the following tasks to manually manage Public folder using inSync.
Edit Public folder settings in inSync
Perform the following steps to modify and update the existing Public folder settings.
- Sign in to Druva Cloud Platform Console and navigate to Microsoft 365 > Public folder.
- Click a configured Public folder that you want to edit.
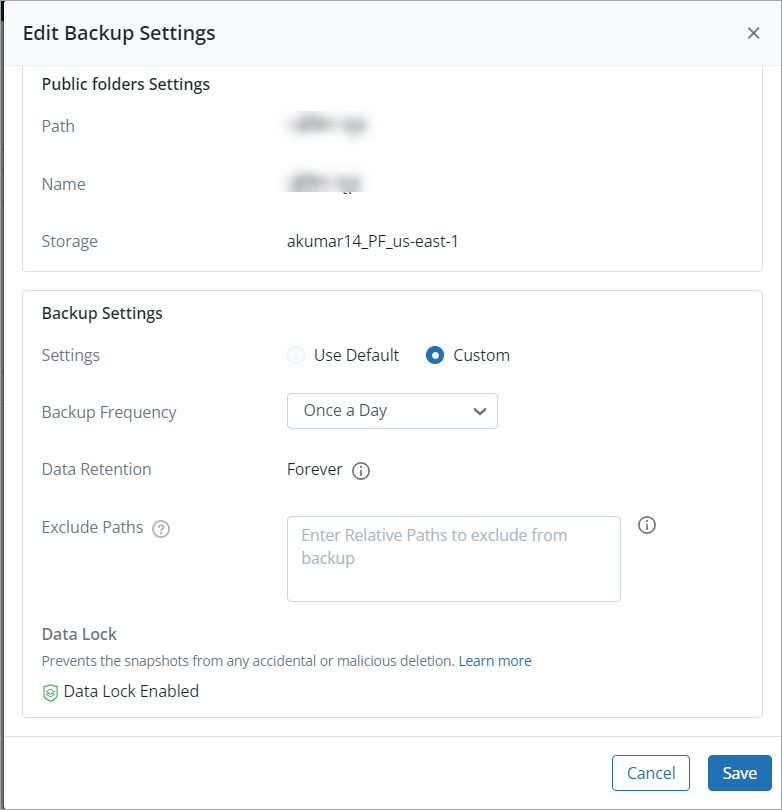
- On the Summary tab under Public folder, click Edit. The Edit Public folder window appears.
- Edit the required details and click Save.
Discover Public folders
If the Auto discover Public folders for backup checkbox under the Auto Configuration Settings is enabled, inSync automatically discovers new Public folder every 24 hours. If you want inSync to discover any Public folder before the next auto-discovery process runs, perform the following steps.
- Sign in to Druva Cloud Platform Console and navigate to Microsoft 365 > Public folder.
- Click Discover Public folders. inSync discovers the Public folder added within your organization after the last auto-discovery process.
If the Auto-assign storage option is enabled, inSync assigns the selected storage and the default backup and retention policies to the Public folder. The discovered Public folder appears on the Public folder list page with App Status as Enabled. If the Auto-assign storage option is disabled, the App Status is Not Configured. - (OPTIONAL) Click the Public folder you want to configure. The Configure Public folder Backup page appears.
- (OPTIONAL) On the Configure Public folder Backup Backup page, enter the required details and click Save. When the Public folder is successfully configured the App Status changes to Enabled.
Enable backup for Public folders
By default, when you configure Public folder for backup, it is automatically enabled for backup.
If you disable backup for Public folder , inSync retains previously backed up data.
Procedure
To enable backup for previously disabled Public folder:
- Sign in to Druva Cloud Platform Console and navigate to Microsoft 365 > Public folder.
A page that lists all the discovered Public folder appears. - Click the disabled Public folder name that you want to enable.
- In the right pane, on the Summary tab, click the
 icon beside Backup Now and click Enable.
 - Click Enable on the confirmation dialog box that appears to enable the Public folder.
inSync now starts backing up the data in accordance with the set backup schedule.
Disable backup for Public folders
As an administrator, you can disable backup of Public folder that are configured for backup.
When you disable backup of Public folder, inSync stops backing up data for those Public folder and retains the previously backed-up data.
If a backup is in progress, inSync completes the backup and then disables backup for that Public folder.
Procedure
To disable backup for Public folder,
- Sign in to Druva Cloud Platform Console and navigate to Microsoft 365 > Public folder.
A page that lists all the discovered Public folder appears. - Click the enabled Public folder name that you want to disable.
- In the right pane, on the Summary tab, click the icon beside Backup Now and click Disable.
- Click Disable on the confirmation dialog box that appears to disable the selected Public folder .
inSync stops backing up data of the selected Public folder.
In the future, if you want to back up these Public folders again, you can enable the backup using the Enable option.
Delete Public folders from inSync
As an administrator, you can delete Public folder configured for backup anytime from inSync.
- When you delete Public folder, inSync permanently deletes all the data backed up for those Public folder.
- You can delete Public folder for which the backup is in progress.
- You cannot delete a Public folder if it is enabled with Data Lock.
To delete Public folder from inSync:
- Sign in to Druva Cloud Platform Console and navigate to Microsoft 365 > Public folder.
- Select the Public folder name that you want to delete.
- Click Delete.
-
On the confirmation window, specify the reason for deletion (the reason is mandatory with a character limit between 10-150). The reason for deletion will be captured in the Admin Audit trail for auditing purposes.
- Click Delete. All the data backed up for the Public folder will be deleted temporarily. You can rollback the deleted Public folder within a configurable rollback window. After the rollback window expires, the Public folder will be deleted permanently. See Rollback Actions for details.
To use Rollback Actions, you need the Security Essentials license. Contact Support to obtain the license. Currently, this feature is available only for the Public Cloud customers.
Rollback Considerations: You cannot rollback Public folder if you delete it, add the same Public folder (through auto-discovery or another method) while the deleted Public folder resides in Rollback Actions, and try to rollback the Public folder .
Public folder mailbox autosplit
As content grows over time for your Public folder data, Microsoft 365 handles the management of your Public folder mailboxes wherein:
- The mailboxes are automatically split as the mailbox quota usage exceeds the threshold limit.
- The autosplit ensures the mailboxes can accept the growing Public folder content over time.
For more information, see the Microsoft blog post for the Public folder mailbox autosplit scenario.
If mailboxes are split for any of your existing Public folders, the Public folder workload selection page will display a duplicate folder in the disabled state with -old suffix in the name of the Public folder.
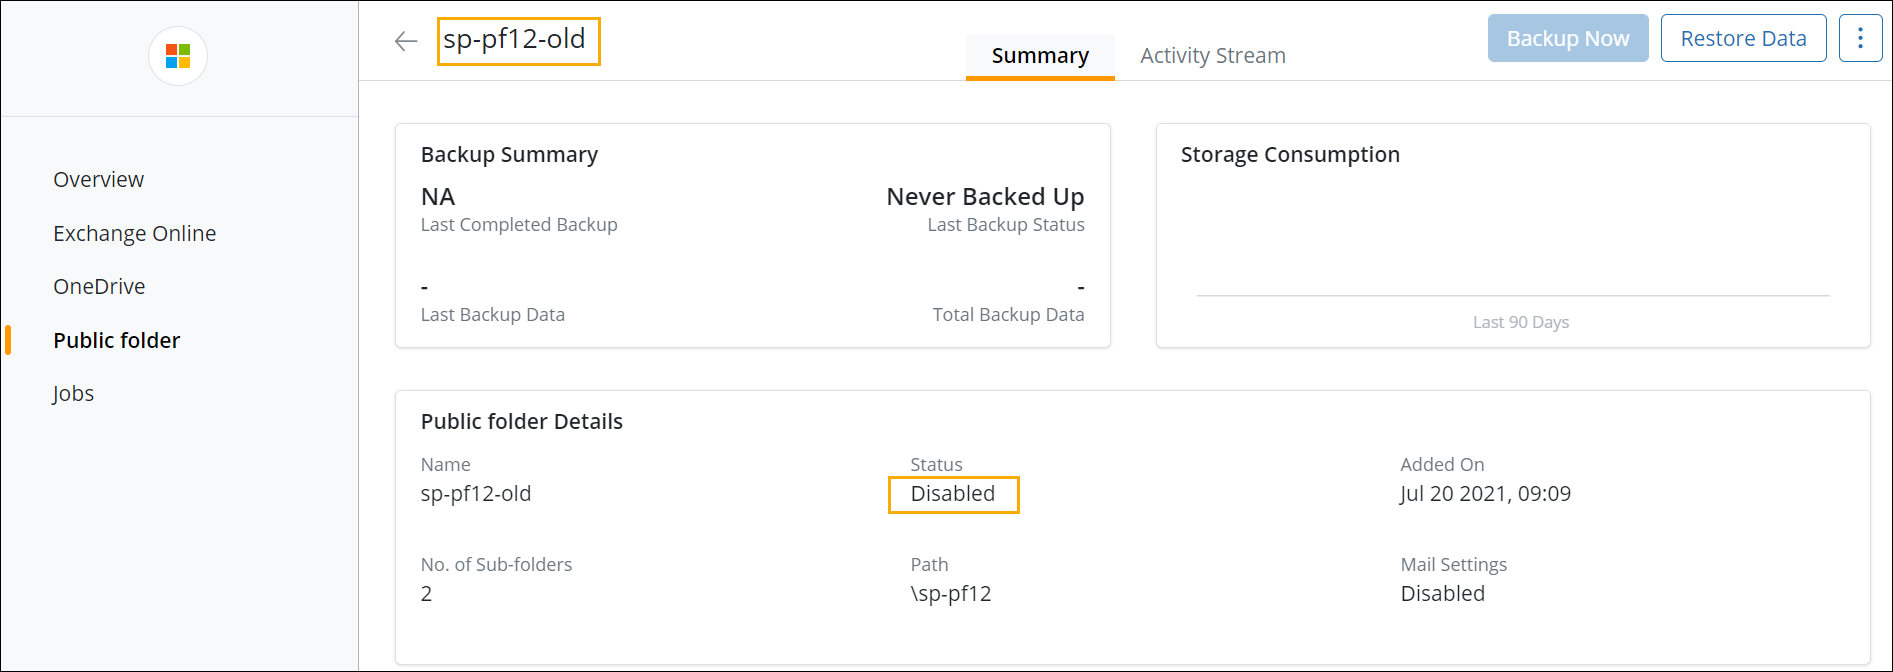
Note: You must delete duplicate folders to manage your Public folders efficiently.
Add Public folder manually
- Sign in to Druva Cloud Platform Console and navigate to Microsoft 365 > Public folder.
- Click the
 icon beside Auto Configuration and select Add Public folder. The Add Public folder window appears.
 - Enter the following details and click Save.
| Field | Description |
|---|---|
| Path | Type the Public folder path. |
| Name | Displays the Public folder name based on the path provided. |
| Assign storage |
Select storage from the drop-down list. Storage once assigned cannot be changed later. |
| Backup Settings | |
| Settings |
Displays the backup and retention policy settings that you want to apply to this Public folder. The following options are available:
|
| Backup Frequency |
Select the frequency of backups for the Public folder. If you have selected the Use Default option, the value is displayed based on the default backup frequency value set. To customize or update the backup frequency for a Public folder, use the Custom settings option. |
| Data Retention | By default, data retention is set to Forever that is, unlimited retention. |
| Exclude Paths |
This option is displayed only if you have selected Custom settings for backup and retention. In the Exclude Paths box, specify the relative URL path of a Public folder separated by a semicolon to exclude the specified paths from Public folder backup.
|
| Data Lock |
Enables the Data Lock feature. This setting is available in the custom section. For more information, see Data Lock. To enable the Data Lock feature, select the Enable Data Lock checkbox and on the confirmation window, click Yes. On the summary page, the Data Lock status is displayed as enabled. These details will be captured in the Admin Audit Trail for auditing purposes.
|