Restore Exchange Online data
Overview
Restoring data like mails, notes, contacts, calendars, and tasks benefits an organization by ensuring the restored data is available for future reference and business continuity. Organizations can retrieve this data in case of accidental deletion or malicious activities. inSync also allows you to restore an entire mailbox or mailbox items individually such as Mails, Notes, Contacts, Calendars, and Tasks.
- An inSync Cloud administrator can restore Exchange Online data using the inSync Management Console
- An inSync end user can restore Exchange Online data using the inSync Web.
An inSync Cloud administrator can restore Exchange Online data to the following locations:
- To the same user's account from where the data was backed up.
- User's desktop or to a custom location on the user's device. If the user has multiple devices, you can choose the device you want to restore the Exchange Online data.
- Different user's account.
For restore, you can also search to easily find and restore selected files and emails.
Notes:
- You cannot restore Microsoft 365 data to a mobile device.
- Administrator will be able to see the snapshots of Exchange Online devices in the UTC time zone.
- Considerations while restoring Exchange online folders with restricted characters folder name:
- The folders are renamed when you restore as a copy.
- In-place restore works correctly only when you restore a single folder. The folders are renamed when you restore multiple folders.
- If you want to restore to another mailbox then the target mailbox must be added as an inSync user in the inSync administrator console to restore a separate user account; otherwise, the target user will not be visible in the restore user interface.
- If you have configured the Recoverable Items folder for backup, you can view the folder and its contents by clicking the individual Exchange Online item.
- Before initiating a restore, ensure you have sufficient mailbox storage space.
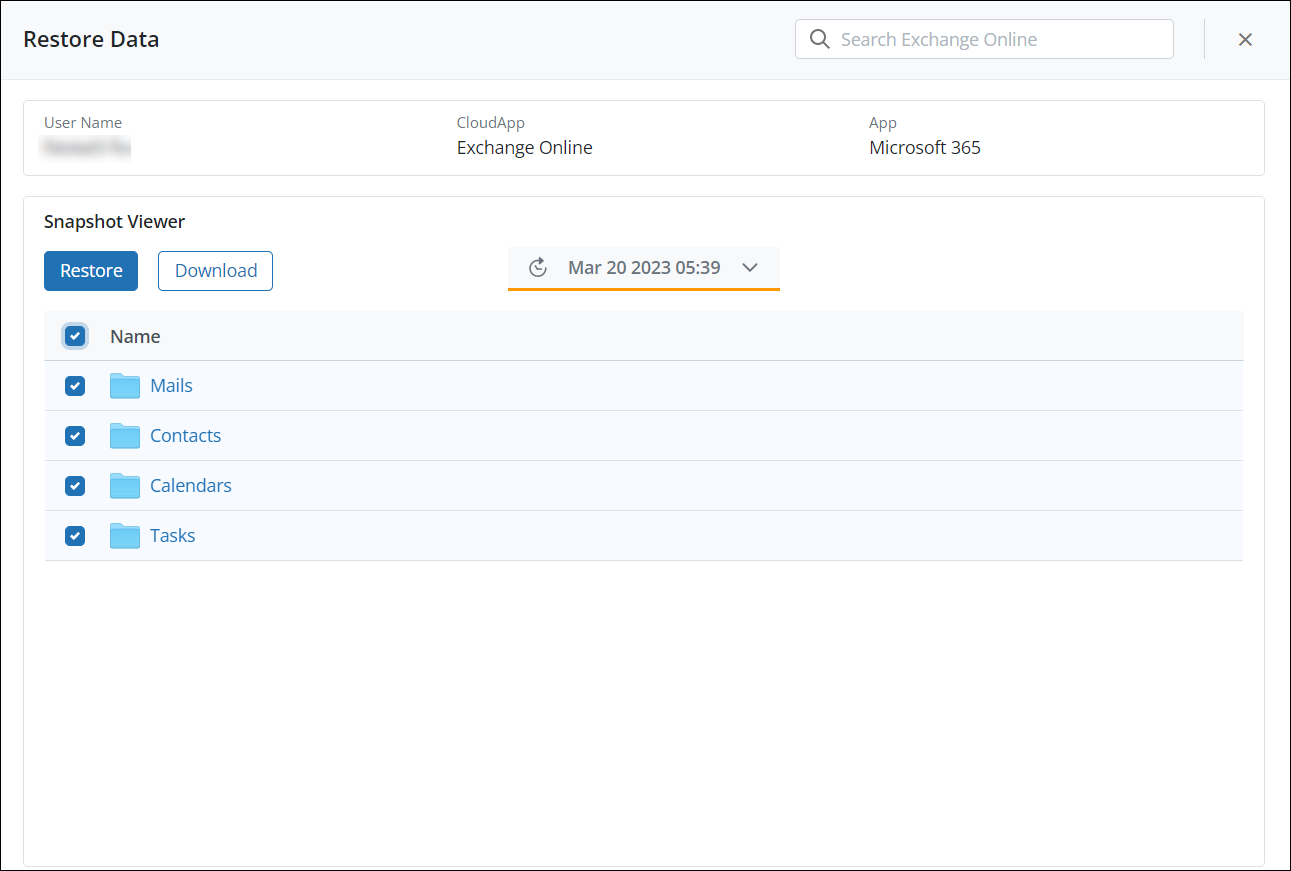
You can restore an entire mailbox or mailbox items individually such as Mails, Contacts, Calendars, Notes, and Tasks.
Restore entire mailbox
You can restore the entire mailbox of a user in a single click.
To restore entire mailbox of a user:
- Sign in to inSync Management Console and navigate to Microsoft 365 > Users.
- On the Users page, click the username of the user whose data you want to restore and click Restore Data. Under Select a data source, select Exchange Online.
- Select the snapshot you want to restore on the Restore Data window.
- Select all or desired folders click Restore.
- On the Restore Exchange Online window, provide the following details:
| Field | Action |
|---|---|
| Restore Location |
Restore to the same User Account: Select this option to restore the data to the same user’s account. Restore to the Different User Account: Select this option to restore the data to a different or another user’s account. Enter Name or Email: Start typing the name or email of the user, and inSync will auto-suggest usernames. Select the required username.
|
| Include In-Place Archive mails |
Select this option to restore the In-Place Archive emails.
|
|
Restore Options |
Select how you want to restore the data. In-Place Restore: Overwrites the existing data with the data selected from the snapshot. Restore Deleted items Only: This option is available only when you select In-Place Restore and restores only the deleted emails to the respective folder locations within the primary mailbox. Restore as a Copy: Creates a new inSync-Restore-<date stamp>-<time stamp> folder and restores the selected snapshot to this folder.
|
-
Click Restore.
Restore mailbox items individually
You can restore mailbox items individually such as Mails, Notes, Contacts, Calendars, and Tasks.
Restore Mails
To restore Mails:
- Sign in to inSync Management Console and navigate to Microsoft 365 > Users.
- On the Users page, click the username of the user whose data you want to restore and click Restore Data. Under Select a data source, select Exchange Online.
- Select the snapshot you want to restore on the Restore Data window.
- Do one of the following:
- To restore emails, select Mails folder and click Restore. On the Restore Exchange Online window, provide the following details.
- Select the mailbox folders or emails that you want to restore.
Alternatively, you can also use Search to search for emails that you want to restore. Click the email to view its details like sender, receiver, attachments, and so on. On the Restore Exchange Online window, provide the following details:
| Field | Action |
|---|---|
| Restore Location |
Restore to the same User Account: Select this option to restore the mails to the same user’s account. Restore to the Different User Account: Select this option to restore the mails to a different or another user’s account Enter Name or Email: Start typing the name or email of the user, and inSync will auto-suggest usernames. Select the required username.
|
| Include In-Place Archive mails |
Select this option to restore the In-Place Archive emails.
|
|
Restore Options |
Select how you want to restore the data. In-Place Restore: Overwrites the folders or mails in the user's primary mailbox with the folders/emails selected for restore.
Restore Deleted items Only: Restores only the deleted emails to the respective folder in the user's primary mailbox. Restore as a Copy: Creates a new inSync-Restore-<date stamp>-<time stamp> folder within the selected folder and restores the data to this folder.
|
- Click Restore. During the restore activity, inSync creates an inSync-restore-<date stamp>-<time stamp> folder inside the user's mailbox and restores all emails in this folder.
Note:
- While restoring mails as a copy on Exchange Online, inSync might display an "ErrorFolderSavePropertyError" error. This error is displayed when inSync tries to restore a folder that has more than 255 characters in its name. This is an API limitation.
- To restore folders within migrated data, it is recommended to restore the folders as a copy. Currently inSync does not support In-Place restore for folders within the migrated data.
- Folders containing emails with around 15K email IDs in CC or BCC are not restored.
Restore Notes
To restore Notes:
- Sign in to inSync Management Console and navigate to Microsoft 365 > Users.
- On the Users page, click the username of the user whose data you want to restore and click Restore Data. Under Select a data source, select Exchange Online.
- Select the snapshot you want to restore on the Restore Data window.
- To restore Notes, select Mails > Notes.
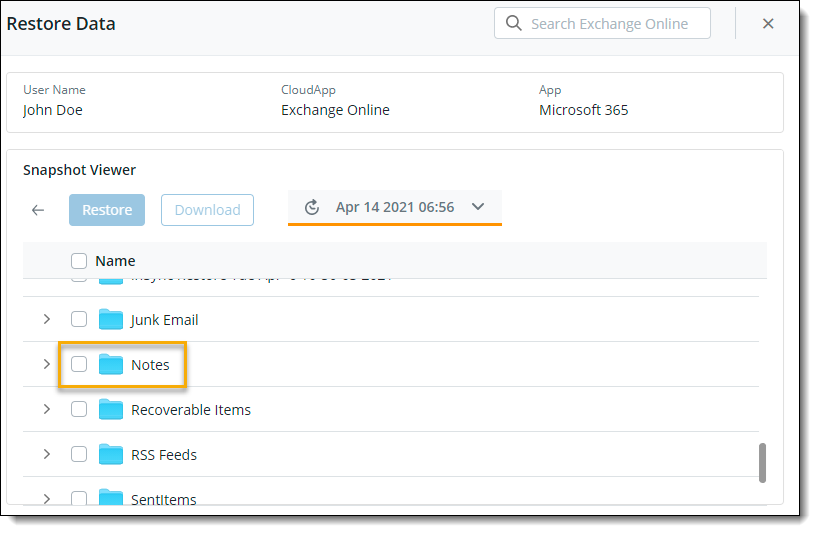
- Do one of the following:
- To restore the entire notes folder, select Notes and click Restore.
- To restore an individual note, click Notes. Browse and select the required note that you want to restore and click Restore.
Alternatively, you can also use Search to search for specific notes that you want to restore.
- On the Restore Exchange Online window, provide the following details:
| Field | Action |
|---|---|
| Restore Location |
Restore to the same User Account: Select this option to restore the notes to the same user’s account. Restore to the Different User Account: Select this option to restore the notes to a different or another user’s account Enter Name or Email: Start typing the name or email of the user, and inSync will auto-suggest usernames. Select the required username.
|
| Restore Options |
Select how you want to restore the data. In-Place Restore: Overwrites the existing data with the data selected from the snapshot. Restore Deleted items Only: This option is available only when you select In-Place Restore and restores only the deleted emails to the respective folder locations within the primary mailbox.
Restore as a Copy: Creates a new inSync-Restore-<date stamp>-<time stamp> folder and restores the selected snapshot to this folder. |
- Click Restore. Based on the selected Restore Options, inSync restores the selected Notes as mail to the user's mailbox.
Note:
- You cannot perform search for specific notes using the search option.
Restore Contacts
To restore Contacts:
- Sign in to inSync Management Console and navigate to Microsoft 365 > Users.
- On the Users page, click the username of the user whose data you want to restore and click Restore Data. Under Select a data source, select Exchange Online.
- Select the snapshot you want to restore on the Restore Data window.
- Do one of the following:
- To restore all contacts, select Contacts and click Restore.
- To restore a contact group or an individual contact, click Contacts and browse the contact or contact group that you want to restore and click Restore.
- On the Restore Exchange Online window, provide the following details:
| Field | Action |
|---|---|
| Restore Location |
Restore to the same User Account: Select this option to restore the contacts to the same user’s account. Restore to the Different User Account: Select this option to restore the contacts to a different or another user’s account Enter Name or Email: Start typing the name or email of the user, and inSync will auto-suggest usernames. Select the required username.
|
|
Restore Options |
Select how you want to restore the data. Restore as a Copy: Creates a new Contacts-<date stamp>-<time stamp> folder within the Contacts and restores the data to this folder. Restore Deleted items Only: Restores only the deleted contacts to the user's primary Contacts.
|
- Click Restore. During the restore activity, for contact groups, inSync creates a separate contact group with the following naming convention: contact group name (inSync Restore date stamp-time stamp). All individual contacts are restored to their respective contact groups.
Note:
- While restoring contacts as a copy on Exchange Online, inSync might display an "ErrorFolderSavePropertyError" error. This error is displayed when inSync tries to restore a folder that has more than 255 characters in its name. This is an API limitation.
- Attachments in contact are not restored properly due to Microsoft Graph API limitation.
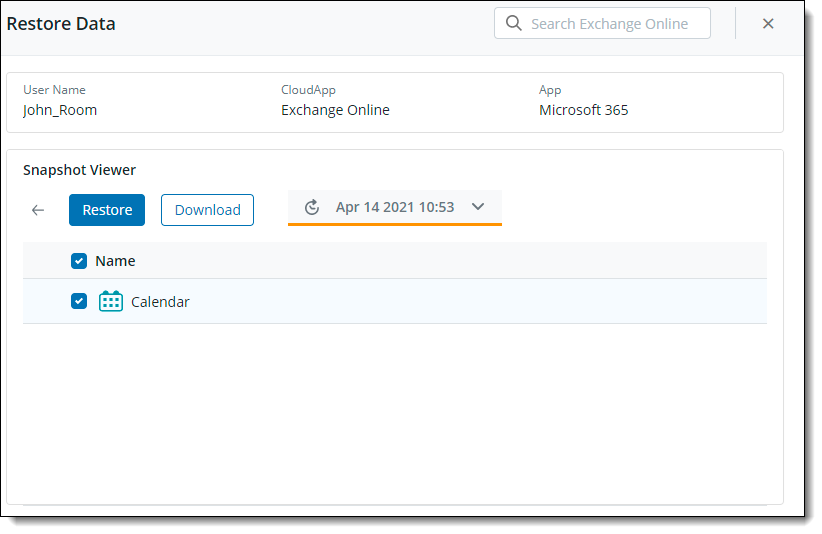
Restore Calendar data
To restore Calendar data:
- Sign in to inSync Management Console and navigate to Microsoft 365 > Users.
- On the Users page, click the username of the user whose data you want to restore and click Restore Data. Under Select a data source, select Exchange Online.
- Select the snapshot you want to restore on the Restore Data window.
- Do one of the following:
- To restore the entire calendar, select Calendar and click Restore.
- To restore an individual calendar, click Calendar and browse the calendar that you want to restore and click Restore.
- On the Restore Exchange Online window, provide the following details:
| Field | Action |
|---|---|
| Restore Location |
Restore to the same User Account: Select this option to restore the calendar data to the same user’s account. Restore to the Different User Account: Select this option to restore the calendar data to a different or another user’s account Enter Name or Email: Start typing the name or email of the user, and inSync will auto-suggest usernames. Select the required username.
|
|
Restore Options |
Select how you want to restore the data. In-Place Restore: Overwrites the events in existing Calendars with the events selected for restore. Restore Deleted items Only: Restores only the deleted events to the user's primary Calendars.
Restore as a Copy: Creates a new Calendar-<date stamp>-<time stamp> folder within the Calendars and restores the data to this folder. |
- Click Restore. During the restore activity, inSync creates a separate calendar with the following naming convention: calendar name (inSync Restore date stamp-time stamp).
Note:
- inSync does not restore event details like ‘When’ and ‘Where’ of saved birthday dates, reminders and country holidays for Exchange Online. Also, holiday events are restored as regular calendar events.
- While restoring calendar on Exchange Online, inSync might display an "ErrorFolderSavePropertyError" error. This error is displayed when inSync tries to restore a calendar that has more than 256 characters in its name. This is an API limitation.
- An Microsoft 365 REST API limitation restricts inSync from capturing event deletions.
- Attachments within calendar events are restored as regular calendar events. You can view the attachments for respective calendar events in user's Outlook account via Outlook client or Outlook web application.
Restore Resources - Room and equipment mailboxes data
To restore Resources - Room and equipment mailboxes data:
- Sign in to inSync Management Console and navigate to Microsoft 365 > Users.
- On the Users page, click the username of the user whose data you want to restore and click Restore Data. Under Select a data source, select Exchange Online.
- Select the snapshot you want to restore on the Restore Data window.
- To restore the Room and Equipment data, click Calendar > Name and click Restore.
- On the Restore Exchange Online window, provide the following details:
| Field | Action |
|---|---|
| Restore Location |
Restore to the same User Account: Select this option to restore the data to the same user’s account. Restore to the Different User Account: Select this option to restore the data to a different or another user’s account Enter Name or Email: Start typing the name or email of the user, and inSync will auto-suggest usernames. Select the required username.
|
|
Restore Options |
We recommend that you use the In-Place restore instead of Restore as a Copy because you may not be able to access the data restored using restore as a copy in Microsoft 365 due to Microsoft 365 limitation. Select how you want to restore the data. The following options are available:
Restore as a Copy: Maintains only one copy which is the primary calendar (named Calendar). Because of Microsoft limitations, you cannot create a new Calendar-<date stamp>-<time stamp> folder within the Calendars and restores the data to this folder. |
- Click Restore.
Restore Tasks
To restore Tasks:
- Sign in to inSync Management Console and navigate to Microsoft 365 > Users.
- On the Users page, click the username of the user whose data you want to restore and click Restore Data. Under Select a data source, select Exchange Online.
- Select the snapshot you want to restore on the Restore Data window.
- Do one of the following:
- To restore an individual or multiple task folders, select Tasks and click Restore.
Note: You cannot perform search for specific tasks using the search option.
- On the Restore Exchange Online window, provide the following details:
| Field | Description |
|---|---|
| Restore Location |
Restore to the same User Account: Select this option to restore the tasks to the same user’s account. Restore to the Different User Account: Select this option to restore the tasks to a different or another user’s account Enter Name or Email: Start typing the name or email of the user, and inSync will auto-suggest usernames. Select the required username.
|
| Restore Options |
Select how you want to restore the data. In-Place Restore: Overwrites the data in existing Tasks with the data selected for restore. Restore Deleted items Only: Restores only the deleted tasks to the user's primary Tasks. This option is available only when you select In-Place Restore. Restore as a Copy (Default option): Creates a new <Task folder name>/inSync-Restore-<date stamp>-<time stamp> folder within the user's Tasks and restores the selected snapshot to this folder.
|
- Click Restore. Based on the selected Restore Options, inSync restores the selected tasks to the user's Tasks.
Note: Due to Graph API limitations, currently restoring tasks with a file more than 3 MB in size is not supported.
Related links