Restore data using a CSV file
Overview
If you wish to restore specific records in a Salesforce org, then a CSV-based restore is the option for you. You can use a CSV containing record IDs to restore specific records to any org registered with inSync. This option can prove effective by performing a cross-org restore to populate data in an org created for testing or training purpose.
Salesforce App analyzes the record IDs from the CSV and restores only the valid records from the list. You can also download the list of invalid record IDs in a CSV from a link on the app.
Cross-org restore helps you to:
- Restore data to the same or another org registered on the inSync Management Console.
- Restore data to a read-only (sandbox) org, which may be used for development, testing, and/or training purposes.
- Restore child records up to 5 levels.
CSV guidelines
The CSV must comply with the following guidelines for a successful restore. You can also download a sample CSV from the Restore tab of the Salesforce App.
- The record count must not exceed 15,000.
- The object name and its record ID must be in adjacent columns as specified in the sample CSV.
- inSync validates and restores the records listed in the CSV from top to bottom. Hence, if the CSV has both parent and child records, the parent record ID must appear above the child record ID but in no particular order.
- If you plan to restore all the child records, you need not provide the child record IDs in the CSV. By selecting the Include deleted child records option, you can restore the child records up to 5 levels.
- Each record ID must be of 18 characters.
- Records from File object (ContentDocument and ContentDocumentLink) cannot be restored using CSV. Instead, use the Restore by Snapshot or Compare options for the restore. Records from both the objects are restored automatically if their parent records are restored using the CSV.
Download the sample CSV
- Launch the Salesforce App and go to RESTORE > BULK tab.
- Select Restore using CSV.
- Click the Download Sample CSV link.
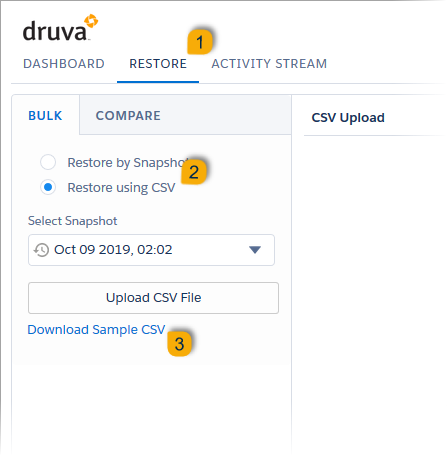
A Sample.csv file gets downloaded. Update this CSV file with the IDs of the records that you wish to restore and keep the CSV ready when you perform the CSV-based restore.
Restore data using a CSV file
Prerequisite: A CSV containing object names and their respective record IDs that you wish to restore.
To restore data using a CSV file:
- Launch the Salesforce App.
- Open the RESTORE tab and go to the BULK tab.
- Select Restore using CSV and from the Select Snapshot field, specify the snapshot from which you want to restore data.
- Click Upload CSV File and upload the CSV containing the record IDs.
Salesforce App analyzes the CSV and displays the list of records that are marked for restore along with their respective object names.
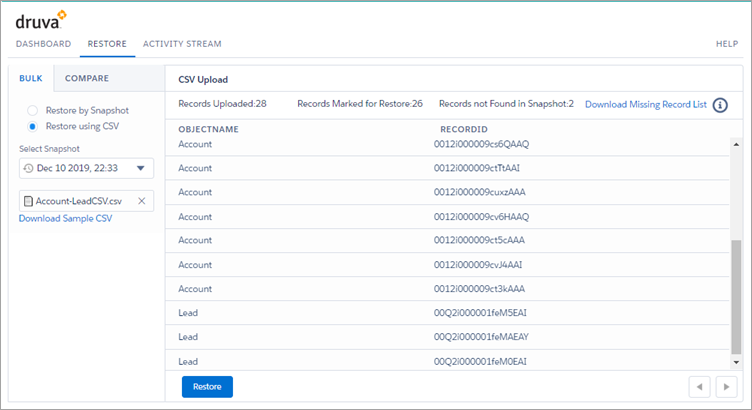
In addition, the following details are also displayed on the app:- Records Uploaded - Number of records (IDs) listed in the uploaded CSV.
- Records Marked for Restore - Number of records validated for restore.
- Records not Found in Snapshot - Number of records that failed the validation and cannot be restored. inSync validates the records by matching the record IDs from the CSV with the records of the selected snapshot. You can download the list of invalid record IDs from Download Missing Record List.
- Download Missing Record List - Link to download a CSV containing list of record IDs that cannot be restored. Use Chrome or Firefox browser to download the Missing Records list. When using Firefox, ensure you update the browser’s configuration settings recommended by Salesforce.
- Click Restore. The Restore Location dialog box is displayed.
The Select an Organization field displays a list of connected orgs on which you can restore the data. By default, the source org of the selected snapshot is displayed first in the list.
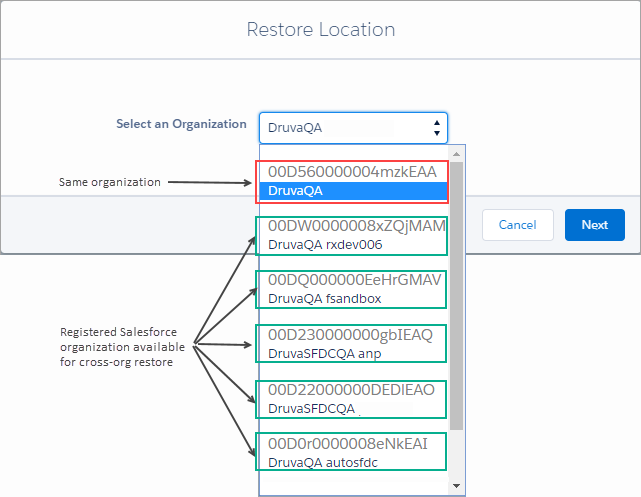
- From the Select an Organization, select one of the registered orgs as the restore destination and click Next.
The Confirm Restore dialog is displayed. - Review the information on the Confirm Restore dialog box and select the appropriate options based on the field description below.
- Overwrite any existing data in destination organization:
- inSync matches the record ID before overwriting a record on the destination org.
- Without a matching record ID, no record is overwritten or created.
- If not selected, inSync creates new entries for those records that are not present in the org, whereas the existing records are retained as is.
For example: From records A, B, and C marked for restore, if A and B are already present in the org, only C is restored as a new record.
A, B, and C are example values used for simplicity; inSync identifies records by their 18-digit record IDs.
- Include deleted child records: inSync identifies the child records from the snapshot and restores the child records up to 5 levels. Deleted child records are also restored.
- Exclude deleted child records: inSync restores only the parent records.
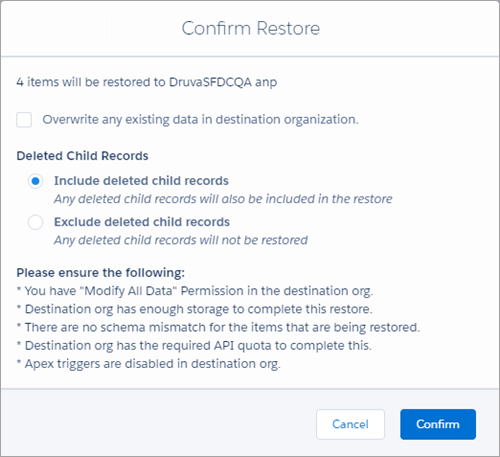
The points displayed under Please ensure the following are already covered in the Before you initiate a cross-org restore section.
- Overwrite any existing data in destination organization:
- After you select the appropriate options and review the information on the Confirm Restore dialog box, click Confirm.
The status and progress of the restore is displayed under Recent Activity on the Dashboard tab and on the Activity Stream tab.
A Restore Successful status is displayed at the end of the restore.