Restore Salesforce data from inSync app for Salesforce
Overview
A Salesforce administrator can use the Salesforce App to restore the following Salesforce data backed up by inSync:
- Metadata
- Object
Salesforce App provides the following modes to restore the Salesforce data:
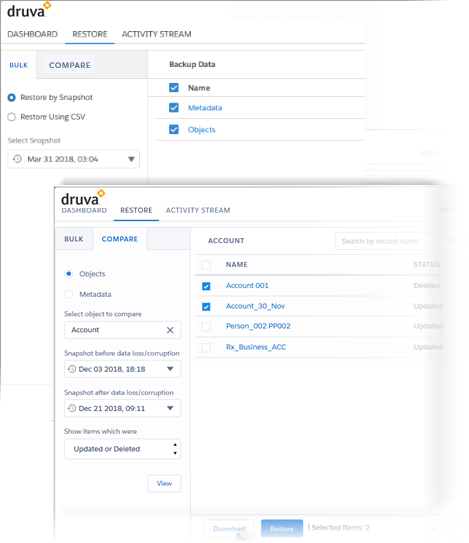
- BULK - This mode enables the Salesforce administrator to:
- Perform a bulk or selective restore from a snapshot
- Use a CSV to restore specific records.
- COMPARE - This mode enables the Salesforce administrator to:
- Compare data changes between snapshots before restore.
- Selectively restore objects and metadata types.
Field description
The following table describes the fields displayed on the BULK and COMPARE tabs of the RESTORE tab UI.
| Field label | Description |
|---|---|
| BULK tab | |
| Restore by Snapshot | Allows bulk or selective restore from the selected snapshot. |
| Restore using CSV | Allows restore based on the object and record details uploaded through a CSV file. |
|
Select Snapshot |
Sets the snapshot from which object data and metadata needs to be restored. |
| Metadata | Expands to display metadata types > elements > items and finally display the content of the metadata item, provided the data is in formats such as xml, html, email and so on. |
| Objects | Expands to display the standard and custom Salesforce objects backed up in the selected snapshots. The node expands to display Salesforce objects > records and enables object-level restore directly from a snapshot. |
| COMPARE tab | |
|
Objects |
Sets the Compare mode to filter and display object data. |
| Metadata | Sets the Compare mode to filter and display metadata types. |
| Select object to compare |
Sets the Salesforce object from which records are compared and displayed on the app. This field is hidden when metadata is compared. |
|
Snapshot before data loss/corruption |
Sets the older snapshot of the two compared to identify the data changes. The data from this snapshot replaces the current values during a restore. If a download is initiated, the app downloads the data from this snapshot. |
|
Snapshot after data loss/corruption |
Sets the latter snapshot of the two compared to identify the data changes. |
|
Show items which were |
Provides the option to set any one of the following filters.
|
|
Search |
Searches the of records displayed on the tab based on the search string entered in this field. The field label changes to Search by field name when you click a record to view its fields. Only those records or fields with names that match the search string are filtered. For example, to search record or field names starting with Billing, you can search with search string 'Bill' or 'bill' but not 'ill'. To clear the search result and return to the list view of records or fields, click |
 in the search box or delete the search string.
 inSync initiates backups at a frequency set for the Salesforce Organization. Backups are stored as snapshots, which are recognized by their respective date and time of creation. Hence, two snapshots are compared to identify the data changes introduced in the interval between the two backups.
To view and compare the data changes between the two snapshots in the COMPARE mode, click the record or the metadata type name to drill down and view the data changes.
You can, therefore, compare the values before actually restoring them. The app allows the restore of an individual or multiple records with their respective child records.
Restore of Files data in Salesforce
Salesforce manages the items listed under Files through the following objects:
- ContentVersion: Stores the actual file and the backed up versions of a file.
- ContentDocument: Stores all the file-related information about the latest version of a file.
- ContentDocumentLink: Tracks and stores the links and share associations of a file.
inSync backs up the above objects and supports restore of Files data from object ContentDocument and ContentDocumentLink.
Druva recommends restoring Files data from the ContentDocument object as it restores the file along with its linked associations.
To reinstate any deleted or updated associations of a File item, the Salesforce administrator can perform a selective restore from the ContentDocumentLink object.
Restore audit fields
The audit fields that can be restored from the Salesforce App are:
- CreatedByID
- CreatedDate
- LastModifiedbyID
- LastModifiedDate
The audit fields cannot be restored for all objects. The objects for which the audit fields can be restored are:
- Account
- CampaignMember
- Case
- CaseComment
- Contact
- Content Version
- Contracts - as of Spring '15
- FeedComment
- FeedItem
- Idea
- IdeaComment
- Lead
- Opportunity
- Vote
- Work Order
- Task and Events
- All Custom Objects
- Attachments
Since the audit fields are read-only, the Salesforce administrator must enable Create Audit Fields setting before initiating a restore from the Salesforce App.
Refer the Enable ‘Create Audit Fields’ knowledge article for the procedure and considerations of this task.
After Create Audit Fields is enabled, the fields are updated only when restore is triggered to reinstate deleted records and not while replacing any updated records.
Find objects created by external apps
inSync backs up the standard Salesforce objects as well as the objects created by any external applications (apps) inside the Salesforce organization configured for backup. However, identifying such objects and their associated external apps may become a time-consuming task. This procedure provides the steps to identify the objects created by the external apps and their parent apps.
- Log in to the Salesforce organization and launch the Classic View.
- Click the Setup link from the menu and then click Installed Packages from the Build list.
- Check the Namespace prefix column for the objects created by external apps and backed up by inSync. The associated external app name can be traced from the Package Name column.
- Open the RESTORE tab of the Salesforce App and use the Search box to find the object from the backup.
The procedures to restore Salesforce data and metadata are described in the procedures below.
Bulk restore from the Salesforce App
The bulk restore option enables restore from the Salesforce App directly from a snapshot. The app also provides a preview for metadata items if required while performing the restore.
Using bulk restore, you can restore data and metadata from a specific snapshot:
Bulk restore Salesforce metadata
To restore Salesforce data using Salesforce App:
- Launch the Salesforce App.
- Open the RESTORE tab. The BULK tab is open by default.
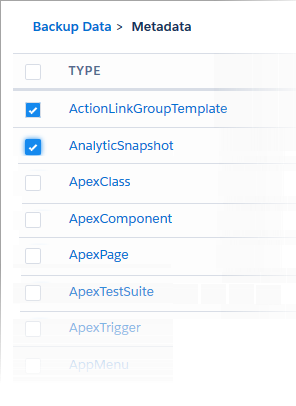
The Select Snapshot field displays the latest snapshot by default and the relevant latest Objects and Metadata are displayed under Backup Data. The Metadata link expands when clicked to display the list of metadata types. - In the Select Snapshot field, specify the snapshot from which bulk restore needs to be performed.
- Expand the Metadata node and select the type to be restored.
- Click Restore. The app displays a confirmation message.
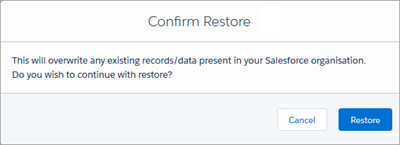
- Click Restore
Salesforce App initiates a restore and displays the status on the Dashboard.
Bulk restore Salesforce objects
To restore Salesforce data using Salesforce App:
- Launch the Salesforce App.
- Open the RESTORE tab. The BULK tab is open by default.
- Select Restore by Snapshot.
The Select Snapshot field displays the latest snapshot by default and the relevant latest Metadata and Objects are displayed under Backup Data. The Objects link expands when clicked to display the list of metadata types. - In the Select Snapshot field, specify the snapshot from which bulk restore needs to be performed.
- Expand the Objects node and select the objects to be restored.

- Click Restore. The app displays a confirmation message.
- Click Restore
Salesforce App initiates a restore and displays the status on the Dashboard.
Compare and restore from the Salesforce App
The compare and restore option provides a view to compare the changes between object fields and metadata items. The procedures to compare and restore Object data and Metadata types are described below.
Compare and restore object data
To compare and restore data from Salesforce objects:
- Launch the Salesforce App.
- Open the RESTORE tab. The BULK tab is open by default.
- Open the COMPARE tab and select Objects.
- Enter the Salesforce object name under Select object to compare. The field auto-suggests object names and helps in entering the correct object name.
- Under Snapshot before data loss/corruption, select a date and a snapshot that will overwrite the latest values of the object during restore.
- Under Snapshot after data loss/corruption, select a date and a snapshot to compare against the earlier snapshot.
- Select any one of following filter options under Show items which were.
- Updated
- Deleted
- Updated or Deleted
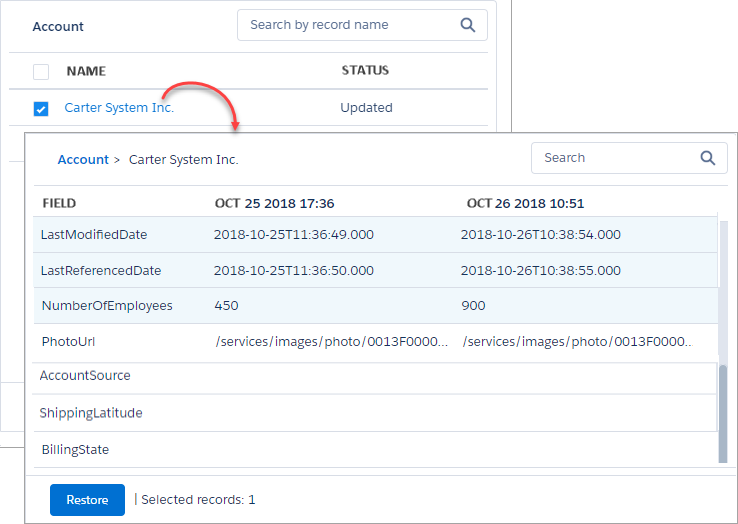
- Click View. Salesforce App displays a list of records filtered based on the value set in Show items which were field.
To compare the field changes, click a record from the list. The app displays a comparison between the fields of the two snapshots. The changed fields of the record are grouped and displayed above the unchanged fields. - Select the checkbox against the records to restore. The app displays the count of records selected for restore.
- Click Restore.
- Based on whether to include or exclude restore of child records, select any one of the following on the Restore Options dialog box and then click Next.
- Include deleted child records: Restores even the child records that were deleted in data loss or corruption.
- Exclude deleted child records: Excludes child records while performing the data restore for the record.
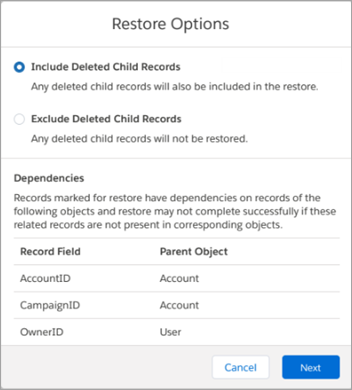
The records marked for restore may have dependencies on records of other objects. The Restore Options dialog box lists such Record Fields and their respective Parent Objects for your reference. Ensure that the parent records are present in your Salesforce organization before initiating the restore. In absence of the parent records, the restore may fail.
- Review the restore summary and click Yes to initiate the restore.
The app overwrites the current Salesforce data with the data restored from the Salesforce App.
Compare and restore Salesforce metadata
- Launch the Salesforce App.
- Open the RESTORE tab. The BULK tab is open by default.
- Open the COMPARE tab and select Metadata.
- Under Snapshot before data loss/corruption, select a date and a snapshot that will overwrite the latest values of the metadata during restore.
- Under Snapshot after data loss/corruption, select a date and a snapshot to compare against the earlier snapshot of the metadata.
- Select any one of following filter options under Show items which were.
- Updated
- Deleted
- Updated or Deleted
- Click View. Salesforce App displays a list of metadata types filtered based on the value set in Show items which were field.
To preview the data changes in the metadata types, click the metadata type names. The app displays a comparison between the values of the metadata item from the two snapshots, provided the metadata is in formats such as HTML, email, text and so on. - Select the checkbox against the metadata type or the metadata type to restore. The app displays the count of selections made for restore.
- Click Restore. A confirmation message is displayed.
- Click Restore again to initiate the metadata restore.
The app overwrites the existing values of the Salesforce metadata with those restored from Salesforce App.