Download Salesforce data from the inSync app for Salesforce
Overview
inSync backs up Salesforce data based on a backup schedule configured in for the organization. Backups are stored in snapshots which are identified by their respective timestamps. A Salesforce administrator can use the Salesforce App to download the data backed up by inSync. Metadata and Salesforce object data can be downloaded independently from the app.
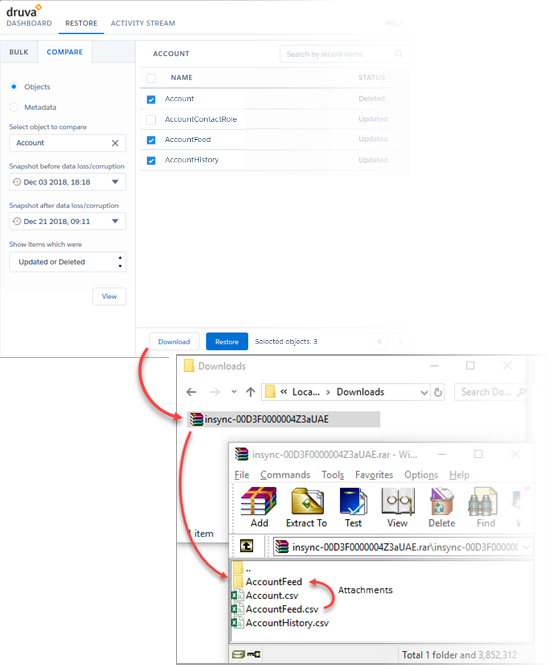
inSync creates a CSV file for each object or metadata type downloaded from the app. All the CSV files are saved to a folder and the folder is downloaded in a compressed or zipped format. The download location of the zipped folder depends on the location set in the browser setting. inSync also provides an option to choose either Field Names or Field Labels as the CSV headers when you download data using the Compare tab. If any object marked for download has attachments, the attachments are downloaded in a separate folder labeled with the object name.
A Salesforce administrator can use the inSync App for Salesforce to download the following Salesforce data backed up by inSync:
- Metadata
- Object
inSync App for Salesforce provides the following modes to download the Salesforce data:
- BULK - This mode in inSync App for Salesforce enables the Salesforce administrator to:
- Download single or multiple objects and metadata types directly from a snapshot.
- Browse and preview metadata items.
- COMPARE - This mode in inSync App for Salesforce enables the Salesforce administrator to:
- Selectively download objects and metadata types.
- Compare data changes between snapshots before initiating the download.
Download files data from Salesforce
Salesforce manages the items listed under Files through the following objects:
-
ContentVersion
-
ContentDocument
-
ContentDocumentLink
inSync backs up the above objects and supports the download of the data from Salesforce App.
Druva recommends downloading data from the ContentVersion object as it stores the actual files and all the backed up versions of each file. All the items of the Files object get downloaded in a separate folder titled ContentVersion.
Find objects created by external apps
inSync backs up the standard Salesforce objects as well as the objects created by any external applications (apps) inside the Salesforce organization configured for backup. However, identifying such objects and their associated external apps may become a time-consuming task. This procedure provides the steps to identify the objects created by the external apps and their parent apps.
- Log in to the Salesforce organization and launch the Classic View.
- Click the Setup link from the menu and then click Installed Packages from the Build list.
- Check the Namespace prefix column for the objects created by external apps and backed up by inSync. The associated external app name can be traced from the Package Name column.
- Open the RESTORE tab of the Salesforce App and use the Search box to find the object from the backup.
Bulk download from the inSync App for Salesforce
To download Salesforce data using inSync App for Salesforce:
- Launch the Salesforce App and open the RESTORE tab.
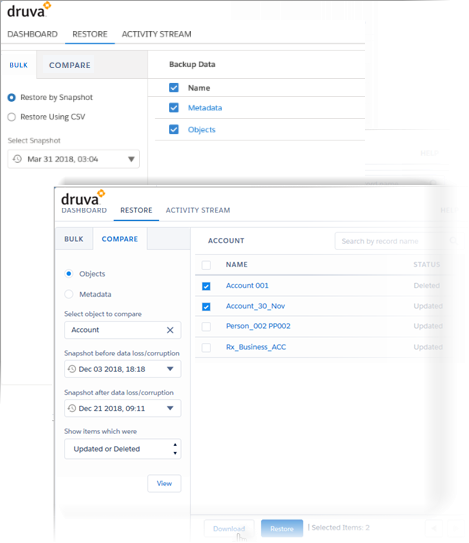
- On the BULK tab, select Restore by Snapshot.
- Use the Select Snapshot field to specify the snapshot from which bulk download needs to be performed.
The Select Snapshot field displays the latest snapshot by default. The relevant Metadata and Objects are displayed under Backup Data.
The Metadata and Objects nodes expand to display the list of metadata types and objects respectively. The drill down view of Metadata provides a preview of metadata items. - Depending on the data to download, Metadata or Objects, select the metadata types of or objects.
- Click Download.
inSync downloads the selected objects in a compressed folder at the default download location of the device.
Download Salesforce data using the Compare mode
The compare mode provides a view to compare the changes between object fields and metadata items. The procedures to download data from objects and metadata from the Compare mode are described below.
Download object data
To download Salesforce object data in the Compare mode:
- Launch the Salesforce App.
- Open the RESTORE tab. The BULK tab is open by default.
- Open the COMPARE tab and select Objects.
- Enter the Salesforce object name under Select object to compare. The field auto-suggests object names and helps to enter the correct object name.
- Under Snapshot before data loss/corruption, select a date and the snapshot that is older of the two getting compared. The data from this snapshot gets downloaded in this procedure.
- Under Snapshot after data loss/corruption, select a date and a snapshot created later amongst the two getting compared.
- Select any one of following filter options under Show items which were.
- Updated
- Deleted
- Updated or Deleted
- Click View. Salesforce App displays a list of records filtered based on the value set in Show items which were field.
To compare the field changes, click a record from the list. The app displays a comparison between the fields of the two snapshots. The changed fields of the record are filtered to the top above the unchanged fields. - Select the checkbox against the object names from which data needs to be downloaded.
- Click Download. inSync downloads the data from the snapshot before data loss/corruption in a compressed folder at the default download location of the device.
Download Salesforce metadata
- Launch the Salesforce App.
- Open the RESTORE tab. The BULK tab is open by default.
- Open the COMPARE tab and select Metadata.
- Under Snapshot before data loss/corruption, select a date and the snapshot that is older of the two getting compared. The data from this snapshot gets downloaded in this procedure.
- Under Snapshot after data loss/corruption, select a date and a snapshot created later amongst the two getting compared.
- Select any one of following filter options under Show items which were.
- Updated
- Deleted
- Updated or Deleted
- Click View. Salesforce App displays a list of metadata types filtered based on the value set in Show items which were field.
To compare the field changes, click a record from the list. The app displays a comparison between the fields of the two snapshots. The changed fields of the record are grouped and displayed above the unchanged fields. - Select the checkbox against the metadata type name from which data needs to be downloaded.
- Click Download. inSync downloads the metadata from the snapshot before data loss/corruption in a compressed folder at the default download location of the device.-