Quick reference guide to deploy Enterprise Workloads
If you are a new Druva customer and looking to deploy workloads within the Druva ecosystem, this article will provide you with a comprehensive starting point.
Note: The Enterprise Workloads Management Console is exclusively available in English. Any language translator tool used for managing your console may or may not work.
Prerequisites
- Ensure that you have valid licenses. For more information, see License consideration.
- Before you deploy Druva, get acquainted with the Key concepts and terms.
- Get acquainted with the Support matrix.
Best practices before starting deployment
- Make sure you have more than one Druva Cloud Administrator created for your account. If in case you forget your password, the other Druva cloud admin can reset the password. Druva does not store passwords.
- If using single sign-on (SSO) for administrators, enable “ Allow failsafe access to Druva Cloud Administrators.” This allows the administrators to access the Druva Cloud Platform when there is an issue with single sign-on.
- Ensure that you have the correct storage regions added to your instance. This is especially important if you have servers or offices located in different geographical regions, as you'll want to configure region-specific storage.
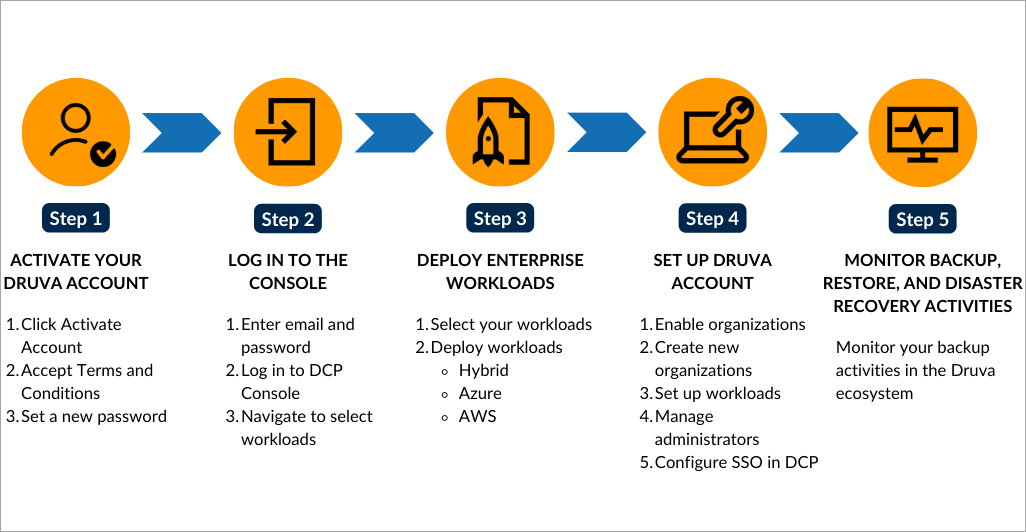
Steps for deployment of Enterprise Workloads
- Activate your Druva account
- Log in to the Management Console
- Deploy Enterprise Workloads
- Set up Druva Account
- Monitor backup, restore, and disaster recovery activities
Step 1: Activate your Druva account
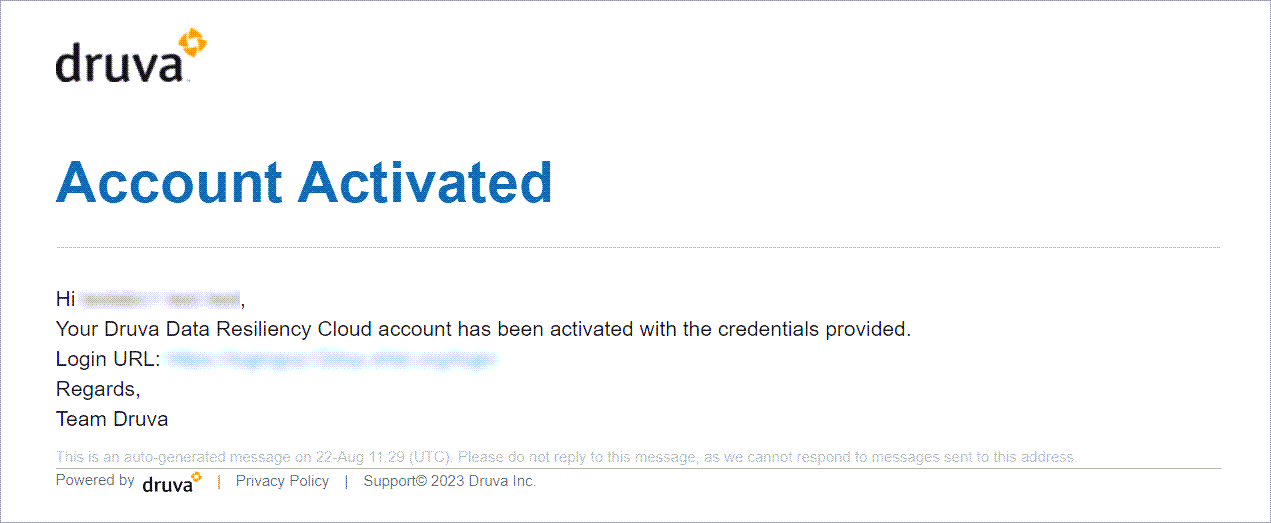
You receive an invitation email from Druva with the link to activate your Druva account.
-
Click the Activate Account link given in the email.
-
Go through the Terms and Conditions carefully. Once done, click the Accept Terms and Conditions.
A new window opens where you can set a new password for your account. -
Set and confirm the new password and click Next.
The account is activated and you receive an email confirming the same.

Step 2: Log in to the Management Console
-
Enter your email address and password in the login link provided in your Account Activated email.
The page refreshes and now you are logged in to the Welcome page. -
From the Welcome page, you can choose to navigate to the various workloads you want to configure and backup.
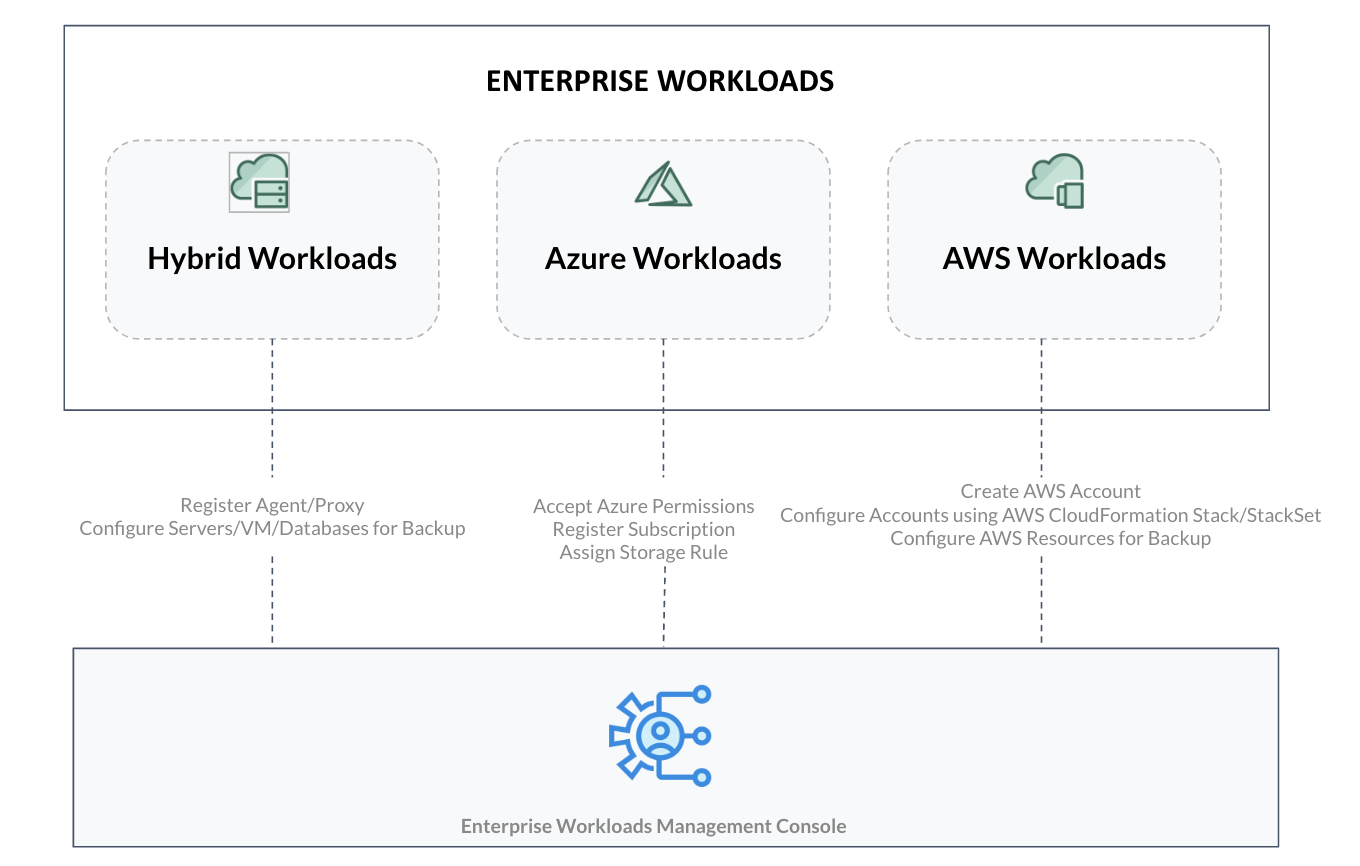
Step 3: Deploy Enterprise Workloads
Druva provides a unified management console for protecting and managing resources deployed in data centers, Azure, and AWS Clouds.
Before you begin
- Druva has created interactive self-paced Product Tours for a more detailed understanding of the products and services offered by Druva. You can click on the Product Tours link to navigate to the Product Tours page.
- You can contact Druva support for more information by clicking on the Talk to an Expert link.
Select your workloads
From the Welcome page, you can click on the workload that you want to configure for backup and be redirected to the configuration page for that particular workload.

Alternatively, you can also navigate to the various workloads through the All Services tab in the left navigation pane. The Enterprise Workloads section on the DCP page displays three radio buttons to deploy Hybrid Workloads, Azure Workloads, and AWS workloads.
You can click any of the workloads to proceed with the configuration and backup activity for that particular workload.
Deploy Enterprise Workloads
Deploy Hybrid Workloads
Druva includes Druva Cloud and multiple instances of Hybrid Workloads agents. Druva Cloud is the server component in the cloud and is managed by Druva, while the Hybrid Workloads agent is the client component you need to install on each server you want to back up. Hybrid Workloads agent communicates with Druva Cloud to initiate scheduled backups and restores. Druva Cloud acknowledges the agent requests and assigns the request to storage within the cloud.
Important: Review the Support matrix before configuring Hybrid Workloads for backup.
- Configure Druva to back up and restore files and folders on Windows/Linux servers
Watch the following video to set up Druva to back up your files and folders.
- Configure Druva to back up and restore VMware virtual machines
Watch the following video to set up Druva to back up your VMware virtual machines.Configure Disaster Recovery as a Service (DRaaS) feature for your VMware servers to extend the cloud-based data protection for enterprise infrastructure. See Configure DRaaS for more information.
- Configure Druva to back up and restore Hyper-V virtual machines
Watch the following video to set up Druva to back up your Hyper-V virtual machines:
- Configure Druva to back up and restore Nutanix AHV virtual machines
Watch the following video to configure Druva to back up your Nutanix AHV virtual machines. - Configure Druva to back up and restore NAS share
Watch the following video to configure Druva to back up your NAS shares.
- Configure Druva Phoenix to back up and restore SQL Databases
Watch the following video to set up Druva to back up your SQL databases. - Configure Druva to back up and restore Oracle Databases using Phoenix Backup Store and the Direct to Cloud agent.
Watch the following videos to set up Druva to back up your Oracle databases using Phoenix Backup Store and the Direct to Cloud agent.
- Configure Druva to back up and restore SAP HANA Databases
Watch the following video to set up Druva to back up your SAP HANA databases. - (Optional configuration) Configure CloudCache
CloudCache temporarily stores backup data before it syncs the data with Druva Cloud. You need to install CloudCache on a Windows server in your own environment.
Deploy Azure Workloads
Onboard Azure subscriptions by registering your Azure Tenant and authorizing Druva to onboard new Azure subscriptions. Select a preferred Druva storage to back up your data from a specific Azure Region. Configure backup settings. To know more Configure Azure virtual machines for backup.
Deploy AWS Workloads
To get started with the deployment of AWS workloads and configure accounts using AWS Cloud Formation Template, refer to Set up Cloud Ranger. Once you have configured your Druva AWS account, you can start backup and restore of AWS workloads.
Step 4: Set up Druva Account
- (Optional) Enable organizations: When the customer is onboarded, Druva creates an organization by default named Default Organization. The customer needs to enable an organization to view the Default Organization. To enable an organization, please refer to Enabling and Disabling Organizations.
- (Optional) Create new organizations: You can create new organizations from the All Organizations menu to segregate your resources based on various factors such as geographic regions, domain etc. To create new organizations, please refer to the Multi-organization administration.
- (Optional) Setup workloads: Once you have created an organization, you can select the workload and register it in your organization. Clicking on the workload will redirect you to the registration page for that particular workload.
- (Optional) Manage administrators: You can set up new group administrators and define the role of your administrator. Refer to Manage Administrator Roles to see the roles defined while creating new administrator accounts.
- (Optional) Configure single-sign-on in the Druva Cloud Platform: Single Sign-On (SSO) allows users to access multiple resources using a single action of authentication and authorization. Please refer to Set Up Single Sign-On (SSO) to configure single sign-on in the Druva Cloud Platform.

Step 5: Monitor backup, restore, and disaster recovery activities
Once you have configured your workloads, you can monitor your backup, restore, and disaster recovery activities in the Druva ecosystem.
- Reports: View the details of backup and restore activities. For more information, please refer to Reports.
- Dashboard: The global and organization dashboards display detailed information on the latest backup and restore status across workloads, top critical alerts, storage consumption, and savings across organizations. For more information please refer to Dashboard.
- Storage: Storage provides details about storage consumption and deduplication savings across all organizations. For more information please refer to Storage.
- Analytics: Analytics provides an aggregate view of credit balance, total source+changes, total current source data, total storage consumed, and dedupe savings across all organizations. For more information, please refer to Analytics.
- Audit Trails: Audit Trails provides a chronological view of all the administrator activities performed on the Management Console, thus enabling organizations to meet data governance and compliance requirements. For more information, please refer to Audit Trails.
- Billing: The Billing section has two sub-sections:
- Cost allocation: Allows you to create and manage cost codes for administrative groups, organizations, and backup sets, and set cost allocation rates for cost codes.
- Credit Limits: Allows you to configure and manage the number of credits that an organization can consume for a specified duration and define the appropriate actions when the credit limit is reached.
For more information, please refer to Billing.
Additional resources
- Druva resources
https://www.druva.com/products/data-center/ - Druva documentation for Druva
https://docs.druva.com/Druva - Druva Support Portal
https://support.druva.com - Druva Academy
https://academy.druva.com/path/getting-started-with-hybrid-workloads