Credit limits
Overview
Managing credit consumption is crucial when administering your organization. Druva enables you to configure the number of credits that an organization can consume and define appropriate actions when the credit limit is reached. You might choose to disable the backups for an organization or alert you when the credit limit reaches a defined limit. This feature benefits you to create a cost-effective environment and track the credit consumption for each organization.
Note: Druva allows you to define credit limits only for organizations.
Druva actively tracks credit consumption for each organization and sends notifications to administrators when:
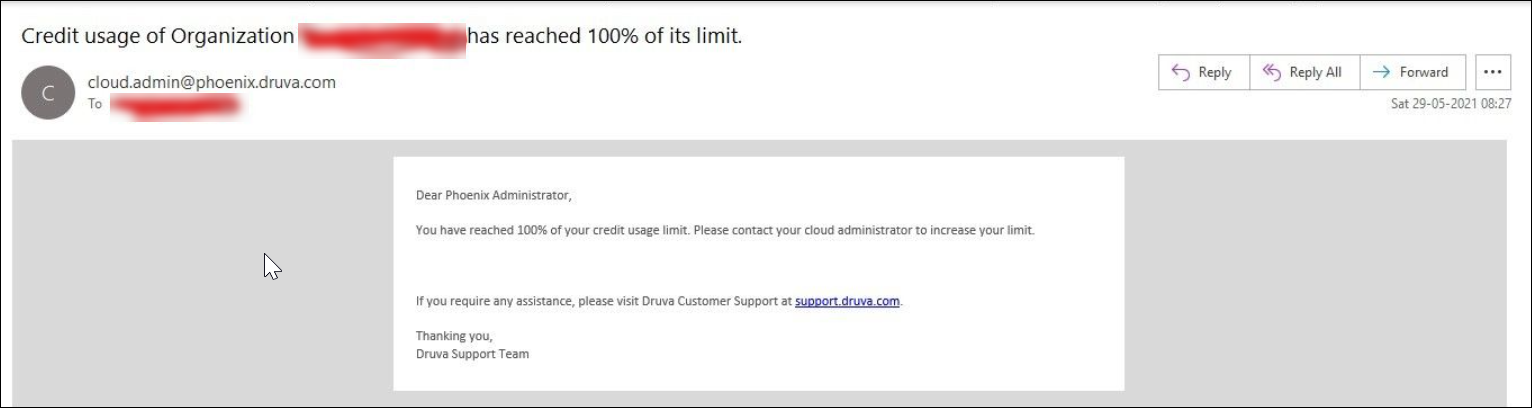
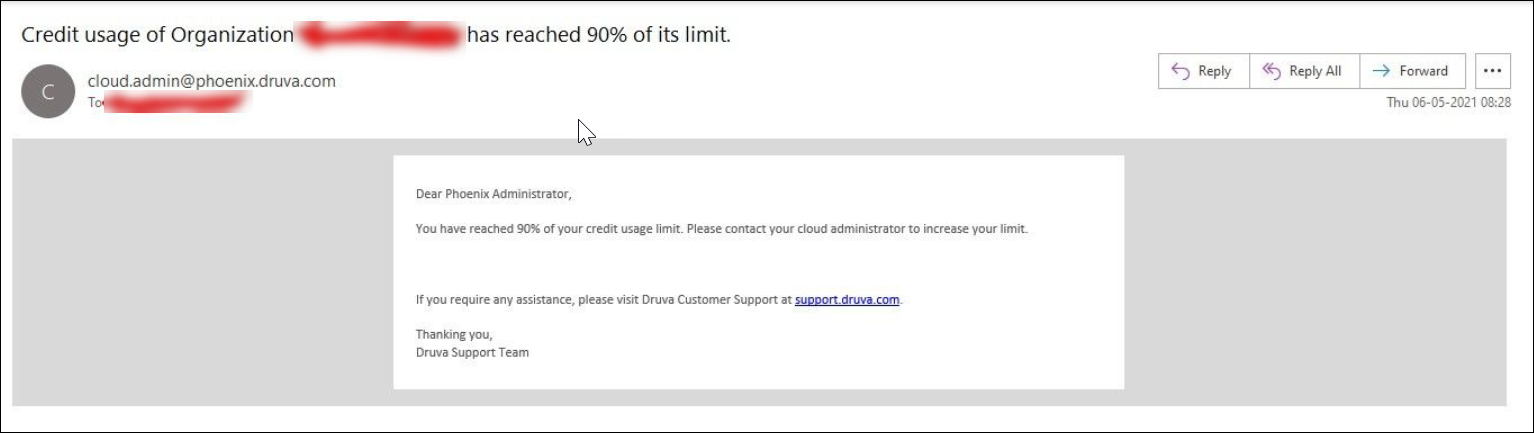
- The credit usage reaches 80%, 90%, and 100% of the defined credit limit
- And, thereafter at every 10% increase
To view the alerts generated, see Alerts.
View credit limits
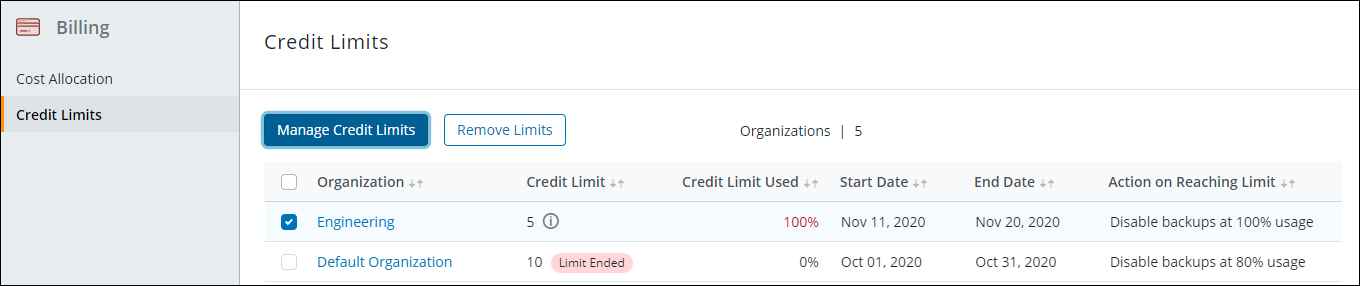
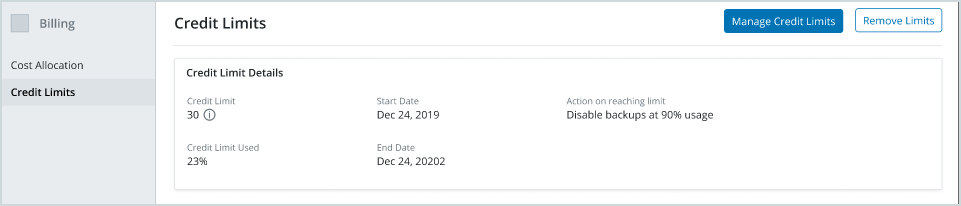
You can view credit limits defined for your organizations using the Credit Limits page.
Procedure
- Log on to the Management Console.
- On the menu bar, click Billing, and select Credit Limits from the left-pane.
The Credit Limits page appears.
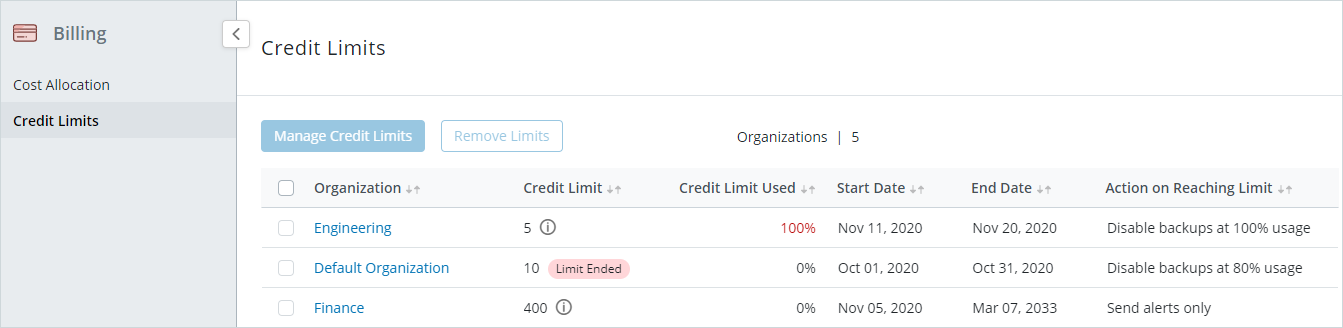
If the organization is enabled, the Credit Limits page provides the following details:
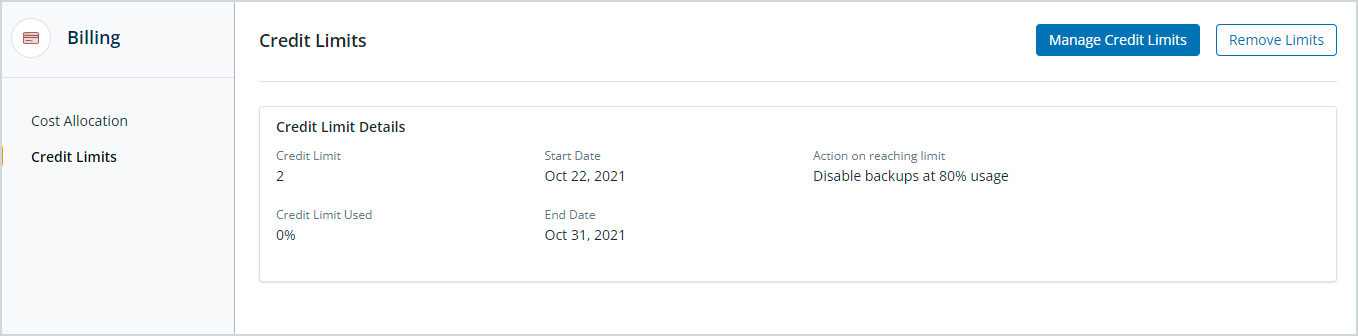
If the organization is disabled, the Credit Limits page provides the following details:Field Description Organization The name of the organization configured within your environment.
Note:The Organization column is not displayed if organization is disabled. For more information, see Enabling and Disabling Organizations.
Credit Limit The credit limit configured for the organization. - Limit Ended - A limit ended
 icon appears next to the credit limit when the credit limit date has ended for an organization.
 - Credit Limit history - A credit limit information
 icon appears to notify the last three credit changes for an organization. Learn more.
Credit limit Used The percentage of credit limit consumed. Start Date The date when the credit limit duration is started for the organization. End Date The date when the credit limit expires. Action on Reaching Limit Action to be taken when the credit limit reaches a certain limit.
- Limit Ended - A limit ended
Manage credit limits
Only Druva cloud administrators, cloud administrators, and custom cloud administrators configured can set the credit quotas for organizations configured in their environment.
Note: You can set credit limits for multiple organizations simultaneously.
Procedure
- Log on to the Management Console.
- On the menu bar, click Billing, and select Credit Limits from the left-pane.
The Credit Limits page appears. - Click Manage Credit Limits. If organization is enabled, then select an organization and click Manage Credit Limits.
The Manage Credit Limits page appears with a list of organizations configured within your environment along with the predefined credit limits if any, and the percentage of the credit limit consumed.
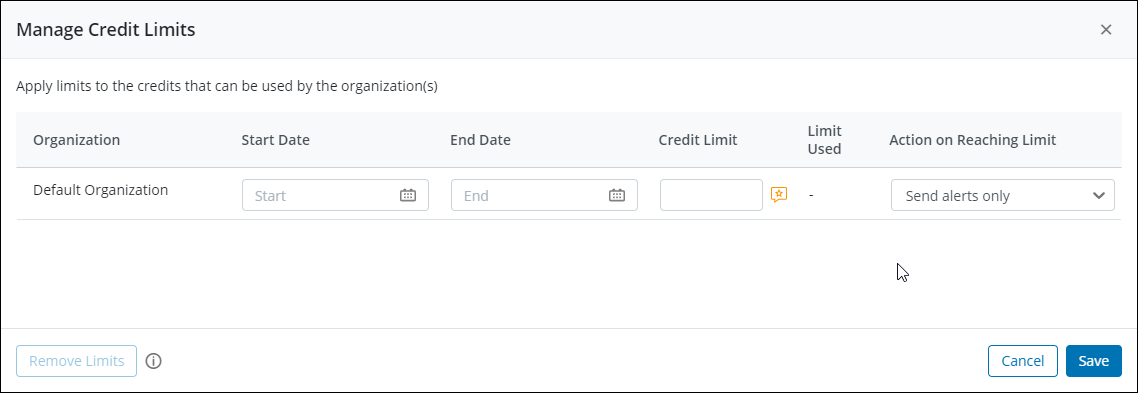
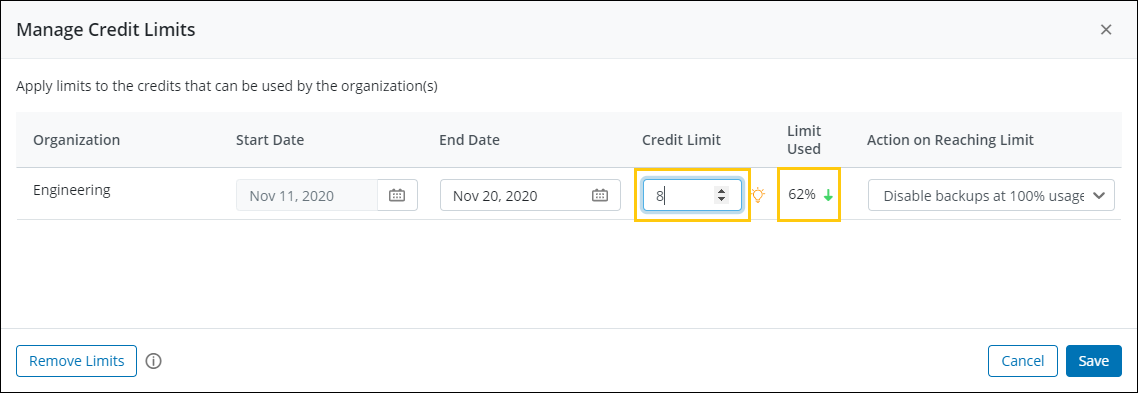
- On the Manage Credit Limits dialog, specify the following:
Field Description Organization The name of the organization configured within your environment. Note:The Organization column is not displayed if organization is disabled. For more information, see Enabling and Disabling Organizations.
Start Date The date when the credit limit was configured for the organization. By default, this date is set to the current date. End Date The date when the credit limit expires. This date must be greater than the current or the start date. Credit Limit The credit limit configured for the organization.
Based on your credit usage pattern for the last 30 days, Druva recommends the credit limit. Learn more.Limit used The percentage of credit limit consumed. This shows the credit consumption that changes after the credit limit is increased or decreased. Action on Reaching Limit Specify the actions to be taken when the credit limit reaches a specified limit. - Send alerts only - Sends an email to the administrators subscribed to the Billing alert for that organization when the consumption limit has reached the 80%, 90%, and 100% of the defined credit limit, and thereafter at every 10% increase.
- Disable backups at 80% - Once the consumption reaches 80% of the defined credit limit, backups are disabled. To enable the backups again, increase the credit limit to a sufficient level such that consumption drops below 80%.
- Disable backups at 90% - Once the consumption reaches 90% of the defined credit limit, backups are disabled. To enable the backups again, increase the credit limit to a sufficient level such that consumption drops below 90%.
- Disable backups at 100% - Once the consumption reaches 100% of the defined credit limit, backups are disabled. To enable the backups again, increase the credit limit to a sufficient level such that consumption drops below 100%.
Note: You might notice an increase in the credit consumption for an organization even though its backups are disabled. This may be due to the existing backups that are present in the organization consuming credits.
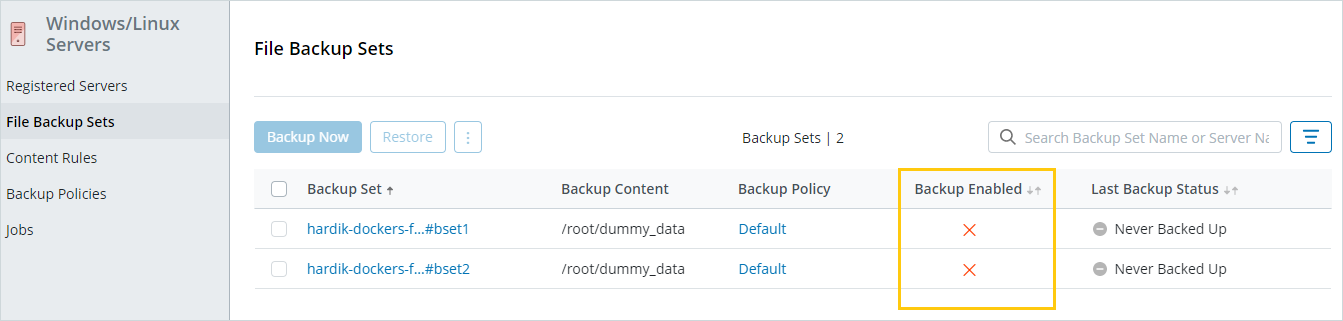
If you select the backups to be disabled after reaching a certain limit, Druva automatically stops the backup for the selected organization. You can see the disabled state of the backup set on the backups listing page and backup details page. To enable the backups again, increase the credit limit.
Ongoing Druva backup jobs will not fail if the credit limit is exceeded during the job execution. The backup set will be disabled so that the next backup job does not run.

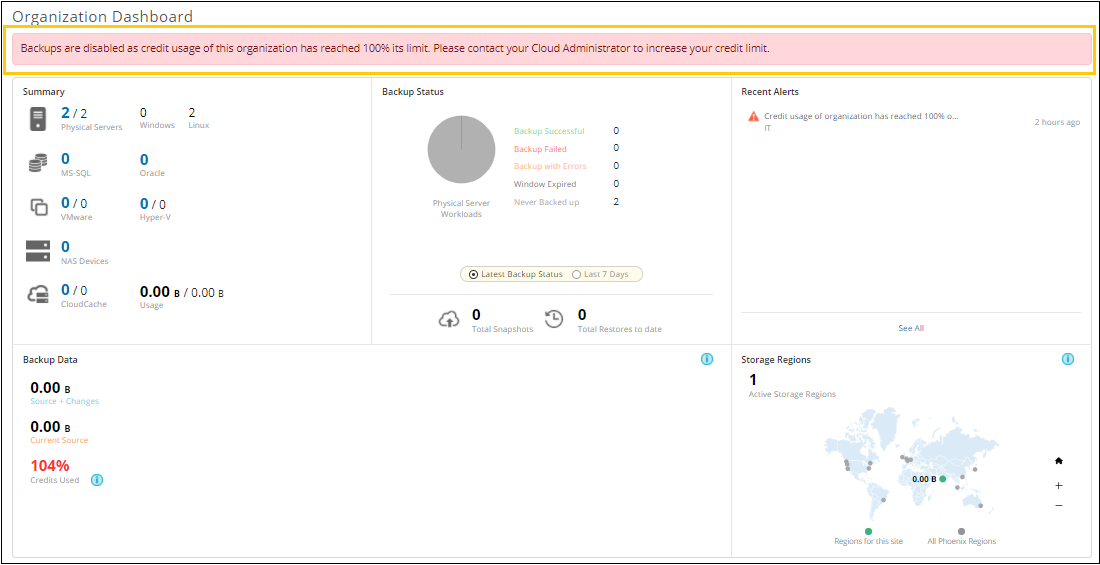
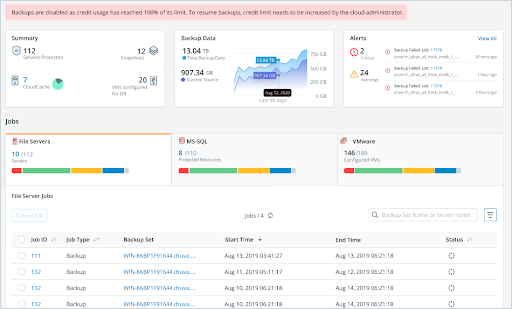
You can also see the status of the credit limit consumption on the organization’s dashboard.
If organization is disabled, then the status of the credit limit consumption is displayed as follows:
- Click Save.
The new credit limits for the organizations now appear on the Credit Limits page.
Increase the credit limit to enable backups
To enable the backups again for an organization whose backup sets are disabled because of insufficient credits, you must increase the credit limit.
To increase the credit limit,
- Log on to the Management Console.
- On the menu bar, click Billing and select Credit Limits from the left-pane.
The Credit Limits page appears. - Click Manage Credit Limits. If organization is enabled, then select an organization and click Manage Credit Limits. For more information, see Enabling and Disabling Organizations.
- On the Manage Credit Limits dialog, increase the credit limit to a sufficient value. The Limit Used field shows the percentage of credit consumption that will decrease post applying the increased credit limit.
Note: The Organization column is displayed only if organization is enabled.
Using Druva recommended credits
Druva intelligently recommends credits based on your usage pattern. This recommendation appears only for organizations that are 30 days older and have consumed credits during this duration.
To use Druva recommended credit limits,
- Log on to the Management Console.
- On the menu bar, click Billing and select Credit Limits from the left-pane.
The Credit Limits page appears. - Click Manage Credit Limits. If organization is enabled, then select an organization and click Manage Credit Limits. For more information, see Enabling and Disabling Organizations.
- In the Manage Credit Limits dialog, click the recommendation
 icon to view the recommended credit limit.
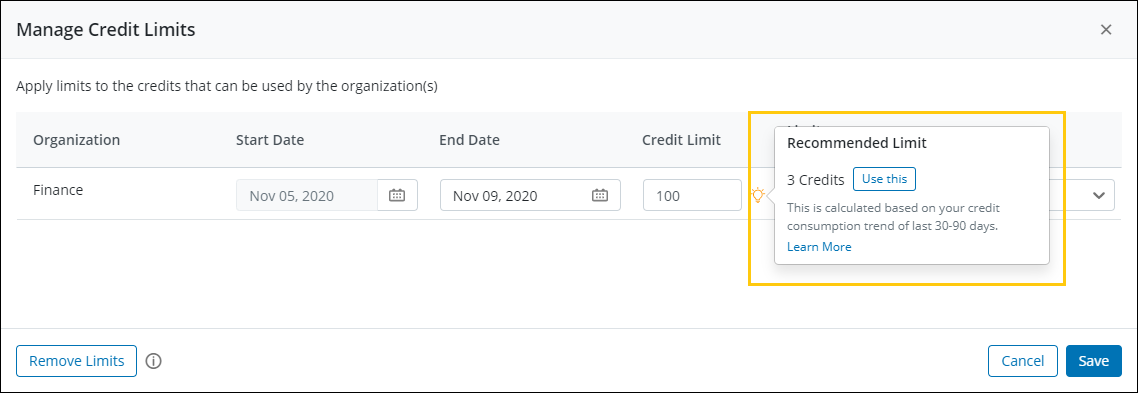
-
Click Use this to select the recommended credit limit.
-
Click Save.
Viewing the history of change in credit limits
You can view the history of credit limits assigned to an organization if the organization is enabled. For more information, see Enabling and Disabling Organizations.
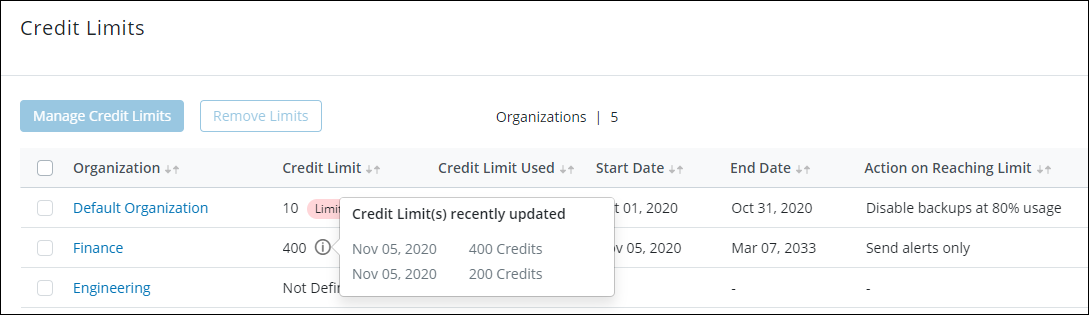
A maximum of three credit limit changes is shown in history.
- Log on to the Management Console.
- On the menu bar, click Billing and select Credit Limits from the left-pane.
The Credit Limits page appears. - Click on the information icon next to the credit limit.
If the organization is enabled, you will see a list of credit limits that were recently updated for an organization.
If the organization is enabled, then the Credit Limits page provides the following details:
Reassigning credits limit to an organization whose limit has ended
You might want to reassign credit limits to organizations whose end date is over. To reassign credit limits to multiple organizations at once, select the organizations, and click Manage Credit Limits.
Note: The Organization column is displayed only if organization is enabled. For more information, see Enabling and Disabling Organizations.
To reassign credit limit to an organization whose limit has ended,
- Log on to the Management Console.
- On the menu bar, click Billing and select Credit Limits from the left-pane.
The Credit Limits page appears. - Click Manage Credit Limits. If organization is enabled, select the organization whose credit limit has ended, and click Manage Credit Limits.

- Select the Start Date. You can choose any date next to the previous end date.
- Select the End Date.
- Specify the credit limit
- Select an action to be taken when the credit limit reaches a certain limit.
- Click Save.
Sample email alert
See the following sample emails that are sent after you reach a certain percentage of credit utilization: