Understanding Enterprise Workloads workflows
These workflow diagrams explain the backup and restore processes for Enterprise Workloads:
- Data backup workflow
- Warm restore workflow
- File server backup workflow
- File server restore workflow
- MS-SQL server backup workflow
- MS-SQL server restore workflow
- Oracle database backup workflow using Phoenix Backup Store
- Oracle database restore workflow using Phoenix Backup Store
- Oracle Direct to Cloud database backup workflow
- Oracle Direct to Cloud database restore workflow
- NAS Share backup workflow
- NAS Share restore workflow
- VMware virtual machine backup workflow
- VMware virtual machine restore workflow
- Hyper-V virtual machine backup workflow
- Hyper-V virtual machine restore workflow
- Druva disaster recovery workflow
- Druva AWS proxy setup workflow
- Data backup with CloudCache deployment workflow
- Data restore with CloudCache deployment workflow
- Ports and communication protocols for VMware
- Ports and communication protocols for File server
- Ports and communication protocols for CloudCache
- Azure virtual machine backup workflow
- Azure virtual machine restore workflow
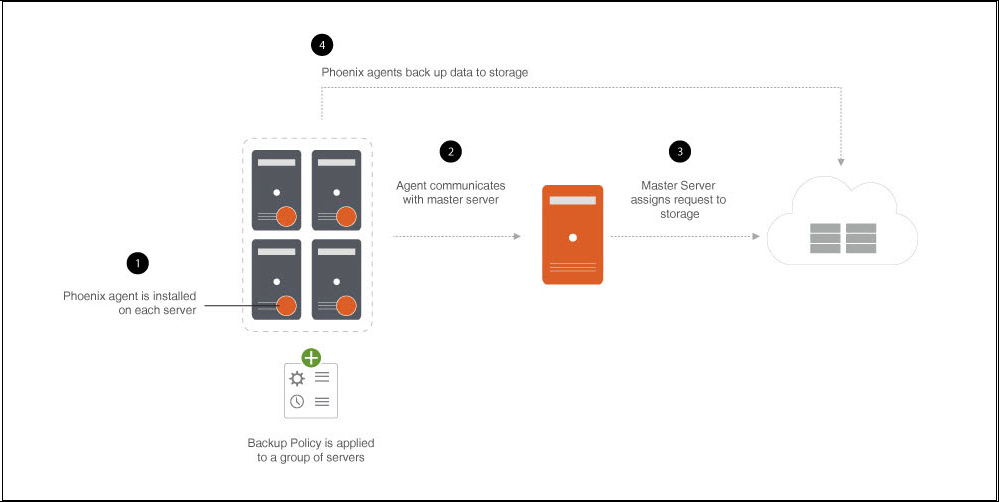
Data backup workflow
The following diagram illustrates how data flows within the Druva setup at the time of data backup.
| Step | Description |
|---|---|
|
Step 1 |
Hybrid Workloads agents installed on servers, back up server data according to the schedule defined in the backup policy. At the scheduled time, Druva Cloud initiates backups from servers on which Hybrid Workloads agents are installed. |
|
Step 2 |
Hybrid Workloads agents attempt to communicate with Druva Cloud following a response-request messaging pattern over WAN. |
|
Step 3 |
Druva Cloud validates agent communication requests. Upon successful validation, Druva Cloud assigns agent requests to storage. |
|
Step 4 |
Hybrid Workloads agents back up data to storage. |
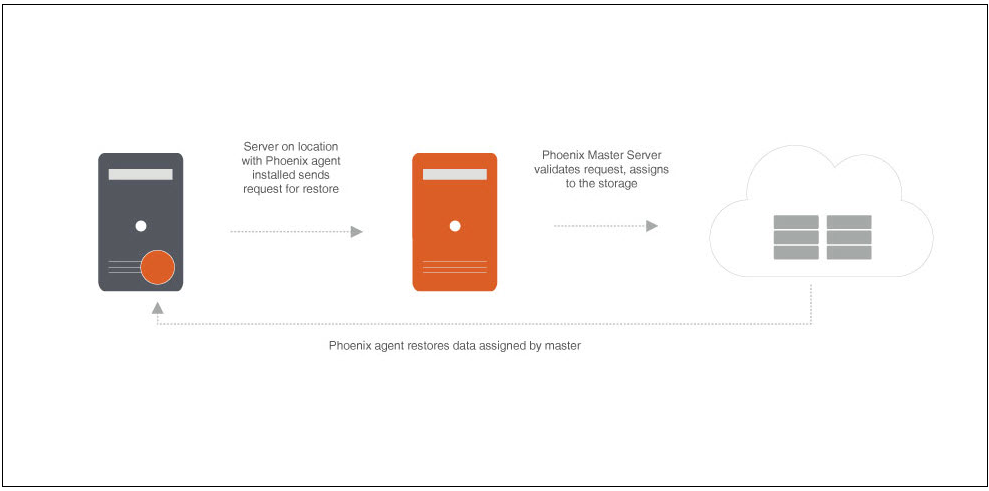
Warm restore workflow
A warm restore is a restore of data using snapshots that date back to 90 days in time (also referred to as warm snapshots).
The following diagram illustrates how data flows within the Druva setup at the time of warm restore.
| Step | Description |
|---|---|
|
Step 1 |
Hybrid Workloads agents installed on servers send restore requests for data dating back to 90 days in time over WAN. |
|
Step 2 |
Druva Cloud validates the requests and assigns them to storage. |
|
Step 3 |
Hybrid Workloads agents restore data from the storage that Druva Cloud assigned. |
File server backup workflow
 Business Enterprise Elite
This article provides the workflow diagrams and the steps for data backup from the following operating systems:
Note: If you restart or reboot your servers during backups, the backup operation is aborted. Hybrid Workloads agent starts a fresh backup following the backup schedule. Alternatively, you can start a manual backup at any time.
File servers with Windows operating system
This topic explains how data flow during data backup from the File servers with Windows operating system.
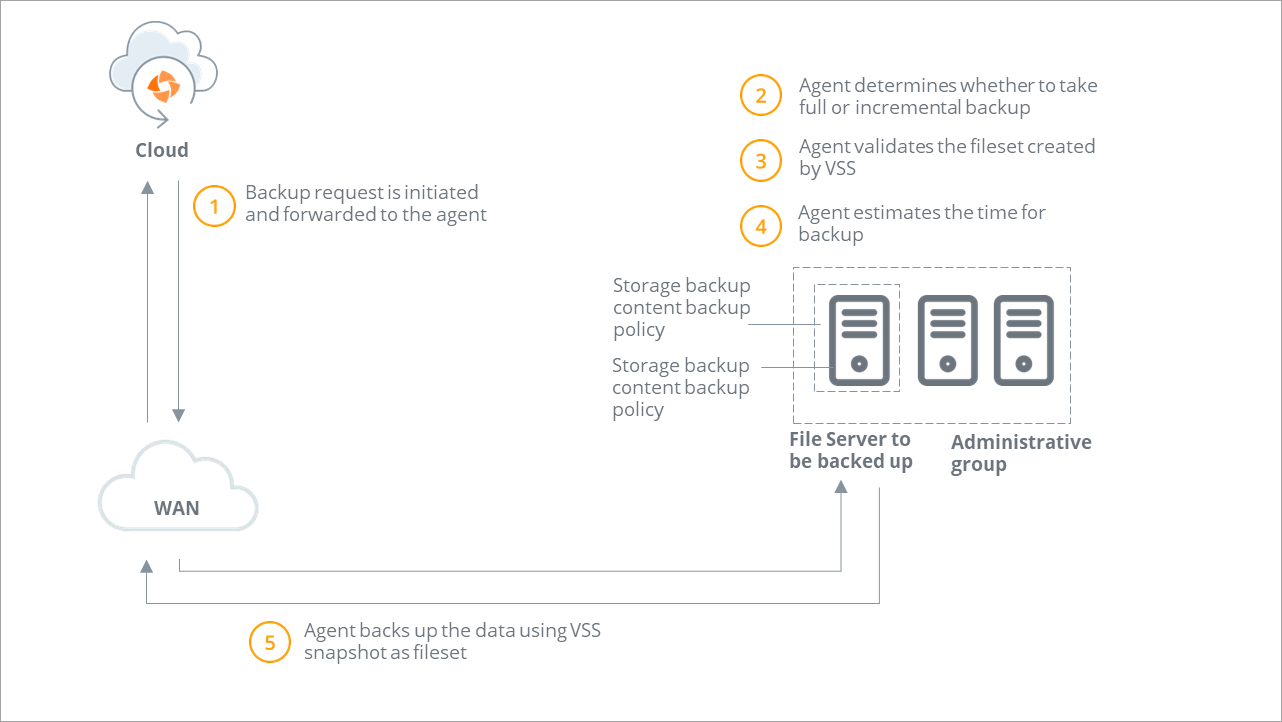
Backup workflow
| Step | Operation |
|---|---|
|
Step 1 |
A backup request is initiated and forwarded to the Hybrid Workloads agent. Druva checks if Hybrid Workloads agent is running.
|
|
Step 2 |
Druva determines the type of backup. If you or another administrator initiates the first backup, Druva performs a full backup. All subsequent backups triggered by administrators are incremental backups. |
|
Step 3
|
Hybrid Workloads agent verifies that the VSS service is running. If the VSS service is not running, Hybrid Workloads agent starts the VSS service and instructs VSS to create a recovery point. Hybrid Workloads agent validates if recovery points are created successfully. |
|
Step 4 |
Hybrid Workloads agent estimates the files and data to back up. |
|
Step 5
|
|
|
Step 6 |
After the backup completes, Hybrid Workloads agent deletes the created VSS recovery points. |
File servers with Linux operating system
This topic explains how data flow during data backup from the File servers with Linux operating system.
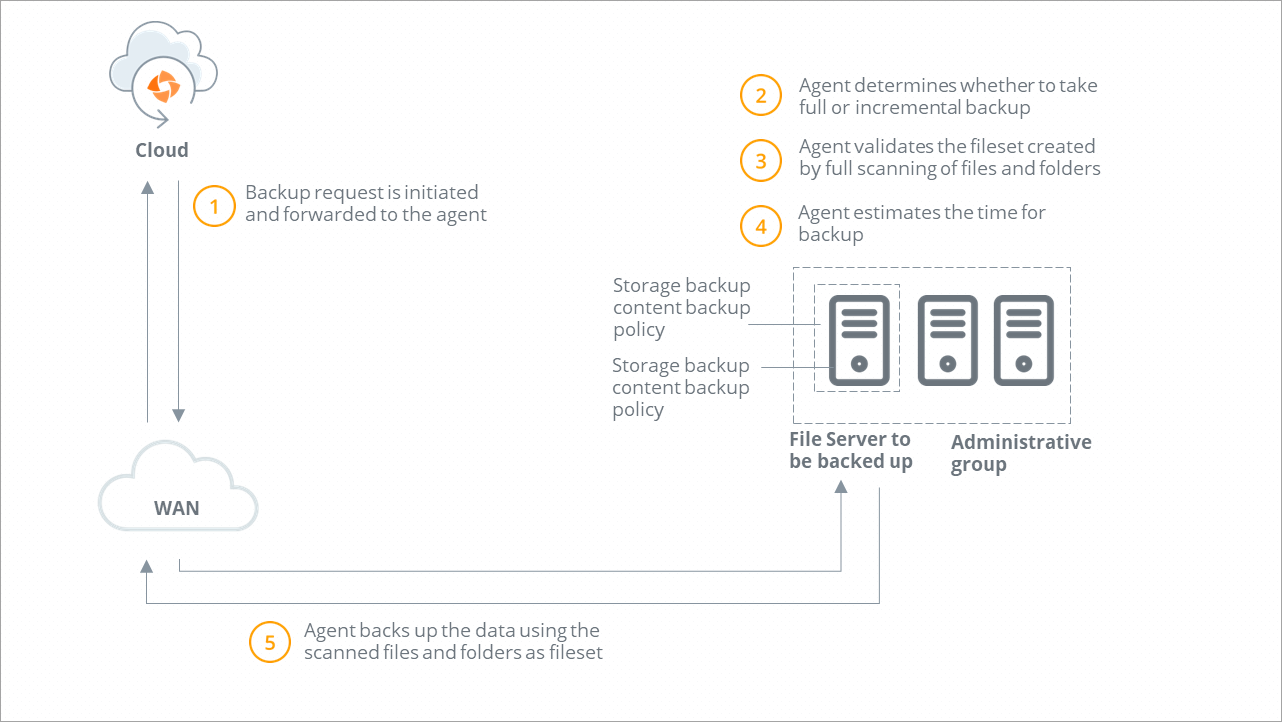
Backup workflow
| Step | Operation |
|---|---|
|
Step 1 |
A backup request is initiated and forwarded to the Hybrid Workloads agent. Druva checks if Hybrid Workloads agent is running.
|
|
Step 2 |
Druva determines the type of backup. If you or another administrator initiates the first backup, Druva performs a full backup. All subsequent backups triggered by administrators are incremental backups. |
|
Step 3 |
Hybrid Workloads agent performs the full scanning of live files and folders on the File server. |
|
Step 4 |
Hybrid Workloads agent estimates the files and data to back up. |
|
Step 5 |
Hybrid Workloads agent uses the scanned folders and files as the fileset for data transmission.
|
File server restore workflow
Restore workflow on the same File server
Restore workflow on a new File server
Steps to restore File server
NAS Share backup workflow
Business Enterprise Elite
This article provides the workflow diagrams and steps for data backup of NAS shares on Windows and Linux.
Backup workflow
The following workflow illustrates the data flow during backup of NAS shares on Windows or Linux:
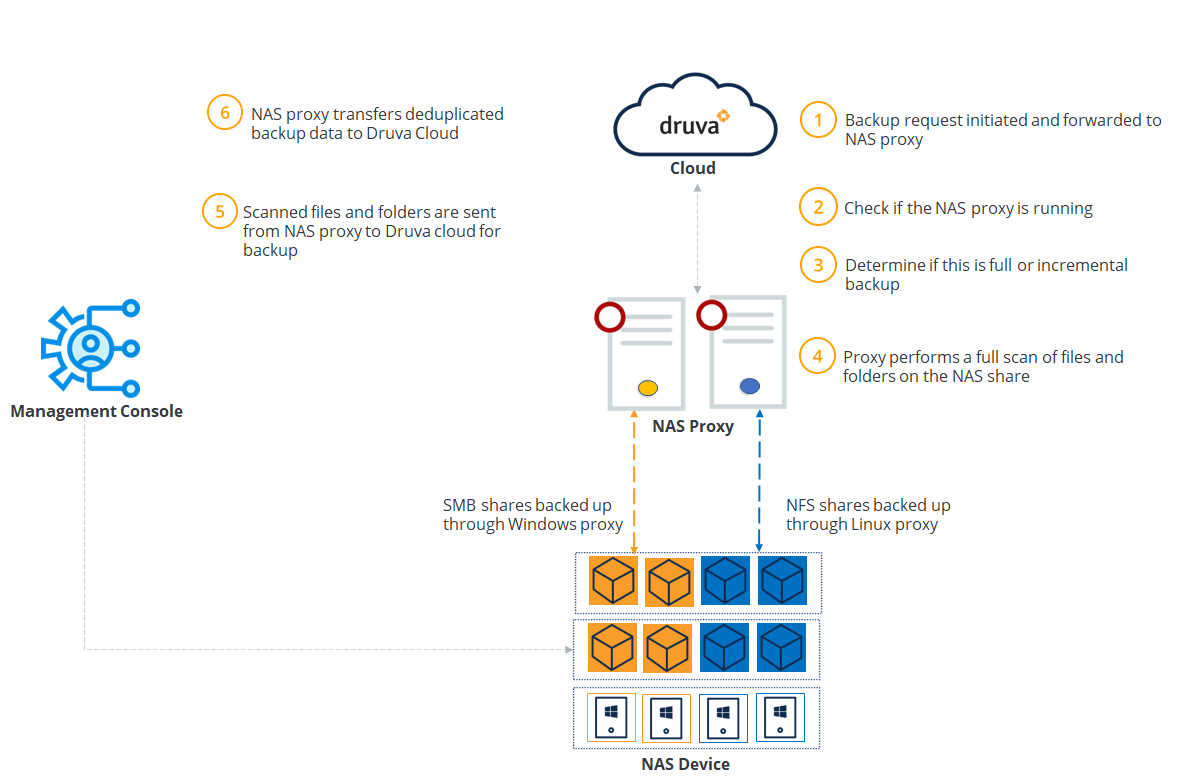
The following table summarizes the workflow steps.
| Step | Operation |
|---|---|
|
Step 1 |
A backup request is initiated and forwarded to the NAS proxy. |
|
Step 2
|
Druva checks if the NAS proxy is running.
|
|
Step 3
|
Druva determines the type of backup. If it is the first backup from any source, Druva performs a full backup. The subsequent backups are incremental backups. |
|
Step 4 |
Enterprise Workloads agent performs a full scan of the files and folders on the NAS share. |
|
Step 5 |
NAS proxy sends the scanned files and folders for backup to Druva Cloud.
|
| Step 6 | NAS proxy transfers the deduplicated backup data to the Druva Cloud. |
NAS Share restore workflow
Business Enterprise Elite
Workflow to restore on the source NAS share

Workflow to restore on a different NAS share
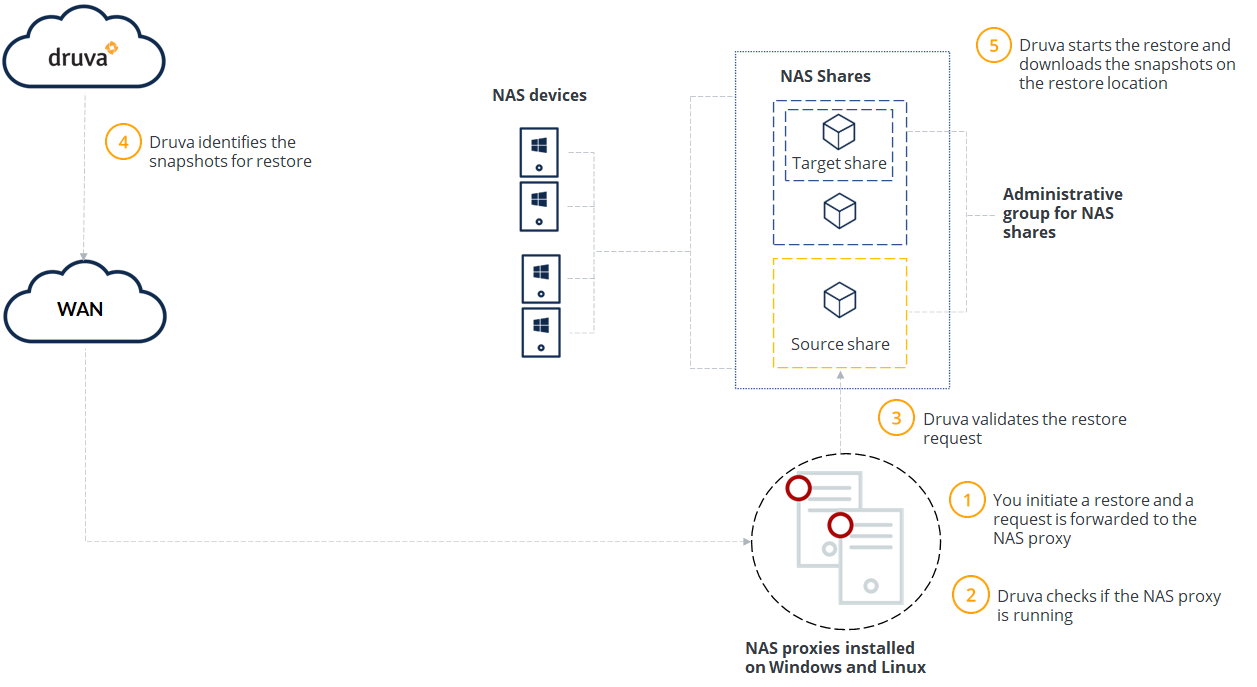
Steps to restore a NAS device
| Step | Operation |
|---|---|
|
Step 1 |
You initiate a restore operation. You can select the destination share for the restore of the selected NAS recovery point. For example, SMB share for a Windows restore and NFS share for a Linux restore. |
|
Step 2 |
Druva checks if the NAS proxy is running.
|
|
Step 3 |
Druva checks whether the share type of the restore destination is same as the sources and validates the restore request. |
|
Step 4 |
Druva identifies the recovery points to restore. |
|
Step 5 |
Druva starts the restore operation and sequentially downloads the recovery points to the restore destination. |
Note: For more information about restoring a NAS share, see Restore a NAS share.
What you must know about NAS share restore
This section highlights the important considerations of the NAS share restore:
- Hot recovery points reside on the CloudCache for the period specified in the CloudCache configuration. See Configure CloudCache for information on the configuration.
- If you are a group administrator, you can restore data only to the NAS share that belongs to the administrative group that you manage. Cloud administrators and data protection officers can restore data to shares across all administrative groups.
- You can restore data only to a share that has the same operating system as the source share.
- In the event of a network connection failure during restore, the NAS proxy attempts to connect to the Druva Cloud. After the network connection is restored, the NAS proxy restarts the restore from the state where it was interrupted.
- If you restart or reboot the NAS device during a restore, the restore operation is aborted.
- If you choose to restore data to the same location, the existing data at that location is overwritten unless a different restore setting is configured.
- The time zone for the recovery point timestamp and the file/ folder timestamp may differ if the NAS proxy and NAS shares are in different time zones.
- Long file and folder names are now visible in the Restore Data page. The Date Modified and Size information is visible on the next line.
- Restores are not supported to mapped drives.
- For CIFS/SMB shares:
- The following file attributes are supported:
- Not content-indexed
- Read-only
-
The following Access Control Lists (ACLs) are backed up and restored:
- Owner name
- Create time (ctime) of a file
- Modified time (mtime) of a file
- Primary group that the owner of the file belongs to
- System Access Control List (SACL)
- Discretionary Access Control List (DACL)
- The following file attributes are supported:
- For NFS shares,
- File permissions for file owners, groups, and users are restored.
- File attributes are not supported.
- The following Access Control Lists (ACLs) are backed up and restored:
- Owner name
- Modified time (mtime) in nanoseconds
- During restore to an alternate location, Druva honors the settings provided at the destination location. If inheritance is enabled on the file/directory to be restored, then the restored file/directory will have the inherited Access Control Lists (ACLs) from the parent of the destination directory. You must consider this behavior while choosing and configuring a destination directory, as Druva honors the destination's permissions.
- The following special permissions for files and folders are not supported:
- Sticky bit
- Backup and restore can run simultaneously on the same agent.
- The backup request triggered while a restore is in progress will be queued.
- Full scan restore will be marked with an
 icon.
icon.
MS-SQL server backup workflow
Full backups
Differential backups
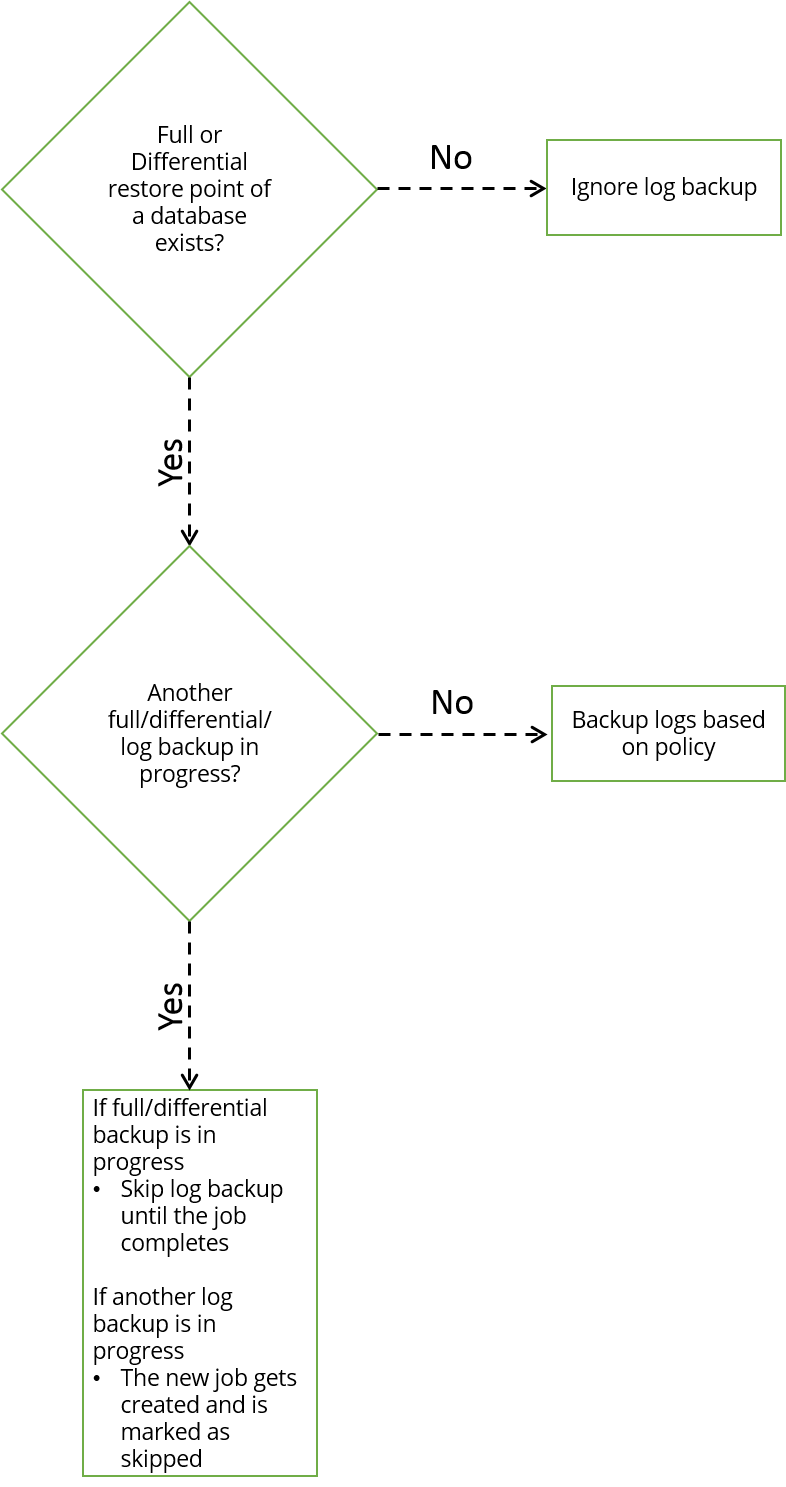
Transaction log backups
Transaction log in MS-SQL server records all the updates to the servers. Druva frequently backs up the transaction log based on the intervals you provide in the backup policy, and are triggered after a full or differential backup is complete. When Druva backs up transaction logs, transaction logs are truncated on the MS-SQL server. If a full backup is not complete for a server even once, the transaction log backups are not triggered. Transaction logs provide a tighter recovery point objective and are dependent on recovery points created using the full or differential backup. Log backups are not applicable for databases in simple recovery mode.
Understanding log backup schedules
Backed up transaction logs are retained based on daily retention period. Weekly, monthly, and yearly retention policies are not applicable for log backups.
For example, you specify an interval 30 minutes for log backups. In the example above, the full backup is triggered on February 1, 2017 at 12:00:00 PM, and completes on February 1, 2017 4:00:00 PM. At 4:30 PM, a log backup is triggered. Subsequently, the transaction log is backed up every 30 minutes until 9:00:00 PM when differential backup kicks in.
Restoring from a transaction log
When you restore your database using a transaction log, you can:
- Choose a point-in-time when a transaction occurred
- Choose a marked transaction in the transaction log and restore your database to that point.
- Choose a point-in-time when a transaction occurred and leave the database in standby mode
When you choose a point-in-time or a marked transaction, Druva restores your database using a recovery point. After restoring your database using a recovery point, it applies transaction logs to your database up to the selected transaction. This lets you restore your database to a time between two recovery points, allowing a tighter recovery point objective.
Workflow
The following flowchart depicts the transaction log workflow:
Limitations on transaction mark backup and restore for AG backup sets
Druva does not back up transaction marks if the log backups are taken from any secondary nodes.
MS-SQL server does not replicate transaction marks related to the transaction logs on the secondary nodes for databases in availability group (AG). If you try to restore a transaction mark for an AG backup set from Druva, you might or might not see transaction marks that were created on the MS-SQL server depending on whether the log backup happened from the primary or secondary node.
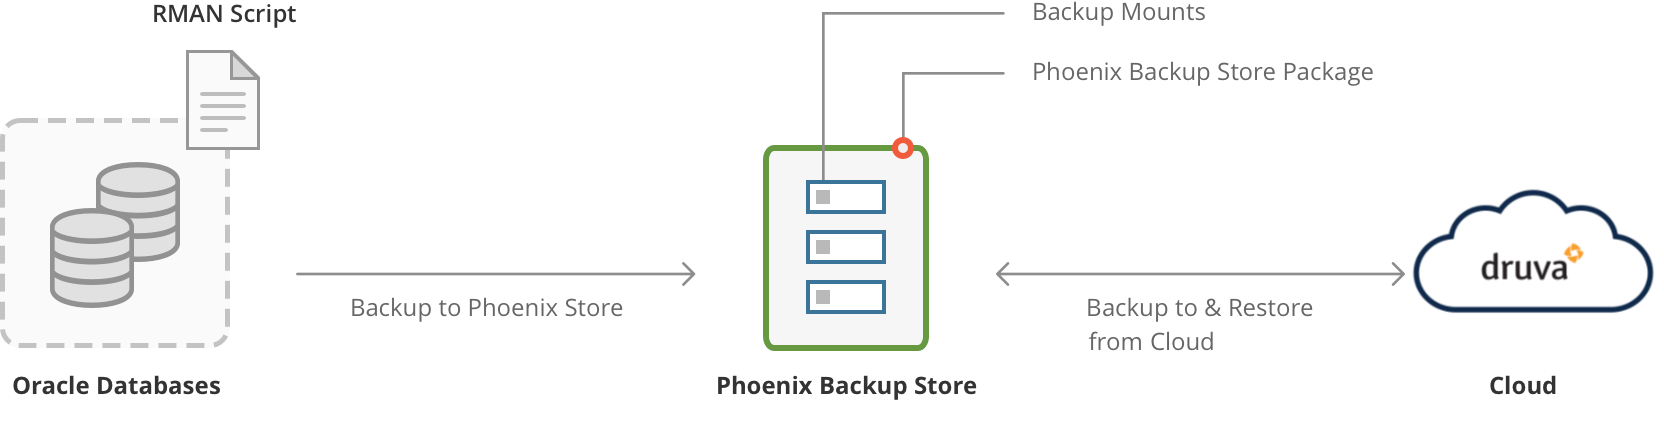
Oracle database backup workflow using Phoenix Backup Store
Business Enterprise Elite
The Druva backup workflow for Oracle is described below:
| Step | Description |
|---|---|
| Step 1 | An Oracle Database Administrator triggers the RMAN script with the name of the mount on the Phoenix Backup Store. The RMAN creates an Oracle RMAN backup and stores it on the mount. The Phoenix Backup Store creates a recovery point of the Oracle RMAN backup stored on the mount. |
| Step 2 | The Phoenix Backup Store creates a ZFS recovery point of the Oracle RMAN backup and applies a timestamp to the recovery point. The timestamp corresponds to the PUT request made to the Phoenix Backup Store after RMAN completes writing the Oracle RMAN backup to the backup mount. For more information, see Phoenix Backup Store API reference. |
| Step 3 | Phoenix Backup Store uploads the recovery point to the Druva Cloud. This recovery point serves as a recovery point. After the recovery point is uploaded to the cloud, it is deleted from the Phoenix Backup Store. |
Every time the Database Administrator runs the RMAN script, the RMAN creates an Oracle RMAN backup on the mount. The Phoenix Backup Store creates a new recovery point of every new Oracle RMAN backup that RMAN creates and stores on the mount and uploads the recovery point to the cloud creating a new recovery point.
RMAN can store backup data until sufficient storage is available on the Phoenix Backup Store. If sufficient storage is not available, RMAN cannot store backups and the backup jobs fail. Ensure that you periodically remove Oracle RMAN backups from the the Phoenix Backup Store or increase storage capacity on it.
Oracle database restore workflow using Phoenix Backup Store

| Step | Operations |
|---|---|
|
Step 1 |
The administrator selects a recovery point and initiates a restore. |
|
Step 2 |
The administrator can restore a recovery point to the original Phoenix Backup Store or an alternate Phoenix Backup Store. |
|
Step 3 |
The recovery point is unpacked and downloaded as an Oracle RMAN backup to a location on the Phoenix Backup Store. The Oracle RMAN backup download location on the Phoenix Backup Store is /mnt/restores/<backupmount_name>/<restore_job_id>/data where:
|
|
Step 4 |
The recovery point location is mapped to the RMAN host so that RMAN can use data stored on it to restore databases to the Oracle instance. |
|
Step 5 |
The Database Administrator restores the Oracle RMAN backup to the Oracle instance. |
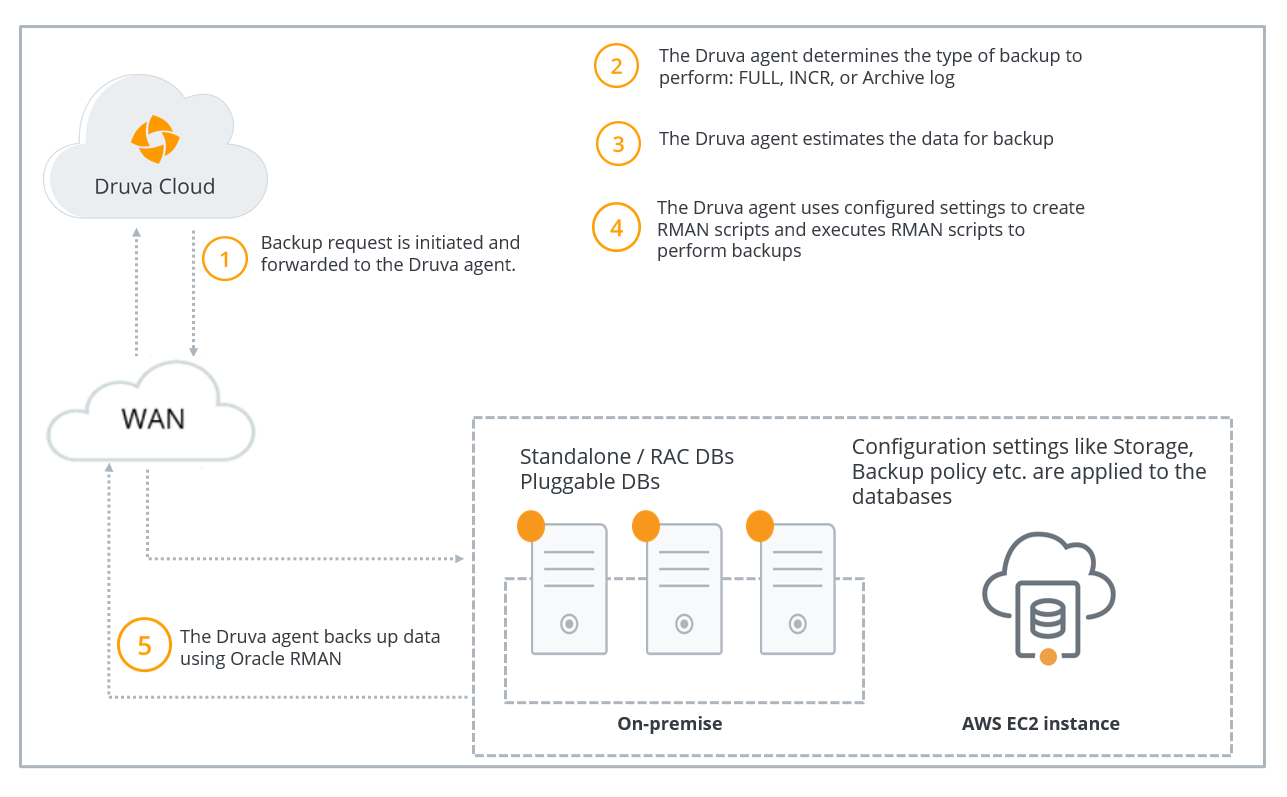
Oracle Direct to Cloud database backup workflow
The following diagram depicts the data flow at the time of backing up Oracle databases.
| Step | Operation |
|
Step 1 |
A backup request is initiated and forwarded to the Druva Oracle agent. Druva checks if the Hybrid Workloads agent is running.
|
|
Step 2 |
Druva determines the type of backup. If you or another administrator initiates the first backup, Druva performs a full backup. All subsequent backups triggered by administrators are incremental backups. Druva also performs archive log backups based on the settings configured to back up archive logs. |
|
Step 3 |
Hybrid Workloads agent estimates the data files to back up. |
|
Step 4 |
Hybrid Workloads agent uses the configured backup settings to create corresponding RMAN scripts. Hybrid Workloads agent performs some pre-checks on the configured instances for the RAC databases and only the eligible instances are used for backup. For more information about the pre-checks, see Backup configuration pre-checks. |
|
Step 5 |
Hybrid Workloads agent backs up data using the Oracle RMAN and streams the deduplicated backup data directly to the Druva Cloud. For the RAC databases, if the primary instance on which backup was initiated goes down, the backup fails. After the transfer completes, the recovery point is created. |
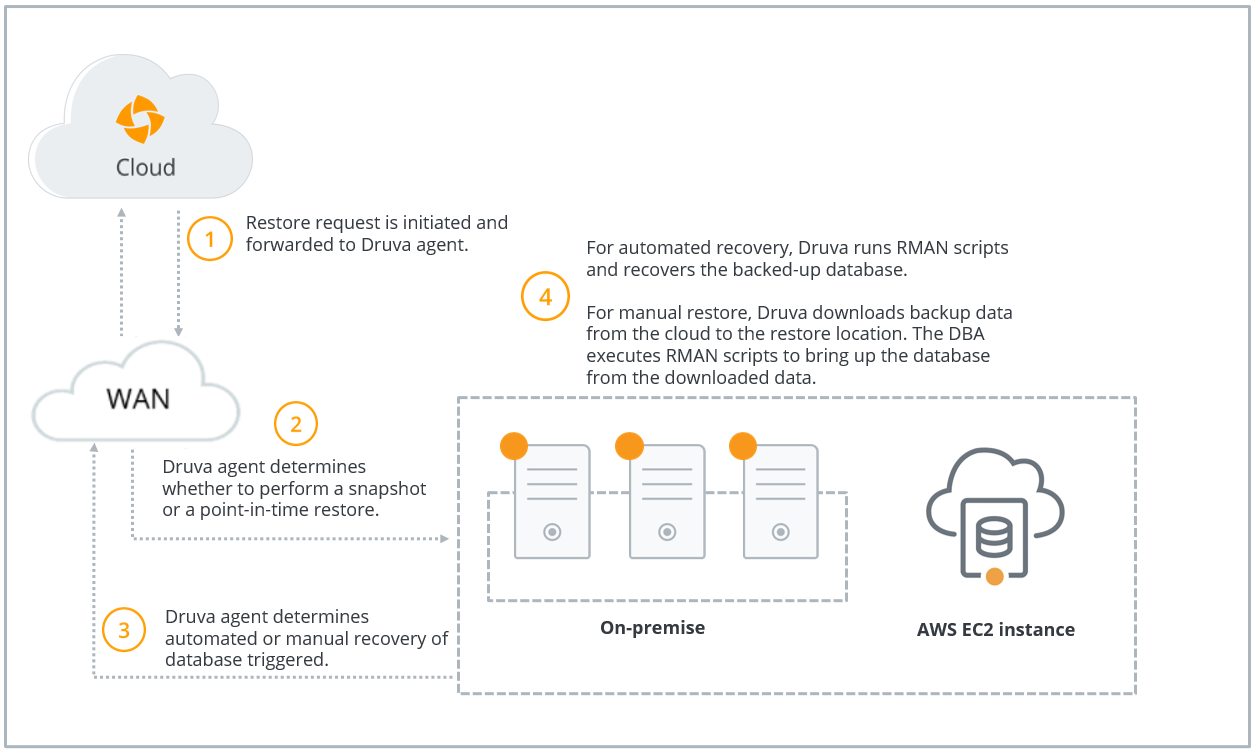
Oracle Direct to Cloud database restore workflow
The following diagram depicts the data flow at the time of restoring Oracle databases.
| Step | Operation |
| Step 1 | Administrator selects a recovery point and initiates a restore. Druva agent performs pre-checks before restore and only the eligible instances are used for restore. For more information, see Restore pre-checks. |
|
Step 2 |
Administrator can choose to restore database from a recovery point or to a point in time. Additionally, the administrator can also choose to restore the wallet files from a recovery point or to a point in time. |
|
Step 3 |
Druva determines the restore option selected by the administrator.
|
|
Step 4 |
|
VMware virtual machine backup workflow
Business Enterprise Elite
Overview
Druva performs backup on virtual machines based on the schedule defined in the backup policy, that virtual machine is a part of or an on-demand backup triggered from Management Console. This involves the interaction of Druva components and VMware components.
The following diagram depicts the data flow at the time of backing up virtual machines.
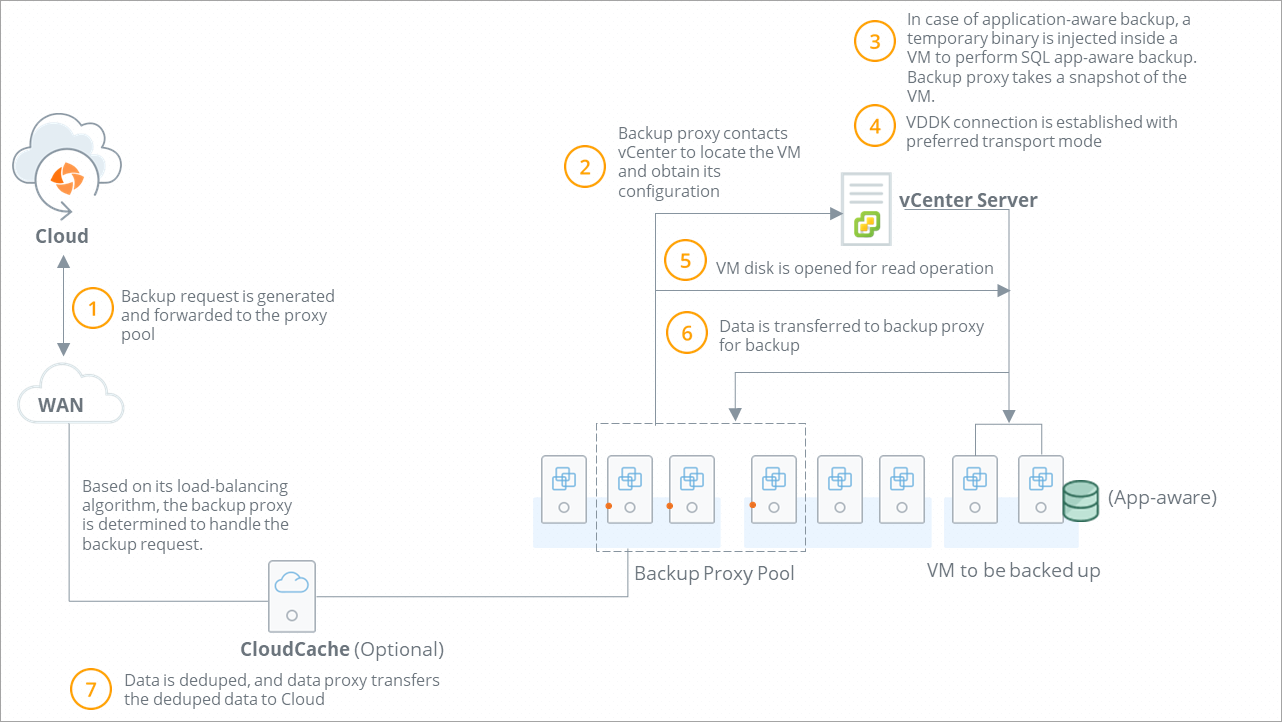
Virtual machine backup workflow
| Step | Operation |
|---|---|
|
Step 1 |
Virtual machine backup request is initiated based on,
Druva forwards the backup request to the backup proxy pool.
|
|
Step 2 |
|
|
Step 3 |
In case of application-aware backup:
The backup proxy queries the ESXi hypervisor or the vCenter server to create VM recovery points that contain VMDK files and the VMX files of the virtual machines. Ensure that enough storage is available on the local datastore for the VM recovery point. The backup proxy uses:
|
|
Step 4 |
Backup proxy establishes a VDDK connection to the VM recovery point using a transport mode to read the VM data. |
|
Step 5 |
Backup proxy starts reading the virtual machine recovery point. |
|
Step 6 |
The backup proxy reads the virtual machine recovery point and prepares to send the backup data to CloudCache (if configured) or Druva Cloud. |
|
Step 7 |
Backup proxy transfers the deduplicated backup data to the Druva Cloud. After the transfer completes, the backup proxy deletes the virtual machine recovery point. |
Related articles
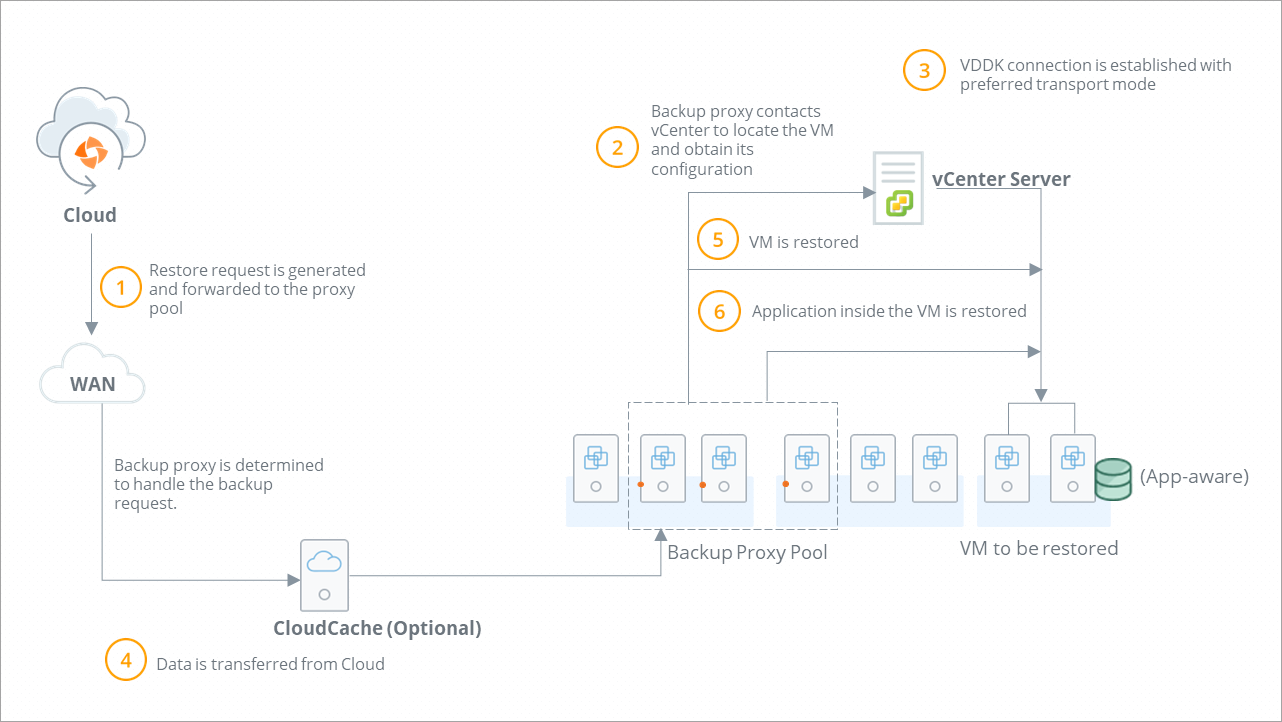
VMware virtual machine restore workflow
The following diagram illustrates the restore workflow:
| Step | Operations |
|---|---|
| Step 1 |
Administrator initiates virtual machine restore. Druva forwards the restore request to the backup proxy pool.
|
| Step 2 |
|
| Step 3 |
VDDK connection is established with the virtual machine with SSL transport mode. Backup proxy checks if it is a full virtual machine restore or a VMDK file restore. Backup proxy contacts the virtual machine and establishes a write connection to restore virtual machine data.
|
| Step 4 | Backup proxy obtains the virtual machine data from Druva Cloud. |
| Step 5 |
Restore operations starts. Druva checks if the restore completes successfully.
|
| Step 6 | For Microsoft SQL database (with application-aware backup), the application is restored. |
Hyper-V virtual machine backup workflow
Business Enterprise Elite
Druva backs up virtual machines based on the schedule defined in the backup policy, or if a backup is triggered from Management Console. The backup workflow is explained below:
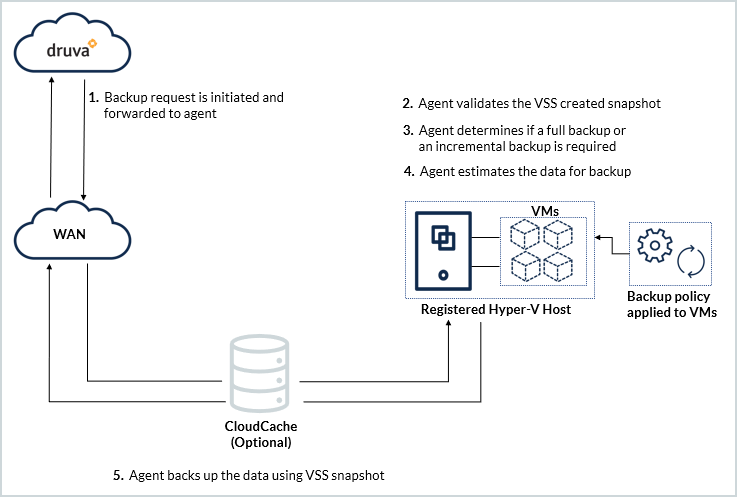
Virtual machine backup workflow
| Step | Operation |
|---|---|
|
Step 1 |
Virtual machine backup request is initiated based on:
Druva forwards the backup request to the agent. |
|
Step 2 |
Hybrid Workloads agent verifies that the VSS service is running. The Hybrid Workloads agent requests the VSS service to create a recovery point. If the VSS service is not running, Hybrid Workloads agent starts the VSS service and instructs VSS to create a recovery point. Druva recommends that you enable Backup (volume recovery point) under Hyper-V Integration Services. If the Backup (Volume recovery point) is enabled, the VSS service can create a recovery point without interrupting services on the virtual machine. Hybrid Workloads agent validates if recovery points are created successfully and initiates the backup job.
Note: Integration Services are available for virtual machines with Windows guest OS. However, Microsoft provides Integration Services for certain Linux distributions also. For more information, see: On Windows Server 2016 or later, the Hybrid Workloads agent can back up virtual machines using the Resilient Change Tracking (RCT) feature if:
The Hybrid Workloads agent can back up virtual machines using RCT on a Hyper-V host that meets the criteria above and:
|
|
Step 3 |
Druva determines the type of backup.
|
|
Step 4 |
Agent estimates the data for backup |
|
Step 5 |
Agent backs up the data based on the VSS provided recovery point |
Next steps
If you want to configure Druva for backup and restore, see:
To learn more, see:
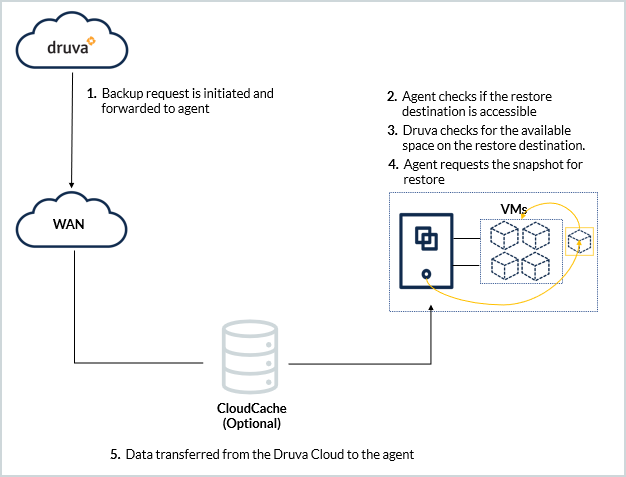
Hyper-V virtual machine restore workflow
| Step | Operations |
|---|---|
|
Step 1 |
Administrator initiates virtual machine restore. Druva forwards the restore request to the Hyper-V server agent. |
|
Step 2 |
Druva checks if the Hybrid Workloads agent is running. If the agent is running, Druva restores the virtual machine. If the agent is not running, the restore job is queued until the agent is ready for backup and restore. |
|
Step 3 |
Hybrid Workloads agent checks if the destination Hyper-V server has sufficient storage to restore the virtual machine. |
|
Step 4 |
Hybrid Workloads agent checks if it is a full virtual machine restore or a virtual disk restore. Agent contacts the server and establishes a write connection to restore virtual machine data.
|
|
Step 5 |
Druva Cloud sends the recovery point to the Hyper-V server agent. |
|
Step 6 |
Restore operations start. Druva checks if the restore completes successfully.
|
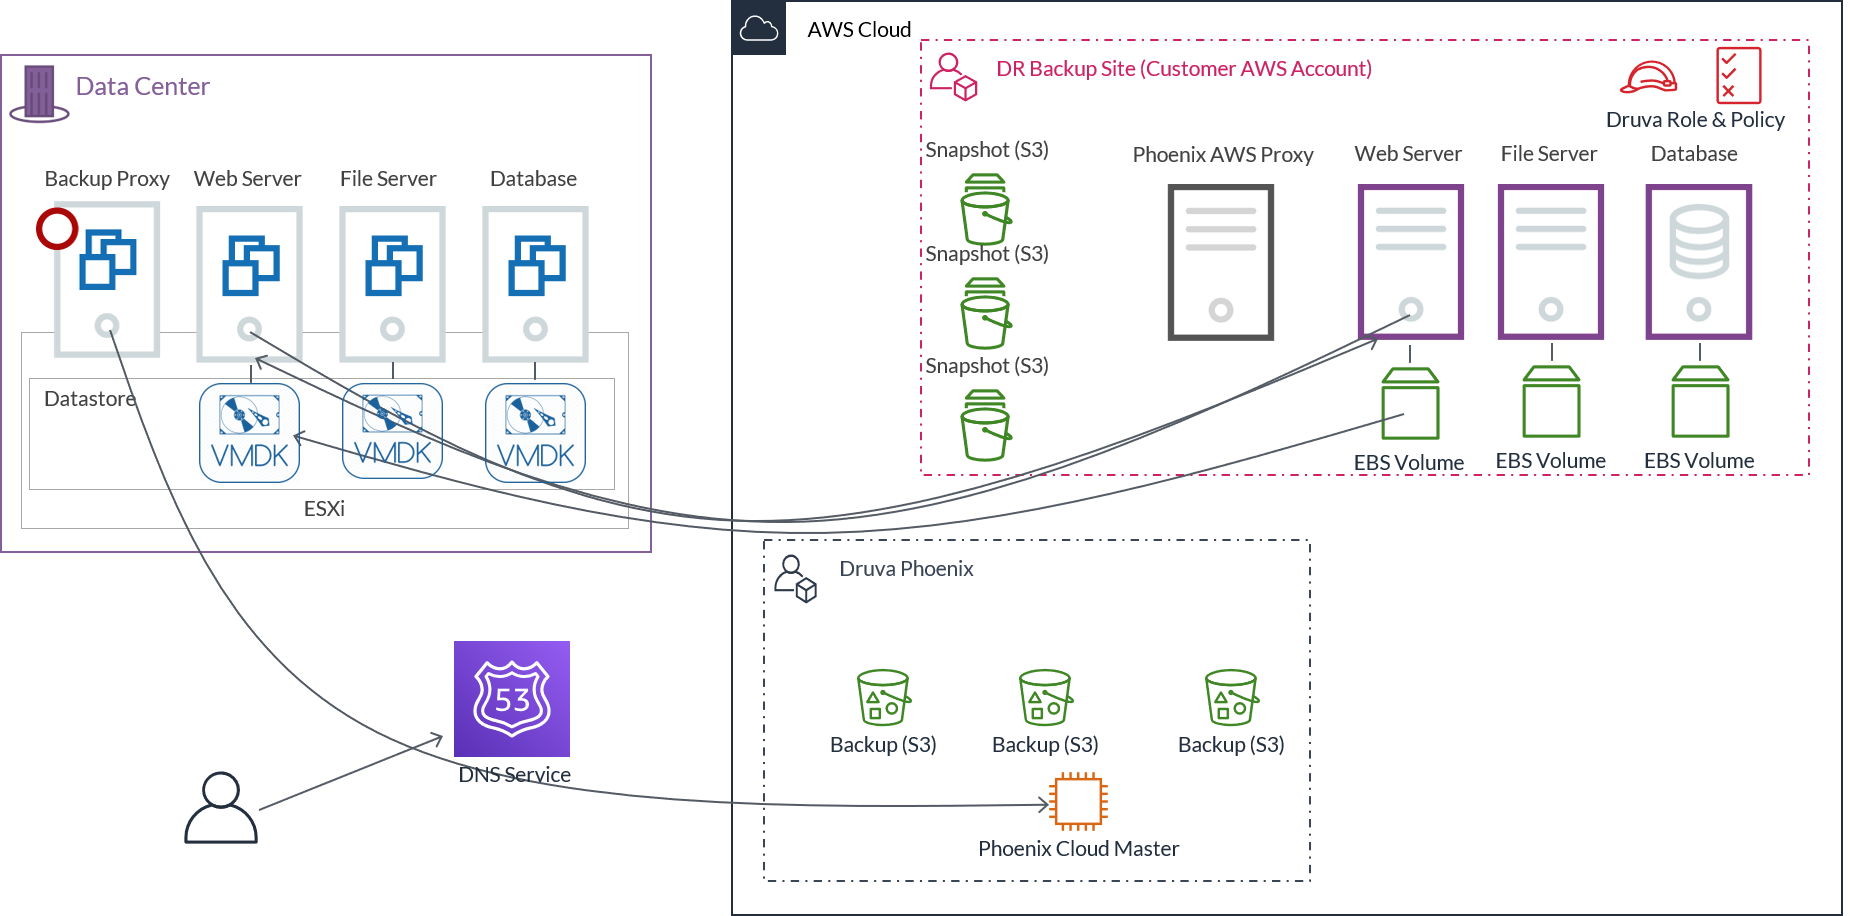
Druva disaster recovery workflow
Enterprise Workloads Editions
❌ Business| ✅ Enterprise (Purchase Separately) | ✅ Elite
Disaster recovery stages
The following table lists the different stages of the disaster recovery process.
For definitions of different terms and concepts used, see Disaster recovery concepts.
| Stage | Description |
|---|---|
| Restore |
With Disaster Recovery, the Druva AWS proxy:
|
| Failover |
The Druva AWS proxy replicates the entire virtual machine the first time it creates a DR copy. Subsequently, it incrementally updates the DR copy based on the replication frequency specified in the DR plan. This DR copy replaces the copy that is present in your AWS account. Druva AWS proxy maintains only the latest DR copy of a virtual machine. At the time of failover, the Druva AWS proxy:
|
| Failback | You can failback the EC2 instances (failed over) and recover the virtual machine with a single click in your virtualization infrastructure in a few hours after it has been recovered to your AWS account during failover. |
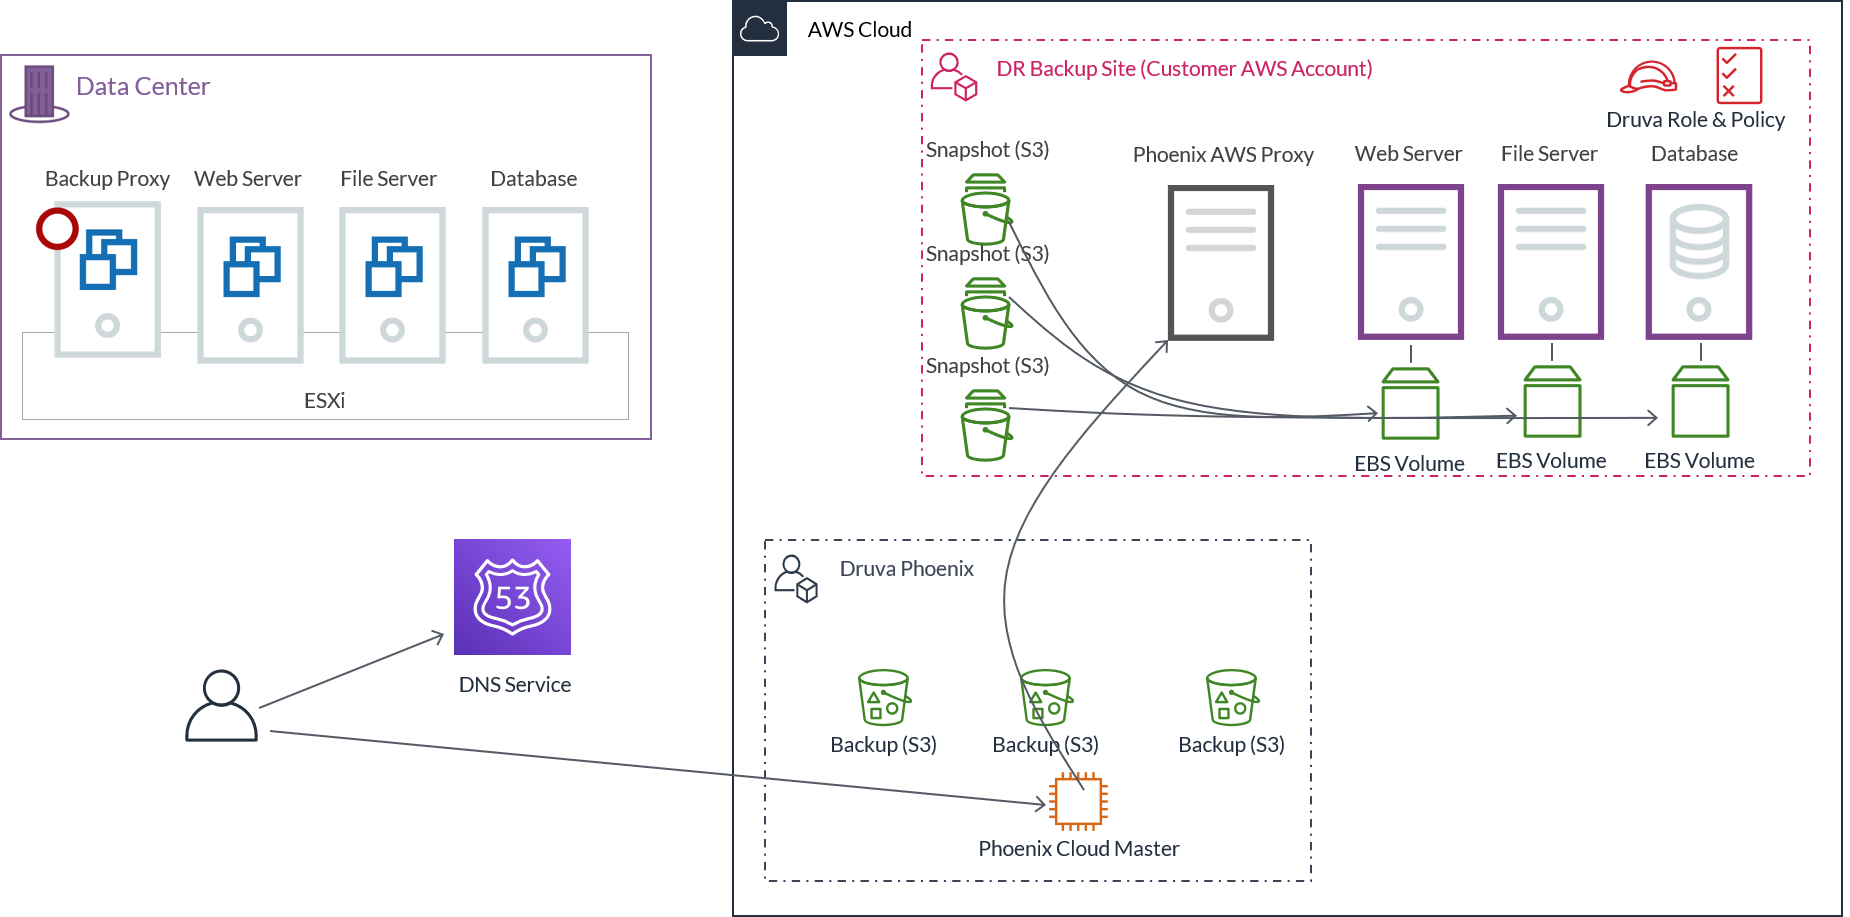
The following diagram depicts the Disaster Recovery workflow:
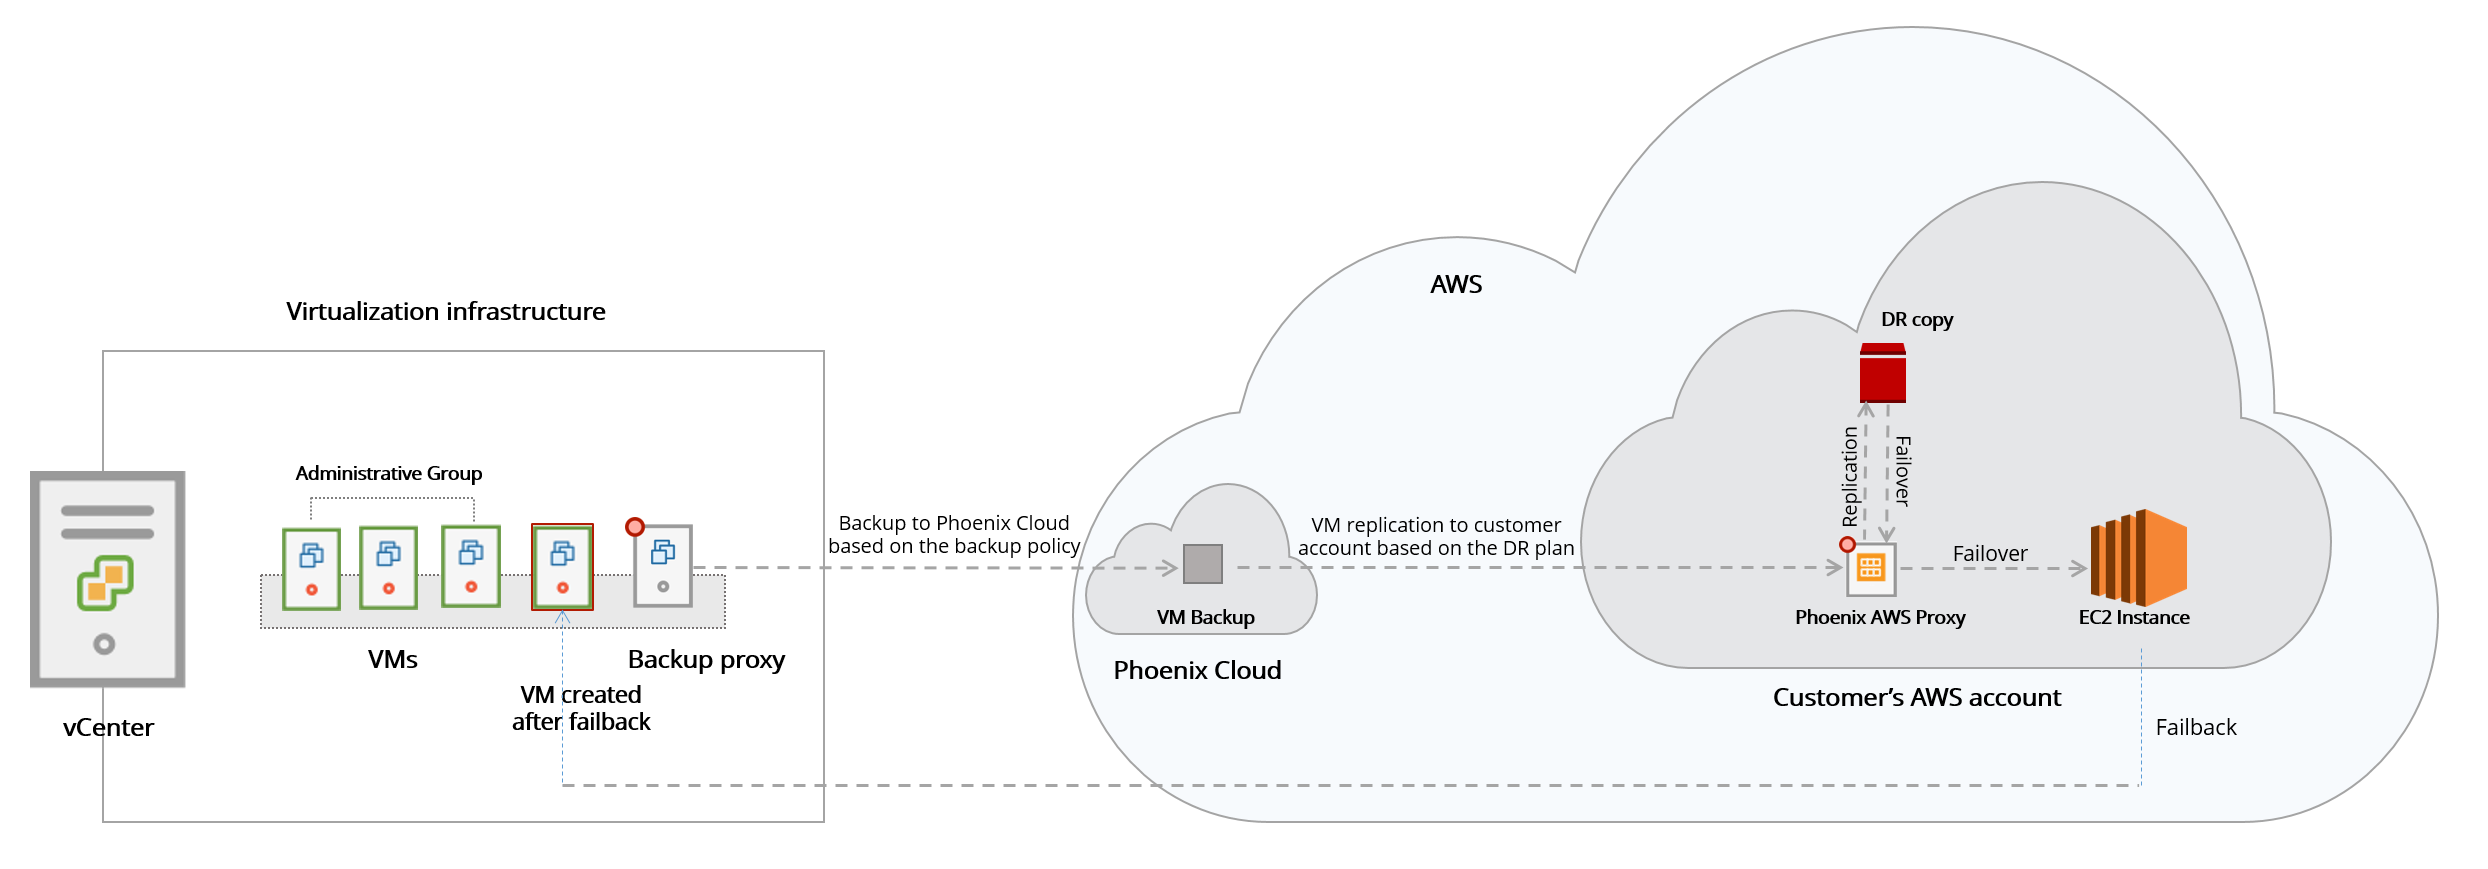
How disaster recovery works
Disaster Recovery solution takes advantage of the backups of the data center to the Druva Cloud. The DR Backup site is deployed in the customer’s AWS account and since Druva is also deployed on AWS, data transfer between the accounts in the same region is seamless.
The latest backup recovery point is copied into your AWS account and stored as writeable snapshots.
The same process is repeated for all VMDK disks attached to the protected VMs.
But how is it happening, you might ask? The entity executing all these tasks is the Druva AWS proxy. The Druva AWS proxy moves the data from Druva S3 to the customer’s account but to make this transition happen, the EC2 instance running the Druva AWS proxy needs a set of permissions. These permissions are defined in the Druva role and policy added to the customer account during proxy deployment.
In a nutshell, this process is the data path from the primary data center to the backup site in the cloud. The frequency of the updates is configurable in Druva and it should be set according to the required RPO.
For more information on DR plans and creating DR plans, see Disaster Recovery Plan.
Restore workflow
Let's discuss the DR restore workflow flow briefly and know what is happening during the process of copying data from Druva account to the customer account.

- The Druva Cloud tells the Druva AWS proxy to copy the virtual machine backup data from S3 bucket in Druva.
- The Druva AWS proxy then makes an API call to execute this command.
- The data from S3 goes through the Druva AWS proxy to the writable snapshot and the data path for this Druva AWS proxy is the Internet gateway.
We introduce one more entity here, which is S3 endpoint. It ensures that the data coming from one account to another does not leave the AWS network if you are using PrivateLink..
Failover workflow
To ask what a failover is, is to ask what happens when disaster strikes and the primary data center becomes unavailable. Here’s what happens.
- First, an administrator triggers the failover from the Management Console and Druva Cloud instructs the Druva AWS proxy to initiate the failover.
- The EBS snapshot is used to create an EBS volume. The Druva AWS proxy creates an EC2 instance in your AWS account. You can choose the EC2 instance type from the Management Console or let Druva automatically assign the instance type (recommended) when you configure the VM for DR. The EBS volume gets attached to the EC2 instance.
- Once the process has completed, EC2 instance is restarted and is ready to support its workload. The same process is repeated for all protected VMs.
- The last step is to update the DNS servers to redirect the traffic to the IP addresses of the new EC2 servers. This can be achieved via post-boot scripts.
Druva provides advanced orchestration capabilities allowing to decide on the failover sequence, creating dependencies between EC2s and adding scripts for execution during EC2 boot. An example of dependency would be an e-commerce Web server storing data in the database. It wouldn’t make sense to start Web EC2 before the database is available.
Disaster Recovery also allows for DR testing in a different VPC or subnet.
Failback workflow
The starting point for failback is a freshly rebuilt primary data center and backup DR site containing data which needs to be transferred back to the primary site.
- The first step is to redeploy the Druva backup proxy VM to establish communication with the Druva Cloud and get the backup configuration from the cloud.
- In the next step, the backup proxy launches a template VM, which reaches out to the EC2 instance and get its configuration information – number of CPUs, memory size, number of disks, and so on.
- Based on this information received, it attaches one or more VMDK disks and starts copying data from the EBS volumes to the VMDK disks.
- Once the download is completed, the template VM is rebooted with the configuration parameters read from the EC2 instance. After that, the server is operational. The same process is repeated for all protected VMs.
- The last step is to update the DNS to redirect the traffic back to the primary site.
Druva AWS proxy setup workflow
Druva AWS proxy deployment comprises of the following steps:
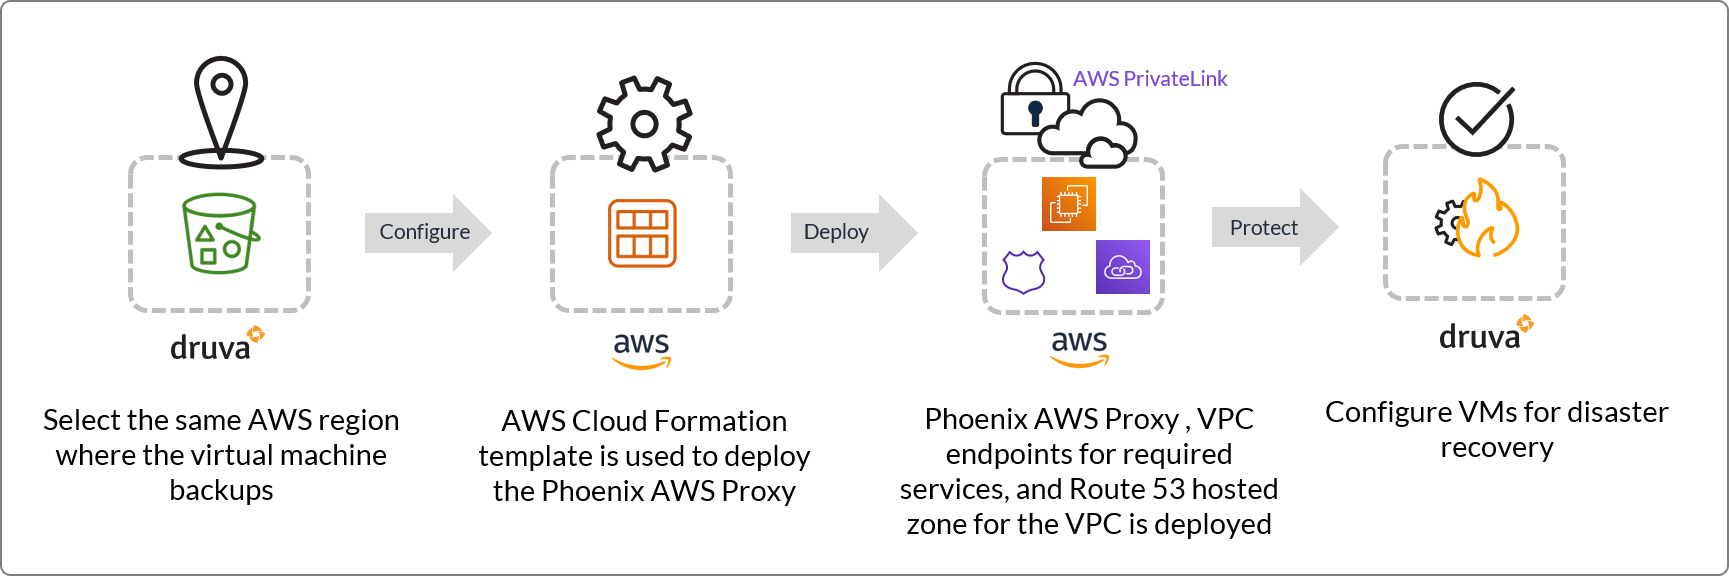
Step 1: Select an AWS region on the Management Console
Step 2: Create a CloudFormation Stack on the AWS Management Console
Step 3: View deployed proxy
Data backup with CloudCache deployment workflow
 Business Enterprise Elite
The following diagram illustrates how data flows during backup in a CloudCache deployment.
| Step | Description |
|---|---|
|
Step 1
|
Hybrid Workloads agent backs up the server data according to the schedule defined in the backup policy. At the scheduled time, Druva Cloud initiates the backup request and forwards it to Hybrid Workloads agent.
|
|
Step 2
|
|
|
Step 3
|
As per the predefined schedule, CloudCache synchronizes the backup data to the storage that Druva Cloud assigns.
|
Note: Administrators must configure the synchronization schedule and a bandwidth that CloudCache can consume. For more information, see Configure CloudCache.
Data restore with CloudCache deployment workflow
Business Enterprise Elite
The following diagram illustrates how data flows within the Druva setup at the time of hot restore.
| Step | Description |
|---|---|
|
Step 1 |
Druva Cloud initiates the restore request and forwards it to the Hybrid Workloads agent. |
|
Step 2
|
|
Note: If the connection to CloudCache is interrupted at the time of a backup, the Hybrid Workloads agent backs up data directly to the Druva Cloud. Since the deduplication data is available on the Druva Cloud, Hybrid Workloads agent requires a connection to Druva Cloud and CloudCache to restore data. Ensure that the Hybrid Workloads agent can connect to Druva Cloud and CloudCache.
During a CloudCache disconnection, if a few data blocks remain in CloudCache and are not fully transferred/flushed to the Cloud, any attempts to restore a warm snapshot will fail.
Ports and communication protocols for VMware
Business Enterprise Elite
Druva communicates with your virtual infrastructure to backup and restore virtual machine data. This communication happens via ports and communication protocols that are secure for communication and transition of data.
Druva uses a combination of Transport Layer Security (TLS) and Secure Socket Layer (SSL) protocols for establishing a connection and initiating communication between Druva components and your virtual infrastructure components such as vCenter Server, ESXi hosts, and virtual machines.
The following diagram depicts the ports and communication protocols that are used by Druva for secure connection and communication during the backup and restore operations.
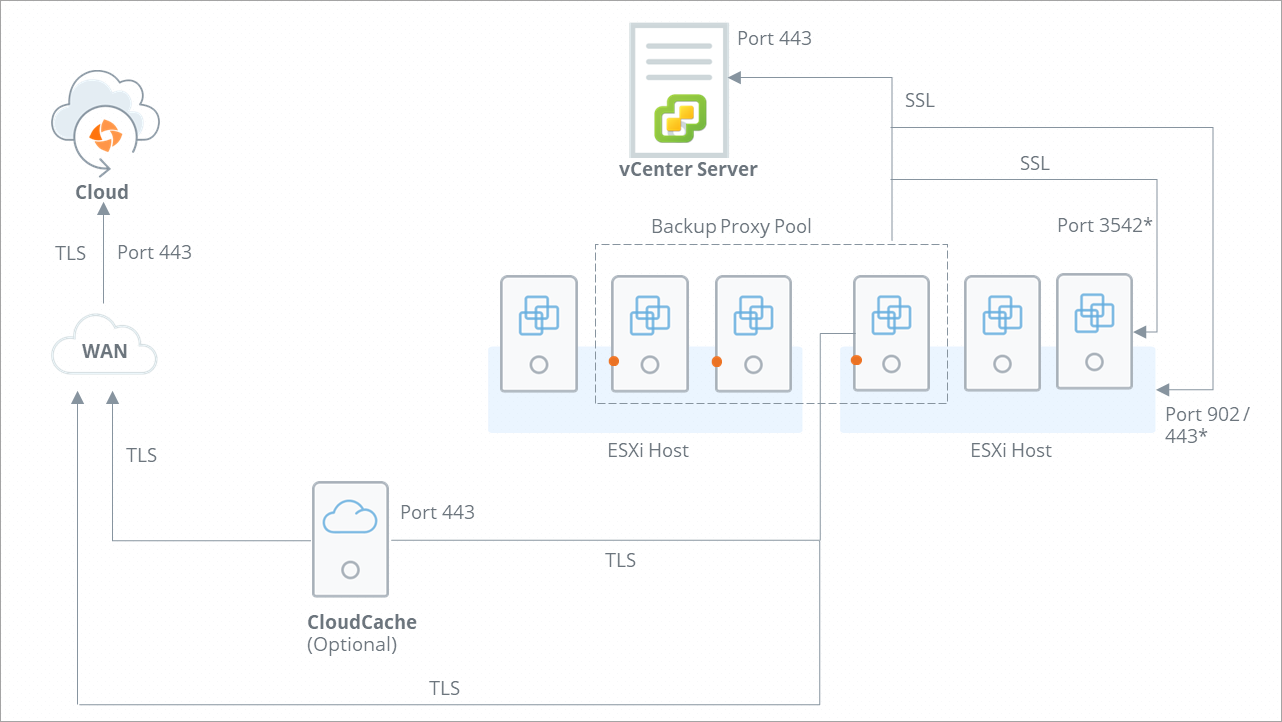
The following table describes the port and communication protocols used for communication between Druva and various VMware components.
Note: Communication happens from a backup proxy to other parties on various ports. Here, the backup proxy is the communication initiator, which is unidirectional. These ports are used for outgoing (unidirectional) communication, not incoming communication. However, data in the form of a response can flow in the opposite direction. Standard system ports such as 22 (SSH) and 2049 (NFS-SERVER) are used for incoming requests.
|
Port |
Communication Protocol |
Description |
|---|---|---|
|
443 |
HTTPS+SSL |
Druva uses Port 443 to establish a secure connection and communication between the following:
Note: Backup proxy establishes connection with ESXi host over Port 443 only if it registered with Druva as Standalone ESXi. If the ESXi host is registered with Druva through vCenter Server, backup proxy communicates with the ESXi host over Port 902. |
|
902 |
TCP/UDP |
Druva uses port 902 to establish a connection between the backup proxy and ESXi host registered with Druva through vCenter Server. Note: By default, VMware uses the port 902 for the vixDiskLib connection (All Transport Modes). You must use the VixDiskLib to access a virtual disk. All operations require a VixDiskLib connection to access virtual disk data. |
| 3542 | HTTPS+SSL | For application-aware backups, the backup proxy uses VMware Tools to inject two executables and a few supporting files such as certificates into the guest OS of the virtual machine. When the executables run, they start guest OS processes called guestossvc and PhoenixSQLGuestPlugin. The backup proxy uses the opened port 3542 on the guest OS so that it can communicate with guestossvc to run SQL Server backups. Ensure that this port is open on the guest OS. The backup proxy also uses this port to restore databases to the virtual machine. |
| 3545 | HTTPS+SSL | For application-aware backups, the SQL executable service PhoenixSQLGuestPlugin queries the Microsoft VSS APIs to back up and restore SQL Server databases. The guestossvc service interacts with the PhoenixSQLGuestPlugin service using this port. The PhoenixSQLGuestPlugin service cannot directly communicate with the backup proxy. |
|
3389/22
|
TCP/UDP |
During the backup cycle, the backup proxy sends network packets to Windows virtual machines (where VMware tools are installed) on port 3389 to identify if the RDP port is open or not. For Linux virtual machines, the port is 22, which is used for SSH. This is used for Disaster Recovery or DR restores. |
| 123 | UDP | Backup proxy accesses NTP server on Port 123 (UDP) for time synchronization. |
|
443 |
HTTPS+TLS |
Druva uses TLS 2.0 or a secure connection that happens between the following:
|
Firewall rules for protection of Enterprise Workloads
For more information, see article.
Reference articles
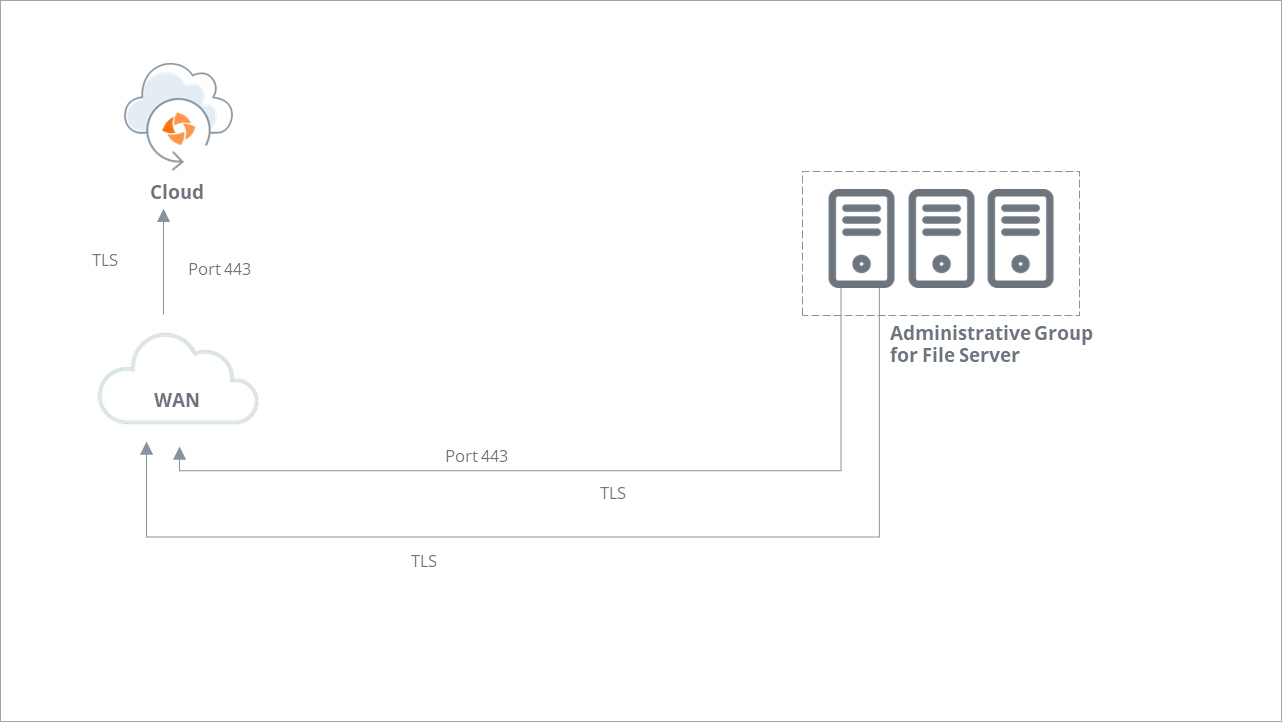
Ports and communication protocols for File server
Druva communicates with your File servers to backup and restores the data from your File servers. This communication happens through ports and protocols that are secure for communication and transition of data.
Druva uses Transport Layer Security (TLS) protocol for establishing a connection and initiating communication between Druva components and your File servers.
The following diagram depicts the ports and communication protocols that are used by Druva for secure connection and communication during the backup and restore operations.
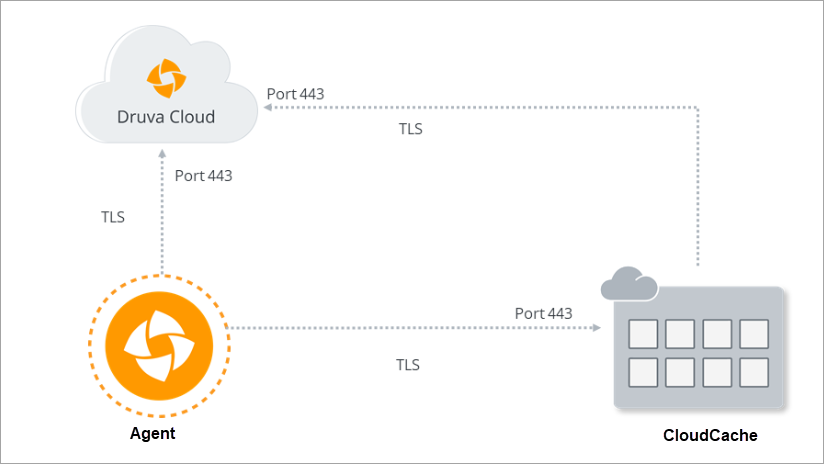
Ports and communication protocols for CloudCache
CloudCache communicates with your servers and Druva Cloud to back up and restore the data. This communication happens through ports and protocols that are secure for communication and transition of data.
CloudCache uses Transport Layer Security (TLS) protocol to establish a connection and initiate communication with Druva components.
The following diagram depicts the ports and communication protocols that are used by CloudCache for secure connection and communication during the backup and restore operations.
Azure virtual machine backup workflow
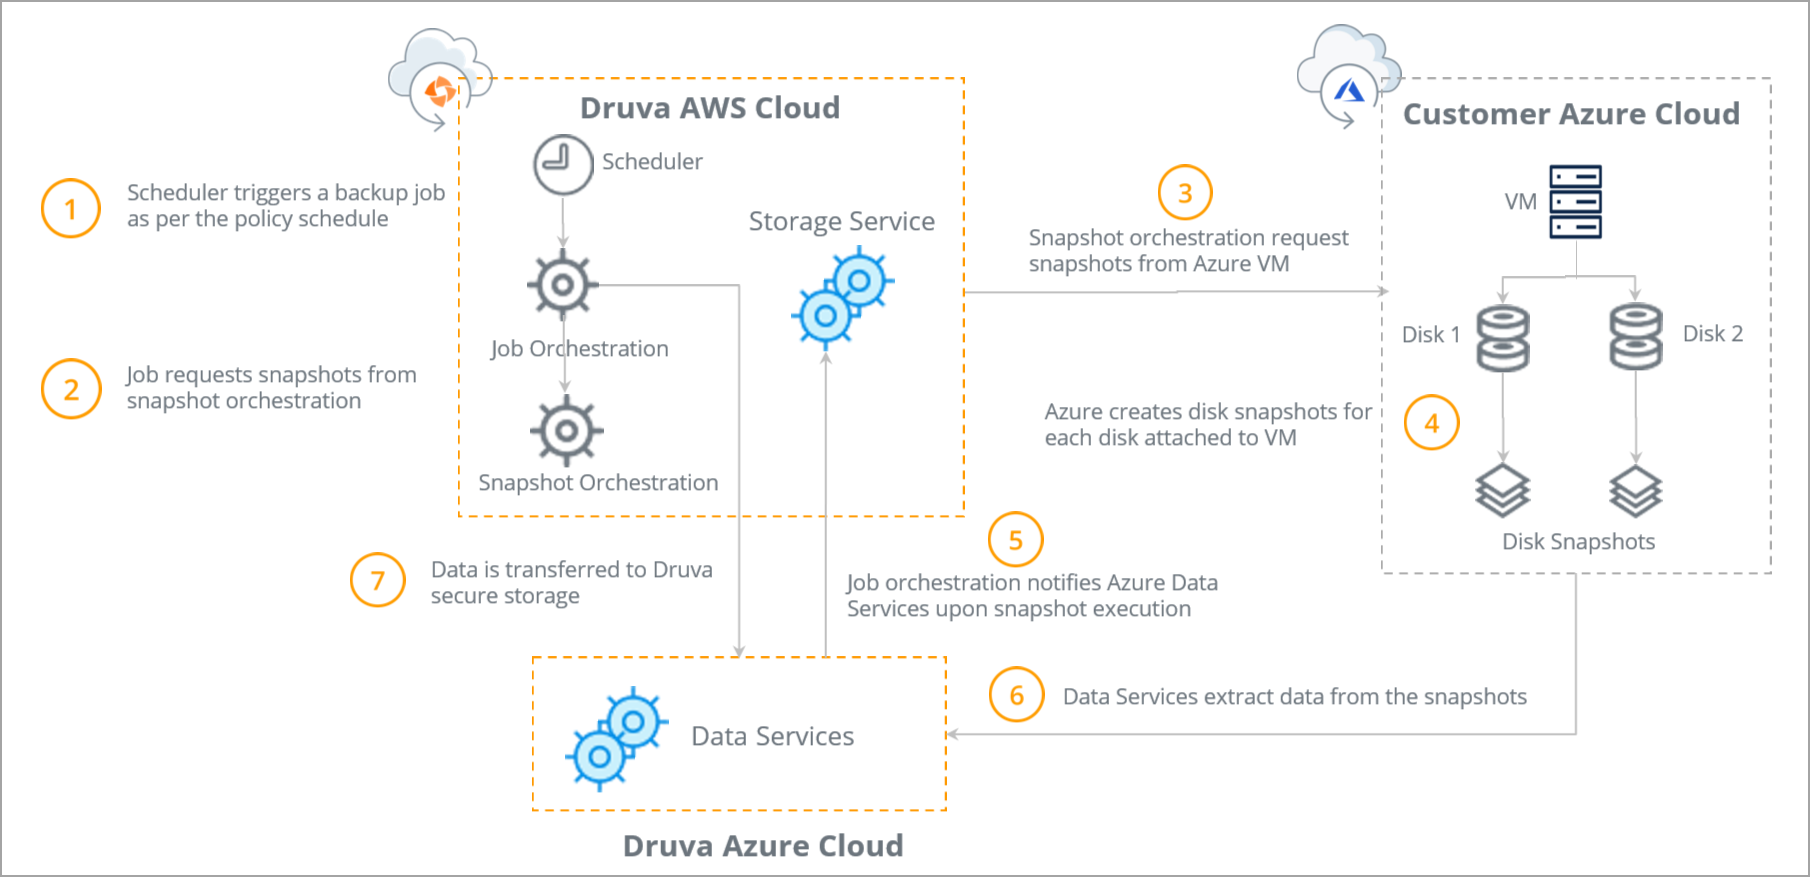
Business Enterprise Elite The overall backup workflow is illustrated below:
| Steps | Cloud |
|---|---|
|
Step 1: The Scheduler triggers the backup job per the backup policy schedule. |
Druva AWS Cloud |
|
Step 2: Once initiated the backup job requests snapshots from Snapshot Orchestration. |
Druva AWS Cloud |
|
Step 3: Snapshot orchestration requests snapshots of the Azure virtual machines and attached disks. The Snapshot Orchestration component communicates with the Azure cloud infrastructure within the customer's account to orchestrate and manage the backup process. |
Customer’s Azure Cloud |
|
Step 4: The Azure cloud infrastructure generates the snapshots for each disk attached to the Azure virtual machines. |
Customer’s Azure Cloud |
|
Step 5: Job orchestration notifies Azure Data Services that the snapshots are generated. |
Druva Azure Cloud |
|
Step 6: Data Services extracts the snapshots of the Azure virtual machines and attached disks. |
Druva Azure Cloud |
|
Step 7: Job orchestration directs snapshots to the secure Druva AWS Cloud Data transfer to Druva Storage is secure and is enabled for compression and deduplication to optimize storage utilization and minimize transfer time. |
Druva AWS Cloud |
Full and Incremental Snapshots
Once a backup request is received, Druva identifies VMs to be protected and creates one full Azure native snapshot for each disk, during the first backup. The subsequent backup job creates a new Azure native snapshot that is incremental to the first full snapshot.
Each consecutive backup job creates an incremental snapshot, and previous snapshots are replaced by the new latest full snapshot.
The overall sequence of backup operations are elaborated below:
- Identify protected VMs: Identify VMs to configure for backup from the management console.
- Create snapshots for each disk on the VM: The backup policy executes to generate snapshots of each disk on the VM.
- Data proxy in Druva account for protected VM's region: The data proxy on Druva’s account is launched based on the region that the protected VMs is assigned to.
- Read data from snapshot: The snapshot data is read - full for the first snapshot and the incremental data from consecutive backups.
- New blocks move to Druva storage: New blocks and any associated metadata trasnsfer to the assigned Druva Cloud Storage.
- Replace previous snapshots: The previous full snapshot is replaced with latest snapshots, which includes any incremental data. At this point the data proxy is removed from the Druva account.
Azure virtual machine restore workflow
Business Enterprise Elite The overall restore workflow is illustrated below:
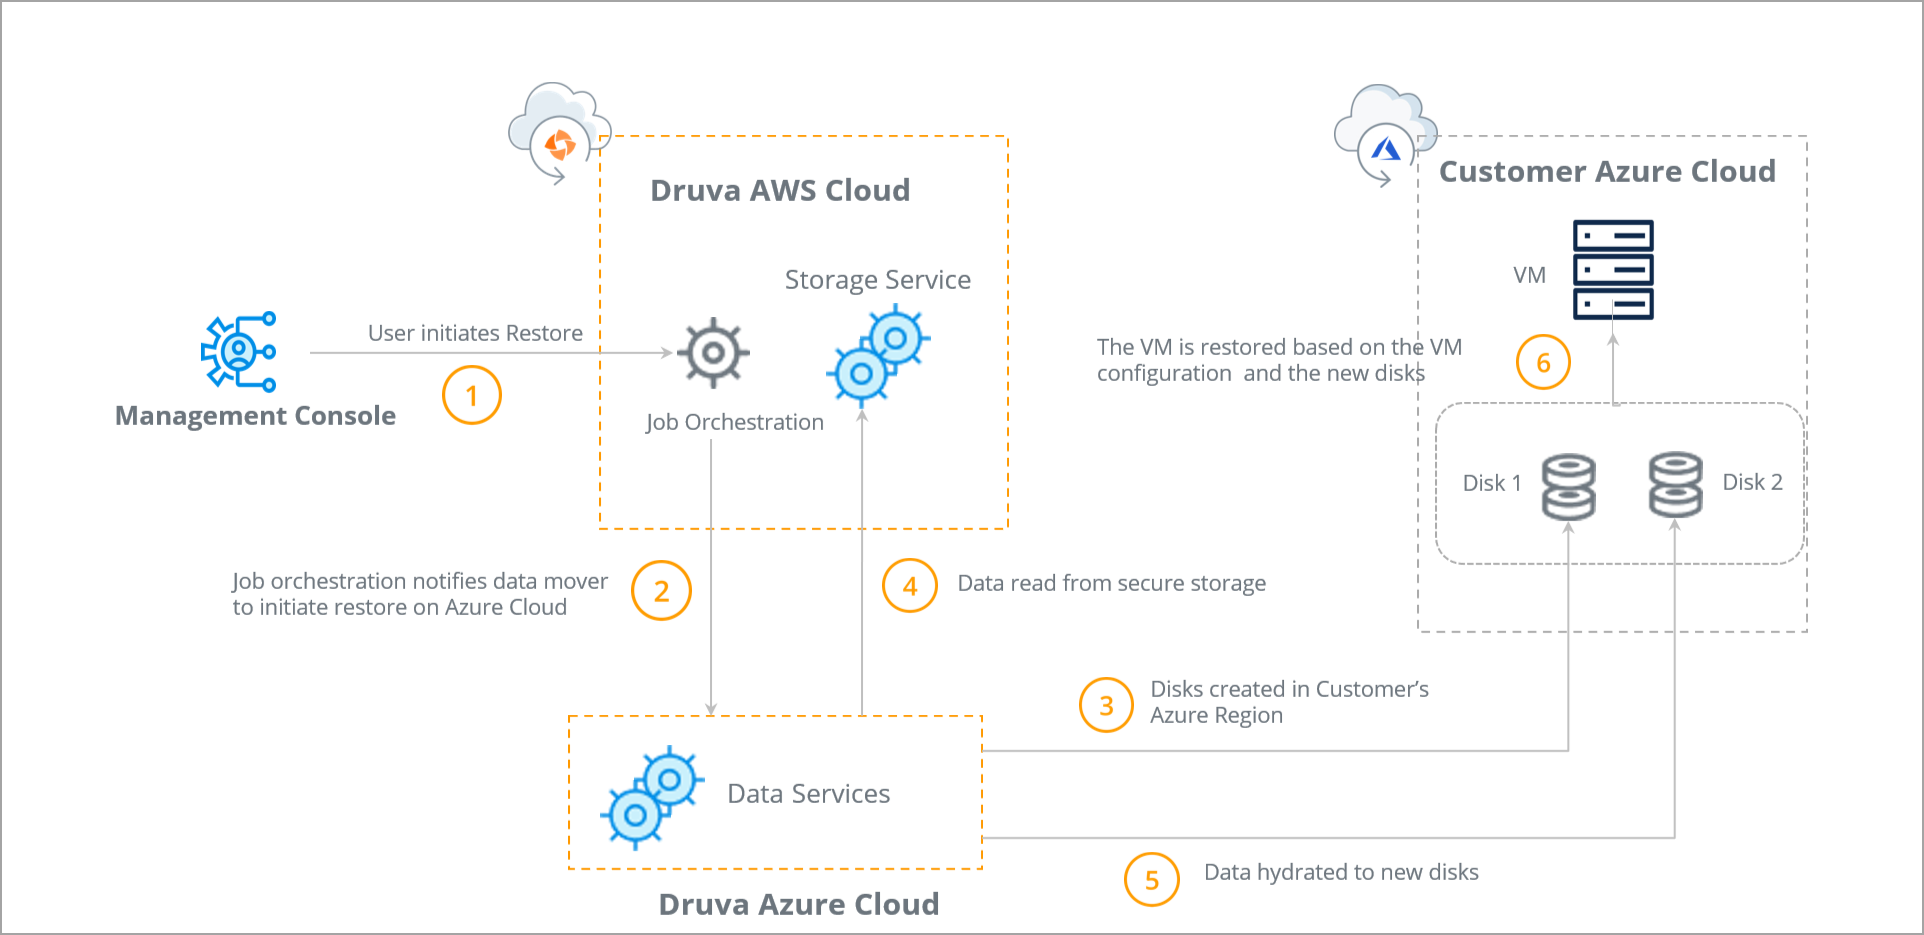
| Steps | Cloud |
|---|---|
|
Step 1: User initiates Restore from the management console. |
Druva AWS Cloud |
|
Step 2: Once the restore job is initiated, Job orchestration notifies data mover to initiate restore on Azure Cloud. |
Druva AWS Cloud |
|
Step 3: Data Services creates disks within the customer’s Azure Region. |
Customer’s Azure Cloud |
|
Step 4: Data is read from the secure Druva storage. |
Druva Azure Cloud |
|
Step 5: Data Services accesses and hydrates the data to new disks. |
Druva Azure Cloud |
|
Step 6: The VM is restored based on the VM configuration and the hydrated disks. |
Customer’s Azure Cloud |