
How can we help you?

Druva Documentation

Quick steps to setup Phoenix for backup of Oracle databases

Enterprise Workloads Editions: File:/tick.png Business File:/cross.png Enterprise File:/tick.png Elite


Before you get into Druva configuration, learn more about Druva for Oracle and read system requirements.

Steps to setup Druva to back up Oracle databases

Watch video


Perform the following tasks to set up Druva to back up your databases.
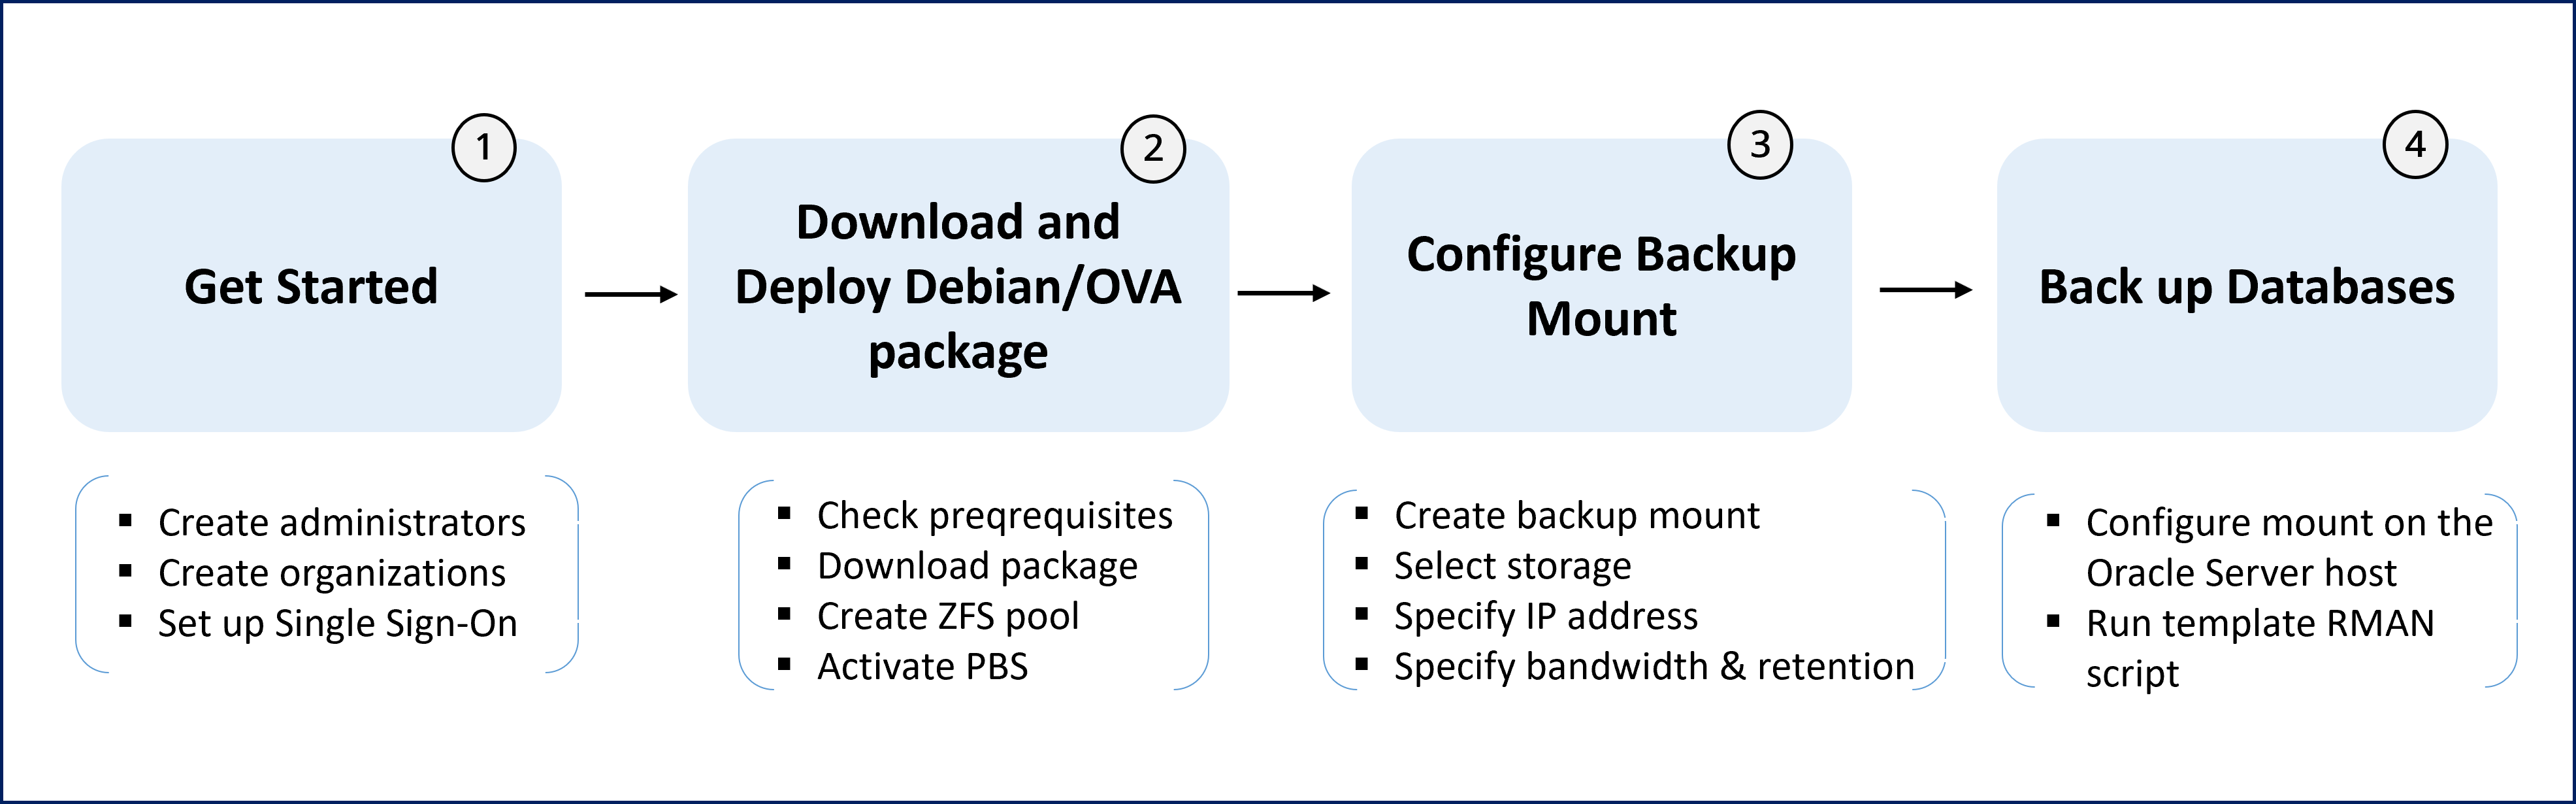
PBS_Quick_Steps.png

Task Description Where to perform the steps?
  1. Get started with Druva
  1. Log in to the Management Console with the credentials that you received in the invitation email.
  2. Create administrators.
  3. Create organizations.
  4. Set up Single Sign-On (SSO), if required.
  5. Log out of the Management Console and log in using the updated settings.

For more information, see Get Started with Druva.

  • Management Console


2. Download and deploy the Debian or OVA  package

  • Log in to the Management Console
  • Download the Phoenix Backup Store deployment package
  • Generate an activation token

Not all administrators can perform the actions required to configure a Phoenix Backup Store. For more information, see Manage administrator accounts.  

Read the system requirements for deploying the Phoenix Backup Store. 

  1. Log in to the Management Console.
  2. Click Oracle > Phoenix Backup Store from the Protect menu. Note that if the All Organizations menu is enabled, select an organization and then click Protect > Oracle > Phoenix Backup Store. On the Phoenix Backup Stores page click Register Phoenix Backup Store.
  3. Download the Phoenix Backup Store Debian package or the OVA and generate an activation token. 
Note: If this is your first login, the welcome screen appears. Click Get Started to set up Druva. 

Deploy and register the Phoenix Backup Store

  • On an Ubuntu server:
    1. Set up the Ubuntu server as described in the system requirements
    2. Install the Debian package that Druva provides to set up the Phoenix Backup Store.  For more information on the Phoenix Backup Store, see Druva components for Oracle
    3. Activate the Phoenix Backup Store. 
    4. Create a ZFS pool on which backup mounts will be created. A backup mount is a shared directory on the Phoenix Backup Store. You mount this shared directory on the RMAN host, and it serves as a target location for RMAN to store Oracle RMAN backups.
  • On a VMware setup
    1. Deploy the OVA package that Druva provides and create a Phoenix Backup Store virtual machine. 
    2. Start the virtual machine and activate the Phoenix Backup Store using the activation token.
    3. Create a ZFS pool using the virtual disks attached to the virtual machine on which backup mounts will be created. A backup mount is a shared directory on the Phoenix Backup Store. You mount this shared directory on the RMAN host, and it serves as a target location for RMAN to store Oracle RMAN backups.
  • On an EC2 instance with Ubuntu as its operating system
    1. Set up the Ubuntu server as described in the system requirements
    2. Install the Debian package that Druva provides to set up the Phoenix Backup Store.  For more information on the Phoenix Backup Store, see Druva components for Oracle
    3. Activate the Phoenix Backup Store. 
    4. Create a ZFS pool on which backup mounts will be created. A backup mount is a shared directory on the Phoenix Backup Store. You mount this shared directory on the RMAN host, and it serves as a target location for RMAN to store Oracle RMAN backups.
  • Management Console and Phoenix Backup Store


  1. Configure backup mounts on the Phoenix Backup Store
  • After activating the Phoenix Backup Store, it is registered under the Phoenix Backup Store tab of the Oracle page. After the Phoenix Backup Store is deployed and registered, it works as an NFS server. Create a backup mount on the Phoenix Backup Store that serves as a target location for Oracle RMAN backups. To create a mount: 
    1. Select a registered Phoenix Backup Store on the Management Console and click Create Backup Mount
    2. Follow the steps on the wizard to create a backup mount. In the wizard: 
      • Provide a name for the mount
      • Select storage for the recovery points
      • Specify IP addresses of the RMAN hosts that can access the mount
      • Specify a bandwidth for the Phoenix Backup Store to upload recovery points to the cloud
      • Provide the retention settings for the recovery points.  
  • Management Console


  1. Back up Oracle databases
  • The backup mount is created on the Phoenix Backup Store with a shared directory path. Mount the shared directory to the RMAN host. The RMAN hosts with whitelisted IP addresses can store Oracle RMAN backups on the mount. 
  • Run the Druva provided RMAN template script with the name of the mount. The script will create an Oracle RMAN backup and store it on the mount. The Phoenix Backup Store will create a recovery point of the Oracle RMAN backup and upload it to the Cloud. 
  • The Oracle RMAN backups are available on the Phoenix Backup Store for restore.

The RMAN can store data on the Phoenix Backup Store as long as enough storage is available on it. Druva alerts you when the storage on the Phoenix Backup Store is critically low. Backups can fail if enough storage on the Phoenix Backup Store is not available for RMAN to store Oracle RMAN backups.

Ensure that you periodically remove Oracle RMAN backups stored on the Phoenix Backup Store or add capacity to it so that enough storage is available for RMAN to store latest backups. 

  • RMAN host


  • Was this article helpful?