DR Failover Checks - Guest OS
Enterprise Workloads Editions
❌ Business| ✅ Enterprise (Purchase Separately) | ✅ Elite
Overview
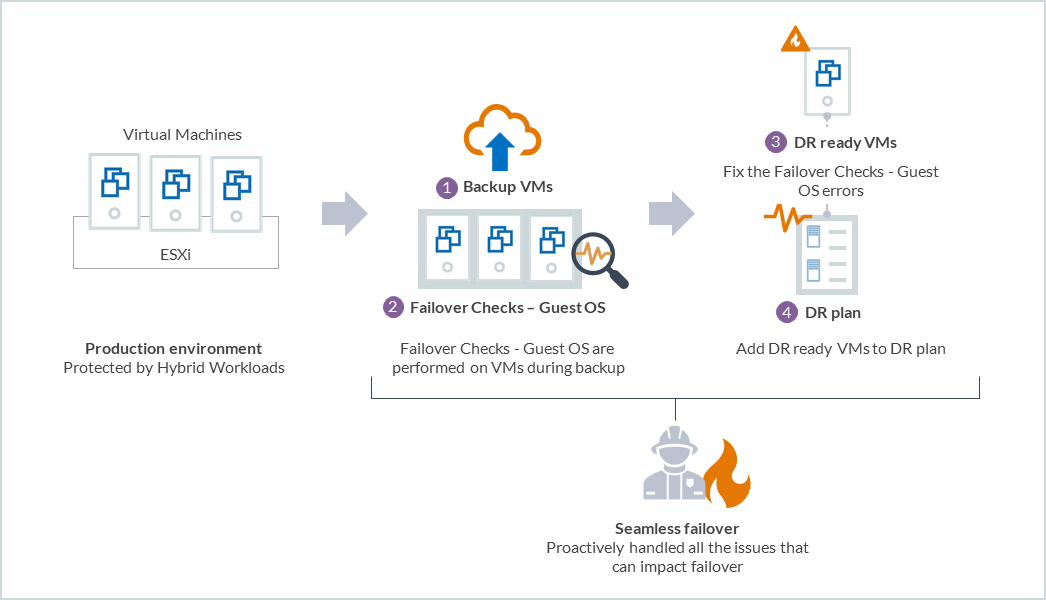
Are the VMs in your environment DR ready? Find out this and more as Druva automates this process for you with the Failover checks - Guest OS capability. When the VMs are being backed up, the Failover checks - Guest OS kick into action and provide the status; if the VMs have successfully cleared the checks and are DR ready or not. With these checks in place, you can prepare a robust DR strategy and avoid any failures during failover. It further helps avoid sending requests to the cloud that are bound to fail and help reduce failed requests to the cloud, and your cloud spending too!
The status of the Failover checks - Guest OS is available through the Virtual Machines page. The following diagram illustrates the capability.
Assign credentials
To use the Failover checks - Guest OS capability, ensure that the credentials you assign to virtual machines meet the following requirements:
Windows virtual machines
- The account must have local administrative permissions.
- For a Windows domain user, the credentials must be entered in the following format <UserName>@<DomainName> and <password>.
- UAC must be disabled on the virtual machine. See disabling UAC on Windows server for more information.
Linux virtual machines
- A non-root user must have sudo rights and must have the NOPASSWD: ALL tag enabled in the sudoers file. Edit the sudoers file and ensure that the non-root user has the following entry at the end:
username ALL=(ALL) NOPASSWD: ALL
Where username, is the username that can execute all commands without prompting for a password.
- Additionally, TTY must be disabled in the sudoers file either globally for all users (root and non-root users) or for a single sudo user.
To disable TTY globally, replace
Defaults requiretty with
Defaults !requiretty
To disable TTY for a specific user or group, suffix Defaults with the user or group:
Defaults:myuser !requiretty
Where myuser is the username for which TTY is being disabled.
Verifying permissions
-
Login to the Linux machine using the user account that needs to be tested.
-
Execute the sudo -l command. If the user has sudo privileges and the NOPASSWD: ALL tag has been enabled in the sudoers file, the command will generate the following output without prompting for a password.
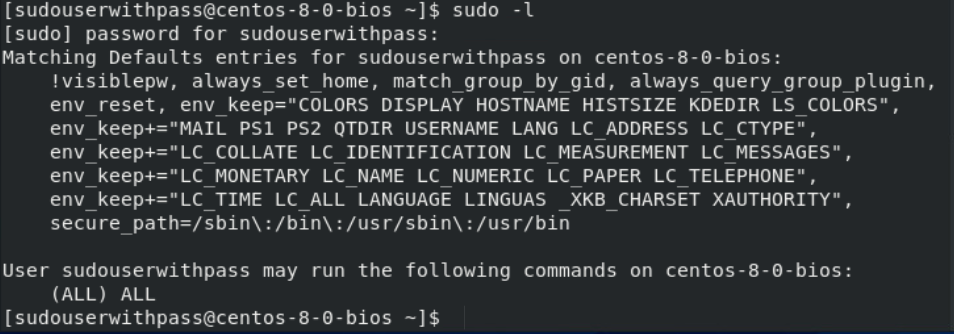
If the user does not have sudo privileges or does not have the NOPASSWD: ALL tag enabled in the sudoers file, the command will generate the following output and will prompt for a password.

-
The directory /home/{username} must exist, and the non-root user must have read, write, and execute (RWX) permissions over this directory.
While a VM backup is in progress, the prerequisite checks use the working directory /home/{username}/Druva/Phoenix/Preflight for non-root users and the directory /home/{PreflightBinaryName}/Druva/Phoenix/Preflight for root users. Once the prerequisite checks are complete, Druva deletes the directories that it created under /home/{username} for non-root users or /home/{PreflightBinaryName} for root users.
Assigning credentials to virtual machines
Assign credentials from the VMware page
To assign credentials to a virtual machine, perform the following tasks:
- In the organization that contains your virtual machine, navigate to Protect > VMware.
- In the navigation pane on the left, under vCenter/ESXi host, select the vCenter server or ESXi host that hosts the virtual machine.
- On the All Virtual Machines page, select the virtual machine that needs to be configured for DR, and click Manage Credentials.
- Click Add Credential to create a new credential, or select an existing credential. Click Assign. See Manage credentials for VMware servers for details.
Note: Ensure that the backup proxy is version 4.8.11 or higher. For more information on upgrading the backup proxy, see Upgrade backup proxy.
Assign credentials from the Disaster Recovery page
- Log in to the Management Console.
- On the menu bar, click the dropdown next to All Organizations, and select the required Organization from the drop-down list.
- On the menu bar, click Disaster Recovery.
- In the left pane, click the dropdown under DR PLAN and select the DR plan that has the VMs that need to be assigned credentials. Alternatively, you can also click the DR plan from the DR Plans page.
- In the left pane click Virtual Machines under the selected DR plan.
- From the list of virtual machines, select one or more virtual machines that need to be assigned credentials, or whose credentials need to be updated, click more options, and then click Update Credentials.
- In the Update Credentials dialog box, select pre-existing credentials, or click New Credentials to create a new set of credentials. Provide the following information in the Add Credentials dialog box if you choose to create a new set of credentials:
- Label: Enter a label that uniquely identifies the credential in the Credential Store.
- Username: Enter a username. If the user is a Windows user and is part of a domain, enter the username in the format <UserName>@<DomainName>
- Password: Enter the password.
- Confirm Password: Re-enter the password.
- Click Save.
Assign key-based authentication for your Linux based virtual machine(VM)
Prerequisites
- The backup proxy should connect via ssh to the source VM.
- Linux VM should have credentials assigned; if not, you need to assign using the Management Console. While assigning credentials, ensure you provide the correct username, and for the password, you can add a dummy value.
Note: This feature is available for backup proxy version 6.0.0 -147290 .
Best Practices
- The key itself should have restricted permissions (read or write permissions for intended owners or administrators only).
- Configure ssh connection to only trusted host or VM subnet by using UFW(Uncomplicated Firewall) or iptables utilities or network firewall and then disable dynamic port forwarding.
To assign key-based authentication to your Linux virtual machines, perform the following:
Note: Repeat the following steps for all backup proxies in the pool. The DR check may fail if you do not assign keys from all the backup proxies on the Linux VM.
- Log in to your VMware backup proxy using your account credentials.
- Stop the Phoenix agent service by running the following command:
service Phoenix stop - Create an ssh keypair at the backup proxy by executing the following command:
ssh-keygen -m pem
A default key pair(public and private key) is generated at the location /root/.ssh. The default key name is id_rsa(if you overwrite this name, use it consistently in the following steps).
.png?revision=1)
Note: Leave the Enter passphrase field empty as it is not supported.
- Copy the public key from the backup proxy to the source VM(VM intended for backup, for example, root@172.16.14.219) by executing the following command:
ssh-copy-id -i /root/.ssh/id_rsa root@172.16.14.219Note: You have to copy this key to all your Linux VMs for successful key-based authentication.
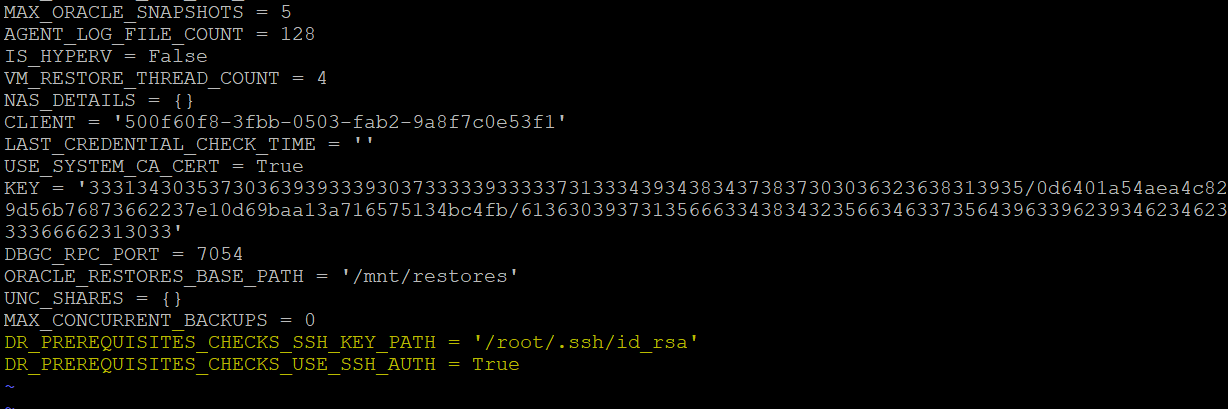
- Open the Phoenix.cfg file located at /etc/Phoenix/VMWARE, and add the following parameters:
- DR_PREREQUISITES_CHECKS_SSH_KEY_PATH = '/root/.ssh/id_rsa'(This is the private key path)
- DR_PREREQUISITES_CHECKS_USE_SSH_AUTH = True
- Restart the Phoenix services using the following command:
service Phoenix restart
Key-based authentication is applied to your Linux-based VM. All Linux VMs that already have credentials assigned on the Druva portal will now use key-based authentication for Guest OS operation.
Accessing the Failover Checks - Guest OS statuses
From the Overview page
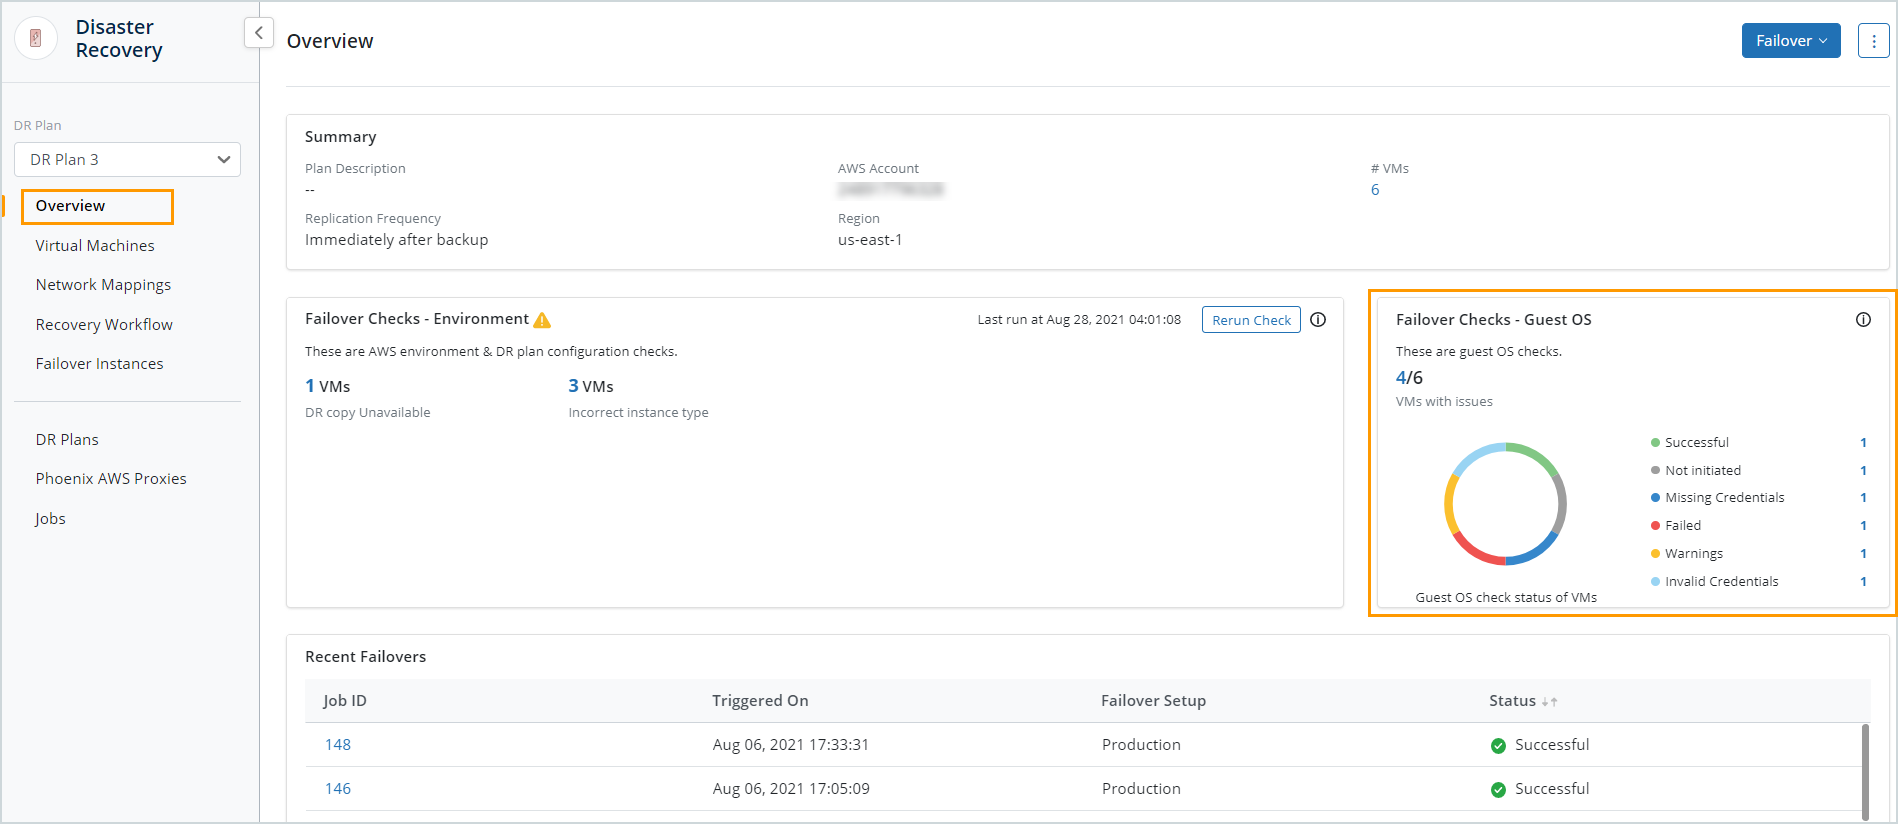
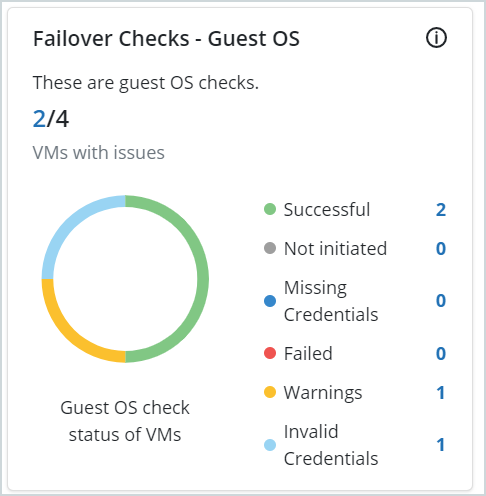
You can access the Failover Checks - Guest OS from the DR plan Overview page. The Failover Checks - Guest OS card on the Overview page gives you the guest OS check statuses at a glance.
From the Virtual Machines page
You can also access the Failover Checks - Guest OS from the Virtual machines page.The Failover Checks - Guest OS column on the Virtual Machines page displays the guest OS check status for all VMs that are a part of the DR plan. You can also filter the VMs by the Failover Checks - Guest OS status and the Failover Checks - Environment status.
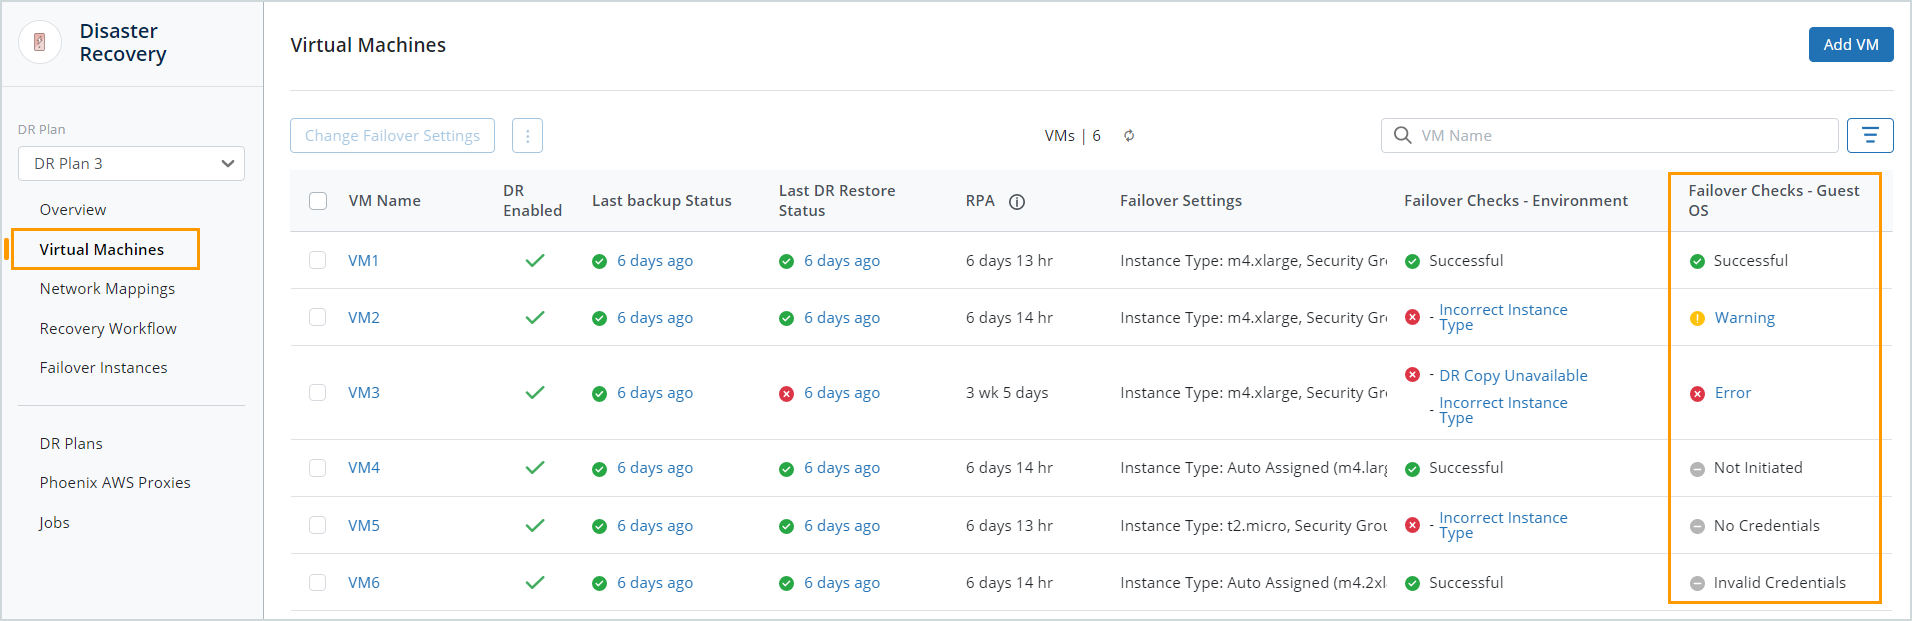
Failover Checks - Guest OS checks
| Field | Description |
|---|---|
| X/Y VMs with issues |
X of a total of Y VMs in the DR plan have issues with the guest OS that could cause failovers to fail. |
|
Guest OS check status of VMs (Circular chart) |
This is a graphical representation of the guest OS check statuses of all VMs in the DR plan. Hovering over the colored segments gives you the number of VMs with a specific issue with the guest OS check. |
| Status |
The number of VMs with a specific Guest OS check status. Clicking the hyperlink next to the VM status takes you to the Virtual Machines page, which is now filtered to show all the VMs with the specific status. The statuses are:
See DR failover checks - Guest OS for more information. |
Failover Checks - Guest OS statuses
The following table describes the Failover Checks - Guest OS statuses.
| Status | Description |
|---|---|
| Successful | Failover Checks - Guest OS passed. |
| Not initiated | Failover Checks - Guest OS could not be initiated because either:
|
| Invalid credentials |
Failover Checks - Guest OS could not be performed because either:
|
| No credentials |
Failover Checks - Guest OS could not be performed because credentials are not assigned to the VM. See, Configure virtual machines for backup. |
| Error | Failover Checks - Guest OS failed. See, DR failover checks - Guest OS. |
| Warning |
Failover Checks - Guest OS passed with warnings. We recommend fixing the warnings since they may cause the failover to fail. |
Resolving DR failover checks - Guest OS
After you resolve the checks, trigger a new back job and only after all the checks are successful, the VM is DR ready.
Linux Failover Checks - Guest OS
| Check | Description |
|---|---|
|
Source Metadata Collection |
What is verified Verifies that all required metadata was collected from the source. Potential errors
Recommendation
|
| Free Space |
What is verified Verifies there is enough free storage space. Potential errors The source does not have enough free space on {MPOINT} ({DEVICE}). At least {SIZE} Mb needed space is required․ Recommendation Provision additional free disk space as described in the message. |
| Bootloader |
What is verified Verifies the source boot loader is supported. Potential errors Source has an unsupported version of GRUB. Please install grub-legacy or grub2 on the source and try again․ Recommendation Ensure that grub-legacy or grub2 is installed on the source virtual machine. Else, install the grub package on the source virtual machine. Review the GRUB installation documentation for your operating system. For example for CentOS refer to: https://wiki.centos.org/HowTos/GrubInstallation. |
| OS Support |
What is verified Verifies the source operating system is supported. Potential errors
Recommendation Review the system requirements. |
| Cloud-init Configuration |
What is verified Checks cloud-init configuration for potential problems. Potential errors
Recommendation
|
| Supported FS |
What is verified Verifies source filesystems are supported. Potential errors {DEVICE} has {FS_TYPE} filesystem, which is not supported. Recommendation One of the devices has an unsupported FS. Failover can continue if it is excluded. For failover, this means the file system might be missing from the target. See, Configure virtual machines for backup. Ensure that the disk to be excluded does not have following mountpoints : "/", "/usr", "/var" ,"/boot" |
| Selected Disks |
What is verified Verifies failover can proceed with only the selected disks. Potential errors
Recommendation
|
| LVM PVs |
What is verified Verifies LVM physical volumes are on supported storage devices. Potential errors Device {DEVICE} which is a PV for LVM Volume Group {VOLUME_GROUP} (mount: {MOUNT}) was not recognized as a supported device. Recommendation The block device which holds the volume was not recognized as a supported device. Failover can't continue if the volume is critical.
|
| XEN/AWS Platform Details |
What is verified Checks if the type of XEN hypervisor can be detected (does nothing for non-XEN). Potential errors Could not determine if this xen-based source is an AWS EC2 instance, as instance metadata could not be retrieved. Recommendation Couldn't reach the AWS metadata service to determine this is an AWS instance. The instance ID will be missing. Verify if network settings are correct on ec2-instance. Verify if "http://169.254.169.254/latest/meta-data/" is reachable from the instance. To verify, launch a temporary EC2 instance with the same configuration as the failover instance. If the metadata URL is not reachable from the temporary EC2 instance as well, refer to the AWS documentation for more information. |
| DHCP Configuration |
What is verified Checks the source DHCP config for unsupported options. Potential errors DHCP configuration contains 'supersede'. Target might have a broken network. Recommendation The EC2 instance has custom DHCP client configurations. Druva doesn't reset the configurations. This could potentially cause issues. Verify the /etc/dhcp/dhclient.conf of the EC2 instance. |
| Required Mounts |
What is verified Verifies the required mount points were recognized. Potential errors /mountpoint is mandatory. Recommendation Ensure that the VMDK containing "/" mountpoint is not excluded from backup. |
Windows Failover Checks - Guest OS
| Check | Description |
|---|---|
| Hyper-V |
What is verified Verifies the source is not a Hyper-V host. Potential errors The source is running hyper-v. Migration of hyper-v servers is not supported by Druva. Hyper-V server will not be able to run in the target cloud and the source will fail to start in the target cloud environment. Recommendation Hyper-V is not supported. |
| OS Support |
What is verified Verifies the source operating system is supported. Potential errors This OS is not supported for conversion. Please review our documentation for supported OS for conversion. Recommendation Review the system requirements. |
| PV Drivers |
What is verified Verifies the source doesn't have 'AWS PV Network Device' NICs. Potential errors TCP offloading must be disabled on source with driver type {DRIVER}. Recommendation If phase 2 system has no network, disable TCP offloading on the source. To disable TCP offloading
|
| Pending MS Windows updates |
What is verified Checks if there are pending Windows updates scheduled to happen after the Windows server reboot. Potential errors Source has pending Windows updates detected. Recommendation Druva triggers a DR replication job (as per the replication frequency in the DR plan) even if the prerequisite checks detect pending MS Windows updates. The DR replication job completes successfully; however, DR failovers from this DR copy may take longer than usual as Druva reboots the machines as part of the pending Windows updates. We recommend you apply the pending Windows updates and reboot your machines at the earliest opportunity so that the next DR replication job will create a DR copy that you can successfully failover from within the expected duration. |
| Pending MS Windows chkdsk operation on the boot disk |
What is verified Checks if there are pending chkdsk operations scheduled to happen after a Windows server reboot. Potential errors Source has pending chkdsk detected. Recommendation Druva triggers a DR replication job (as per the replication frequency in the DR plan) even if the prerequisite checks detect scheduled chkdsk operations on the boot disk. The DR replication job completes; however, DR failovers from this DR copy may take longer than usual as Druva tries to bypass the pending chkdsk operation on the boot disk. We recommend you complete pending chkdsk operations at the earliest so that subsequent DR replication jobs create a DR copy you can successfully failover from within the expected duration. |
| Network Drivers |
What is verified Verifies there are no incompatible NIC drivers installed. Potential errors Citrix PV Ethernet Adapter is not supported during AWS conversion. Recommendation The Citrix driver installed on the source might cause problems in phase 2. Uninstall the driver. |
| .Net |
What is verified Checks whether the required version of .Net Framework is installed. Potential errors Microsoft .NET Framework v{VERSION} will be installed. Recommendation This is an information message. It can be ignored. |
| Supported FS |
What is verified Verifies source file systems are supported. Potential errors The source has unsupported file systems '{FS_TYPE}' (volume {VOLUME_ID}, mount point {MOUNT_POINT}). Volumes with a non-supported file system can not be transferred. Recommendation One of the devices has an unsupported file system . Failover can continue if it is excluded. See, Configure virtual machines for backup. Ensure that the disk to be excluded does not have following mountpoints : "C:" |
| Sysprep State |
What is verified Verifies previous Sysprep run wasn't incomplete. Potential errors Druva has discovered that a previous Sysprep attempt did not complete properly on the source VM. In the registry navigate to ''HKEY_LOCAL_MACHINE\\SYSTEM\\CurrentControlSet\\Control\\Session Manager\\'' and locate the key ''BootExecute''. Remove the line containing ''sysprepDecryptor.exe'' and reboot the source VM before migrating. Recommendation In the registry navigate to HKEY_LOCAL_MACHINE\\SYSTEM\\CurrentControlSet\\Control\\Session Manager\\ and locate the key BootExecute. Remove the line containing sysprepDecryptor.exe and reboot the source VM before migrating. |
| Is Domain Controller |
What is verified The source VM is a Domain Controller. Potential errors It appears that the source VM is a Domain Controller. Recommendation Domain controllers sometimes are slow to boot (might cause time outs) and are generally more prone to errors during failover. Use larger instance-type like m4.xlarge family for running failover. |
| Image State | What is checked ? We check the Windows registry in the source VM for image state. What can the check fail with ? - BLOCKER The Image State is {IMAGE_STATE}. Image could be undeployable. What if the check fails ? Use a source VM whose image state is not IMAGE_STATE_UNDEPLOYABLE |
| Free Space |
What is verified Verifies there is enough free storage space. Potential errors The source VM doesn't have sufficient space on C volume. Druva requires {TOTAL_SPACE_REQUIREMENT} MB free space on C volume. Recommendation Provision additional free disk space as described in the message. |
| Antivirus Software |
What is verified Checks whether the source has AV/protection software installed. Potential errors {AV_NAME} antivirus software detected (service name: {SERVICE_NAME}). If failover fails, try whitelisting Druva software components. Recommendation Antivirus software blocks cli.exe or some other executable during failover. Try whitelisting the executables. |
| Selected Disks |
What is verified Verifies failover can proceed with only the selected disks. Potential errors
Recommendation Consider removing the disk from the backup and selected_disks. See, Configure virtual machines for backup. Ensure that the disk to be excluded does not have following mountpoints : "C:" |