Restore virtual machine data
 Business Enterprise Elite
If you have taken a standard backup (non-application aware), you can restore:
- Full virtual machine: Restores the entire virtual machine. For more information, see Restore full virtual machine.
- Data Restore: Restores VMDKs, files and folders.
- Instant restore: Restores the entire virtual machine instantly. For more information, see Restore virtual machines instantly.
To know more about the restore workflow, see About VMware restores.
Prerequisites
-
Before you proceed with the restore, ensure you have reviewed the prerequisites and considerations.
-
For the list of supported disks, partitions, and files, see Support matrix.
-
You must have write permission for the target location, where you want to restore the files.
-
During File Level Restore, on the destination virtual machine, the Guest OS type setting must have a valid Windows or Linux version in the VMware settings on the vCenter. Do not set the value to other. For more information, see Change the Configured Guest Operating System.
Restore file and folders
Druva provides you with the capability to restore files to CIFS/SMB share and any virtual machine in your vCenter/ESXi.
The following ACL parameters are restored along with the files:
| Source virtual machine | Restore type | ACL parameters restored |
|---|---|---|
| File-level Restore to a virtual machine: | ||
| Windows virtual machine | Original virtual machine |
|
|
Windows virtual machine |
Alternate Windows virtual machine |
|
| Alternate Linux virtual machine |
|
|
| Linux virtual machine | Original virtual machine |
|
|
Linux virtual machine |
Alternate Windows virtual machine |
|
| Alternate Linux virtual machine |
|
|
| File-level Restore to CIFS share: | ||
| Windows virtual machine | - |
|
| Linux virtual machine | - |
|
The following video provides a quick process overview.
Considerations
- If the Hybrid Workloads agent restarts during the file restore operation, the job is not retried as Druva does not store any guest OS credential. This job will fail with PHOENIX250. For more information see, Druva errors.
- The target virtual machine should have enough space to store the restored files. If the target virtual machine does not have enough space, the triggered restore job will be marked as successful with error.
- File-level restore for deduplicated volume is not supported. Although it is possible to browse the disk successfully, it does not guarantee that files/folders can be restored successfully. As a workaround, you must restore the full VMDK.
Procedure
- Log in to the Management Console.
- From the top menu bar, select your organization if organizations are enabled.
- Click Protect > VMware.
The All vCenter/ESXi host page appears that lists all the registered vCenter/hypervisors. - You can either select the registered vCenter/ESXi host from the card view or list view or select it from the vCenter/ESXi host list in the left navigation pane.
- In the left navigation pane, click Configured VMs.
- Select the virtual machine you want to restore.
- Click Restore > VM Restore.
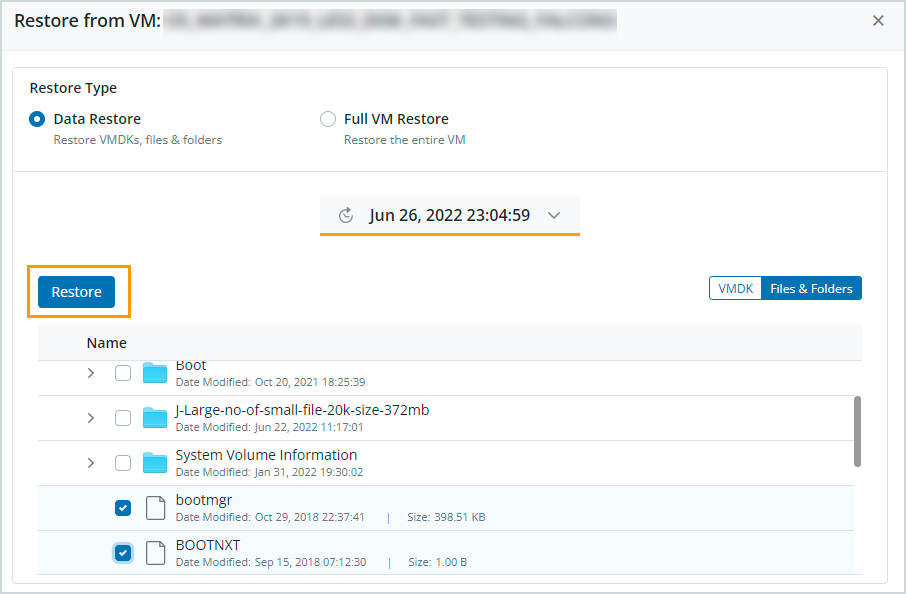
- Click Data Restore and then select a recovery point.
To know more about restoring cold recovery points, see Restoration of cold-tier data. - Click Files & Folders and select the file or folder you want to restore.
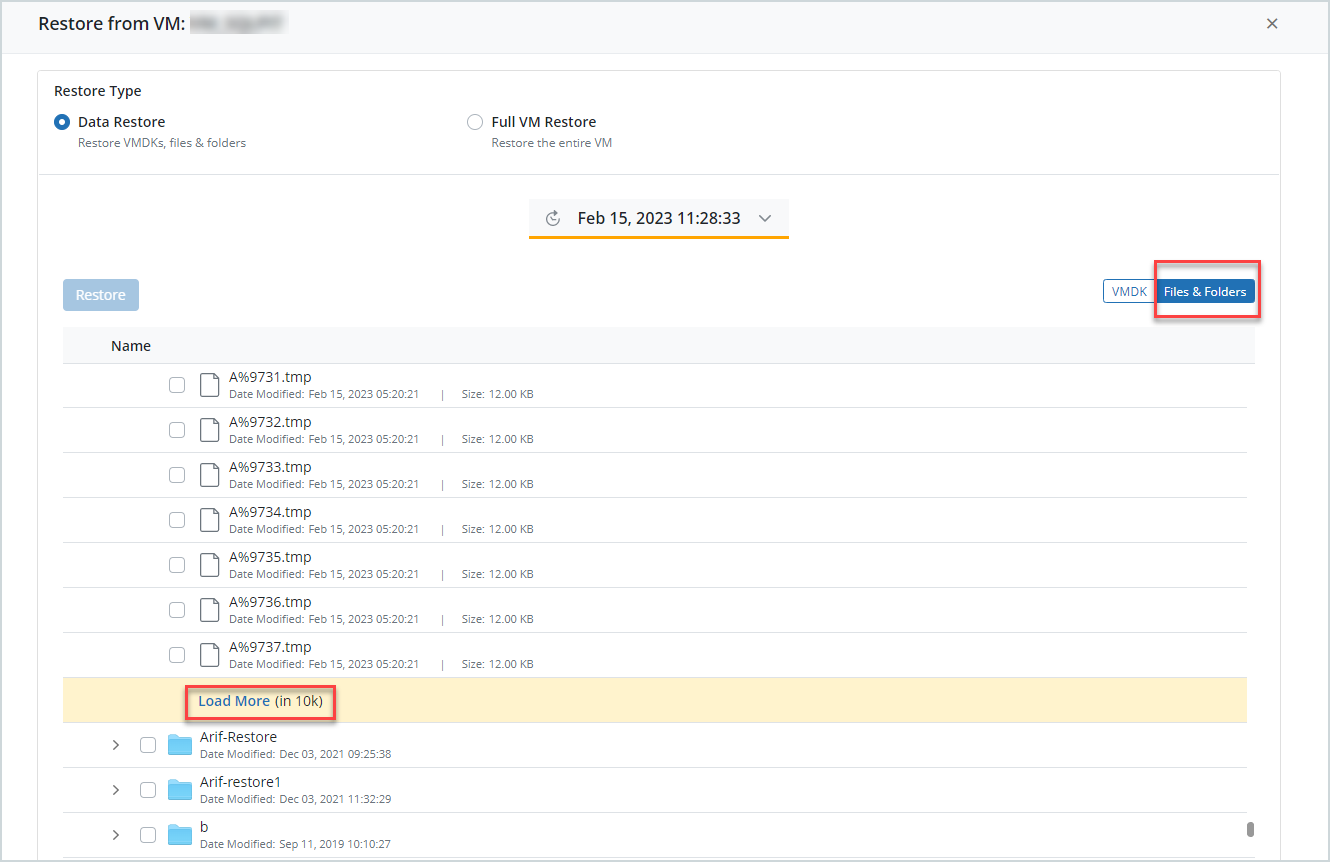
Note: A single click of expanding a particular folder will load a total of 1024 files/folders. If there are more than 1024 files/folders, then the Load More option will be visible to display the next set of results in that folder.
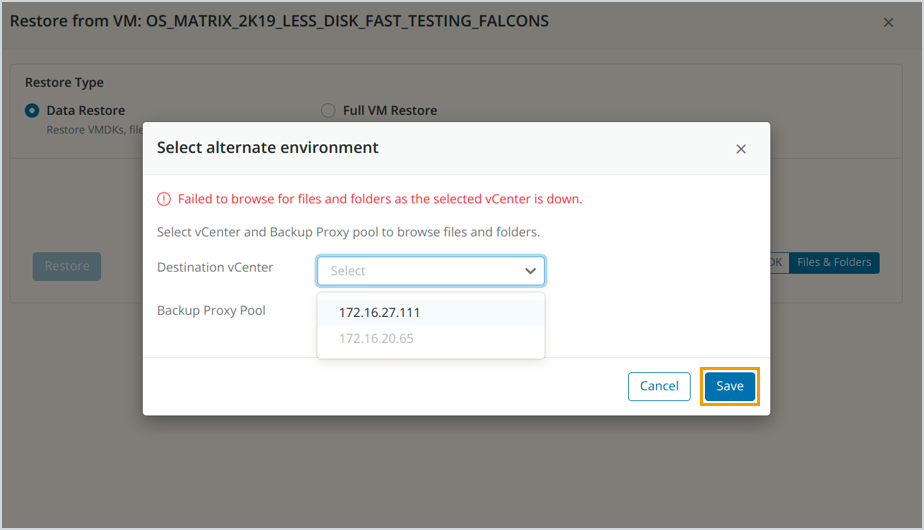
Suppose all the backup proxies for the source backup set vCenter or standalone ESXi host are in a disconnected state. In that case, you can still use a different vCenter or standalone ESXi host proxies that are in a connected state for file-level browse and restore. Select the alternate vCenter or standalone ESXi host for file-level and click Save. The file-level browse is triggered on the alternate vCenter or standalone ESXi host Backup proxy.
If the disk configured for the selected VM is a Dynamic GUID (Global Unique Identifier) Partition Table (GPT) disk, an error is displayed with a warning, for example,
Failed to mount 2 out of 4 volumes.
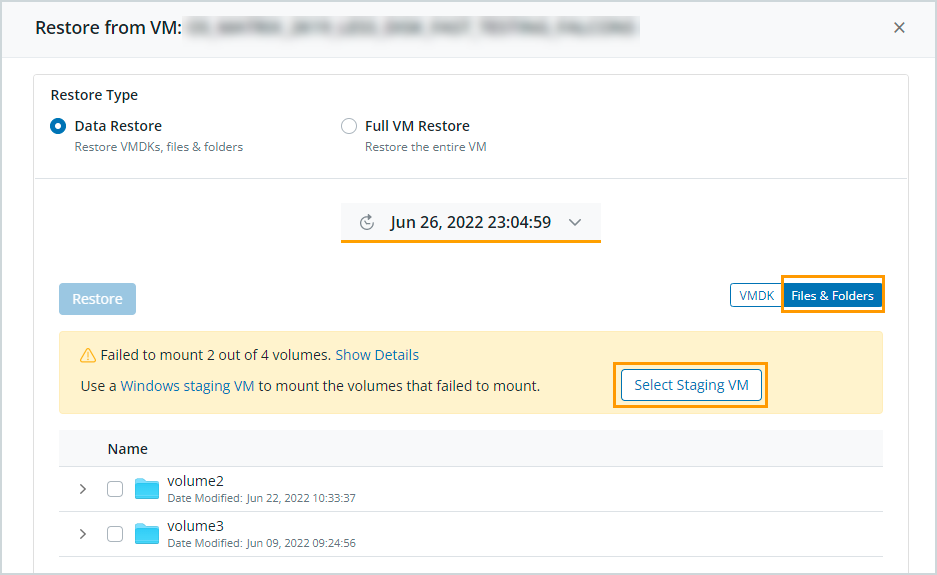
File-level restore eliminates the need to perform time-consuming disk restores when you want to restore a single file. However, during file-level restore, the volumes listing is excluded for Dynamic GPT disks in the backup set. Therefore you can use a Windows Server staging VM to perform a file-level browse restore.
A staging VM can be another Windows Server VM present in your environment. For more information, see prerequisites for a staging VM.Note: During FLR browse for restoring data from Linux VM, Druva considers and displays every logical partition as a separate volume. Also, the volume/mount point under the root is visible as an empty directory.
Perform the following:
- Click Select Staging VM. The Select Staging VM dialog is displayed with various topology details.
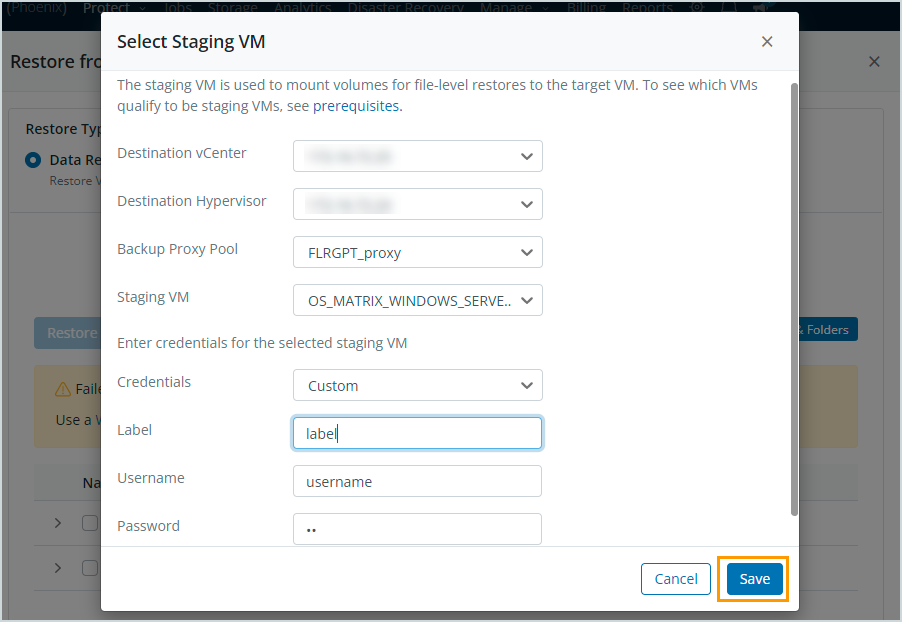
Field Description Destination vCenter
Select the required destination vCenter where you want to restore the files or, in the case of the CIFS share to which you intend to restore the files. Ensure that the Backup proxy installed on this vCenter can access the CIFS shares.
Destination Hypervisor
Select the required hypervisor.
Backup Proxy Pool
From the drop-down list, select a Backup proxy pool. It is recommended that you select a Backup proxy pool with backup proxies that are locally connected to the destination hypervisor for restore.
Note: If the virtual machine has a Backup proxy pool mapped to it, the mapped Backup proxy pool is selected by default.
Staging VM
Select a staging VM with credentials assigned or credentials not assigned.
If you select a staging VM without credentials, then the Credentials field is displayed.Note: This field lists the staging VMs only if it follows all the pre-requisites.
Note: The staging VM is used to mount volumes for file-level restores to the target VM.
Enter credentials for the selected staging VM Credentials Select or enter credentials for the selected staging VM.
If you click the Custom value, then you can create credentials and the Label, Username, and Password fields are displayed.Label Enter a label for the staging VM. Username Enter a valid username for the staging VM. Password Enter a valid password for the staging VM. - Click Save.
Note: After you click Save, the Dynamic GPT disks browse workflow is started. A browse job is triggered on the Backup proxy that mounts the VMDKs and attach those disks on the selected staging VM. The directories of the attached staging VM are then displayed. Select the files to be restored and click Restore.
- Click Select Staging VM. The Select Staging VM dialog is displayed with various topology details.
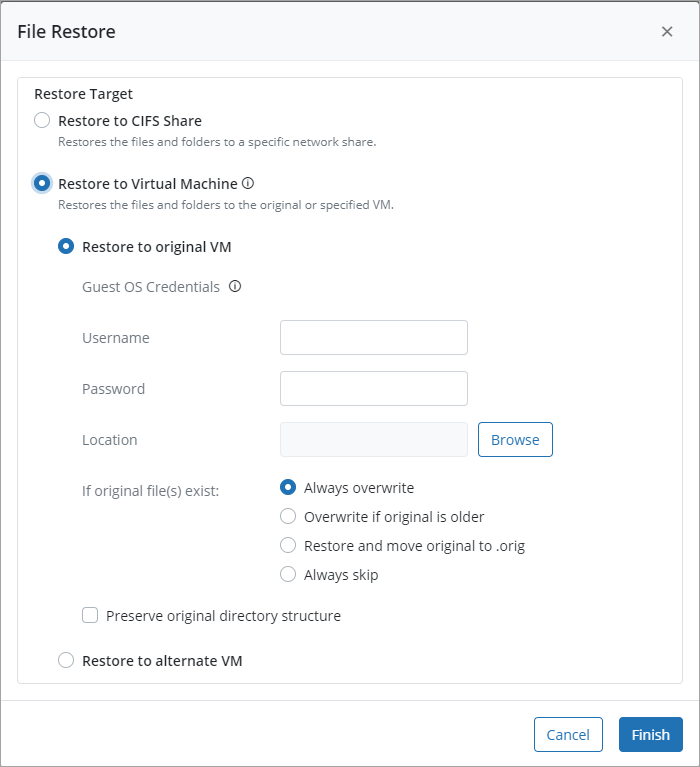
- On the File Restore page, you can choose one of the following restore targets.
-
Restore to CIFS share: Restores the files and folders to a specific network share.
The restored file will be available on UNC share in the Phoenix-VMWare-FLR-[jobid] folder.
Field Description UNC Path
Valid UNC share (network share) path that is reachable from the selected vCenter/ESXi.
Valid sharename format:
- \\<hostname> or<Ip address>\<Sharename>
- //Host/Folder
Note: UNC sharename must not have any Unicode characters.
Username
Valid username of UNC share.
Note: You can specify domain name in the username of the UNC share in the "domain@username" format.
Password
Valid password for UNC share.
Destination VMware Setup
From the drop-down list, select a vCenter/ESXi that has at least one backup proxy in the connected state.
Backup Proxy Pool From the drop-down list, select a backup proxy pool. It is recommended that you select a backup proxy pool with backup proxies that are locally connected to the destination hypervisor for restore. Staging VM
Select a staging VM with credentials assigned or credentials not assigned.
If you select a staging VM without credentials, then the Credentials field is displayed.Note: This field lists the staging VMs only if it follows all the prerequisites.
Note: The staging VM is used to mount volumes for file-level restores to the target VM.
Note: An administrator can assign credentials for the staging VM from All Virtual Machines page on the Management Console. For more information, see Manage credentials for VMware servers.
Enter credentials for the selected staging VM Credentials Select or enter credentials for the selected staging VM.
If you click the Custom value, then you can create credentials and the Label, Username, and Password fields are displayed.Label Enter a label for the staging VM. Username Enter a valid username for the staging VM. Password Enter a valid password for the staging VM. -
Restore to Virtual Machine: Restores the files and folders to the original or specified VM.
-
Restore to original VM: Select this option if you want to restore the selected files to the same virtual machine.
Field Description Guest OS Credentials Username Valid username. Password Valid password. Location Browse to the location where you want to restore files. Backup Proxy Pool From the drop-down list, select a Backup proxy pool. It is recommended that you select a Backup proxy pool with backup proxies that are locally connected to the destination hypervisor for restore. Staging VM
Select a staging VM with credentials assigned or credentials not assigned.
If you select a staging VM without credentials, then the Credentials field is displayed.Note: This field lists the staging VMs only if it follows all the prerequisites.
Note: The staging VM is used to mount volumes for file-level restores to the target VM.
Note: This field is prepopulated by the same staging VM used in the previous flow to list the available files and folders. However, you can modify this.
Enter credentials for the selected staging VM Credentials Select or enter credentials for the selected staging VM.
If you click the Custom value, then you can create credentials and the Label, Username, and Password fields are displayed.Label Enter a label for the staging VM. Username Enter a valid username for the staging VM. Password Enter a valid password for the staging VM. If original file (s) exist
Always overwrite The files with the same name will always be overwritten at the destination regardless of the file version or date. By default, this option is always selected. Always skip The files with the same name will not be restored to the destination. The number of files skipped will be displayed in the progress logs. Overwrite if original is older The files with the same name will be overwritten only if the files are older than the version being restored.
Restore and move original to .orig If the file being restored already exists at the destination, the version being restored will be saved with the same filename. While the existing file will be renamed to filename.ext.orig. On subsequent restores, the existing file versions at the destination will be appended with an incremental number such as filename.ext.orig1, filename.ext.orig2, and so on. Preserve original directory structure You can preserve the entire source location directory structure, that is tree path while restoring a file to an alternate location.
An example of original directory structure: If you are restoring folder “B” from the source location Volume1/A/B/C/D to F:/.
The restored file structure will be F:/A/B/C/D. -
Restore to an Alternate VM: Select this option if you want to restore the selected files to a different virtual machine.
Field Description Destination VMware Setup Select the required vCenter/ESXi. Destination Hypervisor Select the required Hypervisor.
Destination VM
Select the required virtual machine where you want to restore the files.
Note: The timestamp under the Destination VM drop-down lists the last time the virtual machine listing page was refreshed.
Backup Proxy Pool From the drop-down list, select a backup proxy pool. It is recommended that you select a backup proxy pool with backup proxies that are locally connected to the destination hypervisor for restore.
Note: If the virtual machine has a backup proxy pool mapped to it, the mapped backup proxy pool is selected by default.
Guest OS Credentials Username Valid username. Password Valid password. Location Browse to the location where you want to restore files. Staging VM
You can select a staging VM with credentials assigned or credentials not assigned.
If you select a staging VM without credentials, then the Credentials field is displayed.Note: This field lists the staging VMs only if it follows all the prerequisites.
Note: The staging VM is used to mount volumes for file-level restores to the target VM.
Note: This field is prepopulated by the same staging VM used in the previous flow to list the available files and folders. However, you can modify this.
Enter credentials for the selected staging VM Credentials Select or enter credentials for the selected staging VM.
If you click the Custom value, then you can create credentials and the Label, Username, and Password fields are displayed.Label Enter a label for the staging VM. Username Enter a valid username for the staging VM. Password Enter a valid password for the staging VM. If original file(s) exist Always overwrite The files with the same name will always be overwritten at the destination regardless of the file version or date. By default, this option is always selected. Always skip The files with the same name will not be restored to the destination. The number of files skipped will be displayed in the progress logs. Overwrite if original is older The files with the same name will be overwritten only if the files are older than the version being restored.
Restore and move original to .orig If the file being restored already exists at the destination, the version being restored will be saved with the same filename. While the existing file will be renamed to filename.ext.orig. On subsequent restores, the existing file versions at the destination will be appended with an incremental number such as filename.ext.orig1, filename.ext.orig2, and so on. Preserve original directory structure You can preserve the entire source location directory structure, which is tree path while restoring a file to an alternate location.
An example of original directory structure: If you are restoring folder “B” from the source location Volume1/A/B/C/D to F:/.
The restored file structure will be F:/A/B/C/D.
-
-
- Click Finish. After clicking Finish, Druva initiates restore pre-checks. These checks look for issues that can cause your restore job to fail before the restore has even started. Druva does not initiate a restore job if the restore pre-checks identify any issues. You must fix any identified issues before restoring your data. For more information, see VMware restore pre-checks.
Note: During FLR, zero-byte files are skipped, and the count is not displayed in the Job logs on the Management Console. To see the skipped files, download the restore job logs and unzip all the files, including the FLR job logs. Next,
1. Go to the directory where the log files are unzipped.
2. Open the file with a name starting with 'Phoenix-Flr' using a text editor and then use the search string 'Skipping empty file' to search the skipped file names. Alternatively, you can use the following Linux command to search the skipped file names:
grep -i "Skipping empty file" *Phoenix-Flr*
Restore a VMware virtual disk
Considerations
After a restore completes, you should expect the following:
If you choose to restore a virtual disk/VMDK, Druva creates a new virtual machine with minimum configuration (100 MB and 1 CPU) and associates the VMDK files that you selected to it. Configuration does not matter if a virtual disk is not bootable. The new VM is named as per the following convention: <Name of the original virtual machine>_<counter>. The counter increments by 1 for subsequent restores of the virtual machine if a VM folder with the same name preexists in the datastore. For example, for the first restore of a virtual machine named Test Virtual Machine, Druva creates a virtual machine called Test Virtual Machine_1. For the second restore, Druva creates a virtual machine called Test Virtual Machine_2. This process checks the VMware datastore before creating the virtual machine. Multiple restores require a consistent datastore selection. The presence of the error The name ‘vm_name_1’ already exists in the vCenter/ESXi console may cause restores to fail if the datastore selection is inconsistent.
In addition, the VMware hypervisor changes the thin disk to a thick disk in the following scenarios:
- If Changed Block Tracking (CBT) was disabled at the time of backup.
- The virtual disk was attached to a virtual machine that was created on top of an NFS datastore at the time of backup. For more information, see the VMware KB article.
- All data blocks of the thin disk were allocated at the time of backup.
Procedure
- Log in to the Management Console.
- From the top menu bar, select your organization if organizations are enabled.
- Click Protect > VMware.
The vCenter/ESXi host page appears that lists all the registered vCenter/hypervisors. - You can either select the registered vCenter/ESXi host from the card view or list view or select it from the vCenter/ESXi host list in the left navigation pane.
- In the left navigation pane, click Configured VMs.
- Select the virtual machine you want to restore.
- Click Restore > VM Restore.
- Click Data Restore and then select a recovery point.
To know more about restoring cold recovery points, see Restoration of cold-tier data. - Click VMDK and select the virtual disk you want to restore.
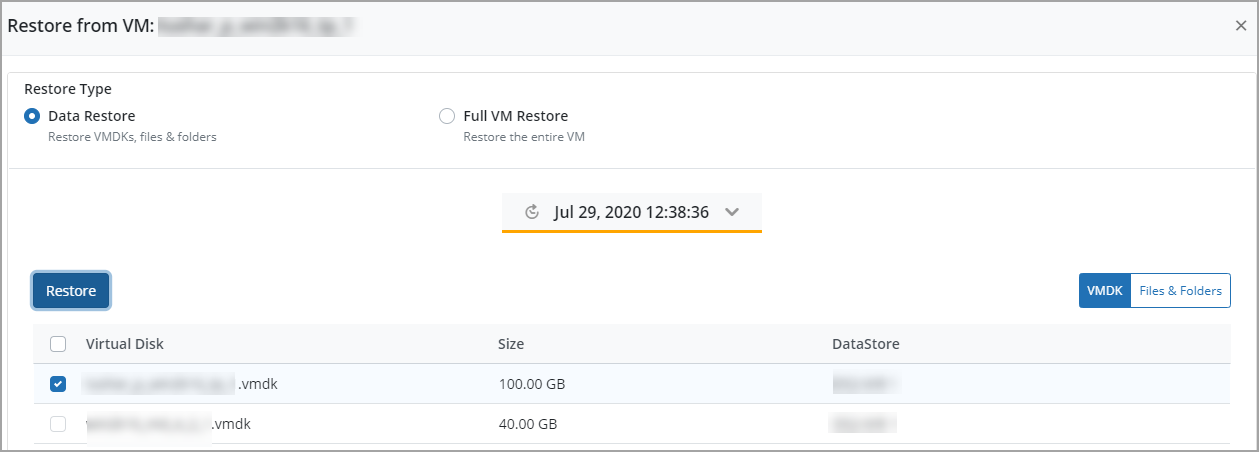
- Click Restore.
- In the Virtual Disk Restore dialog box, enter the following details.
Field Description Destination VMware Setup
From the dropdown list, select the VMware setup where you want to restore the virtual disk.
Backup Proxy Pool
Lists the backup proxy pools available in the vCenter server.
It is recommended that you select a backup proxy pool with backup proxies that are locally connected to the destination hypervisor for restore.
Destination Hypervisor
From the dropdown list, select the ESXi hypervisor where you want to restore this virtual disk.
Destination Datastore
From the dropdown list, select the data store where you want to restore this virtual disk.
Compute Resource
Select host, cluster, or a resource pool where you want to restore the virtual disk. You cannot select a datacenter or a folder.
This option is not available if you are restoring a virtual disk to a standalone ESXi host.Folder
Select a folder under the data center hierarchy where you want to restore the virtual disk.
This option is not available if you are restoring a virtual disk to a standalone ESXi host. - Review the restore details, and click Finish. After clicking Finish, Druva initiates restore pre-checks. These checks look for issues that can cause your restore job to fail before the restore has even started. Druva does not initiate a restore job if the restore pre-checks identify any issues. You must fix any identified issues before restoring your data. For more information, see VMware restore pre-checks.
Note: To access the restored VMWARE virtual disks, please refer to the article Adding existing Virtual Disks to a Virtual Machine.