Restore virtual machines instantly
 Business Enterprise Elite
Overview
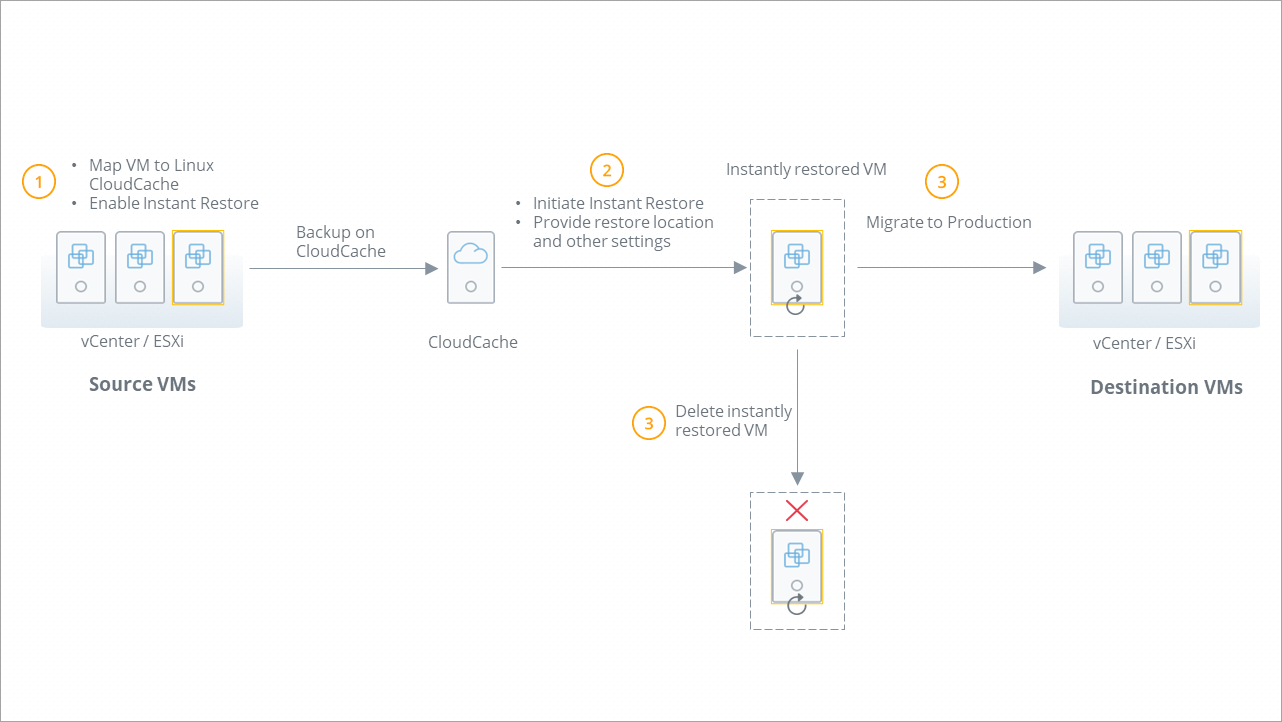
A downtime of a few business hours can cost several million dollars to the business. Hence it is extremely important for organizations to minimize disruptions and downtime of crucial production applications. A low RTO today is one of the most critical capabilities organizations look out for when deploying a backup solution to meet their data protection needs. Druva Instant Restore capability allows administrators to instantly restore virtual machines that are mapped to Linux CloudCache within a few minutes, thereby minimizing disruption to crucial business operations.
Key highlights
The following are some of the key highlights of the instant restore capability:
-
The virtual machines are restored instantly from Linux CloudCache within less than 5 minutes, depending on the size of the virtual machine.
-
You can specify a registered vCenter/ESXi host on which the VMs will be restored from Linux CloudCache.
-
You can choose to power ON the virtual machine and also connect to a network after the restore.
-
You can migrate the restored virtual machine to production.
-
You can specify the destination host or the datastore where you want to migrate the virtual machine. Additionally, an administrator can also specify the priority of migration.
-
You can delete the instantly restored virtual machines that are no longer needed.
The following diagram shows an overview of the Instant Restore process:
Before you begin
-
Before proceeding with the restore, make sure you have read the prerequisites and considerations for Instant Restore.
-
For information on roles and permissions that are required for instant restore and related actions, see the important considerations in Manage administrator roles.
Steps to restore virtual machines instantly
Perform the following tasks for restoring a virtual machine instantly:
| Task No. | Task | Description |
|---|---|---|
| 1. | Configure the virtual machine for backup |
Configure a virtual machine for backup either manually or by using a configuration rule. As a part of configuring the virtual machine for backup, do the following:
For more information, see Manually configure virtual machines for backup and Automatically configure virtual machines for backup. Alternatively, you can also enable Instant Restore from the Reconfigure page. For more information, see Enable or Disable Instant Restore. |
| 2. | Initiate Instant Restore for the selected virtual machine(s). | Backup the virtual machine to the Linux CloudCache configured in Task 1. |
| 3. | Initiate Instant Restore for the selected virtual machine(s). | From the list of configured virtual machines, select the virtual machines that you want to restore instantly and initiate the instant restore process. For more information, see the procedure for Instant Restore. |
Procedure
In the restore target window, provide the following information:
|
Field |
Description |
|---|---|
|
Restore Location |
|
|
Destination vCenter |
From the dropdown list, select the VMware setup where you want to restore the virtual machine. |
|
Destination Host |
Select a host with local network connectivity to the CloudCache configured for the virtual machine. |
|
Backup Proxy Pool |
Lists the Backup proxy pools available in the vCenter server. It is recommended that you select a Backup proxy pool with backup proxies that are locally connected to the destination hypervisor for restore. |
|
Compute Resource |
Select a host, cluster, or a resource pool where you want to restore the virtual machine. You cannot select a data center or a folder. This option is not available if you are restoring a virtual machine to a standalone ESXi host. |
|
Folder |
Select a folder under the data center hierarchy where you want to restore the virtual machine. This option is not available if you are restoring a virtual machine to a standalone ESXi host. |
|
Recovered VM Name (Optional) |
Provide a name for the recovered virtual machine. By default, the recovered virtual machine is saved in the format IR_<original_VM_name_number>. For example, IR_TestVM_1.
|
|
Settings |
|
| Staging Location (optional) | Select a datastore on the ESXi host that will store changes to the instantly restored VM. |
|
Restore Settings |
|
|
Power on VMs after restore |
Select to power the virtual machine ON after restoring. |
|
Connect to network |
Select if you want to connect the virtual machine to a network after restoring, and from the dropdown list, select the network to which you want to connect the virtual machine. |
- Log in to the Management Console.
- From the top menu bar, select your organization if organizations are enabled.
- Click Protect > VMware.
The vCenter/ESXi host page appears that lists all the registered vCenter/hypervisors. - You can either select the registered vCenter/ESXi host from the card view or list view or select it from the vCenter/ESXi host list in the left navigation pane.
- In the left navigation pane, click Configured VMs.
- Select the virtual machine that is configured for instant restore and click Restore > Instant restore.
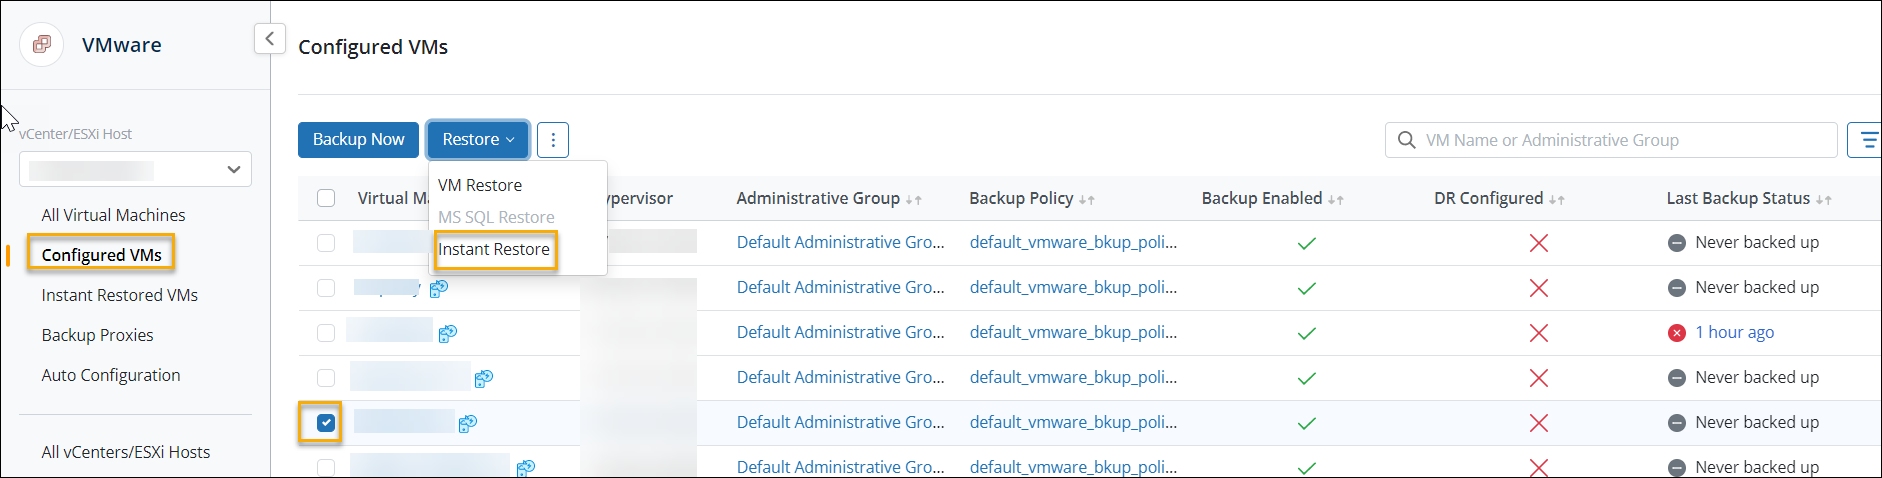
-
Alternatively, on the Configured VMs page, click the virtual machine that you want to restore instantly. On the virtual machine details page, click Restore > Instant restore.
-
On the Recovery point Selection screen, select the Hot recovery point and click Proceed to Restore.
Note: Instant restore is supported from Hot recovery points only.
-
Click Finish.
You can view the status of the restore process on the Jobs page. The restored virtual machines will be listed on the Instant Recovered VMs page.
The instantly restored machines are not available to configure for backup. You must first migrate the virtual machines to production to be able to configure them for backup.
Limitations
-
Instant restore is not supported for Windows CloudCache.
-
You cannot perform an instant restore or migrate a VM on a standalone ESXi.
-
We do not support any extension, shrinking, or inflation done to an already added disk on an instantly restored virtual machine.
-
Instant Restore to lower ESXI or Vcenter version from higher version ESXi or Vcenter's VM is not supported. For example, if you have taken a backup on vCenter version 5.5, you cannot restore a VM from version 5.5 to version 5.1. For more information, see ESXi/ESX hosts and compatible virtual machine hardware versions list (2007240).
-
Instant Restore feature is not available on VMC as it doesn’t support NFS datastores.
-
If the data block is not present on the CloudCache, the instant restore of the virtual machine fails.
-
To perform both, instant restore and migration on VC 6.0 having ESX 5.1 and 5.5, you must power the VM OFF. If the VM is powered ON, you can perform either instant restore or migration, but not both.
-
Linux CloudCache restart is not supported. Instantly restored VMs go in invalid state.
Virtual machine conditions and limitations for vMotion
-
The source and the destination management network IP address families must match.
-
If virtual CPU performance counters are enabled, you can migrate virtual machines only to hosts that have compatible CPU performance counters.
-
You can migrate virtual machines with USB devices that are connected to a physical USB device on the host.
-
You cannot use migration with vMotion to migrate a virtual machine that uses a virtual device backed by a device that is not accessible on the destination host.
-
You cannot use migration with vMotion to migrate a virtual machine that uses a virtual device backed by a device on the client computer.
For more information, see Virtual Machine Conditions and Limitations for vMotion in the vSphere Web Client.
Storage vMotion Requirements and Limitations
-
Virtual machine disks must be in persistent mode or must be Raw Device Mappings (RDMs).
-
Migration of virtual machines during VMware Tools installation is not supported.
-
The host on which the virtual machine is running must have a license that includes Storage vMotion.
-
ESX/ESXi 3.5 hosts must be licensed and configured for vMotion. ESX/ESXi 4.0 and later hosts do not require vMotion configuration in order to perform migration with Storage vMotion.
-
The host on which the virtual machine is running must have access to both the source and target datastores.
For more information, see Storage vMotion Requirements and Limitations.
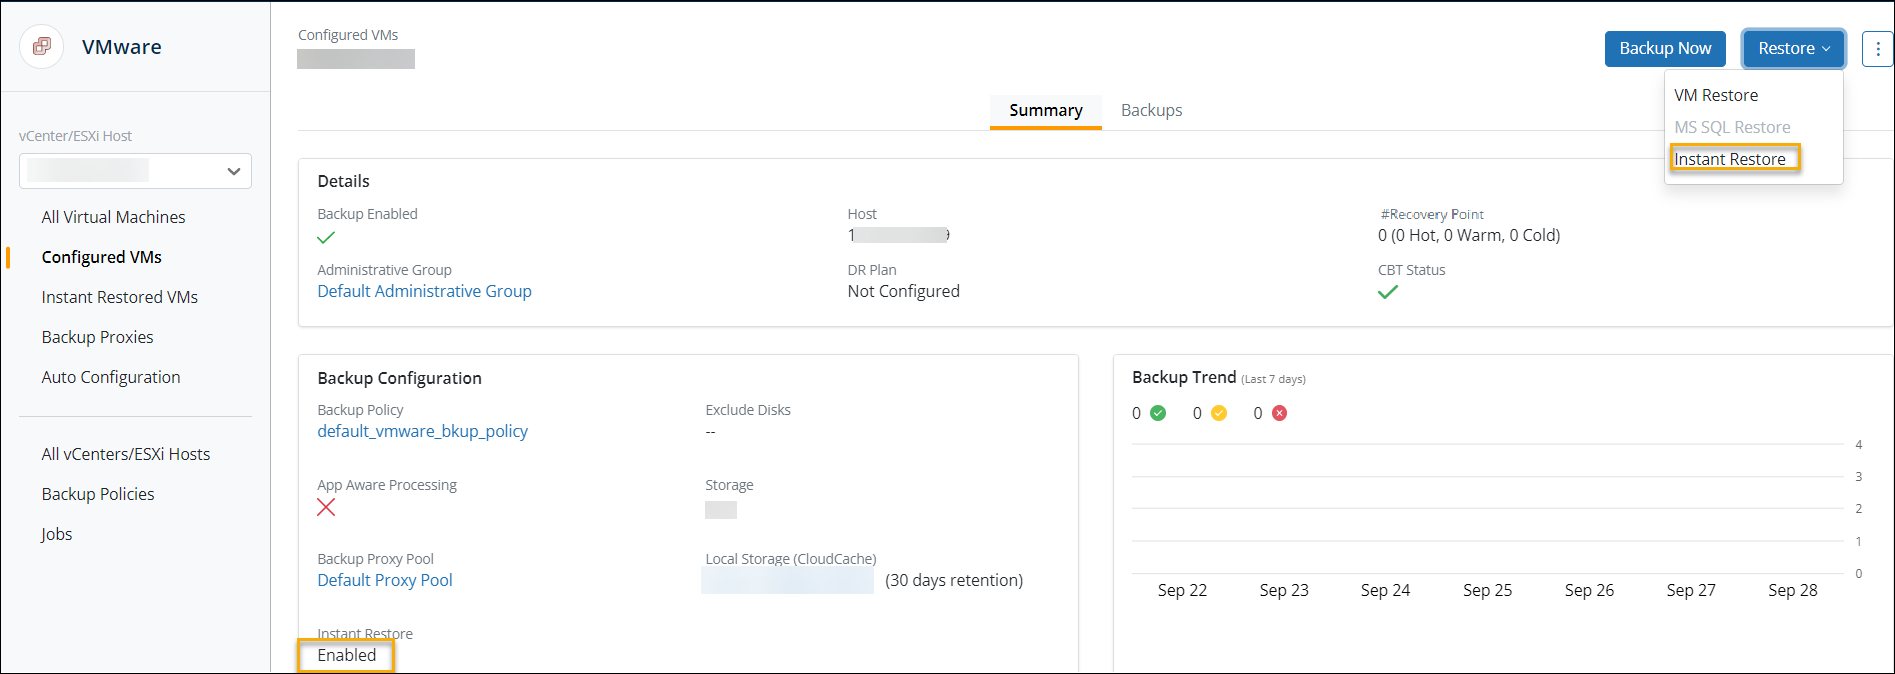
Enable or disable Instant restore
An administrator can enable or disable instant restore for a virtual machine at any point of time.
Procedure
- Log in to the Management Console.
- From the top menu bar, select your organization if organizations are enabled.
- Click Protect > VMware.
The vCenter/ESXi host page appears that lists all the registered vCenter/hypervisors. - You can either select the registered vCenter/ESXi host from the card view or list view or select it from the vCenter/ESXi host list in the left navigation pane.
- In the left navigation pane, click Configured VMs.
- On the Configured VMs page, do the following:
-
Select the virtual machines for which you want to enable or disable instant restore and select
> Change Instant Restore on the top of the screen.
-
On the Change Instant restore dialog box, select either of the following options:
Enable Instant Restore: Select to enable instant restore for virtual machines that are mapped to Linux CloudCache.
Disable Instant Restore: Select to disable instant restore of the selected virtual machines. -
Click Save.
-
-
Alternatively, you can also enable or disable instant restore by doing the following:
-
On the Configured VMs page, click the virtual machine for which you want to enable or disable instant restore and from top right corner, select
-
On the Reconfigure for Backup page, under Backup Settings section, select Map to CloudCache and select Linux CloudCache.
-
Select Enable instant restore from CloudCache.
-
- Click Save.
Migrate to Production
After restoring the virtual machines instantly, administrators can migrate the virtual machines to the production environment. Administrators can choose to migrate the restored virtual machine either at the same location as that of the target host or at an alternate location. Additionally, administrators can also specify the VMotion priority for migration.
Before you begin
Make sure that vMotion is enabled on source and destination hosts.
Procedure
|
Field |
Description |
|---|---|
|
Migration Target |
|
|
Same host as of instant restore |
Select to migrate the virtual machine to the same host as that of the restore target |
|
Destination Datastore |
From the dropdown list, select the datastore where you want to migrate the virtual machine. Make sure that the datasource has a minimum 110 GB disk space available.
|
|
Alternate Location |
Select to migrate the virtual machine to an alternate location. For migrating the virtual machine to an alternate location, provide the following details: Destination Hypervisor: From the dropdown list, select the ESXi hypervisor where you want to restore this virtual machine. Destination Datastore: From the dropdown list, select the data store where you want to restore this virtual machine.
Compute Resource: Select host, cluster, or a resource pool where you want to restore the virtual machine. You cannot select a datacenter or a folder. This option is not available if you are restoring a virtual machine to a standalone ESXi host. Folder: Select a folder under the data center hierarchy where you want to restore the virtual machine. This option is not available if you are restoring a virtual machine to a standalone ESXi host. Network: <Check if this is valid, copied from full restore>
Select a network setting available at the destination hypervisor. For on-premises, If a network adapter was not attached to the virtual machine at the time of backup, Druva will attach the VMXNET3 or VMXNET2 type adapter and restore the virtual machine with the selected network setting. If a network adapter was attached to the virtual machine at the time of backup, Druva will restore the virtual machine with the backed up network adapter and selected network setting. If multiple network adapters were attached to the virtual machine at the time of backup, Druva will restore the virtual machine with all the adapters and selected network settings. For troubleshooting network issues, see Troubleshooting. |
|
vMotion Priority |
From the drop down, select the priority with which you want to migrate the virtual machine by using the storage vMotion. |
- Log in to the Management Console.
- From the top menu bar, select your organization if organizations are enabled.
- Click Protect > VMware.
The vCenter/ESXi host page appears that lists all the registered vCenter/hypervisors. - You can either select the registered vCenter/ESXi host from the card view or list view or select it from the vCenter/ESXi host list in the left navigation pane.
- In the left navigation pane, click Instant Recovered VMs.
- From the list of instantly restored virtual machines, select the virtual machine and click Migrate to Production.
Note: You cannot select a virtual machine for migration if deletion is in progress for that virtual machine. - In the Migrate to Production dialog box, provide the following information:
-
Click Finish.
You can see the status of the migration on Jobs page. The job type for migration is Restore (Migrate to Production).
Once the migration is successful, the virtual machine is removed from the list on the Instant Recovered VMs page and listed under All Virtual Machines page. You can now configure this virtual machine for backup.
Next Steps
Delete instantly restored virtual machines
An administrator can delete instantly restored virtual machines. Deleting the virtual machine detaches it from CloudCache and you cannot recover it.
Procedure
- Log in to the Management Console.
- From the top menu bar, select your organization if organizations are enabled.
- Click Protect > VMware.
The vCenter/ESXi host page appears that lists all the registered vCenter/hypervisors. - You can either select the registered vCenter/ESXi host from the card view or list view or select it from the vCenter/ESXi host list in the left navigation pane.
- In the left navigation pane, click Instant Recovered VMs.
- From the list of instantly restored virtual machines, select a virtual machine and click Delete.