Manually install the backup proxy using the OVA
 Business Enterprise Elite
Download backup proxy and generate activation token
In order to backup your virtual machines, you must first download and install backup proxy in your virtual infrastructure environment, and then register backup proxy in Management Console. To register your VMware set up, an activation token is required. This article describes getting the backup proxy and activation token. Registering your servers is described in the following sections.
Download the latest version of backup proxy from the following location:
- Druva Downloads page - http://downloads.druva.com/phoenix/
From the Select Agent drop-down list select VMware. - OR
While registering a backup proxy, you can download it from the Register VMware setup wizard.
Download the appropriate installer based on your plan to deploy VMware backup proxy and your version of Druva Cloud.
Ensure that you download the correct backup proxy. To register a standalone ESXi server, download the standalone backup proxy. To register a vCenter server, download the vCenter backup proxy. To register a VMware Cloud on AWS and Azure VMware Solution, download the vCenter or standalone backup proxy version 4.7.1 or later.
Generate activation token
If you are a Druva Cloud subscriber and,
-
You plan to deploy backup proxy through vCenter Server, download the VMware(Backup Proxy for vCenter) installer file located under Agents for Druva Cloud category.
OR - You plan to deploy backup proxy directly on the standalone ESXi, download the VMware(Backup Proxy for standalone ESXi) installer file located under Agents for Druva Cloud category.
If you are Druva GovCloud subscriber and,
- You plan to deploy backup proxy through vCenter Server, download the VMware(Backup Proxy for vCenter) installer file located under Agents for Druva GovCloud category.
OR - You plan to deploy backup proxy directly on the standalone ESXi, download the VMware(Backup Proxy for standalone ESXi) installer file located under Agents for Druva GovCloud category.
On the Management Console, select VMware from the Protect menu. Note that if the All Organizations menu is enabled, you have to first select an organization and then select VMware from the Protect menu. The Register VMware Setup wizard appears.
Register a standalone ESXi
- ► Expand to view the procedure
-
Note: For additional help on deploying OVF templates, see the associated VMware documentation depending on the version of your VMware setup. For example, see Deploying OVF Templates from the vSphere 5 documentation library.
You can deploy backup proxy on a vCenter server whose virtual machines you want to back up. If you have not deployed a vCenter server, you can deploy backup proxy on a standalone ESXi host. You must deploy backup proxy on the same vCenter server or the ESXi host from where virtual machines are to be backed up.
Watch video
To deploy backup proxy
- Log on to ESXi using vSphere Client.
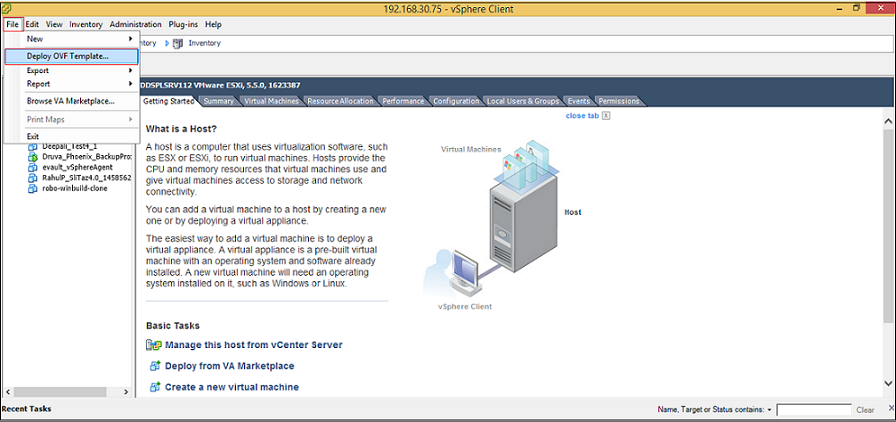
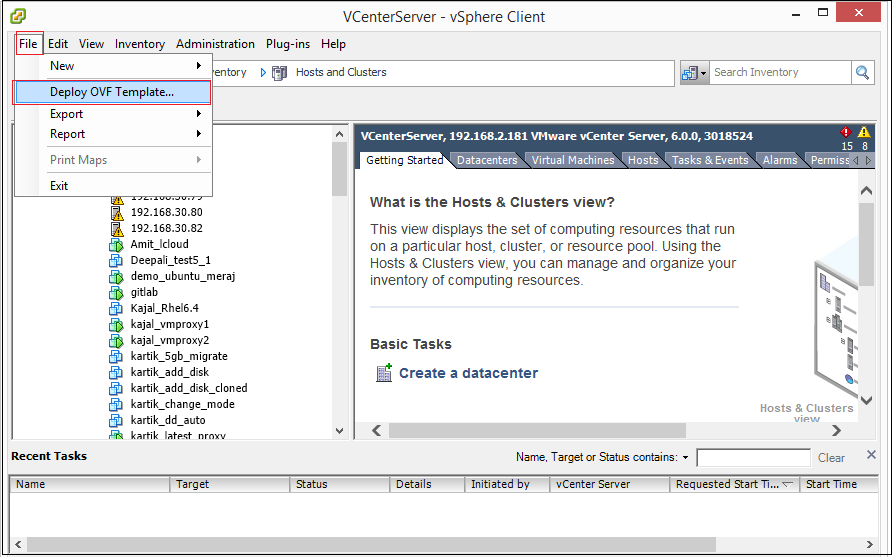
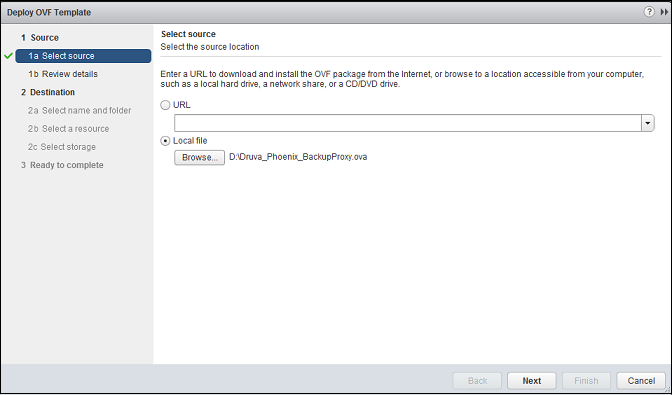
- From the File menu, click Deploy OVF Template.
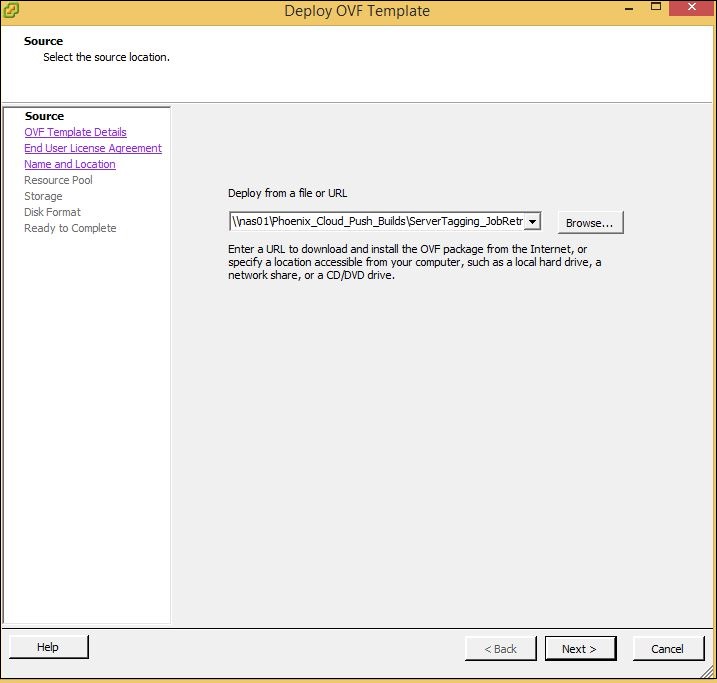
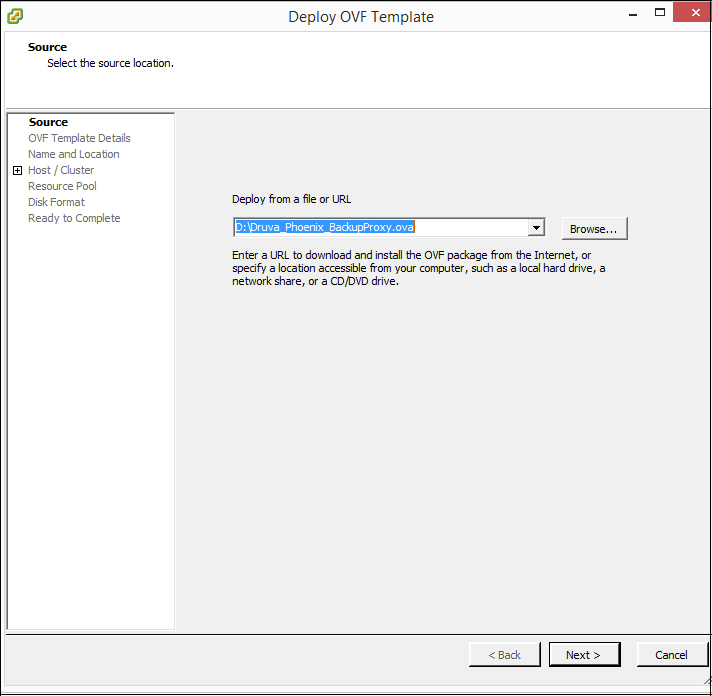
- In the Deploy from a file or URL box, type or select the full path to the OVF template that you downloaded and click Next.
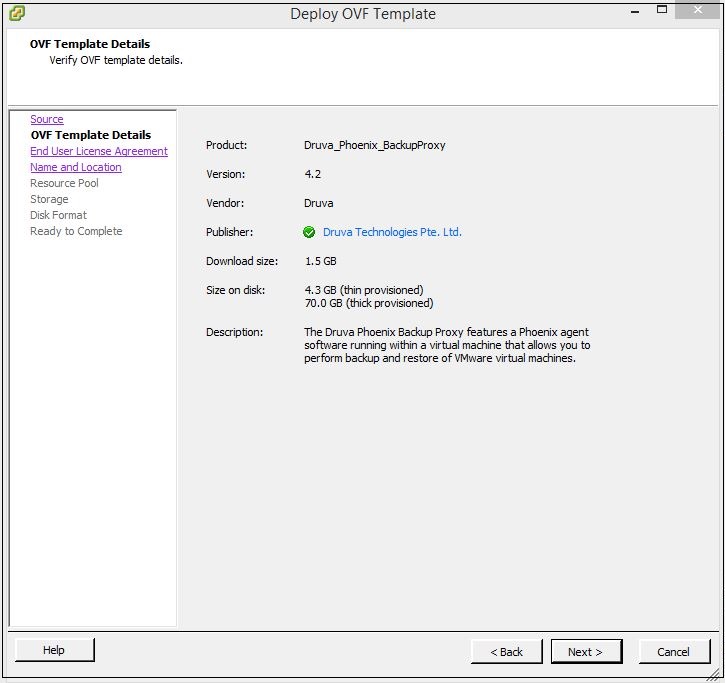
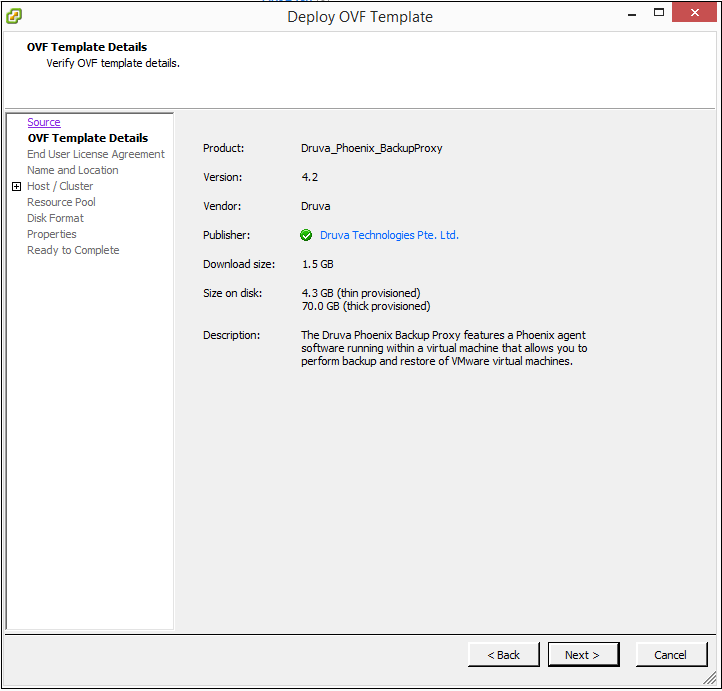
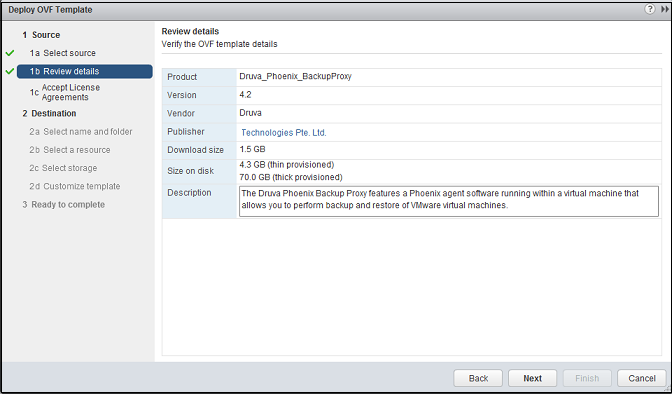
- Verify the OVF template details, and click Next.
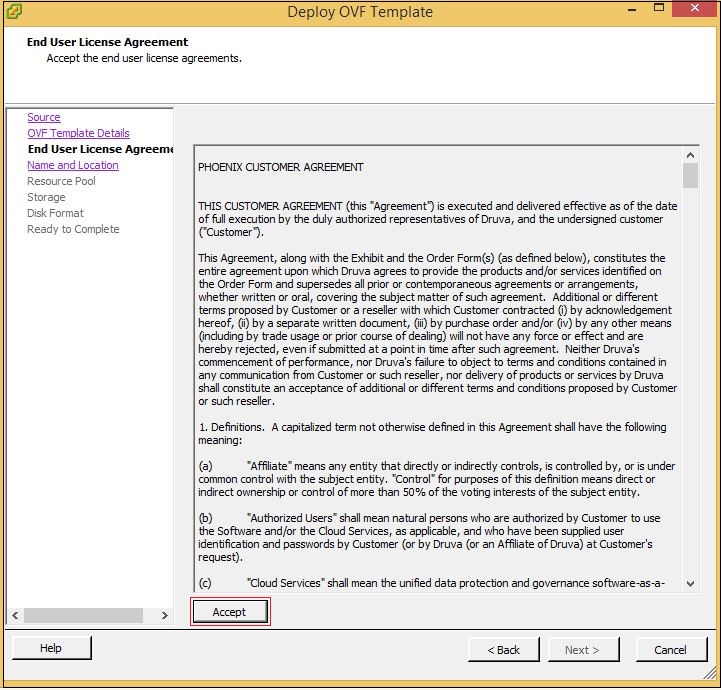
- Click Accept to accept the End User License Agreement (EULA), and click Next.
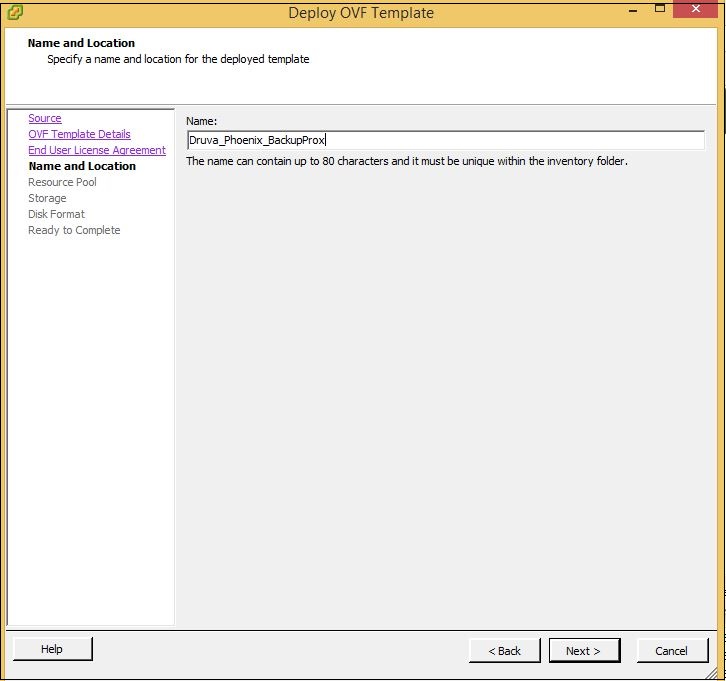
- In the Name box, type a name for the template and click Next.
- From the list of resource pools, click the Resource Pool that you want to assign to this virtual machine and click Next.
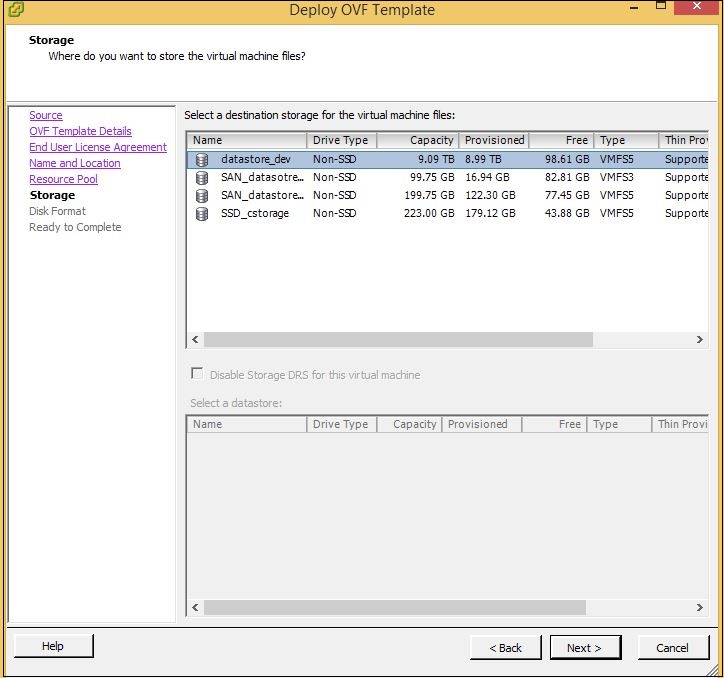
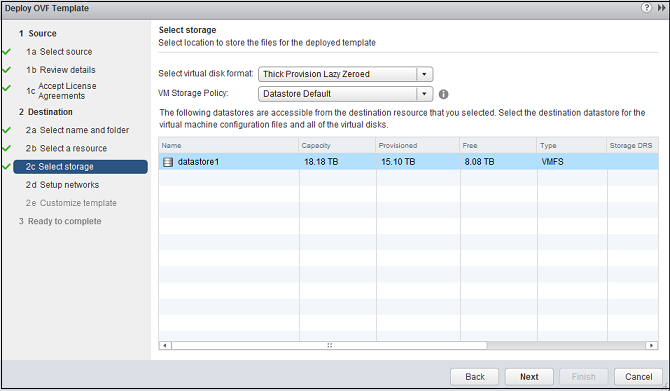
- Select a destination storage, and click Next.
If you created storage profiles, click the storage profile that you want to assign to the virtual machine.
From the list of storage, select a storage that you want to set as destination storage for this virtual machine.
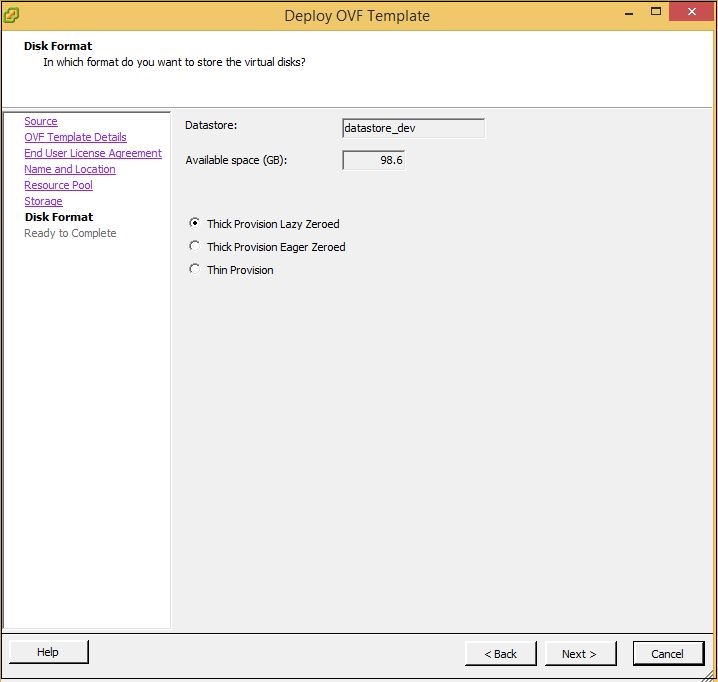
- Select from the following provisioning format, and click Next.
- Thick Provisioned Lazy Zeroed: If you select this format, a thick virtual disk is created, and the existing data is lazy zeroed (existing data on the provisioned storage are cleared when the virtual machine writes to the storage for the first time).
- Thick Provisioned Eager Zeroed: If you select this format, a thick virtual disk is created, and the existing data is eager zeroed (existing data on the provisioned storage is overwritten with zeroes at the time of creating the virtual machine).
- Thin Provisioned: If you select this format, a thin virtual disk is created.
Note: Backup proxy uses the default network mapping settings of the vCenter Server or ESXi hypervisor.
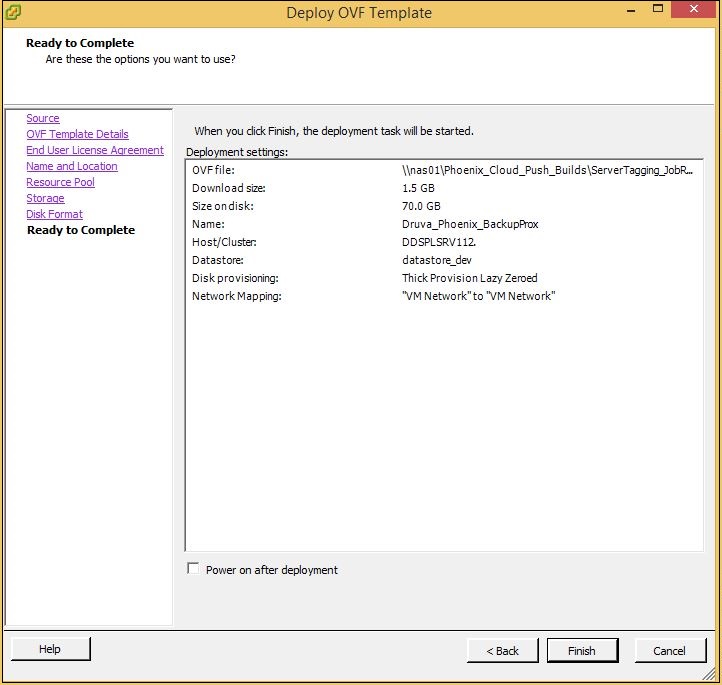
- To start the virtual machine after deployment, select Power on after deployment.
- Verify the summary, and click Finish.
Before configuring backup proxy, ensure that:
- You have the ESXi root credentials handy. You can either set the fully qualified domain name (FQDN) or the IP address of ESXi Server. ESXi root credentials handy. You can either set the fully qualified domain name (FQDN) or the IP address of ESXi Server.
Note: Backup proxy stores these credentials in an encrypted format.
- Ensure port 443 on ESXi host is configured for http/https traffic. ESXi host is configured for http/https traffic. The backup proxy communicates with the registered ESXi host on the port 443.
Note: You can configure backup proxy settings for Standalone ESXi only through CLI. The process of configuring backup proxy through vCenter is applicable only through vCenter desktop/web client and not in case of standalone ESXi because vCenter has the capability to temporarily store the parameters received during the OVF deployment.
To configure backup proxy
- From the vSphere Client console, start the backup proxy virtual machine.
- Log on to the virtual machine with the root username and password.
Note: The default username is root, and the default password is druvaphoenix. If you are configuring the backup proxy for the first time, reset the password and use it for all subsequent logins.
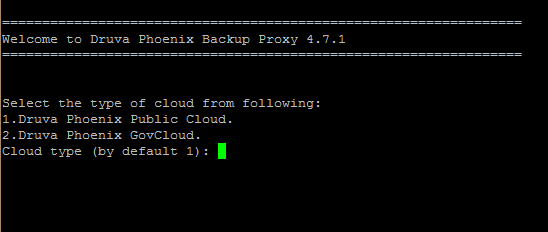
- On the Welcome screen, select GovCloud or Druva Cloud.
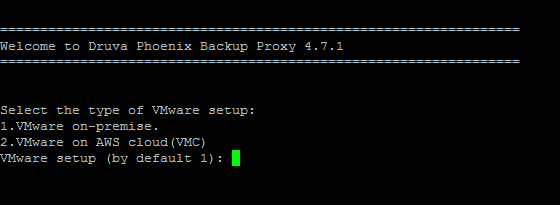
- On the type of VMware setup page, select VMware on-premise.
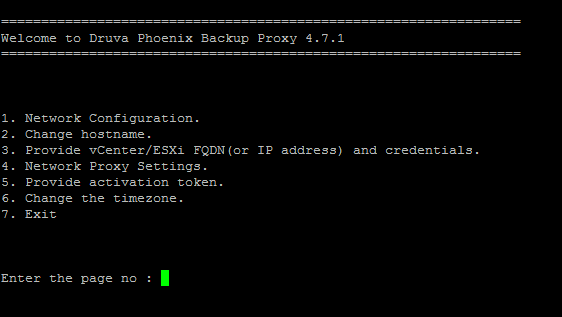
- On the Backup Proxy settings page, enter the required page number and provide the following details:
Note: For VMware proxy version prior to 7.0.0, perform the steps based on the following screen.
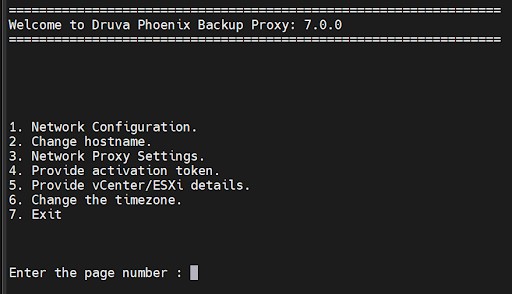
Note: For VMware proxy version 7.0.0 and later, perform the steps based on the following screen. For more details about these steps, refer to the table below.
Field Description 1. Network Configuration
Druva backup proxy provides two network interface cards for configuration. When you select a card for configuration, backup proxy provides an option to enable the card. After you enable the card, you can configure the network settings.
Configure the network settings (Static/DHCP).
- If you select the Static IP, provide the following details:
- IP Address
- Netmask
- Gateway
- Primary DNS Secondary DNS Domain
- Secondary DNS
- Domain
- If you select DHCP, the DHCP IP is set.
Note: Before selecting DHCP setting, verify that no dhclient is running on the backup proxy.
2. Change hostname After the network configuration completes, you can choose to change the hostname. - To change the hostname, provide the new hostname when prompted.
- To leave the hostname unchanged, only press Enter.
- Ensure that you do not enter a special character in the hostname or space.
3. Provide vCenter/ESXi FQDN (or IP address) and credentials When prompted, provide the FQDN or IP address of ESXi server.
Note: For VMware proxy version 7.0.0 and later, refer to the sequence of steps in the above screenshot. Provide the network proxy settings, followed by the activation token, and then vCenter/ESXi FQDN (or IP address) and credentials.
4. Network Proxy Settings
If you are using a web proxy in your environment, enter Yes when you are prompted with Do you want to use Network Proxy Setting. To continue without using a proxy, enter No.
If you enter Yes, provide the following details:
- Choose one of the following authentication methods. Enter:
0 for None
1 for Kerberos
2 for Basic
If you select Kerberos authentication method, provide the following details:- Enter FQDN of DNS Server Name: Enter the FQDN of the DNS server.
- Enter DNS Server User Name: Enter a DNS server user name to let the backup proxy virtual machine use the domain you provided in the DNS Server Name field.
- Enter DNS Server User Password: Enter the password of the user entered in the DNS Server User Name field.
After you provide the DNS server details, the Druva backup proxy attempts to connect to the DNS server. If the connection is successful, provide the following details. - Enter KDC server name: Enter the FQDN of the Key Distribution Center (KDC) server.
- Enter KDC port: Enter the KDC port.
- Enter KDC user name: Enter a user name that the KDC can authenticate.
- Enter KDC Password: Enter the password of the user entered in the KDC user name field.
After you provide the KDC server details, the Druva backup proxy tries to connect to the KDC server and generate an authentication ticket. If the ticket is generated successfully, the Druva backup proxy can connect to the web proxy.
- Proxy Type: Druva supports the following proxy types:
- http
- socks4
- socks5
Enter one of the supported proxy types.
- Proxy Server: Enter the valid proxy server FQDN.
- Proxy port: Enter the corresponding proxy port number.
- Username: Enter a valid proxy username. For a proxy that does not require authentication, enter *.
- Password: Enter the valid proxy password. For a proxy that does not require authentication, enter *.
Note: Ensure that the FQDNs of the DNS server, KDC server, and the web proxy host resolve to the appropriate servers. If the FQDNs do not resolve, add the FQDNs and the respective IP addresses in the /etc/hosts file of the backup proxy virtual machine.
5. Provide activation token
At the prompt, type the activation token that Druva generated while registering the VMware setup. Wait till the virtual machine synchronizes with the NTP server. By default, the Druva backup proxy synchronizes with the CentOS NTP servers. To configure custom NTP server, see Configuring custom NTP server.
For Ubuntu, see Configuring custom NTP server for Druva Ubuntu proxy.
Note: If you choose to activate backup proxy at a later time, press Enter key thrice to exit the configuration. To activate the backup proxy later, see perform a standalone activation of backup proxy.
6. Change the time zone
You can change the time zone on your system:
Type yes, to change the time zone.
-
From the displayed list of continents and oceans, type the number corresponding to the server location.
-
From the displayed list of country, type the number corresponding to the country in which the server is located.
-
Type 1, to set the selected time zone.
The backup proxy will reboot after you change the time zone.
Type no, to keep the default time zone.
Note: You can also manually set the time zone.
7. Exit Wait for the synchronization to complete and exit. - If you select the Static IP, provide the following details:
Note: After you reset the default password of the backup proxy virtual machine, the ProxyConf utility available at /opt/Druva/Phoenix/bin/ is invoked. The ProxyConf utility prompts you for inputs while performing tasks 4 through 6, thus completing the configuration of backup proxy.
Register vCenter using the desktop client
- ► Expand to view the procedure
-
Before you begin
Before you begin, ensure the following:
- vSphere Client for desktop is installed on the server
- The backup proxy virtual appliance is downloaded on the same desktop as the vSphere Client or a location accessible from the system
- You have the following information:
- vCenter credentials
- Web proxy credentials (If you use a Web proxy in your environment).
- Activation token. For more information see, Generate activation token.
- IP settings.
Note: The process of deploying and configuring the backup proxy using a desktop/web client is applicable only for a vCenter host and not for a standalone ESXi host. vCenter has the capability to temporarily store the parameters received during the OVF deployment.
If you use an HTML5 web client for proxy deployment, you'd need to select http in the 'j.proxy type' field under Web Proxy Settings as a hard value even if there is no web proxy. The proxy will not power on post-deployment without this value.
To deploy backup proxy
- Log on to vCenter Server using vSphere Client.
- From the File menu, click Deploy OVF Template.
- In the Deploy from a file or URL box, type or select the full path to the OVF template that you downloaded, and click Next.
- Verify the OVF template details, and click Next.
- Click Accept to accept the End User License Agreement (EULA), and click Next.
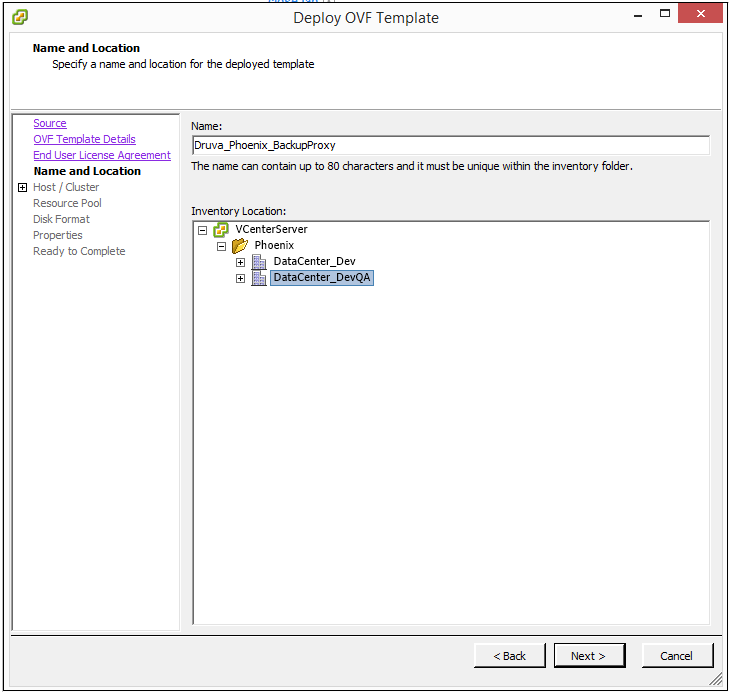
- In the Name box, type a name for the template.
Under Inventory Location, expand or collapse the inventory tree, click a location, and click Next.
- Select a host or a cluster on which you want to deploy backup proxy, and click Next.
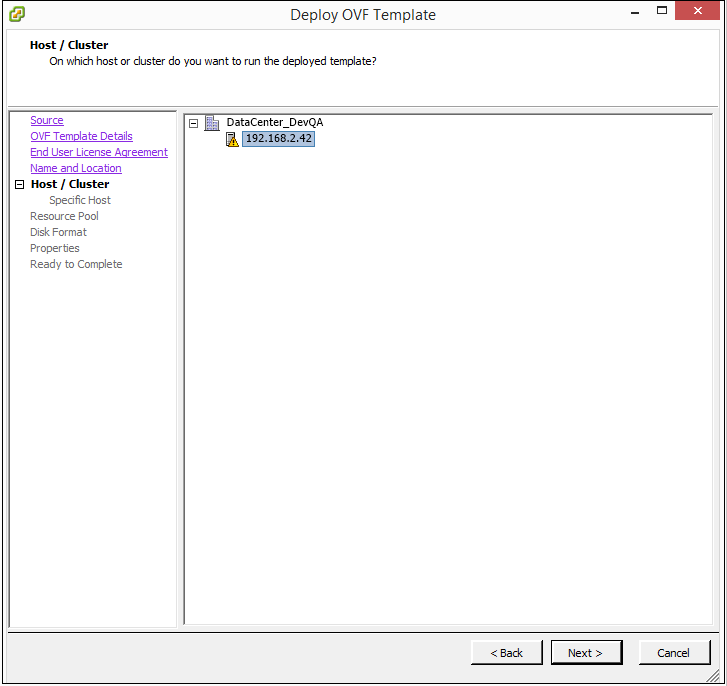
Note: If you are registering a standalone ESXi, select the host from which you want to backup the virtual machines.
- From the list of resource pools, click the resource pool that you want to assign to this virtual machine, and click Next.
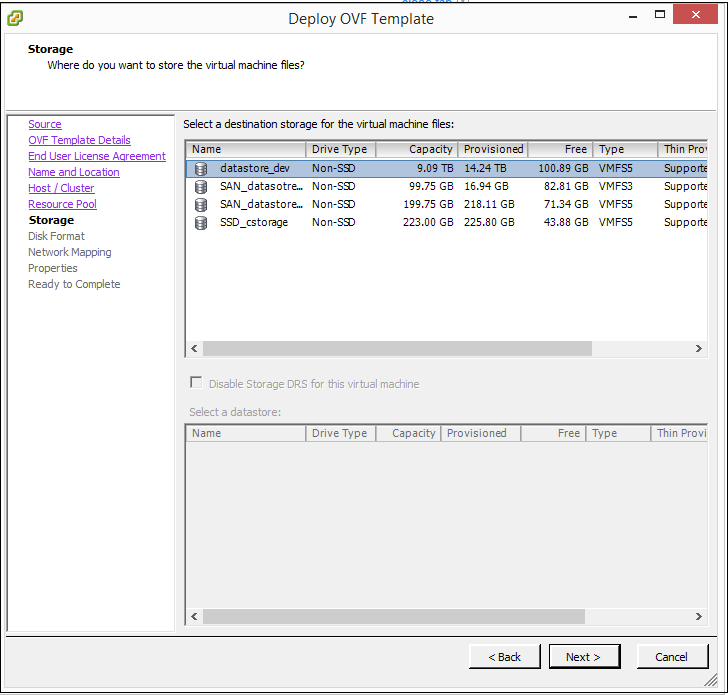
- Select a destination storage, and click Next.
If you created storage profiles, click the storage profile that you want to assign to the virtual machine.
From the list of storage, click a storage that you want to set as destination storage for this virtual machine.
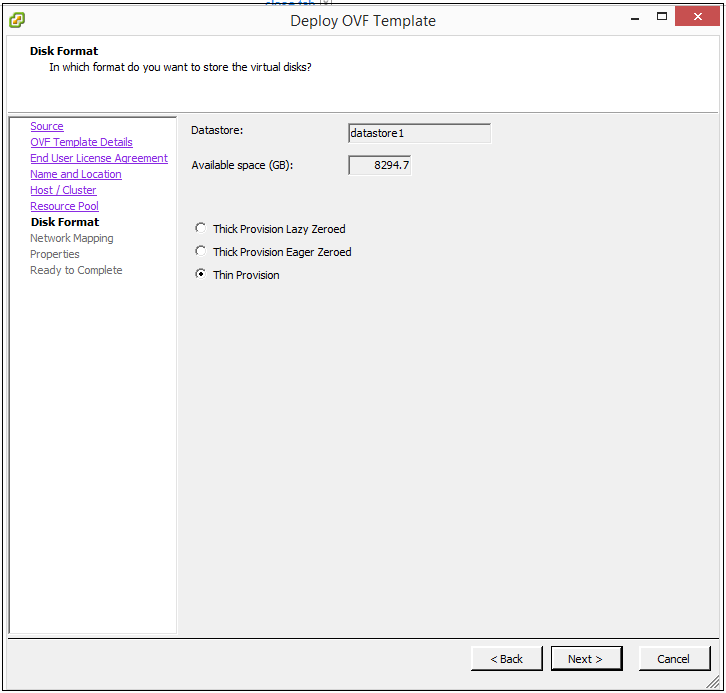
- Select a provisioning format, and click Next.
- Thick Provisioned Lazy Zeroed: If you select this format, a thick virtual disk is created, and the existing data is lazy zeroed (existing data on the provisioned storage are cleared when the virtual machine writes to the storage for the first time).
- Thick Provisioned Eager Zeroed: If you select this format, a thick virtual disk is created, and the existing data is eager zeroed (existing data on the provisioned storage is overwritten with zeroes at the time of creating the virtual machine).
- Thin Provisioned: If you select this format, a thin virtual disk is created.
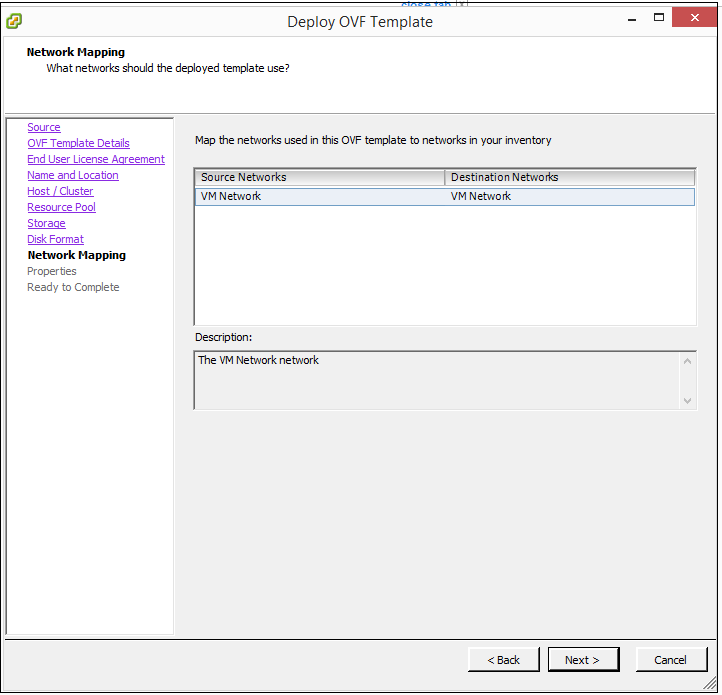
Note: Backup proxy uses the default network mapping settings of the vCenter Server or ESXi hypervisor.
- Select the source and destination network and click Next.
- On the Properties screen, provide the following details:
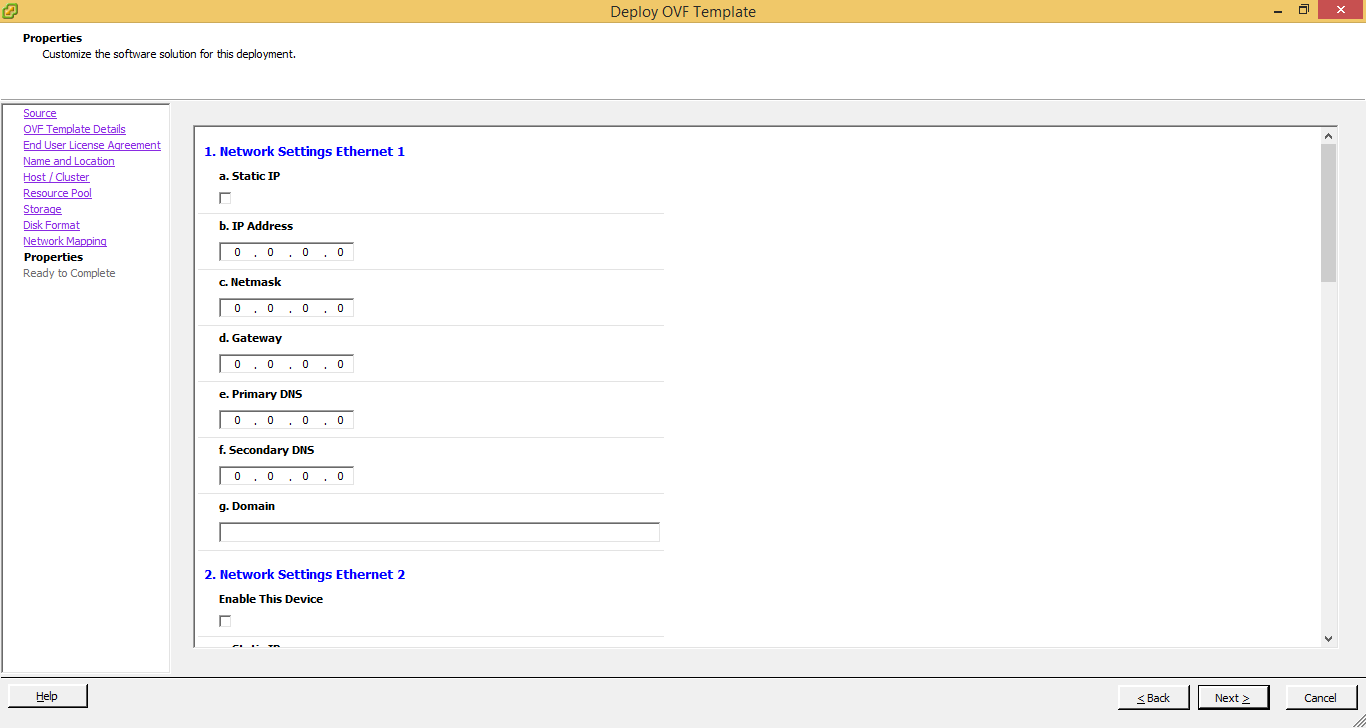
Field Description Network Settings
Druva backup proxy provides two network interface cards for configuration.
Select the Static IP box and provide:
- IP Address
- Netmask
- Gateway
- Primary DNS
- Secondary DNS
- Domain
Hostname Provide the hostname. Ensure that you do not enter a special character or a space in the hostname. vCenter/ESXi details
Provide the following vCenter details on which your backup proxy resides:
- vCenter or ESXi FQDN
- Username
- Password
Ensure that you provide a format that you have used to log in to the vCenter using the Desktop vSphere Client. For example, if your vCenter is connected to a domain, you should provide the username in the following format:
<domain\username>
Web proxy settings
You can configure web proxy for your environment. To set up the web proxy, select the Use Web Proxy checkbox and provide the following details:
- Choose authentication type:
- None
- Basic
- Kerberos
If you select Kerberos authentication method, provide the following details:- Enter KDC server name: Provide the FQDN of the Key Distribution Center (KDC) server.
- Enter KDC user name: Provide a user name that the KDC can authenticate.
- Enter KDC Password: Provide the password of the user entered in the KDC user name field.
- Enter KDC port: Provide the KDC port.
- Enter FQDN of DNS Server Name: Provide the FQDN of the DNS server.
- Enter DNS Server User Name: Provide a DNS server user name to let the backup proxy virtual machine use the domain you provided in the DNS Server Name field.
- Enter DNS Server User Password: Provide the password of the user entered in the DNS Server User Name field.
Note: Ensure that the FQDNs of the KDC, DNS server, and the web proxy host resolve to the appropriate servers. If the FQDNs do not resolve, add the FQDNs and the respective IP addresses in the /etc/hosts file of the backup proxy virtual machine.
- Proxy Type: Druva supports the following proxy types:
- http
- socks4
- socks5
- Proxy Server IP: Valid IP of proxy server.
- Proxy Port: Respective proxy port number.
- Username: Valid proxy username. For a proxy that does not require authentication, enter *.
- Password: Valid proxy password. For a proxy that does not require authentication, enter *.
Activation Token: The activation token that you have received while registering the VMware setup.
Govcloud: Select the checkbox if you are deploying the backup proxy on GovCloud.
Timezone: from the drop-down list , select the required time zone.
- Click Next.
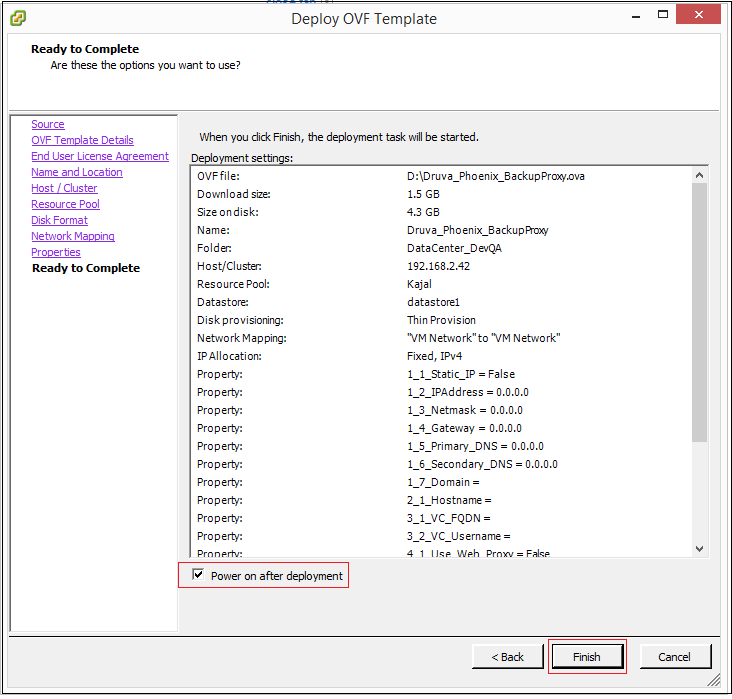
- To start the virtual machine after deployment, select Power on after deployment.
- Verify the summary, and click Finish.
You can see the backup proxy on the UI.
Note: For additional help on deploying OVA templates, see the associated VMware documentation depending on the version of your VMware setup. For example, see this article from the vSphere 5 documentation library.
You can deploy backup proxy on a vCenter server whose virtual machines you want to back up. If you have not deployed vCenter Server, you can deploy backup proxy on a standalone ESXi host. You must deploy backup proxy on the same vCenter Server or the ESXi host from where virtual machines are to be backed up.
Reconfigure backup proxy settings through vSphere Desktop Client
-
Log on to vCenter Server using vSphere Client.
- From the left pane, select the backup proxy virtual machine.
- Right-click the virtual machine and select Power > Power Off.
- On the Confirm Power Off screen, select Yes.
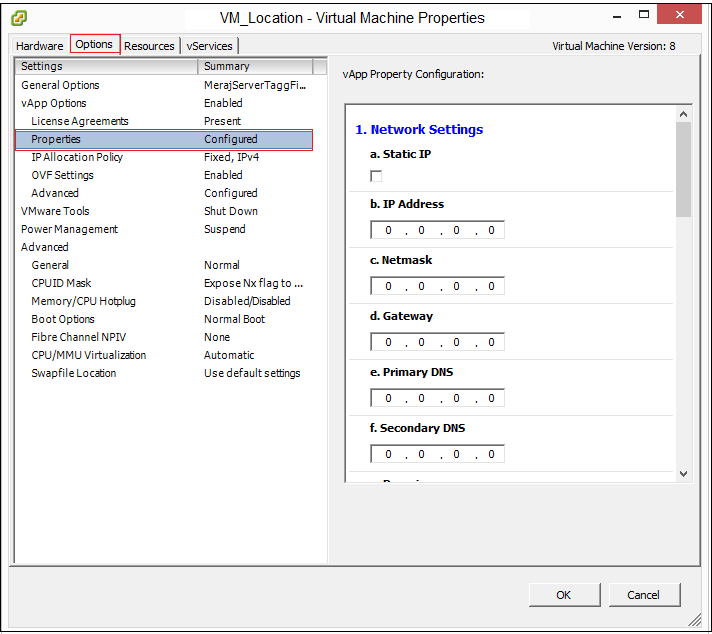
- Right-click the virtual machine and click Edit Settings.
The Virtual Machine Properties page is displayed.

- On the Options tab, click Properties.
- The virtual machine property configuration is displayed in the right pane. Modify the details as per your requirement
Field Description Network Settings
Select the Static IP box and update the following details:
- IP Address
- Netmask
- Gateway
- Primary DNS
- Secondary DNS
- Domain
Hostname Provide the new hostname, if you plan to update it. vCenter/ESXi details Type the new vCenter details on which your backup proxy resides. Web proxy settings
You can configure web proxy for your environment. To set up the web proxy, select the Use Web Proxy checkbox and provide the following details:
Choose authentication type:- None
- Basic
- Kerberos
If you select Kerberos authentication method, provide the following details:- Enter KDC server name: Provide the FQDN of the Key Distribution Center (KDC) server.
- Enter KDC user name: Provide a user name that the KDC can authenticate.
- Enter KDC Password: Provide the password of the user entered in the KDC user name field.
- Enter KDC port: Provide the KDC port.
- Enter FQDN of DNS Server Name: Provide the FQDN of the DNS server.
- Enter DNS Server User Name: Provide a DNS server user name to let the backup proxy virtual machine use the domain you provided in the DNS Server Name field.
- Enter DNS Server User Password: Provide the password of the user entered in the DNS Server User Name field.
- http
- socks4
- socks5
Proxy Server IP: Valid IP of proxy server.
Proxy Port: Respective proxy port number.
Username: Valid proxy username. For a proxy that does not require authentication, enter *.
Password: Valid proxy password. For a proxy that does not require authentication, enter *.Note: Ensure that the FQDNs of the KDC, DNS server, and the web proxy host resolve to the appropriate servers. If the FQDNs do not resolve, add the FQDNs and the respective IP addresses in the /etc/hosts file of the backup proxy virtual machine.
Activation
GovCloud: Select the check box if you are deploying the backup proxy on GovCloud.
Time zone: From the drop-down list, select the required time zone.
-
Click OK.
-
Power ON the virtual machine.
Register vCenter using web client
- ► Expand to view the procedure
-
Before you begin
Before you begin, ensure the following:
- You have the following information:
- vCenter credentials
- Web proxy credentials (If you use a Web proxy in your environment).
- Activation token. For more information see, Generate activation token.
- IP settings.
Note: This process of deploying and configuring the backup proxy using a desktop/web client is applicable only for a vCenter host . vCenter has the capability to temporarily store the parameters received during the OVF deployment.
For additional help on deploying OVF templates, see the associated VMware documentation depending on the version of your VMware setup. For example, see this article from the vSphere 5 documentation library.
You can deploy backup proxy on a vCenter server whose virtual machines you want to back up. If you have not deployed vCenter Server, you can deploy backup proxy on a standalone ESXi host. See, Register a standalone ESXi
You must deploy backup proxy on the same vCenter Server or the ESXi host from where virtual machines are to be backed up.If you use an HTML5 web client for proxy deployment, you'd need to enter 'j.proxy type' in the HTTP field under Web Proxy Settings as a hard value even if there is no web proxy. The proxy will not power on post-deployment without this value.
To deploy backup proxy
- Log into vSphere Web Client.
- In the left pane, click VMs and Templates.
- On the vCenter Server screen, click Actions > Deploy OVF Template.
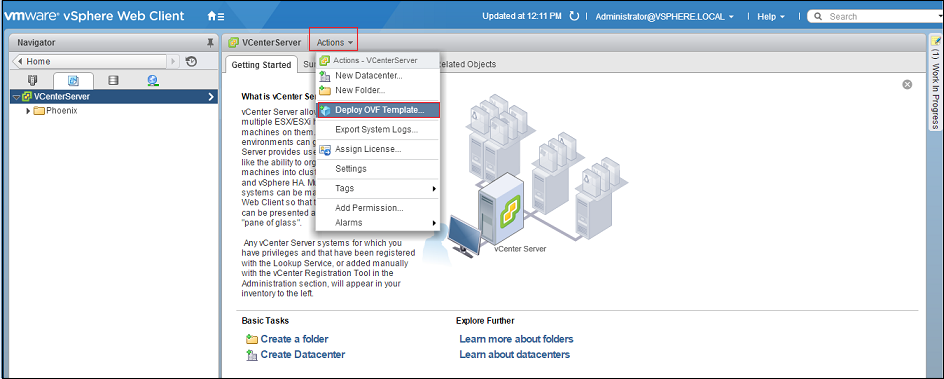
-
In the Select source box, type or select the full path to the OVF template that you downloaded or browse the OVF template location, and click Next.
-
Verify the OVF template details, and click Next.
-
Click Accept to accept the End User License Agreement (EULA), and click Next.
-
In the Name box, type a name for the template.
Under Select folder or datacenter, expand the inventory tree, click a location, and click Next.

-
Select a host or a cluster on which you want to deploy backup proxy, and click Next.
-
From the list of resource pools, click the resource pool that you want to assign to this virtual machine, and click Next.
- Select a provisioning format.
- Thick Provisioned Lazy Zeroed: If you select this format, a thick virtual disk is created, and the existing data is lazy zeroed (existing data on the provisioned storage are cleared when the virtual machine writes to the storage for the first time).
- Thick Provisioned Eager Zeroed: If you select this format, a thick virtual disk is created, and the existing data is eager zeroed (existing data on the provisioned storage is overwritten with zeroes at the time of creating the virtual machine).
- Thin Provisioned: If you select this format, a thin virtual disk is created.
- Select a destination storage, and click Next.
If you created storage profiles, click the storage profile that you want to assign to the virtual machine.
From the list of storage, click a storage that you want to set as destination storage for this virtual machine.
Note: Backup proxy uses the default network mapping settings of the vCenter Server or ESXi hypervisor.
- Select the source and destination network and click Next.

- On the Properties screen, expand the inventory and provide the following details:
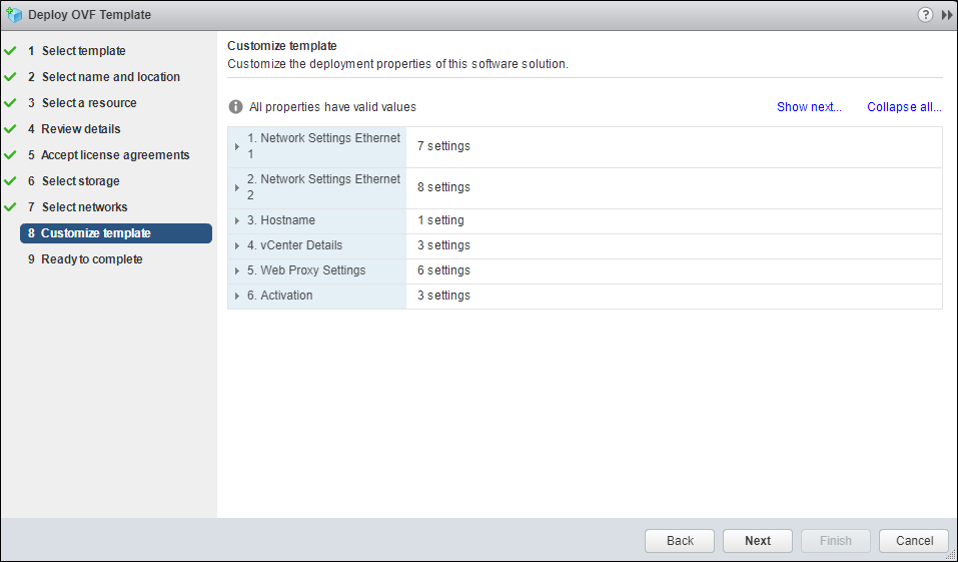
Field Description Network Settings
Druva backup proxy provides two network interface cards for configuration.
Select the Static IP box and provide the following details:
- IP Address
- Netmask
- Gateway
- Primary DNS
- Secondary DNS
- Domain (Optional)
Note: Adding a secondary NIC is optional
Hostname Provide the hostname. Ensure that the hostname does not contain any special characters or a space. vCenter/ESXi details
Provide the following vCenter details on which your backup proxy resides:
- vCenter or ESXi FQDN
- Username
- Password
Ensure that you provide a format that you have used to log in to the vCenter using the Web vSphere Client. For example, if your vCenter is connected to a domain, you should provide the username in the following format:
<domain\username>
Web proxy settings
(Optional)
Note: You need to configure the Web proxy settings only when you have a network proxy in your environment. If you don't have a proxy in your environment, keep these settings blank.
You can configure web proxy for your environment. To set up the web proxy, select the Use Web Proxy checkbox and provide the following details:
- Select authentication type:
- None
- Basic
- Kerberos
If you select Kerberos authentication method, provide the following details:- Enter KDC server name: Provide the FQDN of the Key Distribution Center (KDC) server.
- Enter KDC user name: Provide a user name that the KDC can authenticate.
- Enter KDC Password: Provide the password of the user entered in the KDC user name field.
- Enter KDC port: Provide the KDC port.
- Enter FQDN of DNS Server Name: Provide the FQDN of the DNS server.
- Enter DNS Server User Name: Provide a DNS server user name to let the backup proxy virtual machine use the domain you provided in the DNS Server Name field.
- Enter DNS Server User Password: Provide the password of the user entered in the DNS Server User Name field.
Note: Ensure that the FQDNs of the KDC, DNS server, and the web proxy host resolve to the appropriate servers. If the FQDNs do not resolve, add the FQDNs and the respective IP addresses in the /etc/hosts file of the backup proxy virtual machine.
- Proxy Type: Druva supports the following proxy types:
- http
- socks4
- socks5
- Proxy Server: Valid FQDN of the proxy server.
- Proxy Port: Respective proxy port number.
- Username: Valid proxy username. For a proxy that does not require authentication, enter *.
- Password: Valid proxy password. For a proxy that does not require authentication, enter *.
Activation
- Activation Token: The activation token that you have received while registering the VMware setup.
- Govcloud: Select the checkbox if you are deploying the backup proxy on GovCloud.
- Time zone: from the drop-down list , select the required time zone.
- Job ID: Keep this field blank.
- Click Next.
- To start the virtual machine after deployment, select Power on after deployment.

- Verify the summary, and click Finish.
You can see the backup proxy on the Druva user interface.
Reconfigure backup proxy setting through vSphere Web Client
Log on to vSphere Web Client. From vCenter Inventory Lists, select the backup proxy virtual machine. Right-click the virtual machine and select Power > Power Off. On the Confirm Power Off screen, select Yes. Right-click the virtual machine and click Edit Settings. On the vApp Options tab, expand the inventory list.
.png?revision=1&size=bestfit&width=575&height=602)
Update the following configuration, as per your requirement
Click OK. Power ON the virtual machine.Field Description Network Settings
Select the static IP box and update the following details:
- IP Address
- Netmask
- Gateway
- Primary DNS
- Secondary DNS
- Domain
Hostname Provide the new hostname, if you plan to update it. vCenter/ESXi details Type the new vCenter details on which your backup proxy resides. Web proxy settings
You can configure web proxy for your environment. To set up the web proxy, select the Use Web Proxy checkbox and provide the following details:
Choose authentication type:
- None
- Basic
- Kerberos
If you select Kerberos authentication method, provide the following details:- Enter KDC server name: Provide the FQDN of the Key Distribution Center (KDC) server.
- Enter KDC user name: Provide a user name that the KDC can authenticate.
- Enter KDC Password: Provide the password of the user entered in the KDC user name field.
- Enter KDC port: Provide the KDC port.
- Enter FQDN of DNS Server Name: Provide the FQDN of the DNS server.
- Enter DNS Server User Name: Provide a DNS server user name to let the backup proxy virtual machine use the domain you provided in the DNS Server Name field.
- Enter DNS Server User Password: Provide the password of the user entered in the DNS Server User Name field.
Proxy Type: Druva supports the following proxy types:
- http
- socks4
- socks5
Proxy Server IP: Valid IP of proxy server.
Proxy Port: Respective proxy port number.
Username: Valid proxy username. For a proxy that does not require authentication, enter *.
Password: Valid proxy password. For a proxy that does not require authentication, enter *.Note: Ensure that the FQDNs of the KDC, DNS server, and the web proxy host resolve to the appropriate servers. If the FQDNs do not resolve, add the FQDNs and the respective IP addresses in the /etc/hosts file of the backup proxy virtual machine.
Activation
Govcloud: Select the check box if you are deploying the backup proxy on GovCloud.
Timezone: From the drop-down list, select the required time zone.
- You have the following information:
-
Perform a standalone activation of backup proxy
If you want to activate the backup proxy at a later stage, use the following steps for activation:
- From the vSphere Client console, click VMs and Templates, and start the backup proxy virtual machine.
- Log on to the virtual machine with the default username and the changed password.
- Run the following command to activate backup proxy:
- PhoenixActivate <token> (for VMware backup proxy version 7.0.0 or earlier)
- EnterpriseWorkloadsAgent vmware activate -t <token> (for VMware backup proxy version 7.0.0 and later)
Configuring custom NTP server for CentOS proxy
You can configure Druva VMware backup proxy to use custom NTP server. The NTP requests are serviced through a pool of NTP servers. Currently, the backup proxy uses the *.centos.pool.ntp.org pool.
- Open the /etc/ntp.conf file to configure your NTP server.
The NTP server configuration file contains NTP server entries in the following format:
server <ntp_server_fqdn> [options]
For example:
server 0.centos.pool.ntp.org iburst
server 1.centos.pool.ntp.org iburst
server 2.centos.pool.ntp.org iburst
server 3.centos.pool.ntp.org iburst - Comment the existing NTP server entries and add the following entry to the /etc/ntp.conf file.
server <internal_ntp_server_fqdn> iburst - Restart the ntpd service using the following command:
service ntpd restart - Verify that the /var/log/messages file now synchronizes with the new NTP server without any errors.
Configuring custom NTP server for Ubuntu proxy
Note: For Ubuntu, the proxy time is synchronized to ntp.ubuntu.com, by default. For more information on the same, refer to https://ubuntu.com/server/docs/network-ntp.
You can configure the Druva VMware backup proxy to use a custom NTP server. The NTP requests are serviced through a pool of NTP servers.
- Open the /etc/ntp.conf file to configure your NTP server.
- The NTP server configuration file contains NTP server entries in the following format:
server <ntp_server_fqdn> [options] - Comment out the existing NTP server entries and add the following to the /etc/ntp.conf file.
server <internal_ntp_server_fqdn> iburst - Restart the ntpd service using the following command:
service ntpd restart - Verify that the /var/log/messages file now synchronizes with the new NTP server without any errors.
39515
.png?revision=1)