Troubleshoot VMware issues
 Business Enterprise Elite
This topic describes common workarounds of issues that you might encounter while backing up or restoring virtual machines.
Prerequisites and required permissions
Ensure that you meet the prerequisites and assign all the permissions required for backups and restores. For details, see the following articles:
- Prerequisites for configuring virtual machines for backup
- Required vCenter or ESXi user permissions for backup, restore, and OVA deployment
For more information, on how to manage VMware permissions, see Managing Permissions in the VMware Host Client.
Backup fails if there is insufficient space on the data store.
The backup fails when taking a recovery point of a virtual machine and there is insufficient storage space on the data store.
The backup fails when you have attempted to take a recovery point and saved it to a VMware VMFS partition that does not have enough free space to save the recovery point. The log file displays the following error:
An error occurred while saving the recovery point: Unable to open the recovery point file.
Resolution
- Ensure sufficient free space exist on the data store.
- Delete unused recovery points and unused virtual disks.
- Expand the volume by adding extents.
Backup fails because backup proxy cannot take recovery points
Sometimes, a backup fails because backup proxy cannot take a recovery point of virtual machines that are configured for backup. You might see an error like this in your log file:
An error occurred while saving the recovery point: Change tracking target file already exists
The log files are created at:
- /var/log/Phoenix (for VMware proxy version prior to 7.0.0)
- /var/log/Druva/EnterpriseWorkloads/vmware/backup (for VMware proxy version 7.0.0 and later)
Resolution
- Consolidate the recovery points. For more information, see this article in the VMware Knowledge Base.
- Wait for the next scheduled backup, and check the backup status after the backup completes.
-or- - Start a backup, and check the backup status after the backup completes.
Backup fails because the Small Computer System Interface (SCSI) Controller is in bus sharing mode
A backup fails if the Small Computer System Interface (SCSI) Controller is in sharing mode. This is because VMware does not support recovery points of virtual machines that are in bus-sharing mode.
The log file displays the following error:
Virtual machine is configured to use a device that prevents the recovery point operation: Device '' is a SCSI controller engaged in bus-sharing
The log files are created at:
- /var/log/Phoenix (for VMware proxy version prior to 7.0.0)
- /var/log/Druva/EnterpriseWorkloads/vmware/backup (for VMware proxy version 7.0.0 and later)
Resolution
Ensure that the SCSI mode is not set to bus-sharing.
Backup fails if you enabled Changed Block Tracking for virtual machines
Backups might fail if you enabled Changed Block Tracking (CBT) for virtual machines.
The log files are created at:
- /var/log/Phoenix (for VMware proxy version prior to 7.0.0)
- /var/log/Druva/EnterpriseWorkloads/vmware/backup (for VMware proxy version 7.0.0 and later)
Resolution
1. Login to the backup proxy.
2. Disable the CBT of virtual machine using vmcontrol utility.
3. Enable the CBT of virtual machine using vmcontrol utility.
Note: This utility deletes all the recovery points in the virtual machine.
Backup fails if restore of a recovery point is in progress
A backup which starts after the virtual machine has been reverted to some recovery point from the vSphere Client, fails with the following message:
Error caused by file /vmfs/volumes/55708983-391f41a1-eaa8-00224db1d33b/Rhel6.4-MD-SDS-cbtEnable-MixProvision/Rhel6.4-MD-SDS-cbtEnable-MixProvision.vmdk', faultCause = <unset>, faultMessage = (vmodl.LocalizableMessage) [], file = '/vmfs/volumes/55708983-391f41a1-eaa8-00224db1d33b/Rhel6.4-MD-SDS-cbtEnable-MixProvision/Rhel6.4-MD-SDS-cbtEnable-MixProvision.vmdk' }
The log files are created at:
- /var/log/Phoenix (for VMware proxy version prior to 7.0.0)
- /var/log/Druva/EnterpriseWorkloads/vmware/backup (for VMware proxy version 7.0.0 and later)
Resolution
You must disable and enable CBT on the associated virtual machines to resolve this issue.
1. Login to the backup proxy.
2. Disable the CBT of virtual machine using vmcontrol utility.
3. Enable the CBT of virtual machine using vmcontrol utility.
Note: This utility deletes all the recovery points in the virtual machine.
Backup Fails on a Standalone ESX
Backup fails with the following error message:
[2015-07-29 17:21:59,807] [ERROR] Error <class 'agents.vmware.vixDiskLibHelper.vddk_lib.VDDKException'>:Vddk Error [code = 5643587026947, msg = None]. Traceback -Traceback (most recent call last):
File "agents/vmware/vixDiskLibOCManager.py", line 118, in handle_oc_work
File "agents/vmware/vixDiskLibHelper/vddk_lib.py", line 111, in open_disk
File "agents/vmware/vixDiskLibHelper/vddk_lib.py", line 197, in __raise_vddk_error
VDDKException: Vddk Error [code = 5643587026947, msg = None]
Resolution
The password contains ‘@’. Change the password and retry backup. The backup should work fine after this.
Backup fails due to timeouts
Backup fails with the following error message:
[2015-07-20 18:40:20,487] [ERROR] Error <class 'agents.vmware.vixDiskLibHelper.vddk_lib.VDDKException'>:Vddk Error [code = 10041633552057, msg = None]. Traceback -Traceback (most recent call last):
File "agents/vmware/vixDiskLibOCManager.py", line 118, in handle_oc_work
File "agents/vmware/vixDiskLibHelper/vddk_lib.py", line 111, in open_disk
File "agents/vmware/vixDiskLibHelper/vddk_lib.py", line 197, in __raise_vddk_error
VDDKException: Vddk Error [code = 10041633552057, msg = None]
[2015-07-20 18:40:20,487] [ERROR] Failed to open the Disk [local SAS] Win7 VCenter/Win7 VCenter.vmdk
[2015-07-20 18:40:20,487] [ERROR] [VixThread (id=0, pool=vmdk, parent_id=None)] Backup of VMDK Failed. Fault: Vddk Error [code = 10041633552057, msg = None]
[2015-07-20 18:40:20,487] [INFO] [VixThread (id=0, pool=vmdk, parent_id=None)] In finally to close the connection
[2015-07-20 18:40:20,488] [INFO] [VixThread (id=0, pool=vmdk, parent_id=None)] Closed the connection successfully
Resolution
On the backup proxy there is a vddk config file
- /etc/Phoenix/vddk.cfg (for VMware proxy version prior to 7.0.0)
- /etc/Druva/EnterpriseWorkloads/vddk.cfg (for VMware proxy version 7.0.0 and later)
It is empty by default. In this file, you can configure NBD timeouts.
The exact config can be read at this link.
Backup fails after replacing the vCenter
If you set up a new vCenter to replace an old one, and do not assign the IP address from the old vCenter to the new one your backups fail.
For example, you deploy a backup proxy on vCenter server "A" with IP address 192.0.2.0. Later on, you get a vCenter with a new version, and start a vCenter server "B" using it. Your network infrastructure assigns a new static IP 192.0.2.5 to vCenter server "B". Now, you detach all your ESXi hosts from vCenter "A" and attach them to vCenter server "B", and shut down vCenter "A". Now, when a backup is triggered, your backups fail because Druva cannot locate the vCenter. To resolve this issue, before you shut down vCenter "A", assign an unused IP address like 192.0.2.20 to vCenter "A". This frees the IP address 192.0.2.0. Now, assign the IP address 192.0.2.0 to vCenter "B" and provide vCenter credentials again in Management Console.
Critical Windows events in the logs
If you observe the below errors in your Windows event logs, contact Druva Support:
Event ID: 57 NTFS Warning
The system failed to flush data to the transaction log. Corruption may occur.
Event ID: 137 NTFS Error
The default transaction resource manager on volume \\?\Volume{806289e8-6088-11e0-a168-005056ae003d} encountered a non-retryable error and could not start. The data contains the error code.
Event ID: 140 NTFS Warning
The system failed to flush data to the transaction log. Corruption may occur in VolumeId:<> DeviceName: \Device\HarddiskVolume<>.(A device which does not exist was specified.).
Few databases might not be recoverable since the VSS service failed to keep the SQL VSS recovery point persistent on the source VM. Druva is working closely with VMware support to address the above problem.
Restore Fails
[2015-07-23 12:22:38,491] [ERROR] Exception: (vmodl.fault.ManagedObjectNotFound) {
dynamicType = <unset>,
dynamicProperty = (vmodl.DynamicProperty) [],
msg = 'The object has already been deleted or has not been completely created',
faultCause = <unset>,
faultMessage = (vmodl.LocalizableMessage) [],
obj = 'vim.VirtualMachine:vm-6055'}
Resolution
Sometimes the agent is not able to query the vCenter properly. Retry the restore in some time.
File-level restore fails if a shared drive is mounted as a folder within a folder on a computer
If a user mounts a shared drive as a folder within a folder, file-level restore to the folder fails.
Resolution
Mount the shared drive as a CIFS shared drive or a mapped drive and ensure that the Hybrid Workloads agent recognizes it.
Backup Fails
[2015-07-29 19:24:08,367] [ERROR] (vim.fault.ApplicationQuiesceFault) {
dynamicType = <unset>,
dynamicProperty = (vmodl.DynamicProperty) [],
msg = "An error occurred while quiescing the virtual machine. See the virtual machine's event log for details.",
Resolution
Retry the backup.
Backup and restore Fails for virtual machines that have special characters in its names.
Backup and restore will fail with an Internal error if the virtual machine name has the following special characters.
- Hash ("#")
- Left Curly Brace ("{")
- Right Curly Brace ("}")
- Vertical Bar/Pipe ("|")
- Backslash ("\")
- Caret ("^")
- Tilde ("~")
- Left Square Bracket ("[")
- Right Square Bracket ("]")
- Grave Accent ("`")
- Forward slash/Virgule ("/")
- Left Bracket ("(")
- Right Bracket (")"
Resolution
Do not add the above listed special characters to the virtual machine name.
HotAdd Troubleshooting
Test to see if the disk of the virtual machine to be backed up can be manually HotAdded to the proxy
Performing the following steps will help determine if the infrastructure is present to allow the proxy to attach the disks of the virtual machine to be processed in HotAdd.
1. Create a recovery point on the virtual machine to be processed by backup proxy (Source virtual machine to be backed up).
2. Within a vSphere client, attach the base disk from the virtual machine in Step 1 to the backup proxy.
- Edit the Druva backup proxy that will be processing the virtual machine from Step 1.
- Click Add.
- Choose “Hard Disk”.
- Chose “Use an existing virtual disk”.
- Navigate to the location of the base disk from the virtual machine in step 1.
- Specify that the disk should be attached Independent - Nonpersistent.
- Click Finish.
3. If this task completes this means the infrastructure is present to allow the Proxy to HotAdd the virtual machines base disk.
4. Detach the disk that was attached to the backup proxy.
- Edit the Druva backup proxy from Step 2.
- Highlight the attached disk.
- Click Remove (DO NOT change the radio option).
- Click Finish.
5. Remove the recovery point created in Step 1.
Removing Stuck VMDK’s from the backup proxy
Sometimes the VMware API call to remove the VMDK is not received or did not complete properly. So the VMDKs are stuck to the backup proxy. In order to remove those disks perform the following steps.
Note: Kindly perform these steps only when there is no backup going on in the backup proxy.
-
Through vSphere, you should be able to right-click the Druva proxy virtual machine and select edit settings. Look for the Hard disks attached to the virtual machine. Normally the stuck disks will be listed at the bottom. You should also be able to identify the disks by the name and the datastore they are in under the disk file box (top right).
-
To remove them, select the disk by clicking on it and select remove at the top right. Under removal options choose “remove from virtual machine”. DO NOT choose the option that deletes it from disk (the second option).
Original restore fails
- Restore fails, if the vRDM disk is converted to independent vRDM or pRDM.
Resolution
Revert from the independent vRDM disk/pRDM to vRDM disk. Then try original restore.
- Restore fails, if the new uuid does not match to old uuid
Resolution
If the uuid of the new created vmdk could match to the old uuid restore will fail.
Backup fails of virtual machine having vRDM disks
If the same lun is mapped to two different disks, the backup fails.
Resolution
Unmap the lun from both disks and then map to only one of the disks.
Restore fails on a standalone disk
Restore fails on the standalone disk with the following error message:
[2015-08-21 16:15:54,708] [ERROR] (vim.fault.FileAlreadyExists) {
dynamicType = <unset>,
dynamicProperty = (vmodl.DynamicProperty) [],
msg = 'Cannot complete the operation because the file or folder /vmfs/volumes/5575befd-d1e64fa5-f919-00224db1d2b5/Test-rhel-vm-saranya_5/Test-rhel-vm-saranya_5.vmx already exists',
faultCause = <unset>,
faultMessage = (vmodl.LocalizableMessage) [],
file = '/vmfs/volumes/5575befd-d1e64fa5-f919-00224db1d2b5/Test-rhel-vm-saranya_5/Test-rhel-vm-saranya_5.vmx'
}
Resolution
Rename the folder or vmx file that creates the conflict. Restore work fine after this.
Virtual machine with EFI firmware cannot boot after restore
Perform the following steps if a virtual machine is configured with EFI firmware, and cannot boot after restore. For more information on EFI, see Using EFI/UEFI firmware in a VMware Virtual Machine.
Note: The following steps are applicable if the backup proxy version 4.6.4 or earlier.
Resolution
- Log into vSphere.
- Select the virtual machine that is unable to boot.
- Right-click the virtual machine and select Power> Power Off.
- On the Confirm Power Off screen, click Yes.
- Right-click the virtual machine and select Edit Settings, the Edit Settings window is displayed.
- Under the Options tab, select EFI option.
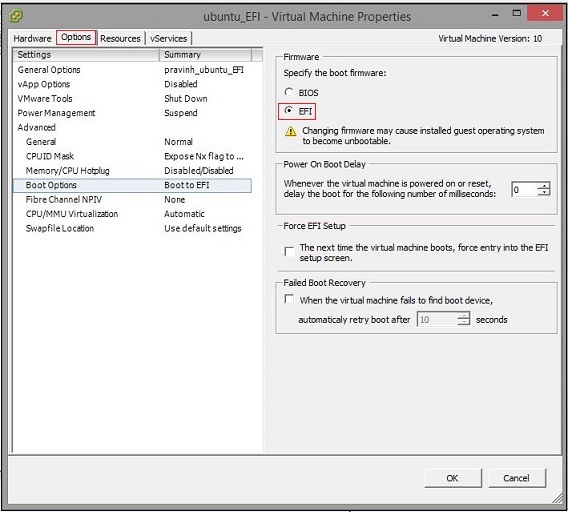
- Click OK.
- Right-click the virtual machine and select Power> Power On.
The virtual machine should boot automatically.
If the virtual machine does not boot, perform the following steps:
- Right-click the virtual machine and select Edit Settings, the Edit Settings window is displayed.
- Under the Options tab, select The next time the virtual machine boots, force entry into the EFI setup screen option.
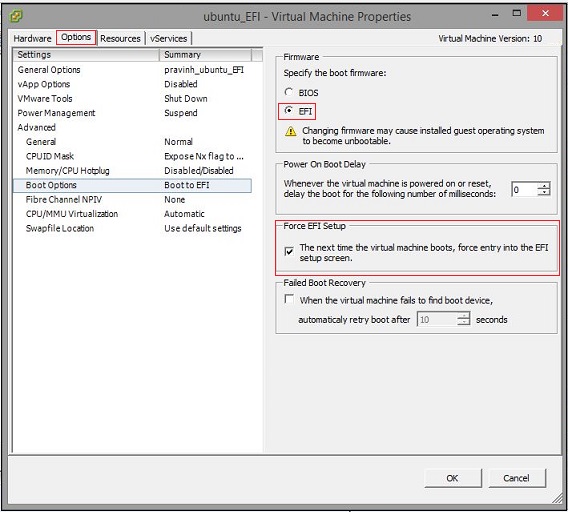
- Click OK.
- Right-click the virtual machine and select Power> Reset.
- Right-click the virtual machine and select Open Console. The Boot Maintenance Manager is displayed.
- Select Enter setup.
- Select Boot from file and then on the next screen highlight the boot partition and press Enter.
- Select the EFI > <Operating system> > <.efi file>.
The virtual machine will boot automatically.
Virtual machine not visible in Druva UI after configuring backup proxy.
The issue occurs if the descriptor file for the virtual machine gets corrupted. The following error is received in backup proxy logs.
One of the virtual machine's VMDK have none as UUID. Skipping VM:ARX_FR_DC01 from listing.
Resolution
Contact VMWare to fix the issue.
See Backup software shows error: Disk does not have a UUID (1033370).
Volume mounting failed.
This error occurs when some volumes are not mounted during File Level Restore.
Resolution
- Ensure that the Partition ID of a volume is consistent with the actual partition type of the volume. If it is not consistent, then the volume will not get mounted.
- If the error still persists, contact Druva Support.
Backup proxy upgrade has failed.
This error can occur due to the following reasons:
- If you have installed a hotfix on your existing Druva version, you cannot automatically upgrade to the next version from the Druva user interface.
- If the server that hosts the backup proxy restarts during the upgrade.
- If the old version is not present on client machine then upgrade rollback will fail.
Resolution
Manually upgrade the backup proxy.
Backup proxy is unable to connect to the Druva Cloud.
This can happen if both network interface cards are enabled, and:
-
You use one network interface card for public network and the other network interface card for private network
-
The network interface card configured for private network uses DHCP
The backup proxy fails to connect to Druva Cloud because the DHCP changes routing table sequence.
Resolution
You can use the following command to manually add a static route entry for the public network in the backup proxy settings.
nmcli connection modify <connection_name> +ipv4.routes "<ip_range>/<subnet_prefix> <gateway>"
For example:
nmcli connection modify eth0 +ipv4.routes "192.168.122.0/24 10.10.10.1"
Virtual machine does not boot after restore
This can happen if:
- A floppy disk was inserted in the virtual machine at the time of backup
- User triggers a restore to original location
- The virtual machine on the original location has the floppy inserted
If the restored virtual machine has the floppy disk inserted, the restored virtual machine attempts to boot from the floppy disk and fails.
Resolution
After restoring the virtual machine:
- Remove the floppy disk before starting the virtual machine
- Change the virtual machine boot order
VMware backup proxy deployment fails for standalone ESXi 6.5 using web client.
This happens due to a VMware issue. For more information, see Unable to deploy OVF from ESXi 6.x Host UI Client (51497).
Resolution
Perform the following steps to resolve the problem.
- Download the OVF tool From the VMware utility page [External Link].
- Install the tool on a computer that you can use to deploy the OVA.
For detailed steps to install the OVF tool, see the VMware doc. - To deploy the OVA using the OVF tool:
- For Windows
On the terminal, enter the following command:ovatool.exe -ds=datastore_name --diskmode=thin/thick --name=name_of_new_backup_proxy path_to_ova_template vi://user@IP_of_ESX_host
For example:"C:\Program Files\VMware\VMware OVF Tool\ovftool.exe" -ds="datastore1" --diskMode=thin --name="EXAMPLE_BACKUPRPOXY_WINDOWS_OVA_TOOL" \\nas01\builds\CertQA\CloudPushBuilds\CP74\Druva_Phoenix_BackupProxy_standalone_4.6.12.ova vi://root@192.0.2.9
- For Linux
On the terminal, enter the following command:ovatool -ds=datastore_name --diskmode=thin/thick --name=name_of_new_backup_proxy path_to_ova_template vi://user@IP_of_ESX_host
For example:ovftool --acceptAllEulas -ds="datastore1" --diskMode=thin --name="EXAMPLE_BACKUPROXY_LINUX_OVA_TOOL_2" Druva_Phoenix_BackupProxy_standalone_4.6.12.ova vi://root@192.0.2.9
- For Windows
- After the OVA is deployed, accept Druva end-user license agreement. In the command line window:
- Enter Yes to accept SSL fingerprint for ESX host.
- Enter the password for the ESX user.
- Enter Yes to Accept Druva end-user license agreement..
Note: Ensure that you use OVF tool version 4.2.0.
Network issues after virtual machine restore
You might encounter network issues if:
- A network adapter was not attached to the virtual machine at the time of backup
- Multiple network adapters were attached to the virtual machine at the time of backup
- Network adapter attached to the virtual machine runs into issues due to its driver
- Network adapter that Druva attaches is incompatible with the guest operating system
- The network adapter was not attached to the virtual machine after restore
Resolution
After restoring the virtual machine:
- If a network adapter was not attached to the virtual machine at the time of backup, Druva will attach the VMXNET3 or VMXNET2 type adapter and restore the virtual machine with the selected network setting. However, the VMXNET3 or VMXNET2 adapter the Druva will attach will require appropriate drivers. To resolve the issue, install VMware tools and the adapter driver on the guest operating system. Or, you can change the network adapter from the vCenter web client UI.
- If multiple adapters were attached to the virtual machine at the time of backup, the restored virtual machine can experience network issues because you can select only one network setting at the time of restore. To resolve this issue, specify appropriate network setting for each adapter after restore.
- If the Druva attached network adapter is incompatible with the guest operating system, the vCenter web client displays a warning. To resolve the issue, select an appropriate network adapter for the virtual machine from the web client UI.
- If Druva backup proxy runs into issues with attaching the network adapter at the time of restore, it skips attaching the network adapter. To resolve the issue, after the virtual machine is restored, select and attach the appropriate network adapter to the virtual machine from the web client UI.
Restore is blocked on Management Console
At the time of restore, backup proxy checks if the administrator can access the destination datastore, folder, network, or resource pool. If the administrator cannot access the resources, restore is disabled on Management Console.
Resolution
Druva recommends that the backup proxy is activated by user credentials having required vCenter/ESXi permissions. The same user credentials should be used to activate all backup proxies.
VMware Tools is not installed on the Sandbox VM
At the time of restore, VMware Tools is not installed on the Sandbox VM.
For more information on Sandbox Recovery, see Restore virtual machines using sandbox.
Resolution
For more information about how to install VMware Tools, see Installing and upgrading VMware Tools in vSphere.
Communication with guest OS becomes non-responsive after 30 min of inactivity
This issue can occur due to Default Power Settings on the client edition of the Windows operating system. For more information, see Restore virtual machines using sandbox.
Resolution
Set the Default Power Settings for inactivity timeout to Never.
vMotion is disabled on the vCenter/Standalone server
Druva disables virtual machine vMotion at the time of backup and restore and re-enables it after backup is complete. If, due to some reason, a user restarts Druva service, the backup proxy fails to re-enable vMotion for that virtual machine, and it stays disabled.
Resolution
To enable vMotion if it is disabled on your server, you can use the vmcontrol utility.
To use the vmcontrol utility
-
From the vSphere Client console, click VMs and Templates, and start the backup proxy virtual machine.
- Open a terminal on the backup proxy.
Note: Alternatively, you can use a terminal client such as PuTTY to access the backup proxy.
- Log on to the backup proxy.
Note: The default username is root, and the default password is druvaphoenix. If you changed the password, use the password that you set.
4. To enable the vmotion, use the following command:
vmcontrol enable_vmotion <vm_name> [ -u instance_uuid ] [ -f esx_fqdn ]
Linux virtual machine boots into maintenance mode after restore
Network proxy settings on the backup proxy are unable to use the Kerberos authentication protocol
This issue occurs if the DNS server, KDC server, and the web proxy host fully qualified domain names (FQDNs) are not reachable.
Resolution
- It is possible that the backup proxy is unable to resolve the FQDNs. To resolve this issue, contact your IT team and update the network manager so that the DNS server, KDC server, and web proxy host FQDNs you provide resolves to the appropriate servers. If the issue persists, update the /etc/hosts file to provide the FQDNs and IP addresses of the DNS server, KDC server, and the web proxy host.
- Ensure that the DNS credentials you have entered at the time of specifying the network proxy settings on the backup proxy are correct.
To verify the issue is resolved, after providing all the network proxy settings on the backup proxy, run the following command on the backup proxy virtual machine terminal to see if it is connected to the right DNS server.
# realm list
The KDC ticket is not generated even if correct credentials are provided
This issue can occur if there is a configuration problem with the web proxy.
Resolution
If you are using WinGate, ensure that WinGate is properly configured. In addition, ensure that the KDC user is getting authenticated on the DNS server.
If the issue persists, check with your IT administrators and ensure that the proxy server is up and running.
Network proxy settings fail at the web proxy
This issue can occur if:
- The Kerberos user needs permissions on the web proxy.
- You have selected socks4/socks5 proxy type at the time of registering the Druva backup proxy however the web proxy is not configured use it.
Resolution
- Ensure that the Kerberos user you provide has the required permissions on the web proxy.
- Ensure that the web proxy is configured to use the proxy type you select at the time of registering the Druva backup proxy.
Backup fails after a few backups were already successfully
This issue can occur if the web proxy authentication method is Kerberos and the Kerberos ticket service on the backup proxy is not running.
Resolution
Check if the PhoenixSetKrbTicket service is running. If the service is not running, manually start the service. If it is running, contact Druva Support.
Web proxy setting fails for a user who is not an administrator on the DNS server
This issue can occur if you choose Kerberos authentication method and provide a DNS server user who is not an administrator.
Resolution
Ensure that the non administrator DNS user whose credentials are provided at the time of configuring the web proxy has the required permissions in the Active Directory.
Log backups fail on a virtual machine with Microsoft SQL Server if its time is reset
This issue can occur if VMware Tools reset the time on a virtual machine.
Resolution
To resolve this error, disable time synchronization. For more information on how to disable time-synchronization, see this article on the VMware knowledge base.
Application-aware backup is failing on virtual machines if the credentials of the VM provided to Druva belong to a non-admin user
This issue can occur if there are a certain permissions that are needed for the credentials that are assigned for the VM.
Resolution
For the local machine user:
- Create a user.
- Add it to the Administrators group.
- Add user to all the available SQL Server instances on guest VM and assign the sysadmin role.
- Update the user account control (UAC) settings to disable the User Account Control: Run all administrators in Admin Approval Mode setting. To do this:
- Run gpedit.msc.
- In the Local Group Policy Editor window that opens, navigate to Computer Configuration > Windows settings > Security settings > Local policies > Security Options.
- Select and right-click on User Account Control: Run all administrators in Admin Approval Mode and then click Properties.
- In the dialog that appears, select Disabled, then click Apply, and then click Ok.
- Restart the VM.
(Administrator rights are required to start/stop VSS service, and calling API CreateVssBackupComponents)
For an active directory (AD) user:
- Add the domain user from the AD to the local administrators' group. For more information, see https://social.technet.microsoft.com/wiki/contents/articles/7833.how-to-make-a-domain-user-the-local-administrator-for-all-pcs.aspx. This would add the domain user to the local administrators' group on PC. Or, if you don't want to manage this setting from the Active Directory, the domain user can be added to the administrators' group on the guest VM directly.
- If the UAC settings are also managed from the AD, update the settings in the Group Policy Object created in the above step by disabling the User Account Control: Run all administrators in Admin Approval Mode setting. If you don't want to manage this setting from the Active Directory, modify this setting on the guest OS of the VM.
- On the guest OS of the VM, run gpupdate /force on command prompt.
- On the guest OS of the VM, the domain user needs to be added to all the available SQL server instances with the sysadmin role.
- Restart the VM.