Restore MS SQL Server databases on VMware virtual machines
 Business Enterprise Elite
Overview
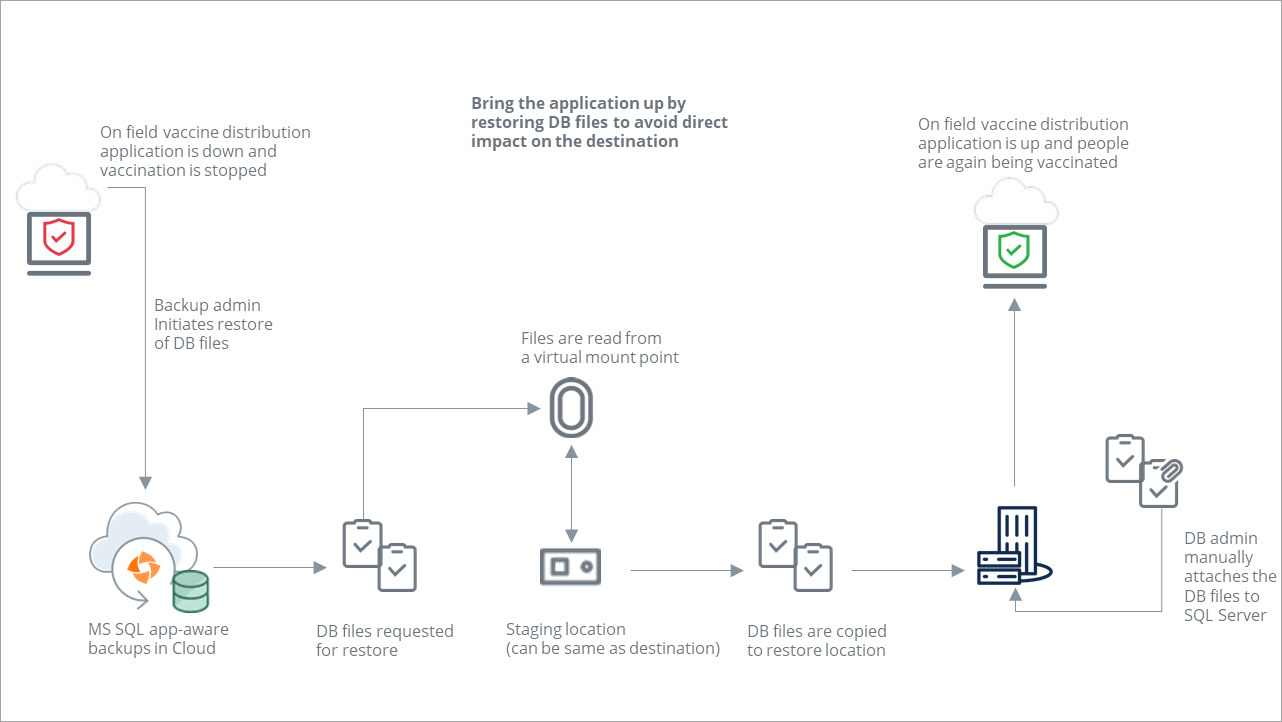
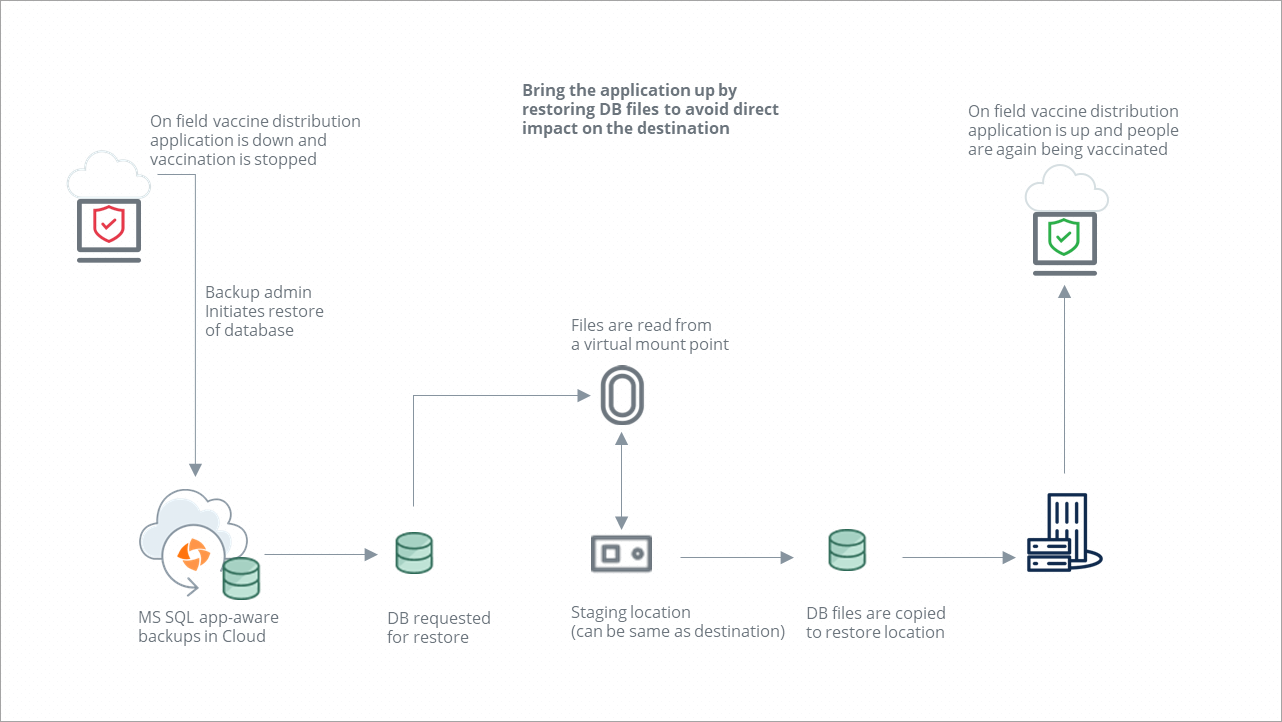
You can restore MS SQL databases from virtual machines where application-aware backup was done successfully. When you enable application-aware backup on VMware virtual machines, Druva detects the applications inside the virtual machine and takes a backup of the data that the application generates. Since Druva supports backup of Microsoft SQL Server databases inside VMs, it takes VSS recovery points of the SQL Server instances and uploads it to the Druva Cloud along with the virtual machine recovery point.
Note: SQL database restores from VMs in the VMware Cloud on AWS (VMC) are unsupported.
To restore databases from application-aware backups you need a Windows staging virtual machine. It is used to attach and mount the disk(VMDK) to selected SQL data for restoring to the destination virtual machine. See, Windows staging virtual machine for application aware database restores.
The following options are available to restore databases:
-
Database restore: Restore SQL Server databases using recovery points.
-
Point In Time restore: Restore SQL Server databases to a point in time using transaction logs.
-
Transaction Mark restore: Restore SQL Server databases using transaction marks.
You can restore the database to an original or an alternate location.
You can also restore database files. The files are downloaded to the specified server location. The database you need to restore must be manually attached to the target SQL server instance.
Also, when you perform a full VM restore, of MS SQL virtual machines (application-aware), the restored databases will be application-consistent.
To know more about the restore workflow, see About VMware restores.
The following graphics illustrate the data flow using an example:
Before you begin
-
Before you proceed with the restore, ensure you have reviewed the prerequisites and considerations.
-
For the list of supported disks, partitions, and files, see Support matrix.
Perform a Database restore
When you want to restore the database to a virtual machine, you can choose a recovery point and Druva restores the databases to a state that was backed up in the selected recovery point.
The following video provides a quick demo of the process.
Procedure
- Log in to the Management Console.
- From the top menu bar, select your organization if organizations are enabled.
- Click Protect > VMware.
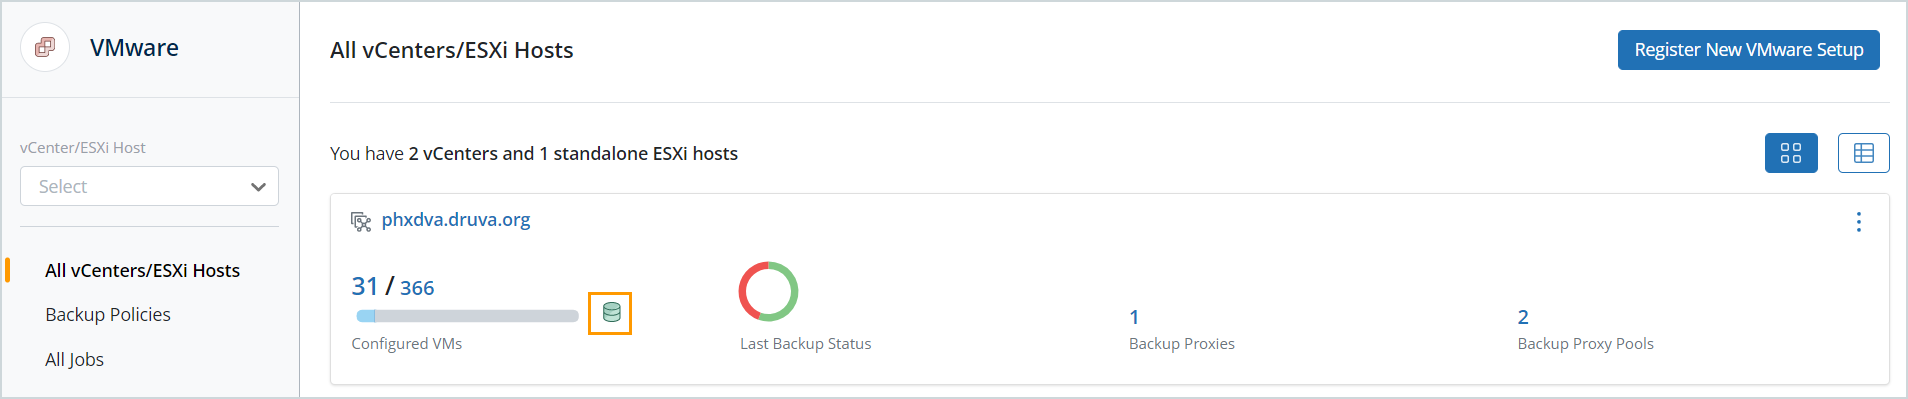
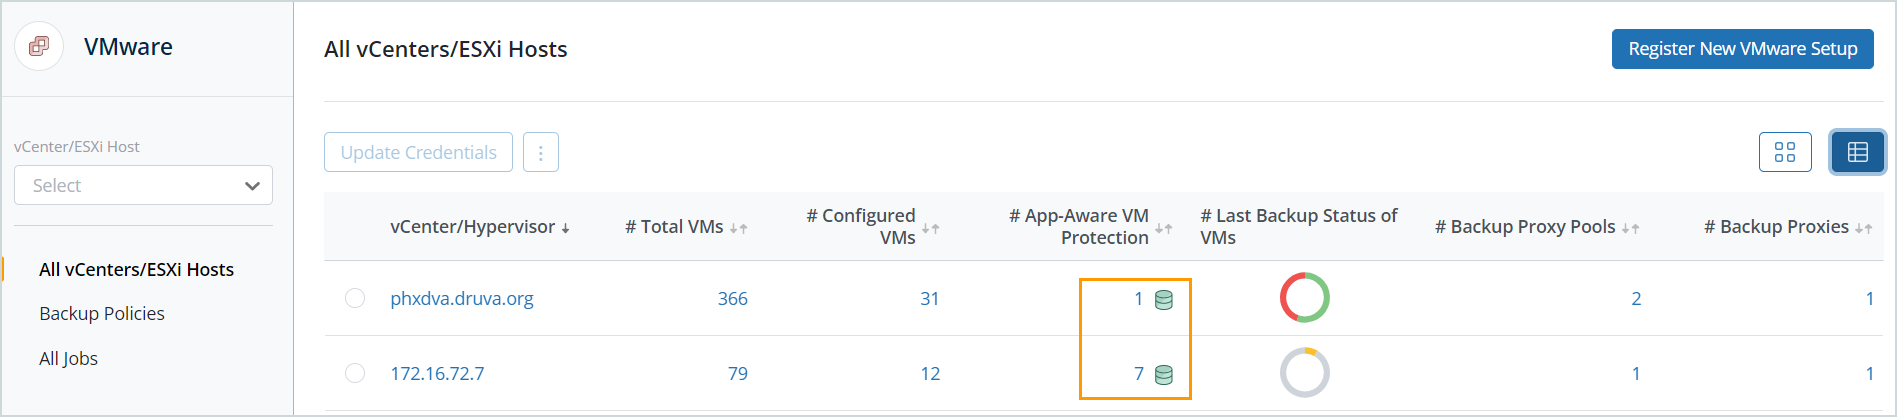
The All vCenter/ESXi hosts page is displayed. You can view all the registered vCenter servers and ESXi hosts from the card view or the list view. - Select the vCenter server or ESXi host from the card view or list view on the All vCenter/ESXi hosts page or select them from the vCenter/ESXi host list in the left navigation pane.
- In the left navigation pane, click Configured VMs.
- Filter the list of configured virtual machines by App-aware backup status Enabled and then select the MS SQL virtual machine you want to restore.
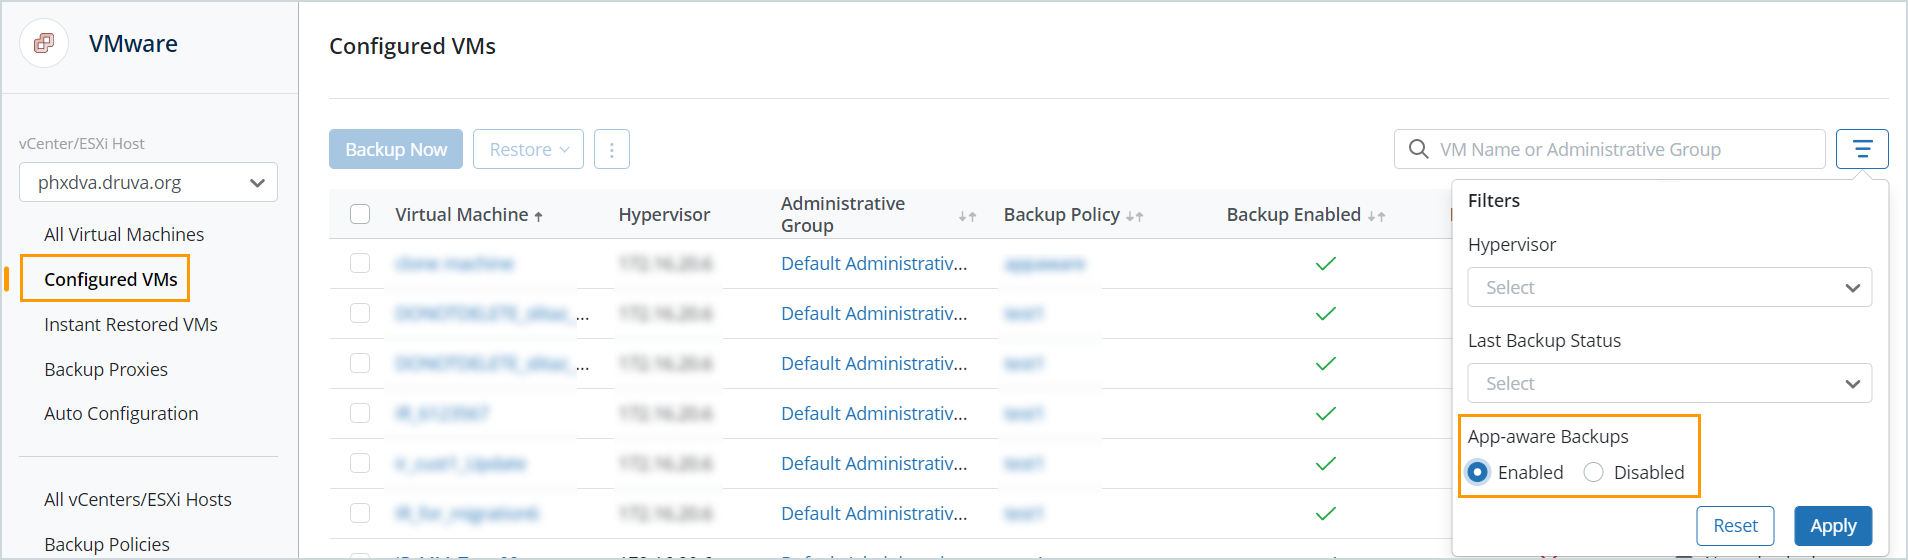
Note: The presence of a green database icon next to the Configured VMs bar chart while in the card view or in the App-Aware VM Protection column while in the list view of the All vCenters/ESXi Hosts page indicates that there are VMs configured for app-aware backups.
![]()
![]()
Clicking the bar chart > VMs configured for App-aware backups (card view), or the count of VMs in the App-Aware VM Protection column (list view) takes you to a filtered Configured VMs page. The Configured VMs page is filtered to show a list of all VMs configured for application-aware backups.
- Click Restore > MS SQL Restore.
- Select Database Restore.
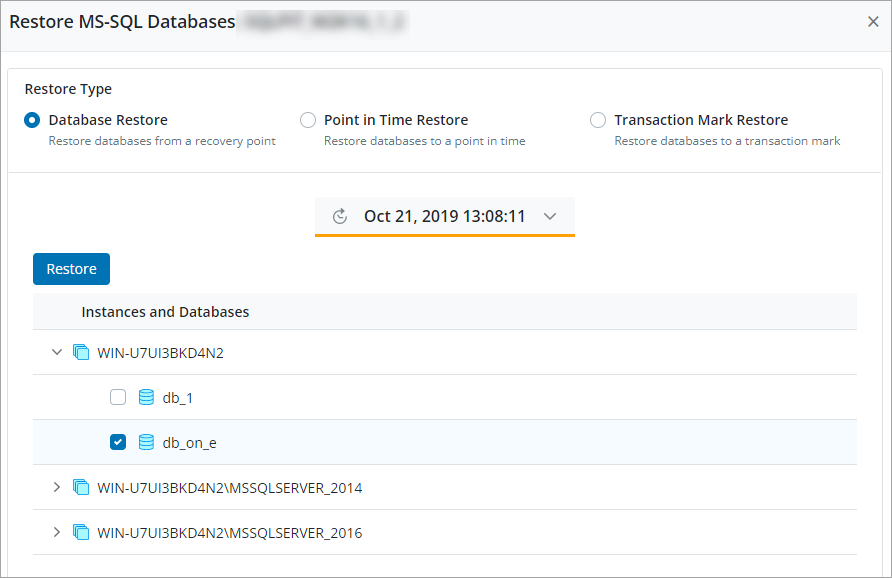
- Select a recovery point.
- Click on an instance name or expand it to see the databases inside it.
- Select the database you want to restore.
- Click Restore.
Enter the restore target details.
Restore to original VM: The database is restored to the original virtual machine from which it was backed up.
-
Restore Location
Restore database as a copy: The database is restored with an alternate name as rst_<original DB name>. -
Settings
-
After Restore, maintain databases in: Select an option to leave databases in one of the following modes:
-
Recovery Mode: In this mode, Druva rolls back all the uncommitted transactions and keeps the database in the ready state. Druva also ensures that all the data sets restored are consistent with the database, and reports errors in case of inconsistencies.
-
Non Recovery Mode: In this mode, Druva does not roll back any uncommitted transactions. The database is not usable in this intermediate, non-recovered state. This mode is used for restoring a database backup and multiple transaction logs, or when multiple RESTORE statements are needed.
-
-
Staging VM: A staging virtual machine is used to mount the selected SQL data for restoring to the target virtual machine. You can also use the destination server for staging. See, Windows staging virtual machine for application aware database restores.
Provide the following details:-
Hypervisor: Select the ESXi host of the staging virtual machine.
-
VM: You can select a staging virtual machine with or without credentials already assigned.
When you select a staging virtual machine without credentials, you can select credentials saved in the credential store or provide custom credentials.
To manage virtual machine credentials, go to All Virtual Machines > Manage Credentials.
-
-
-
Restore to alternate VM: The database is restored to the selected alternate virtual machine
- Restore Location
- Destination VMware Setup: Choose the vCenter/ESXi setup that hosts the virtual machine on which you want to restore the databases. Druva lists the vCenter/ESXi setups that are registered with it.
- Destination Hypervisor: Choose the ESXi host that hosts the virtual machine, if the destination VMware setup that you select is a vCenter. If your destination VMware setup is a standalone ESXi host, the option for this field is the same as the Destination VMware Setup.
- Destination VM: Choose the virtual machine on which you want to restore the databases.
- SQL Instance: Choose the SQL instance on the target virtual machine.
Druva only validates the naming convention of the SQL Instance. - Restore MDF, LDF, NDF files to: You choose to restore the file types to a single location or each type to a different location.
- Settings
- Backup Proxy Pool: Choose a backup proxy pool that can allocate a backup proxy to restore the virtual machine with databases. For optimal results, choose a backup proxy pool that can allocate a backup proxy that is locally connected to the hypervisor on which the virtual machine with databases should be restored.
- After Restore, maintain databases in: Select an option to leave databases in one of the following modes:
- Recovery Mode: In this mode, Druva rolls back all the uncommitted transactions and keeps the database in the ready state. Druva also ensures that all the data sets restored are consistent with the database, and reports errors in case of inconsistencies.
- Non Recovery Mode: In this mode, Druva does not roll back any uncommitted transactions. The database is not usable in this intermediate, non-recovered state. This mode is used for restoring a database backup and multiple transaction logs, or when multiple RESTORE statements are needed.
- Staging VM: A staging virtual machine is used to mount the selected SQL data for restoring to the target virtual machine. You can also use the destination server for staging. See, Windows staging virtual machine for application aware database restores. Provide the following details:
- Hypervisor: Select the ESXi host of the staging virtual machine.
- VM: You can select a staging virtual machine with or without credentials already assigned.
When you select a staging virtual machine without credentials, you can select credentials saved in the credential store or provide custom credentials. To manage virtual machine credentials, go to All Virtual Machines > Manage Credentials.
Restore database files: This is similar to alternate location restore but only the database files are downloaded to the specified server location. The database you need to restore must be manually attached to the SQL server instance.
- Restore location
- Destination VMware Setup: Choose the vCenter/ESXi setup that hosts the virtual machine on which you want to restore the databases. Druva lists the vCenter/ESXi setups that are registered with it.
- Destination Hypervisor: Choose the ESXi host that hosts the virtual machine, if the destination VMware setup that you select is a vCenter. If your destination VMware setup is a standalone ESXi host, the option for this field is the same as the Destination VMware Setup.
- Destination VM: Choose the virtual machine on which you want to restore the databases.
- Restore MDF, LDF, NDF files to: You choose to restore the file types to a single location or each type to a different location.
- Settings
- Backup Proxy Pool: Choose a backup proxy pool that can allocate a backup proxy to restore the virtual machine with databases. For optimal results, choose a backup proxy pool that can allocate a backup proxy that is locally connected to the hypervisor on which the VM with databases should be restored.
- Staging VM: A staging virtual machine is used to mount the selected SQL data for restoring to the target virtual machine. You can also use the destination server for staging. See, Windows staging virtual machine for application aware database restores.
Provide the following details:
-
Hypervisor: Select the ESXi host of the staging virtual machine.
-
VM: You can select a staging virtual machine with or without credentials already assigned.
When you select a staging virtual machine without credentials, you can select credentials saved in the credential store or provide custom credentials.
To manage virtual machine credentials, go to All Virtual Machines > Manage Credentials.
-
- The restore job is initiated. You can view the details from the VMware Jobs page.
Perform a Point in Time restore
Transaction logs are a tool to restore databases to a point in time in between database recovery points. Druva can back up transaction logs in addition to the database recovery points so that you can get a tighter recovery time objective (RTO). When you enable SQL Server aware backup on VMware virtual machines, Druva provides an option to enable transaction log backups. If you enable it, Druva uses the virtual device interface (VDI) to back up and upload the transaction logs to Druva Cloud at specified intervals until the next full SQL Server aware virtual machine recovery point is backed up. Now, you can choose a point in time to restore databases. Druva restores the databases to the transaction with a timestamp that is closest to the point in time that you choose.
Point in time restores of MS SQL databases on virtual machines with NVMe controllers or disks are not supported. Full VM restores having app-aware policy configured will restore such databases as part of VM restores.
Procedure
- Log in to the Management Console.
- From the top menu bar, select your organization if organizations are enabled.
- Click Protect > VMware.
The All vCenter/ESXi hosts page is displayed. You can view all the registered vCenter servers and ESXi hosts from the card view or the list view. - Select the vCenter server or ESXi host from the card view or list view on the All vCenter/ESXi hosts page or select them from the vCenter/ESXi host list in the left navigation pane.
- In the left navigation pane, click Configured VMs.
- Filter the list of configured virtual machines by App-aware backup status Enabled and then select the MS SQL virtual machine you want to restore.
Note: The presence of a green database icon next to the Configured VMs bar chart while in the card view or in the App-Aware VM Protection column while in the list view of the All vCenters/ESXi Hosts page indicates that there are VMs configured for app-aware backups.
Clicking the bar chart > VMs configured for App-aware backups (card view), or the count of VMs in the App-Aware VM Protection column (list view) takes you to a filtered Configured VMs page. The Configured VMs page is filtered to show a list of all VMs configured for application-aware backups. - Click Restore > MS SQL Restore.
- Select Point in time Restore.
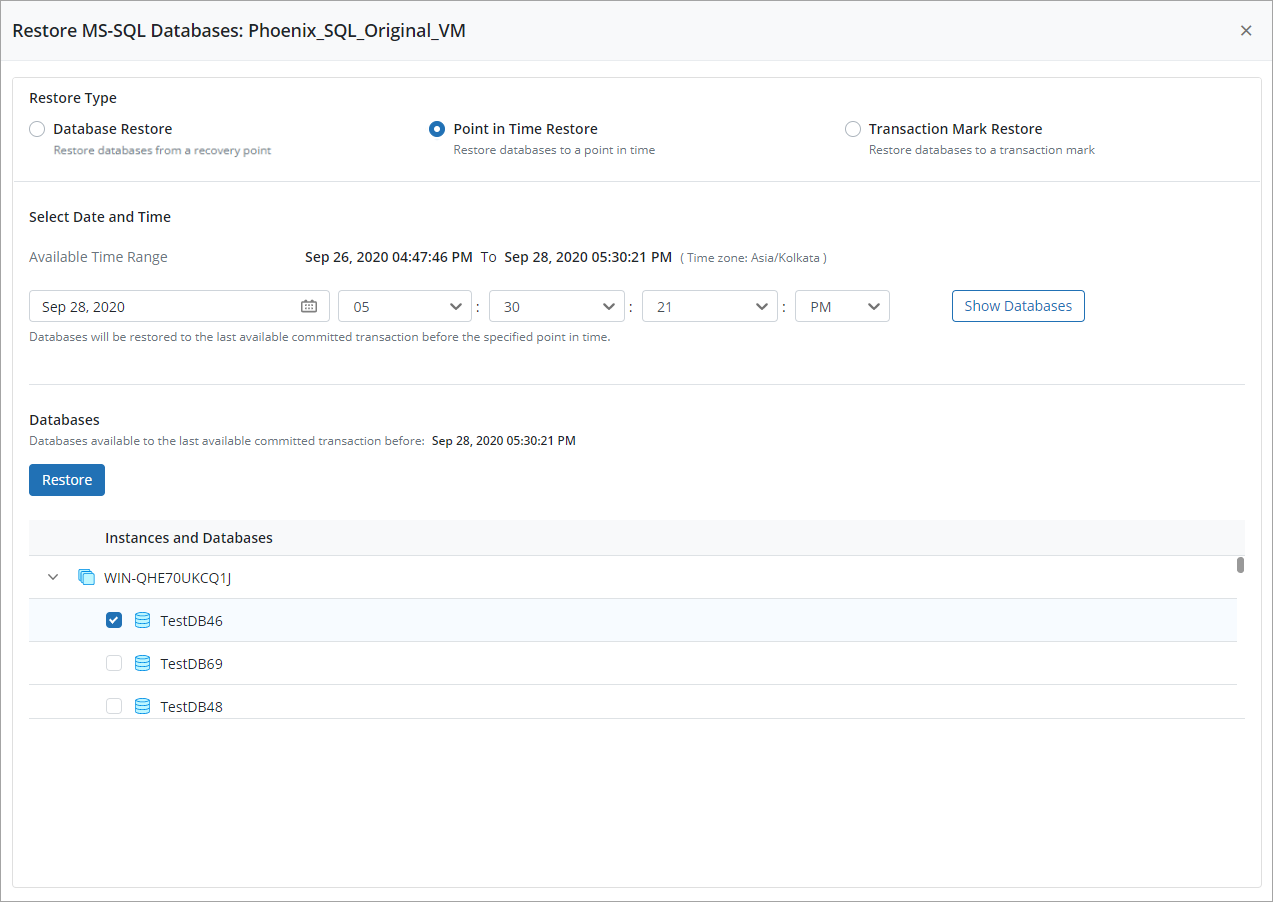
- Specify a date and time to which you want Druva to restore the databases. Databases will be restored to the last available committed transaction before the specified point in time. The backup proxy time zone is used.
- Click Show Databases. All the available databases are displayed.
- Select the databases that you can restore.
- Click Restore.
- Enter the restore target details.
Restore to original VM: The database is restored to the original virtual machine from which it was backed up.
-
Restore database as a copy: The database is restored with an alternate name as rst_<original DB name>.
-
Settings
-
After Restore, maintain databases in: Select an option to leave databases in one of the following modes:
-
Recovery Mode: In this mode, Druva rolls back all the uncommitted transactions and keeps the database in the ready state. Druva also ensures that all the data sets restored are consistent with the database, and reports errors in case of inconsistencies.
-
Non Recovery Mode: In this mode, Druva does not roll back any uncommitted transactions. The database is not usable in this intermediate, non-recovered state. This mode is used for restoring a database backup and multiple transaction logs, or when multiple RESTORE statements are needed
-
-
Staging VM: A staging virtual machine is used to mount the selected SQL data for restoring to the target virtual machine. You can also use the destination server for staging. See, Windows staging virtual machine for application aware database restores.
Provide the following details:
-
-
- Hypervisor: Select the ESXi host of the staging virtual machine.
- VM: You can select a staging virtual machine with or without credentials assigned.
When you select a staging virtual machine without credentials, you can select credentials saved in the credential store or provide custom credentials.
To manage virtual machine credentials, go to All Virtual Machines > Manage Credentials.
Restore to alternate VM: The database is restored to the selected alternate virtual machine.
- Restore location:
- Destination VMware Setup: Choose the vCenter/ESXi setup that hosts the virtual machine on which you want to restore the databases. Druva lists the vCenter/ESXi setups that are registered with it.
- Destination Hypervisor: If the destination VMware setup that you select is a Center, choose the ESXi host that hosts the virtual machine. If your destination VMware setup is a standalone ESXi host, the option for this field is the same as the Destination VMware Setup.
- Destination VM: Choose the virtual machine on which you want to restore the databases.
- SQL Instance: Choose the SQL instance on the target virtual machine.
Druva only validates the naming convention of the SQL Instance. - Restore MDF, LDF, NDF files to: You choose to restore the file types to a single location or each type to a different location.
- Settings
- Backup Proxy Pool: Choose a backup proxy pool that can allocate a backup proxy to restore the virtual machine with databases. For optimal results, choose a backup proxy pool that can allocate a backup proxy that is locally connected to the hypervisor on which the virtual machine with databases should be restored.
- After Restore, maintain databases in: Select an option to leave databases in one of the following modes:
- Recovery Mode: In this mode, Druva rolls back all the uncommitted transactions and keeps the database in the ready state. Druva also ensures that all the data sets restored are consistent with the database, and reports errors in case of inconsistencies.
- Non Recovery Mode: In this mode, Druva does not roll back any uncommitted transactions. The database is not usable in this intermediate, non-recovered state. This mode is used for restoring a database backup and multiple transaction logs, or when multiple RESTORE statements are needed
- Staging VM: A staging virtual machine is used to mount the selected SQL data for restoring to the target virtual machine. You can also use the destination server for staging. See, Windows staging virtual machine for application aware database restores.
Provide the following details:
-
Hypervisor: Select the ESXi host of the staging virtual machine.
-
VM: You can select a staging virtual machine with or without credentials already assigned.
To manage virtual machine credentials, go to All Virtual Machines > Manage Credentials.
When you select a staging virtual machine without credentials, you can select credentials saved in the credential store or provide custom credentials.
Restore database files: This is similar to alternate location restore but only the database files are downloaded to the specified server location. The database you need to restore must be manually attached to the SQL server instance.
- Restore location
- Destination VMware Setup: Choose the vCenter/ESXi setup that hosts the virtual machine on which you want to restore the databases. Druva lists the vCenter/ESXi setups that are registered with it.
- Destination Hypervisor: If the destination VMware setup that you select is a Center, choose the ESXi host that hosts the virtual machine. If your destination VMware setup is a standalone ESXi host, the option for this field is the same as the Destination VMware Setup.
- Destination VM: Choose the virtual machine on which you want to restore the databases.
- Restore MDF, LDF, NDF files to: You choose to restore the file types to a single location or each type to a different location. Transaction log files are also uploaded to restore location.
- Settings
- Backup Proxy Pool: Choose a backup proxy pool that can allocate a backup proxy to restore the virtual machine with databases. For optimal results, choose a backup proxy pool that can allocate a backup proxy that is locally connected to the hypervisor on which the virtual machine with databases should be restored.
- Staging VM: A staging virtual machine is used to mount the selected SQL data for restoring to the target virtual machine. You can also use the destination server for staging. See, Windows staging virtual machine for application aware database restores.
Provide the following details:
-
Hypervisor: Select the ESXi host of the staging virtual machine.
-
VM: You can select a staging virtual machine with or without credentials already assigned.
When you select a staging virtual machine without credentials, you can select credentials saved in the credential store or provide custom credentials.
To manage virtual machine credentials, go to All Virtual Machines > Manage Credentials.
- The restore job is initiated. You can view the details from the VMware Jobs page.
Perform a Transaction Mark restore
If you enable transaction log backups for databases, Druva can utilize transaction marks to identify specific transactions. At the time of restoring databases, you can choose transactions that are marked to restore databases up to the point when these transactions occurred.
Procedure
- Log in to the Management Console.
- From the top menu bar, select your organization if organizations are enabled.
- Click Protect > VMware.
The All vCenter/ESXi hosts page is displayed. You can view all the registered vCenter servers and ESXi hosts from the card view or the list view. - Select the vCenter server or ESXi host from the card view or list view on the All vCenter/ESXi hosts page or select them from the vCenter/ESXi host list in the left navigation pane.
- In the left navigation pane, click Configured VMs.
- Filter the list of configured virtual machines by App-aware backup status Enabled and then select the MS SQL virtual machine you want to restore.
Note: The presence of a green database icon next to the Configured VMs bar chart while in the card view or in the App-Aware VM Protection column while in the list view of the All vCenters/ESXi Hosts page indicates that there are VMs configured for app-aware backups.
Clicking the bar chart > VMs configured for App-aware backups (card view), or the count of VMs in the App-Aware VM Protection column (list view) takes you to a filtered Configured VMs page. The Configured VMs page is filtered to show a list of all VMs configured for application-aware backups. - Click Restore > MS SQL Restore.
- Select Transaction Mark Restore.

- Select a transaction mark.
- Select a restore option.
- Stop before mark: Select this option to exclude the marked transaction in the restore job.
- Stop at mark: Select this option to include the marked transaction in the restore job.
- Select the databases that you want to restore.
- Click Restore.
- Enter the restore target details.
Restore to original VM: The database is restored to the original virtual machine from which it was backed up.
-
Restore location
-
Restore database as a copy: The database is restored with an alternate name as rst_<original DB name>.
-
-
Settings
-
After Restore, maintain databases in: Select an option to leave databases in one of the following modes:
-
Recovery Mode: In this mode, Druva rolls back all the uncommitted transactions and keeps the database in the ready state. Druva also ensures that all the data sets restored are consistent with the database, and reports errors in case of inconsistencies.
-
Non Recovery Mode: In this mode, Druva does not roll back any uncommitted transactions. The database is not usable in this intermediate, non-recovered state. This mode is used for restoring a database backup and multiple transaction logs, or when multiple RESTORE statements are needed.
-
-
Staging VM: A staging virtual machine is used to mount the selected SQL data for restoring to the target virtual machine. You can also use the destination server for staging. See, Windows staging virtual machine for application aware database restores.
Provide the following details: -
Hypervisor: Select the ESXi host of the staging virtual machine.
-
VM: You can select a staging virtual machine with or without credentials already assigned.
When you select a staging virtual machine without credentials, you can select credentials saved in the credential store or provide custom credentials.
To manage virtual machine credentials, go to All Virtual Machines > Manage Credentials.
-
-
Restore to alternate VM: Database is restored to the selected alternate virtual machine.
- Restore location
- Destination VMware Setup: Choose the vCenter/ESXi setup that hosts the virtual machine on which you want to restore the databases. Druva lists the vCenter/ESXi setups that are registered with it.
- Destination Hypervisor: If the destination VMware setup that you select is a Center, choose the ESXi host that hosts the virtual machine. If your destination VMware setup is a standalone ESXi host, the option for this field is the same as the Destination VMware Setup.
- Destination VM: Choose the virtual machine on which you want to restore the databases.
- SQL Instance: Choose the SQL instance on the target virtual machine.
Druva only validates the naming convention of the SQL Instance.
- Settings
- Backup Proxy Pool: Choose a backup proxy pool that can allocate a backup proxy to restore the virtual machine with databases. For optimal results, choose a backup proxy pool that can allocate a backup proxy that is locally connected to the hypervisor on which the virtual machine with databases should be restored.
- After Restore, maintain databases in: Select an option to leave databases in one of the following modes:
- Recovery Mode: In this mode, Druva rolls back all the uncommitted transactions and keeps the database in the ready state. Druva also ensures that all the data sets restored are consistent with the database, and reports errors in case of inconsistencies.
- Non Recovery Mode: In this mode, Druva does not roll back any uncommitted transactions. The database is not usable in this intermediate, non-recovered state. This mode is used for restoring a database backup and multiple transaction logs, or when multiple RESTORE statements are needed.
- Staging VM: A staging virtual machine is used to mount the selected SQL data for restoring to the target virtual machine. You can also use the destination server for staging. See, Windows staging virtual machine for application aware database restores.
Provide the following details:
-
Hypervisor: Select the ESXi host of the staging virtual machine.
-
VM: You can select a staging virtual machine with or without credentials already assigned.
When you select a staging virtual machine without credentials, you can select credentials saved in the credential store or provide custom credentials.
To manage virtual machine credentials, go to All Virtual Machines > Manage Credentials.
Restore database files: This is similar to alternate location restore but only the database files are downloaded to the specified server location. The database you need to restore must be manually attached to the SQL server instance.
- Restore location
- Destination VMware Setup: Choose the vCenter/ESXi setup that hosts the virtual machine on which you want to restore the databases. Druva lists the vCenter/ESXi setups that are registered with it.
- Destination Hypervisor: Choose the ESXi host that hosts the virtual machine, if the destination VMware setup that you select is a vCenter. If your destination VMware setup is a standalone ESXi host, the option for this field is the same as the Destination VMware Setup.
- Destination VM: Choose the virtual machine on which you want to restore the databases.
- Restore MDF, LDF, NDF files to: You choose to restore the file types to a single location or each type to a different location. Transaction log files are also uploaded to restore location.
- Settings
- Backup Proxy Pool: Choose a backup proxy pool that can allocate a backup proxy to restore the virtual machine with databases. For optimal results, choose a backup proxy pool that can allocate a backup proxy that is locally connected to the hypervisor on which the VM with databases should be restored.
- Staging VM: A staging virtual machine is used to mount the selected SQL data for restoring to the target virtual machine. You can also use the destination server for staging. See, Windows staging virtual machine for application aware database restores.
Provide the following details:
-
Hypervisor: Select the ESXi host of the staging virtual machine.
-
VM: You can select a staging virtual machine with or without credentials already assigned.
When you select a staging virtual machine without credentials, you can select credentials saved in the credential store or provide custom credentials.
To manage virtual machine credentials, go to All Virtual Machines > Manage Credentials
- The restore job is initiated. You can view the details from the VMware Jobs page.