Reconfigure backup proxy settings
 Business Enterprise Elite
Overview
As an administrator, you can reconfigure backup proxy settings , in case you want to update any of the following settings due to modifications or updates to it in your virtual environment,
- Network configuration
- Change in the hostname
- Change in the vCenter Server or ESXi FQDN (or IP address) and credentials
- Network proxy settings
- Change the time zone for backup proxy
Reconfiguring backup proxy settings timely ensures virtual machine backups do not fail due to configuration issues.
Procedure
- Log-on to backup proxy with root credentials using vSphere client.
- At the command prompt, type ProxyConf.
- Select the type of Druva Cloud by typing the number adjacent to the cloud.
- Druva Cloud
- GovCloud
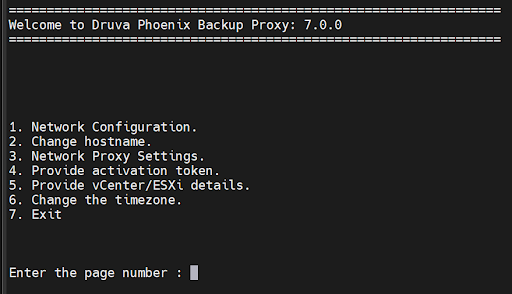
The backup proxy settings are displayed on the screen.
- On the Backup Proxy settings page, enter the required page number and update the details:
Field Description Network configuration
Specify the updated network settings (Static/DHCP).
If you select the Static IP, provide the following details:
If you select DHCP, the DHCP IP will be set.
- IP Address
- Netmask
- Gateway
- Primary DNS Secondary DNS Domain
- Secondary DNS
- Domain
Note: Before selecting DHCP network setting, verify that no dhclient is running on the backup proxy.
Change hostname
After the network configuration completes, you can choose to change the CentOS or Ubuntu operating system hostname.
- To change the hostname, provide the new hostname when prompted.
- To leave the hostname unchanged, only press Enter.
Provide vCenter/ESXi FQDN (or IP address) and credentials
When prompted, provide the FQDN or IP address of ESXi server.
Note: For VMware proxy version 7.0.0 and later, refer to the sequence of steps in the following screen. Provide the network proxy settings, followed by the activation token, and then vCenter/ESXi FQDN (or IP address) and credentials.
Provide activation token You have to enter the activation token that Druva generates when you register the VMware setup. You have to wait till the virtual machine synchronizes with the NTP server. By default, the Druva backup proxy synchronizes with the CentOS NTP servers. To configure custom NTP server, see Configuring custom NTP server. For Ubuntu, see Configuring custom NTP server for Ubuntu proxy.
Note: If you choose to activate backup proxy at a later time, press Enter key thrice to exit the configuration.
Network proxy settings
If you are using a web proxy in your environment, enter Yes when you are prompted with Do you want to use Network Proxy Setting. To continue without using a proxy, enter No.
If you enter Yes, provide the following details:
Choose one of the following authentication methods. Enter:
0 for None
1 for Kerberos
2 for Basic
If you select Kerberos authentication method, provide the following details:- Enter FQDN of DNS Server Name: Enter the FQDN of the DNS server.
- Enter DNS Server User Name: Enter a DNS server user name to let the backup proxy virtual machine use the domain you provided in the DNS Server Name field.
- Enter DNS Server User Password: Enter the password of the user entered in the DNS Server User Name field.
After you provide the DNS server details, the Druva backup proxy attempts to connect to the DNS server. If the connection is successful, provide the following details. - Enter KDC server name: Enter the FQDN of the Key Distribution Center (KDC) server.
- Enter KDC port: Enter the KDC port.
- Enter KDC user name: Enter a user name that the KDC can authenticate.
- Enter KDC Password: Enter the password of the user entered in the KDC user name field.
After you provide the KDC server details, the Druva backup proxy tries to connect to the KDC server and generate an authentication ticket. If the ticket is generated successfully, the Druva backup proxy can connect to the web proxy.
- http
- socks4
- socks5
Enter one of the supported proxy types.
Proxy Server: Enter the valid proxy server FQDN.
Proxy port: Enter the corresponding proxy port number.
Username: Enter a valid proxy username. For a proxy that does not require authentication, enter *.
Password: Enter the valid proxy password. For a proxy that does not require authentication, enter *.Note: Ensure that the FQDNs of the DNS server, KDC server, and the web proxy host resolve to the appropriate servers. If the FQDNs do not resolve, add the FQDNs and the respective IP addresses in the /etc/hosts file of the backup proxy virtual machine.
Change the time zone
You can change the time zone on your system:
Type yes, to change the time zone.
-
From the displayed list of continents and oceans, type the number corresponding to the server location.
-
From the displayed list of country, type the number corresponding to the country in which the server is located.
-
Type 1, to set the selected time zone.
The backup proxy will reboot after you change the time zone.
Type no, to keep the default time zone.
Exit
Wait for the synchronization to complete and exit.
29395