Exporting data from Druva Cloud using AWS Snowball Edge
- Druva provides this feature as an add-on service and this service is charged separately. It is not a part of the standard Druva Business subscription. Contact the Druva Sales team for more details.
- This feature is not available for Druva Gov Cloud.
Druva provides a bulk export service that enables you to obtain a copy of your organization’s data stored in the Druva Cloud. The requested data is shipped to your data center using an AWS Snowball Edge. This service accelerates large data restores from the Druva Cloud in a bandwidth-compromised environment. Druva currently restores data backed up from File servers, NAS shares, SQL resources, and VMware and Hyper-V virtual machines.
You can use the bulk export service in the following situations:
- To recover data when a disaster strikes your organization. For example, the organization data can be compromised due to various business threats, such as malicious attacks, accidental data deletions, network outages, data center failures, and so on.
- To ensure data compliance you can request to export data out of the Druva Cloud.
- To restore the complete data of your organization on the termination of your contract with Druva.
Note: You can use one Snowball Edge device for restoring data from only one storage region. AWS strictly prohibits the movement of the same device across storage regions. To restore data from multiple storage regions, Druva ships multiple Snowball Edge devices to the respective storage regions.
Workflow
The following diagram depicts the bulk data export workflow:
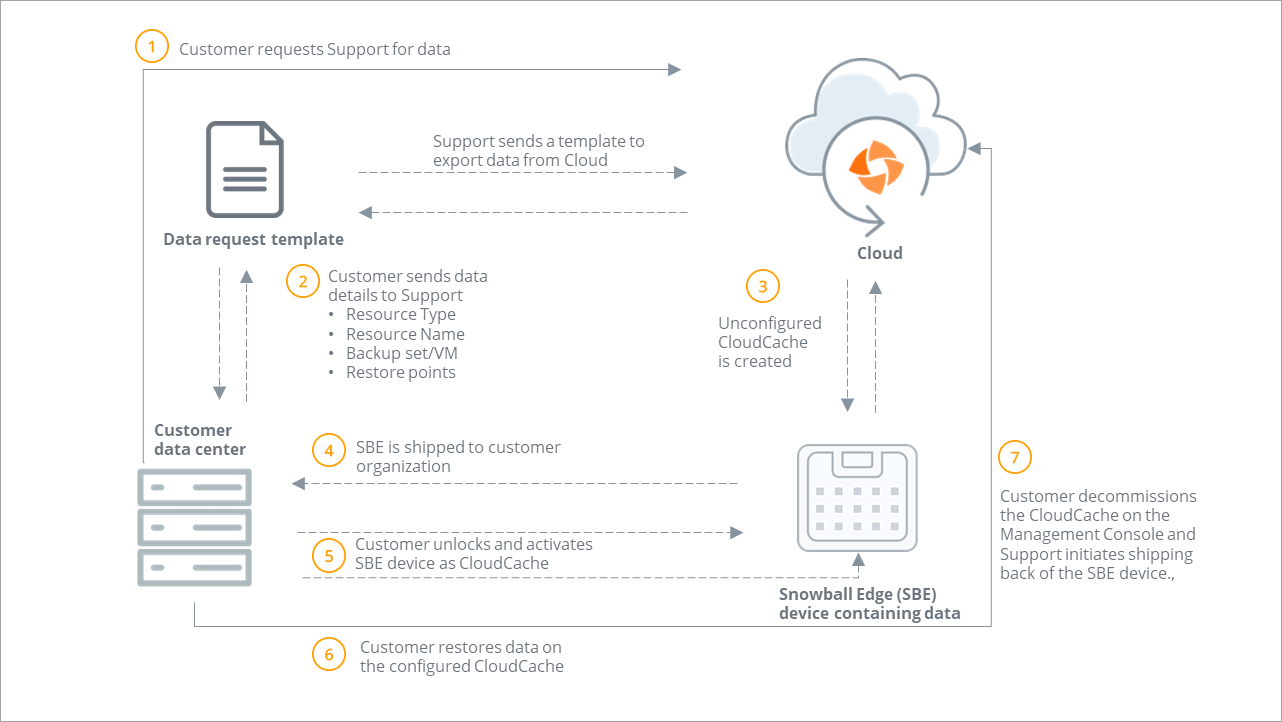
Steps to restore data using AWS Snowball Edge
- A customer sends a request for a copy of data to Support. Support sends a template to the customer requesting for the data details as shown below:
- Resource Type:
- File Server:
- Resource Name: <File_Server_Name>
- Backup Set (Content Rule/Custom Content), Virtual Machine, or NAS Share Name: <Content_Rule>
- Recovery point(s):
- <Date Timestamp of RP1>
- <Date Timestamp of RP2>
- SQL Server:
- Resource Name: <SQL_Server_Name>
- Backup Set (Content Rule/Custom Content), Virtual Machine, or NAS Share Name: <Custom_Content>
- Recovery point(s):
- <Date Timestamp of RP1>
- <Date Timestamp of RP2>
- Virtual Machine:
- Resource Name: <Virtual_Machine_Name>
- Backup Set (Content Rule/Custom Content), Virtual Machine, or NAS Share Name: <Virtual_Machine_Name>
- Recovery point(s):
- <Date Timestamp of RP1>
- <Date Timestamp of RP2>
- Hyper-V:
- Resource Name: <Hyper-V_Name>
- Backup Set (Content Rule/Custom Content), Virtual Machine, or NAS Share Name: <Virtual_Machine_Name>
- Recovery point(s):
- <Date Timestamp of RP1>
- <Date Timestamp of RP2>
- NAS:
- Resource Name: <NAS_Share_Name>
- Backup Set (Content Rule/Custom Content), Virtual Machine, or NAS Share Name: <Share_Name>
- Recovery point(s):
- <Date Timestamp of RP1>
- <Date Timestamp of RP2
- File Server:
- Resource Type:
Note: Ensure that the backup sets listed in the template are not associated with any CloudCache.
- The customer enters the required details in the template and sends the template to Druva Support. The customer must provide the following information in the template: the type of the resource, name of the server or virtual machine whose data is to be restored, backup set/content rule/custom content/NAS share name, and the recovery point details.
- Druva creates an unconfigured CloudCache for the customer’s organization and lists it in the Unconfigured CloudCache tab of the Manage CloudCache page.
- Druva orders an AWS Snowball Edge device, which is shipped to the customer’s organization with the requested data.
- After the Snowball Edge device is delivered to the customer’s organization, the customer needs to unlock the device. For instructions on how to unlock the Snowball Edge device, see Set up and unlock Snowball Edge.
Run the following activation command to activate the Snowball Edge device (EC2 instance):
PhoenixActivate activate_bulkexport_cache --snowball_access_key <access_key> --snowball_secret_key <secret_key> --snowball_ip <SBE_IP> --s3_bucket <sbe_s3_bucket> --type BulkExport --token <token>
Example:
PhoenixActivate activate_bulkexport_cache --snowball_access_key AKIAJL2GFJAJA4YX2DQA --snowball_secret_key kKbgzHTJGB03WJN3wkRbxyQ/+GpBWad55bEpA66t --snowball_ip <SBE_IP> --s3_bucket <sbe_s3_bucket> --type BulkExport --token 1034-1-93-d0c609a440fe9d80fb3c036c58525f7d99371da15b18dd91f03dc471f3533b75Note:The backup sets are automatically attached to the CloudCache on activation.
- After activation, the CloudCache is automatically configured for restore. Any backups to the CloudCache will be blocked for the associated backup sets and will fail if the Backup to Cloud if unable to backup to Cache option is disabled. The customer can now perform the restore operation for the required backup set from the Management Console.
Note: You cannot add synchronization schedules to the CloudCache and the Add Data Volume and the Edit buttons are disabled for this CloudCache.
- After the data is restored, the customer decommissions the CloudCache on the Management Console.
On decommission, the Snowball Edge device is shipped back to Druva and all the backup sets attached to the CloudCache are detached. Druva continues to back up data to the Druva Cloud as per the backup schedule.
Set up and unlock Snowball Edge
Perform the following steps to set up and unlock the Snowball Edge device.
Before you begin
Ensure that you have the following information handy:
- Snowball Edge manifest file, which is provided by Druva and available only after Snowball Edge has been delivered
- Snowball Edge unlock code, which is provided by Druva and available only after Snowball Edge has been delivered
- SSH key for accessing the EC2 instance on Snowball Edge, which is provided by Druva and available only after Snowball Edge has been delivered
- Two IP addresses
- Snowball Edge will communicate with the Internet via one IP address over HTTPS
- Both the IP addresses can be assigned through DHCP
Set up and unlock Snowball Edge
- Connect the Snowball Edge device to your internal network and turn the device on.
- Wait for a few minutes while the device boots up.
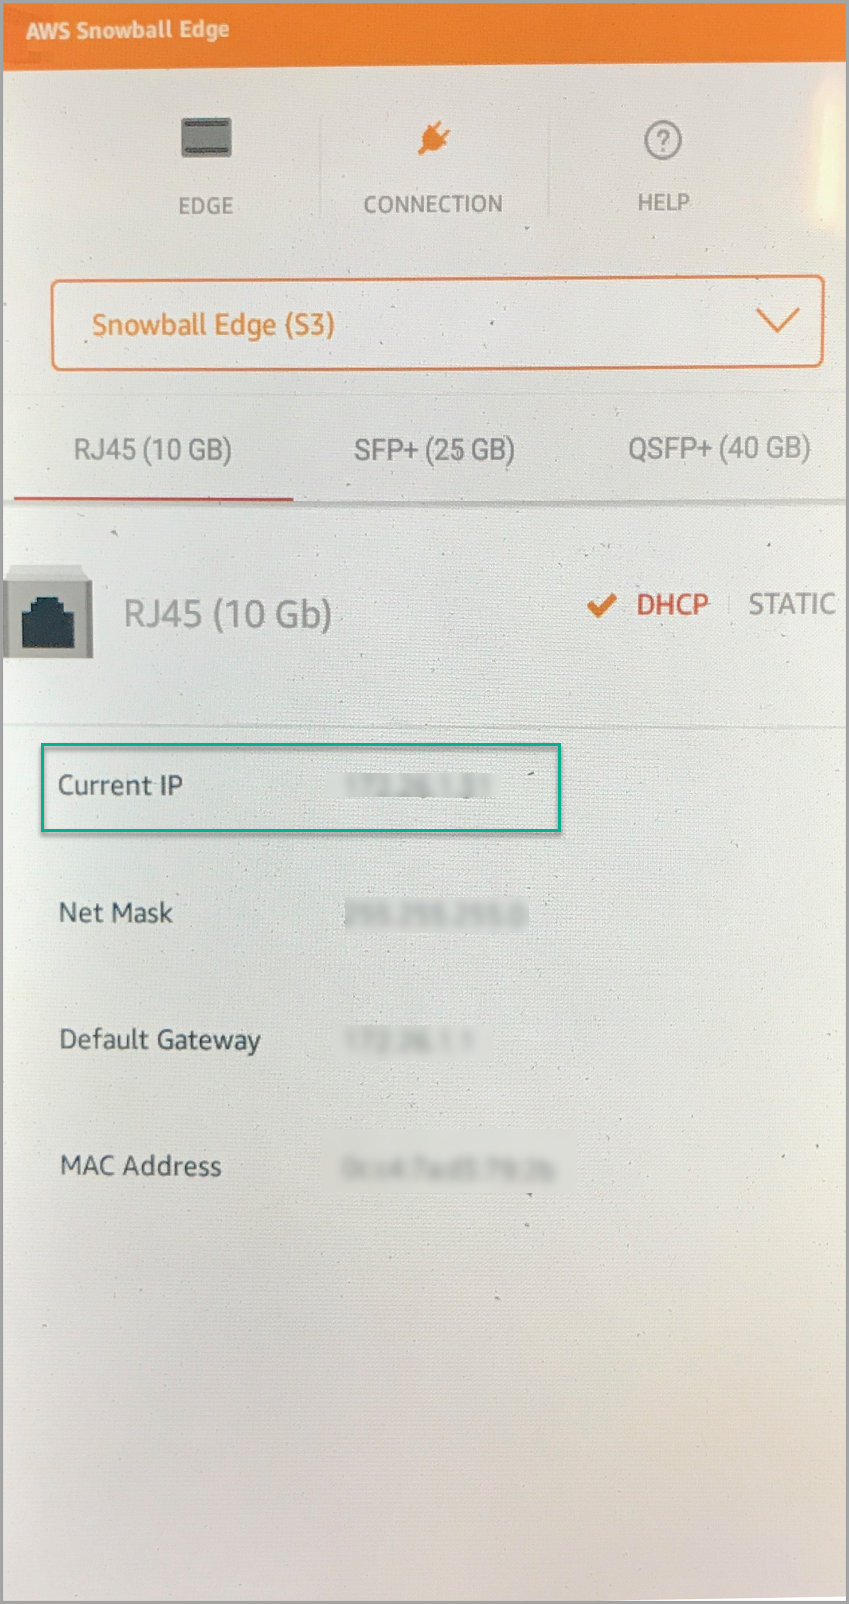
Note: In the case of DHCP, you will know you are properly connected to the network when the IP address is displayed in the Connection tab. In the case of STATIC, you will need to enter these fields manually on the LCD display.
- Note the IP address of the Snowball Edge device on its LCD display.
- Run the
pingcommand from the Snowball Client CLI with the IP address of the Snowball Edge device to ensure that it is connected.
Perform the following steps on the Snowball client
Note: As an example, we are using the values of Snowball Edge IP address as 172.x.x.10 and the EC2 IP address as 172.x.x.45.
- Run the following command on the command prompt of the Snowball Edge client to unlock the AWS Snowball Edge device. The value of the endpoint field is the IP address of the Snowball Edge device. Use the manifest file and unlock code provided by Druva to unlock the Snowball Edge device.
snowballEdge unlock-device --endpoint https://Snowball_Edge_IP_address --manifest-file path/to/manifest/file --unlock-code 29-character_unlock_code
Example:
snowballEdge unlock-device --endpointhttps://172.x.x.10--manifest-fileJID7fa3b0c4-xxxx-xxxx-9bd3-5fb0136e4bae_manifest.bin--unlock-code89faf-xxxxx-xxxxx-f892c-9c141 - Verify that the Snowball Edge device is unlocked by running the following command:
snowballEdge describe-device --endpoint https://Snowball_Edge_IP_address --manifest-file path/to/manifest/file --unlock-code 29-character_unlock_code
Example:
snowballEdge describe-device --endpoint https://172.x.x.10 --manifest-fileJID7fa3b0c4-xxxx-xxxx-9bd3-5fb0136e4bae_manifest.bin--unlock-code89faf-xxxxx-xxxxx-f892c-9c141Note: The message
“State” : “UNLOCKED”appears as part of the output upon the success of the unlock operation. Note the value of thePhysicalNetworkInterfaceIdfield associated with the IP address of the Snowball Edge device.
If the message“State” : “UNLOCKED”does not appear, wait for some time as the unlocking process might take some time. Alternatively, you can verify the manifest file and unlock codes and check if the LCD display on the AWS Snowball Edge device's front indicates that the device is ready for use.
- Check the status of s3 and ec2 services by running the following commands:
- For s3:
snowballEdge describe-service --endpoint https://Snowball_Edge_IP_address --manifest-file path/to/manifest/file --unlock-code 29-character unlock code --service-id s3
Example:snowballEdge describe-service --endpointhttps://172.x.x.10--manifest-fileJID7fa3b0c4-xxxx-xxxx-9bd3-5fb0136e4bae_manifest.bin--unlock-code89faf-xxxxx-xxxxx-f892c-9c141--service-id s3 - For ec2:
snowballEdge describe-service --endpoint https://Snowball_Edge_IP_address --manifest-file path/to/manifest/file --unlock-code 29-character unlock code --service-id ec2
Example:snowballEdge describe-service --endpointhttps://172.x.x.10--manifest-fileJID7fa3b0c4-xxxx-xxxx-9bd3-5fb0136e4bae_manifest.bin--unlock-code89faf-xxxxx-xxxxx-f892c-9c141--service-id ec2
Note: This command returns a status value for a service. It also includes state information that might be helpful in resolving issues you encounter with the service. These states are as follows:
ACTIVE: The service is running and available for use.
ACTIVATING: The service is starting up, but it is not yet available for use.
DEACTIVATING: The service is in the process of shutting down.
INACTIVE: The service is not running and is not available for use.
Ensure that the output states the status of the services as ACTIVE. If the state does not appear as ACTIVE, contact Druva Support. - For s3:
- Create a virtual private network interface. The following examples show the execution of this command with the two different IP address assignment methods, either DHCP or STATIC, depending on the network configuration. Use the value of the
--physical-network-interface-idfield as the one that you noted in Step 2.- For DHCP:
snowballEdge create-virtual-network-interface --physical-network-interface-id physical network configuration ID --ip-address-assignment DHCP --endpoint https://Snowball_Edge_IP_address --manifest-file path/to/manifest/file --unlock-code 29-character unlock code
Example:snowballEdge create-virtual-network-interface --physical-network-interface-id snow.ni-81c83c258386c98fc --ip-address-assignment DHCP --endpointhttps://172.x.x.10--manifest-fileJID7fa3b0c4-xxxx-xxxx-9bd3-5fb0136e4bae_manifest.bin--unlock-code89faf-xxxxx-xxxxx-f892c-9c141 - For STATIC:
snowballEdge create-virtual-network-interface --physical-network-interface-id physical network configuration ID --ip-address-assignment STATIC --static-ip-address-configuration IpAddress=EC2_IP_address,Netmask=netmask --endpoint https://Snowball_Edge_IP_address --manifest-file path/to/manifest/file --unlock-code 29-character unlock code
Example:snowballEdge create-virtual-network-interface --physical-network-interface-id snow.ni-abcd1234 --ip-address-assignment STATIC --static-ip-address-configuration IpAddress=172.x.x.45,Netmask=255.xxx.xxx.x --endpointhttps://172.x.x.10--manifest-fileJID7fa3b0c4-xxxx-xxxx-9bd3-5fb0136e4bae_manifest.bin--unlock-code89faf-xxxxx-xxxxx-f892c-9c141
- For DHCP:
- Obtain the access key and the secret access key for accessing the EC2 instance on Snowball Edge by running the following commands:
- For the access key:
snowballEdge list-access-keys --endpoint https://Snowball_Edge_IP_address --manifest-file path/to/manifest/file --unlock-code 29-character unlock code
Example:snowballEdge list-access-keys --endpointhttps://172.x.x.10--manifest-fileJID7fa3b0c4-xxxx-xxxx-9bd3-5fb0136e4bae_manifest.bin--unlock-code89faf-xxxxx-xxxxx-f892c-9c141 - For the secret access key:
snowballEdge get-secret-access-key --endpoint https://Snowball_Edge_IP_address --manifest-file path/to/manifest/file --unlock-code 29-character unlock code --access-key-id access key --profile user
Example:snowballEdge get-secret-access-key --endpoint https://172.x.x.10 --manifest-file JID7fa3b0c4-xxxx-xxxx-9bd3-5fb0136e4bae_manifest.bin --unlock-code 89faf-xxxxx-xxxxx-f892c-9c141 --access-key-id 2OEYMELHRKVSOE5xxxx --profile user
- For the access key:
- Create an AWS profile to store the access credentials by using the following command:
aws configure --profile profile_name
Example:
aws configure --profile sb2
You are prompted to enter the AWS Access Key ID, AWS Secret Access Key, Default region name, and Default output format. The default region name is the region where the Snowball Edge device is ordered and the default output format is json. For example, if you ordered the Snowball Edge device for us-west-1, the default region name would be us-west-1. - Configure the EC2 instance on the Snowball Edge device by running the following command:
aws ec2 describe-images --endpoint http://Snowball_Edge_IP_address:8008 --profileprofile_name
Example:
aws ec2 describe-images --endpoint http://172.x.x.10:8008 --profile sb2
Note the value of ImageId and use it while executing the following command to launch the EC2 instance:
aws ec2 run-instances --image-id ImageId --count 1 --endpoint http://Snowball_Edge_IP_address:8008 --instance-type sbe1.4xlarge --profile profile_name
Example:
aws ec2 run-instances --image-id snow.ami-7xxxxx03 --count 1 --endpoint http://172.x.x.10:8008 --instance-type sbe1.4xlarge --profile sb2 - Check the status of the EC2 instance by running the following command:
aws ec2 describe-instances --endpoint http://Snowball_Edge_IP_address:8008 --profile profile_name
Example:
aws ec2 describe-instances --endpoint http://172.x.x.10:8008 --profile sb2
TheStatefield in the output should appear as the following example.InstanceIdfield.
"State": {

           "Code": 16,

           "Name": "running"
}
- Check the IP address of the virtual private network interface that we created in Step 4 by running the following command:
aws ec2 describe-addresses --endpoint http://Snowball_Edge_IP_address:8008 --profile profile_name
Example:
aws ec2 describe-addresses --endpoint http://172.x.x.10:8008 --profile sb2
The output should appear as the following example:
{

 "Addresses": [

 {

"PublicIp": "172.x.x.45"

  ]

}
- Associate the IP address of the virtual private network interface with the EC2 instance by running the following command. The IP will be used to access the EC2 instance and to connect to Druva Cloud.
aws ec2 associate-address --public-ip PublicIp(EC2_IP_address) --instance-id InstanceId --endpoint http://Snowball_Edge_ip_address:8008 --profile profile_name
Example:
aws ec2 associate-address --public-ip 172.x.x.45 --instance-id "snow.i-84e798xxxxxd16d4b" --endpoint http://172.x.x.10:8008 --profile sb2 - Connect to the EC2 instance using the SSH key that is shared by Druva by running the following command:
ssh -i keyProvidedbyDruva root@EC2_IP_address
Example:
ssh -i local_xyz.pub root@172.x.x.45 - Add the Snowball Edge EC2 instance IP address in either the DNS table of the DNS server or in the hosts file of the server to be backed up. The location of the hosts file is as follows:
- For Windows: C:\Windows\System32\drivers\etc\hosts
- For Linux: /etc/hosts