Prerequisites to install the backup proxy
 Business Enterprise Elite
Before you begin, ensure that you have reviewed the Support Matrix.
Prerequisites for deploying backup proxy
-
Backup proxy is deployed through an OVA and is an Ubuntu (version 22.04) VM that resides in your VMware infrastructure.
-
Ensure you have subscribed to adequate Druva storage - Based on the data size that you are planning to backup, you must plan to subscribe to enough Druva storage. To determine the exact requirement, you can contact Druva Support, who will analyze and help you determine Druva storage requirements.
-
Druva does not support ESXi hypervisor passwords that contain the character @ (at sign). If the password for an ESXi hypervisor on which a backup proxy is deployed contains "@", change the password to remove this sign before you register and configure the backup proxy.
-
The user setting up the proxy server must have Cloud Administrator for Enterprise workloads privileges.
-
The vCenter/ESXi credentials must have the required user permissions.
-
The IP address / Network being provided to the Druva Backup Proxy must be able to communicate to Druva Cloud (phoenix.druva.com) on port 443.
-
Configure your antivirus and any third-party encryption programs to authorize the latest Druva applications and Druva and S3 URLs.
-
If your network uses a firewall, it's essential to configure it to permit Druva traffic for both transmission and reception of data. This involves enabling exceptions for Druva authorized URLs and opening designated ports. For more information, see ports and communication protocols and S3 URLs.
-
There must not be an SSL terminating proxy in the network.
-
The backup proxy must be deployed to a datastore that has a minimum 110 GB free space.
-
You must have the Web Proxy credentials (If you use a Web proxy in your environment)
-
You must have the IP settings details.
-
The vCenter certificate must be valid.
-
The backup proxy is deployed in the same cluster where the virtual machines being backed up reside.
Prerequisites for Druva Proxy Deployer
-
The Druva Proxy Deployer is supported in the following operating system:
-
macOS 10.14 or later (Mojave)
-
macOS 10.15 or later (Catalina),
-
Windows 7 and later
Note: For Windows 7, if you face any issues, you need to install the Windows update.
-
-
The Druva Proxy Deployer by default uses port 20020. In case you want to use a different port, follow the steps.
-
Close the Druva Proxy Deployer.
-
Go to <install_location>\Druva-Proxy-Deployer\resources\service
-
Open the ServiceConfiguration.json file.
-
Update the port number in the srvRestPort field.
-
-
The local system must have a minimum of 7 GB space on the download location.
-
Ensure that the English language pack is installed on the hosts with a certified operating system that is localized to a language other than English. If the English language pack is not installed, Druva is unable to assign a static IP. To add the English language pack on Windows, see Available Language Packs for Windows. [External link to Microsoft documentation].
Prerequisites for VMC
Ensure VMC SDDC firewall rules are configured to enable http/https traffic over port 443 and NTP port 123 for the communication through Compute and Management Gateways.
The backup proxy communicates with Druva on port 443. The communication is outbound only and you need to create an inbound traffic rule. The backup proxy also communicates with the vCenter on port 443 to understand the VMware hierarchy and communicates with the virtual machines to perform backups and restores. The backup proxy also uses port 123 outbound connection to synchronize time with NTP server.
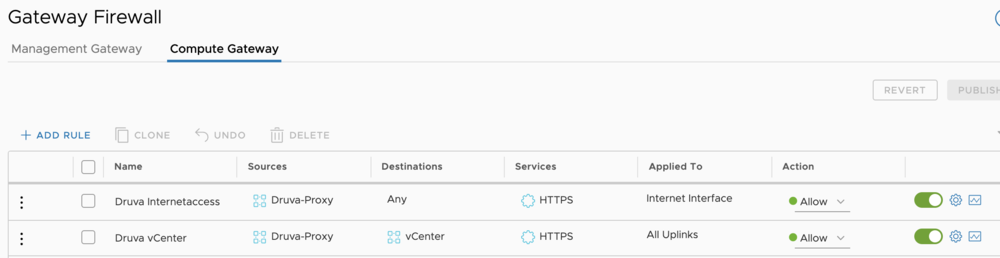
Compute Gateway settings
Create the following rules on the Compute Gateway:
- Source: Druva-Proxy -> Destination: vCenter with Port: 443
- Source: Druva-Proxy -> Destination: Any with Port: 443 applied to: internet interface
Management Gateway settings
Open Port 443 for inbound and outbound communication.
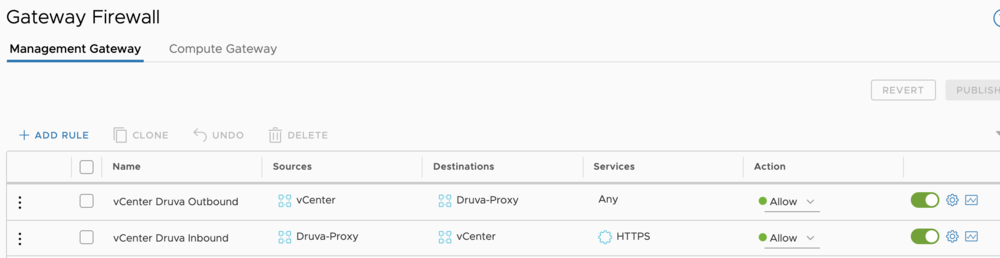
Note: Druva only needs access to the Internet (only Druva provided IP addresses on port 443) and to the vCenter, so you can restrict all other communication.
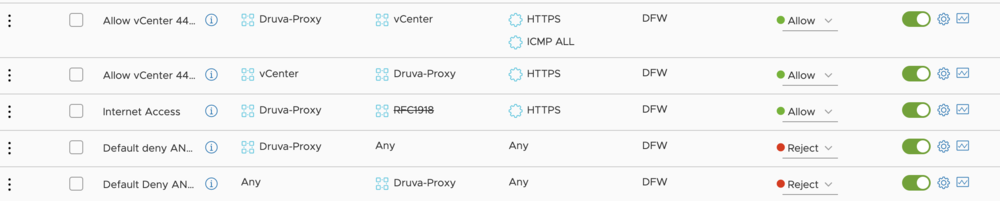
Distributed Firewall settings (Optional step)
Note: The below steps are applicable only if your organization is using Distributed Firewall.
- Ensure that the environment is set to blacklist and create the following rules:
- Source: Druva-Proxy -> Destination: ANY with Service: ANY -> Reject
- Source: ANY -> Destination: Druva-Proxy with Service: ANY -> Reject

Right now, each traffic will be blocked directly on the vNIC of the backup proxy.
- Open the internet traffic, allowing the https traffic to the backup proxy. Create the following rule:
Source: Druva-Proxy -> Destination: is not! RFC1918 with Service 443 -> Allow

- Allow vCenter outbound and inbound traffic. Create the following rules:
Source: Druva-Proxy -> Destination: vCenter with Service 443 -> Allow
Optionally, you can add ICMP
Source: vCenter -> Destination: Druva-Proxy with Service 443 -> Allow
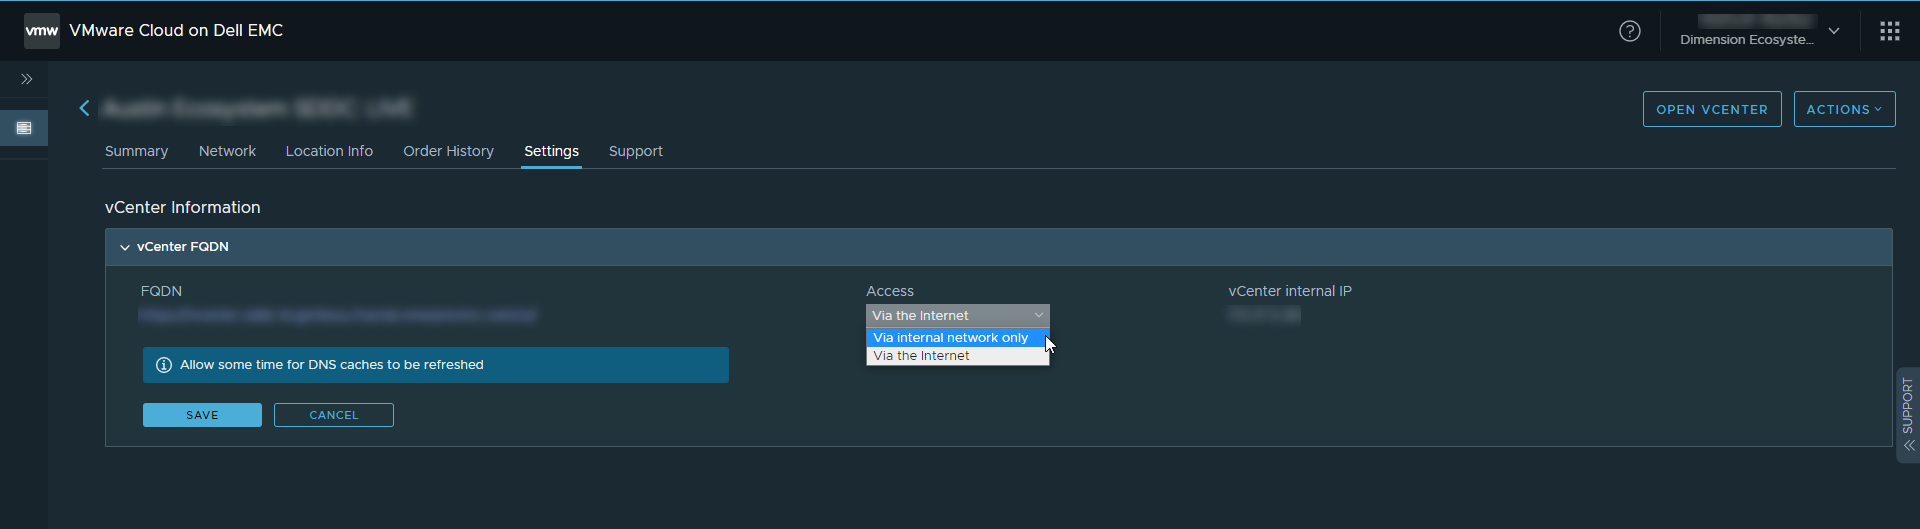
Prerequisite for VMC on Dell EMC
- For VMware Cloud on Dell EMC, configure the Fully Qualified Domain Name (FQDN) to resolve to a vCenter private IP address. Ensure the FQDN Access is set to Via internal network only in the VMware Cloud Services Console.
-
For DR failback on Windows, ensure that the virtual machines on the VMware Cloud can access the AWS instance data using the SMB protocol.
Resource sizing for backup proxy
Deploying a backup proxy creates a new virtual machine with the following configuration:
The backup proxy VM must be dedicated to performing backup proxy operations.
| Parameter | Default Configuration |
|---|---|
| vCPU | 8 vCPU (2 virtual sockets with 4 cores per socket) |
| RAM | 6 GB |
|
Virtual disks |
4 virtual disks are created (40GB, 60GB, and 2 disks with 1MB each), or |
Also, consider the following:
- Resource monitoring tools can be used, but tools that use a lot of CPU (more than 3%) require extra CPU to be added to the virtual machine.
- Operating system patching should be in line with the operating system vendor security and patching policy.
- Operating system upgrades must be verified and supported by Druva.
- If you change the backup proxy configuration, additional changes in the backup proxy settings are required to:
- Ensure concurrent backup jobs
- Avoid any impact on the CPU
For more details, contact Druva Support.
- The minimum supported configuration for backups to run without any issues is 3 vCPU and 3 GB RAM. With this configuration, you can backup only 1 virtual machine at a time.
Guidelines to determine the Backup Proxy Concurrency
The following guidelines will help you determine the concurrency of backups for backup proxies. You can use these guidelines to scale up (increase RAM etc, for proxy server) or scale out (add more backup proxies).
- Each virtual machine backup requires 2 vCPUs and 1.3 GB RAM.
- Additionally, 30% of CPU resources and 2 GB RAM are required for operations, such as file-level restores, log uploads, etc.
The resources allocated to a proxy is a function of the number of concurrent backups you want to achieve in your environment.
If you want to run multiple jobs per backup proxy, increase the configuration as stated above based on the factors discussed below.
Calculating concurrency
The configuration is a function of the number of concurrent backups you want to achieve in your environment.
Say, you have a backup proxy configuration of X vCPUs and Y GB RAM. The number of concurrent backups can be calculated using the following formula:
Number of concurrent backups = Minimum { (X*0.7)/2, (Y-2)/1.3 }
Example 1: If you have 16 vCPUs and 16 GB RAM in your setup, you can calculate the number of concurrent backup operations that can run as follows:
Number of concurrent backups = Minimum { (16*0.7)/2 = 5.6, (16-2)/1.3 = 10.7 } = 5.6
You can run up to 6 concurrent backup operations (after rounding the last decimal).
Correspondingly, you can now calculate your ideal RAM configuration to save system resources.
Optimal RAM configuration required to run 6 concurrent backups = (6*1.3)+2 = 9.8
You can optimize your setup to 10 GB RAM (rounded to the nearest available unit) since the number of concurrent backups is governed by the vCPU configuration. Vice versa will be applicable in case the number of concurrent backups is derived from the RAM configuration.
Example 2: If you have 16 vCPUs and 8 GB RAM in your setup, you can calculate the number of concurrent backup operations that can run as follows:
Number of concurrent backups = Minimum { (16*0.7)/2 = 5.6, (8-2)/1.3 = 4.6 } = 4.6
You can run up to 5 concurrent backup operations (after rounding the last decimal).
Correspondingly, you can now calculate your ideal vCPU configuration to save system resources.
Optimal vCPU configuration required to run 5 concurrent backups = (5*2)*1.3 = 13
You can optimize your setup to 13 vCPUs (rounded to the nearest available unit) since the number of concurrent backups is governed by the RAM configuration.
Calculating the required vCPU and RAM
Alternatively, you can calculate the vCPU and RAM configuration by deciding the number of concurrent backups you want for your environment.
Example: If you have to backup 50 virtual machines in a 14-hour window and each virtual machine requires approximately 1 hour for backup.
Thus, you need 50/14 = 3.6 = ~4 virtual machines to proceed in a parallel backup.
In case you have to run 4 concurrent virtual machine backups in the environment. You can calculate the number of vCPUs and RAM configuration as follows:
vCPUs required = (4*2)/0.7 = 11.42
RAM required = (4*1.3) + 2 = 7.2
You need at least 10 vCPUs and 7 GB RAM for 4 concurrent backups.
Changing the backup proxy concurrency
Perform the following tasks to change the VMware backup proxy concurrency:
- Stop the service using the following command:
- service Phoenix stop (for VMware backup proxy version prior to 7.0.0)
- service Druva-EnterpriseWorkloads stop (for VMware backup proxy version 7.0.0 and later)
- Edit the following and save the file.
- value of the VM_MAX_CONCURRENT_BACKUPS parameter in the phoenix.cfg file at /etc/Phoenix/VMWARE (for VMware backup proxy version prior to 7.0.0)
- value of the vm_max_concurrent_backups parameter in the VMwareConfig.yaml at /etc/Druva/EnterpriseWorkloads/vmware (for VMware backup proxy version 7.0.0 and later)
- Start the Phoenix service using the following command:
service Phoenix start