Restore prerequisites
 Business Enterprise Elite
Required prerequisites for File Level Restores (FLR)
- The target virtual machine must be powered on.
- Ensure that the latest version of VMware tools is installed and running on the target VM.
- You must enter credentials that have write permissions over the restore target (CIFS, original virtual machine, or alternate virtual machine).
- Ensure that the VMware proxy can ping the destination VM.
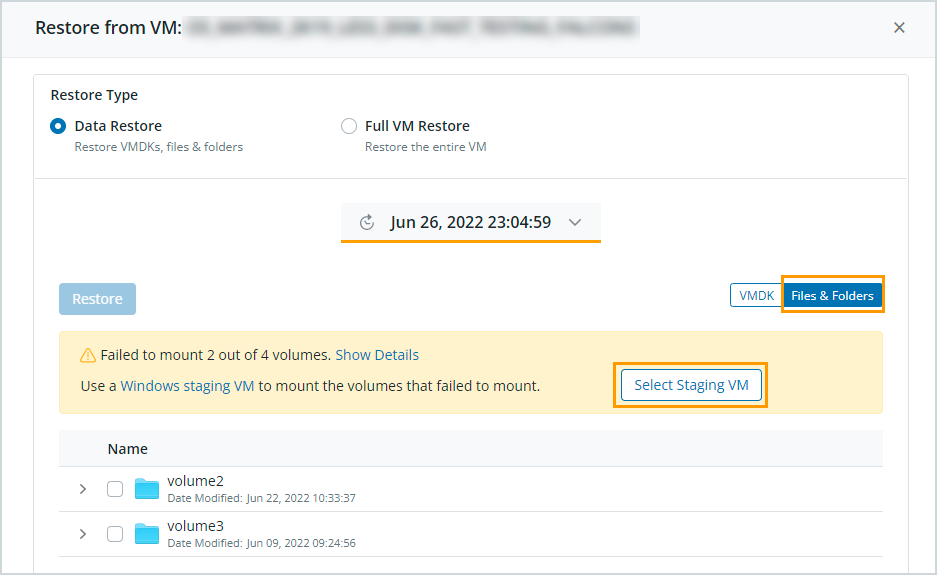
- For dynamic GPT disk partitions (Windows Server backup sets) or unreadable volumes/partitions from MBR disk partitions, such as spanned volumes and the REFS file system, you can use a staging VM. For more information, see Restore files and folders.
Recommended prerequisites for enhanced performance of File Level Restores (FLR)
- The VMware backup proxy must be upgraded to version 5.0.2-121723 or later.
- Exclude the following paths on the target virtual machine from antivirus scans:
- Windows: %ProgramData%\Phoenix\VMware\
- UNIX: $HOME/Phoenix/VMware
- The entered credentials must have write permissions on the target location and the paths above.
- Druva installs a binary called DruvaVMwareRestoreAgent.exe (Windows) or guestossvc (Unix) on the target guest operating system. This binary acts as a server for HTTPS requests from the VMware backup proxy. This process opens specified ports on the target guest operating system for communication. If the process fails to open these ports due to firewall restrictions, it uses the VMware tools API to restore files and folders on the target virtual machine.
Note: If Druva uses the VMware tools API to perform restores, there will be no observable performance gain. The performance will be similar to that of the older agents.
- To allow the DruvaVMwareRestoreAgent.exe (Windows) or guestossvc (Unix) service to communicate on specific ports for restores, perform the following tasks:
- Edit the phoenix.cfg file to allow this process to use specified ports for restore. For example, to use port 58142 for restores, edit the __FLR_GUEST_VM_PORT_RANGE entry to __FLR_GUEST_VM_PORT_RANGE = [58142].For more information on the phoenix.cfg file, see Druva agent logs and configuration details.
- If you don’t enter a specific port, Druva uses the ephemeral ports over HTTPS for restores. Ensure that the last three to four ports in this range are open.
Druva cleans up the installed files related to the DruvaVMwareRestoreAgent.exe (Windows) or guestossvc (Unix) binary; however, if the cleanup fails due to network disruptions or if the VM is powered off, you can kill the DruvaVMwareRestoreAgent.exe (Windows) or guestossvc (Unix) process from the task manager (Windows) or the terminal (Unix), and manually delete these files from the following locations:
| Operating System | Location |
|---|---|
| Unix | $HOME/Phoenix/VMware/<JobID> |
| Windows | $PROGRAMDATA\Phoenix\VMware\<JobID> |
Required prerequisites for File Level Restores (FLR) for GPT Dynamic Disks
- The target virtual machine must be powered on.
- Ensure that the latest version of VMware tools is installed and running on the target VM.
- You must enter credentials that have write permissions over the restore target (CIFS, original virtual machine, or alternate virtual machine).
- The selected staging VM must be in the same VCenter where you want to perform the FLR, i.e., target VM.
- VMware tools must be running on the staging VM.
- The staging VM must have Windows Server 2012 onwards.
- Disk UUID on staging VM must be enabled. For more information, see resolution steps.
- The staging VM must not be configured for backups.
- After adding the staging VM on the vCenter or standalone host, refresh all VMs for the respective vCenter or standalone host on the Management Console, and assign credentials to the staging VM. For more information, see Manage credentials for VMware servers.
Prerequisites for configuring virtual machines for Sandbox Recovery
- You must have the appropriate license enabled. If you do not have a valid license, the Sandbox Recovery option in the VMware Restore workflow is hidden. To enable the license, contact Support.
For more information on Sandbox Recovery, see Restore virtual machines using sandbox. - VMware Tools must be running on the destination VM. During Sandbox Recovery, VMware Tools is used to interact with the VM. As no other communication channel is open for a Sandbox VM, you need to install the VMware Tools manually. For more information, see Troubleshoot VMware issues.
Note: You can continue with the restore regardless of whether VMware Tools is present. If VMware Tools is not present, an alert warning email is sent to the administrator, and a job is created. Post-restore, a scan can start only if you install VMware Tools within 24 hours.
- The proxy version must be 6.3.1-328735 and above.
- Keep the Guest OS credentials handy as you need to provide these details.
- The default administrator and other users of the administrator group can initiate the sandbox restore. These users must have full access to all files and folders.
- For the Linux operating system, provide the root user credentials to start the restore. You'll need to set up a root user login and password for the VMs on which root login is not enabled. Run the following commands to set up the root user.
- echo 'PermitRootLogin=yes' | sudo tee -a /etc/ssh/sshd_config
- Set password for root using passwd command. You must log in as a root user. Use the command sudo su
- sudo systemctl restart sshd
- Ensure that you allow the following URLs for successful sandbox recovery:
- *s3.amazonaws.com/*
- clamav.net/*
- database.clamav.net
- You must install the following to support scanning on Windows Server 2008R2:
Prerequisites for restore of MS SQL database from application-aware backups
- To obtain the latest OVA templates, deploy a fresh additional backup proxy. For more information, see Deploy additional backup proxies.
- Provision for a Windows staging virtual machine. Your target virtual machine can be used as a staging virtual machine as well. For more information, see Windows staging virtual machine for application-aware database restores.
- On the target virtual machine, the latest VMware tools must be running.
- The target virtual machine must have supported the MS SQL server running. For more information, Support Matrix.
- You must have write permission for the target location, where you want to restore the files.
- Ensure that you have added the global permission Host.Config.Storage to create a datastore. For more information, see Required vCenter or ESXi user permissions for backup, restore, and OVA deployment.
- On both target and source virtual machine, open two ports between range ‘49125’ to ‘65535’ for communication with staging virtual machine and target virtual machine (guest OS). For this, update the Phoenix.cfg file. For example, update option RESTORE_PORT_RANGE = [58142, 58141].
For more information, see Druva agent configuration details.
If these ports are not opened, ephemeral ports between range '49125' to '65535' will be used. Ensure that the last 3-4 ports in this range are open. The following files are injected guestossvc_restore.exe and PhoenixSQLGuestPluginRestore.exe. - On the target virtual machine, application discovery must be completed. (Currently, this happens when credentials are assigned and updated every 24hrs just like VM listing refresh). To manually trigger a discovery, unassign and assign the credentials. Also, the virtual machine must be powered on.
Note: SQL database restores from VMs in the VMware Cloud on AWS (VMC) are unsupported.
Windows staging virtual machine for SQL application-aware database restores
When the source virtual machine (MS SQL) is backed up, Druva takes VSS snapshots of the drives where the database files reside and then backs up the entire disk attached to the source virtual machine. These disks (vmdk files) are then uploaded to Druva Cloud.
Now while restoring, because VSS is a proprietary feature of Windows, a Windows virtual machine (staging) is required to read the disks. A staging virtual machine is used to attach and mount the selected vmdk (disks) to this staging virtual machine, from where Druva reads SQL data for restoring to the target virtual machine.
Note: You can use the target virtual machine as a staging virtual machine as well.
The Windows staging virtual machine should meet the following criteria:
- The staging virtual machine must be in the same vCenter or ESXi (if standalone) as the target virtual machine.
- The staging virtual machine must not be configured for backup in Druva, except when the target virtual machine is used as a staging virtual machine.
- The staging virtual machine must be a Windows server at version same or higher than the source virtual machine. The staging virtual machine does not require any additional resources, it should just meet the minimum requirements of a Windows server. The staging server is not used for a resource-intensive operation but just to attach and mount the disks for Druva to read the data from.
- Windows Server virtual machines such as Windows Server 2016 must be used for staging and not Windows client virtual machines such as Windows 8 and 10.
When the disk is attached to Windows client virtual, the VSS snapshots might get deleted in some cases. Hence it is not recommended to use Windows Client virtual machine for staging location. - VMware tools must be running.
- Required credentials must be assigned.
Diskpart is used to bring disks online. To run diskpart, The virtual machine must be logged in to your local Administrators group, or a group with similar permissions. For more information, see https://docs.microsoft.com/en-us/windows-server/administration/windows-commands/diskpart#syntax
Note: The virtual machine must be powered on when credentials are being assigned. - The staging virtual machine must be powered on.
- Disk UUID on must be enabled.
Follow the following steps to verify or enable the disk UUID:- Right-click the virtual machine and click Shut Down Guest OS.
- Right-click the virtual machine and click Edit Settings.
- Click VM Options.
- Expand the Advanced section and click Edit Configuration.
Verify if the parameter disk.EnableUUID is set. If it is, then ensure that it is set to TRUE.
If the parameter is not set, follow the steps:- Click Add Row.
- In the Name column, type disk.EnableUUID.
- In the Value column, type TRUE.
- Click OK and click Save.
- Power on the virtual machine.
For more information, see https://kb.vmware.com/s/article/50121797
- The staging virtual machine must not be cloned from the source virtual machine(whose backup is done).
- If there are any VSS snapshots on the staging virtual machine then remove them before running the job.
- The staging virtual machine should not have GPT disks as they may cause problems with attaching and reading data from the new disks.
- Ensure that the limit of attaching the NFS datastore is not exhausted. Druva attaches a NFS datastore to the parent ESX host where the staging virtual machine resides. Thus, it is recommended you review the best practices for running VMware vsphere on NFS to understand the limitations and tunable configuration for mounting NFS volumes on an ESXi host.
- Add an exception for antivirus scans for the following path on the staging and target virtual machine:
%ProgramData%\Phoenix\VMWARE\