Backup to Druva Cloud fails at the step "aws/monitor/btdcbackup" with the Error: "Failed to prepare backup sources"
Problem description
Backup to Druva Cloud fails at the step "aws/monitor/btdcbackup" with the Error: "Failed to prepare backup sources"
Cause
There are missing permissions for Druva CloudRanger access on the AWS account.
Traceback
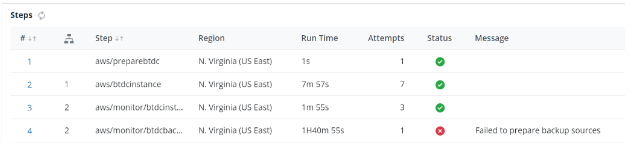
The Audit Trails of the step "aws/monitor/btdcbackup" show the message below:
"status_message": "Failed to prepare backup sources",

"status_code": "custom",

"policy_backup_id": xxxxxxxxxxxx,

"resource_type": "EC2Snapshot",

"resource_id": "snap-aaabbbcccdddeee",

"resource_region": "us-east-1",

"resource_source": "EC2",

"source_account_name": "testaccount",

"body": "{\n   \"id\": \"xxxxxxxxxxxxxxxxxxx\",\n   \"job_task_id\": \"xxxxxxxxxxxxxxxxxxx\",\n   \"job_id\": \"yyyyyyyyyyyyyyyyyyyyyyyyyyy\",\n   \"depends_on_id\": \"zzzzzzzzzzzzzzzzzzzzzz\",\n   \"seq\": 4,\n   \"step\": \"aws/monitor/btdcbackup\",\n   \"source_account_id\": \"abcdefg\",\n   \"target_account_id\": null,\n   \"resource_id\": null,\n   \"is_success\": false,\n   \"status_message\": \"Failed to prepare backup sources\",\n   \"status_code\": \"custom\",\n
Resolution
- Update Existing AWS Access Role for the AWS account in Druva CloudRanger (Link)
- How to Update access roles as below:
- Log into your Druva CloudRanger console and navigate to the account to be updated.
- Click Settings on the left navigation pane. Alternatively, you may use the Settings icon on the main AWS Accounts page to navigate to Account Settings.
- Click Update Configuration under AWS Access.
- Copy the CloudFormation URL or download the template.
- Login to your AWS Console and navigate to the CloudFormation page. Select the stack that you previously created when configuring CloudRanger, and then click Update.
- On the Update stack page, select Replace current template. Then paste the CloudFormation URL into the Amazon S3 URL text box.
- Click Next on the Specify stack details and Configure stack options pages.
- You will be able to preview the changes before you click Update stack to confirm the CloudFormation changes to resources.
- Your IAM role and AWS account access should now be updated with the latest permissions, allowing you to take advantage of any new functionality that is released.