How to configure Okta SSO with CloudRanger
Overview
This article provides the steps to configure SSO for CloudRanger (DCP) using Okta as IdP.
Note: CloudRanger only supports service provider initiated SSO from the CloudRanger console. IDP-based SSO directly from Okta is not supported.
The configuration is performed in the following order:
-
Configure the CloudRanger SSO application on Okta.
-
Contact Druva Support to get the SSO configuration set up in CloudRanger.
-
Update the CloudRanger SSO application on Okta with the correct ‘Assertion Consumer Service URL’ and ‘SP Entity ID’.
Procedure
Step 1: Configure the CloudRanger SSO application on Okta
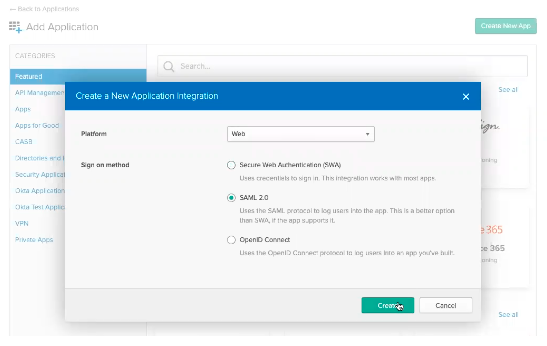
- Create a new web application in Okta, select the Sign on method as SAML 2.0, and click Create.
-
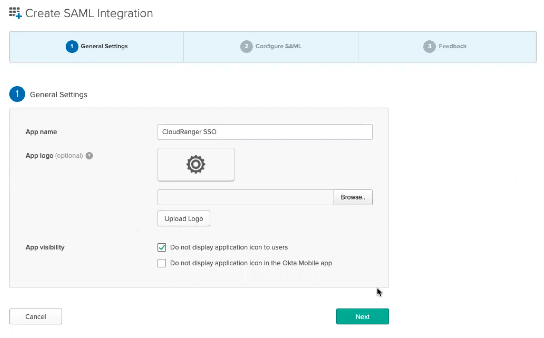
Name the App, select the Do not display application icon to users checkbox, and click Next.
-
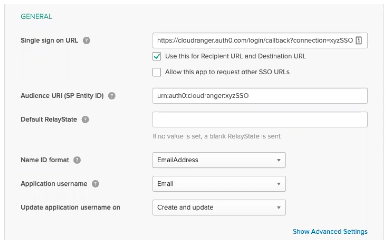
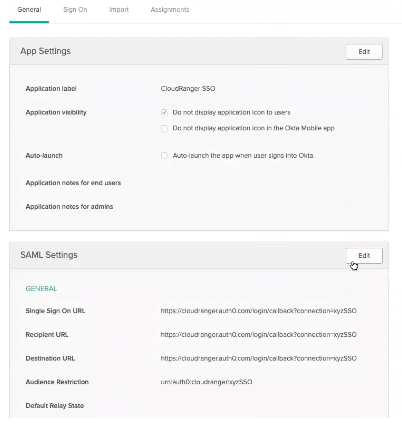
Use the following values in the General Section.
- Single Sign on URL: https://cloudranger.auth0.com/login/...nection=XYZSSO
- Audience Restriction: urn:auth0:cloudranger:XYZSSO
- Name ID format: EmailAddress
- Application username: Email
-
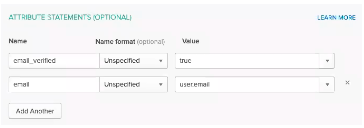
Add the following parameter values in the Attribute Statements section and then click Next.
- email_verified: true
- email: user.email
-
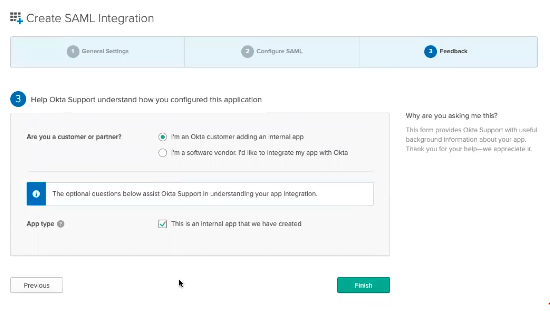
Select the App type as Internal and click Finish.
-
Now that the App is created, click View Setup Instructions under the Sign On tab and copy the Identity Provider Single sign-On URL, and then save it in a notepad.
-
Download the X509 certificate and save this as well.
Step 2: Contact Druva Support to get the SSO configuration setup in CloudRanger
-
Contact Druva Support and provide the following information so that the configuration can be completed in CloudRanger backend.
- Identity Provider Single sign-On URL that you copied in the previous step
- X509 certificate that you downloaded
- The email domain(s) your users will be logging in with, such as "example.com"
- The SAML sign out URL (optional)
-
Druva Support will provide you the correct values for the following parameters once SSO has been configured in the backend.
- Single Sign on URL
- Audience Restriction
Step 3: Update the CloudRanger SSO application on Okta
-
Open the CloudRanger SSO application in Okta and go to the General tab.
-
Click the Edit button under SAML Settings.
-
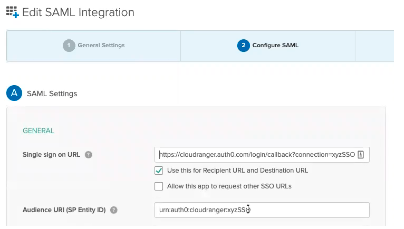
In the Configure SAML section, update the provided values for the following attributes.
- Single sign on URL
- SP Entity ID
-
SSO is now set up correctly and you can use your email address to sign in to CloudRanger.