Ransomware data recovery guide for Endpoints and Servers
- Use this document for data recovery only if your organization has encountered ransomware or malware attack.
- You must have Ransomware Recovery add on license enabled to use these features.
Endpoints data recovery
Here are different ways to recover Endpoints data. Choose the way that suits your organization's requirements.
- Recover using AWS Workspace
- Format existing impacted devices (OS reinstall) or provision a new device
- Use the same impacted devices as target for restores
Recover using AWS Workspace
This approach has the following benefits:
- Provides quickest data recovery with minimal downtime
- Allows infosec administrators to perform security-related investigations in an isolated environment to recover data
Procedure
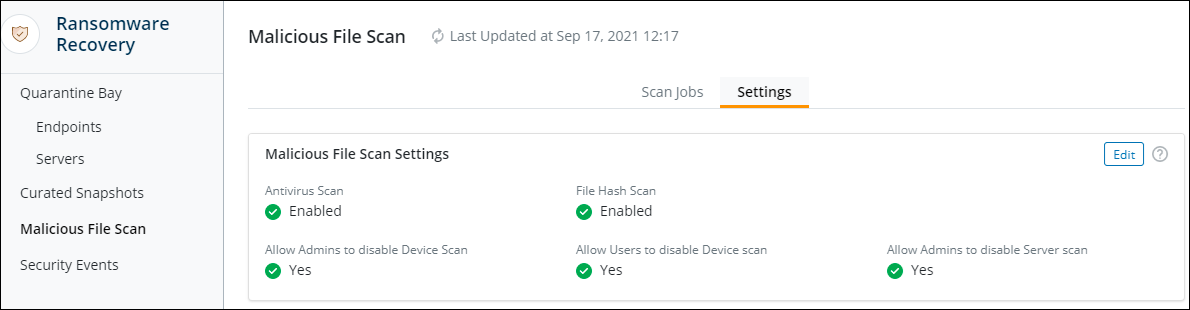
- Scan the files before you restore them by enabling the Malicious File Scan under Cyber Resilience > Ransomware Recovery. For more information, see Enable Malicious File Scan.
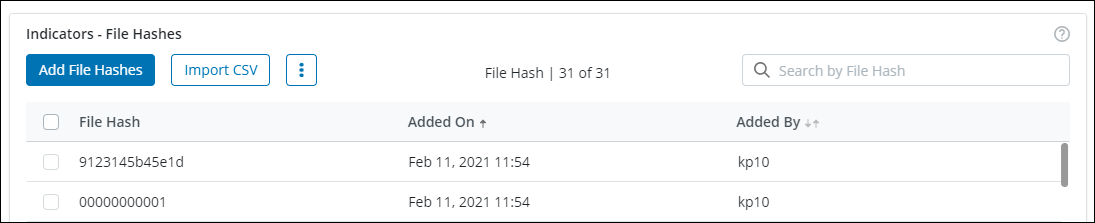
- When you have identified a set of malicious files doing rounds in your organization, you can add or import the SHA1 value of those files so that Druva scans the data for those hash values. Whenever Druva finds a match, it will block the file from being restored. For more information, see Add file hash values of malicious files for scanning
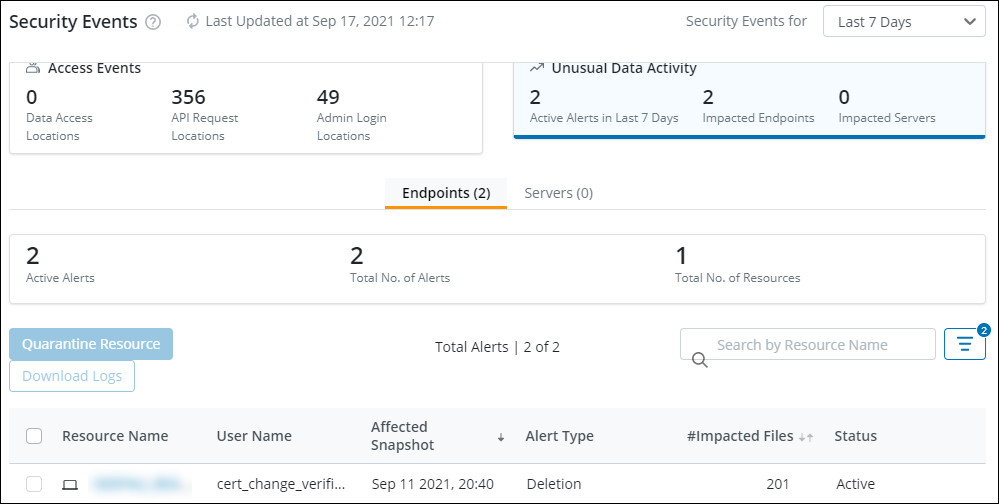
- Identify the impacted users or devices using the Unusual Data Activity feature.
-
Mass Deploy AWS workspaces based on the number of impacted devices. For more information on Mass deployment of workspaces in a Microsoft AD environment, see https://aws.amazon.com/blogs/publicsector/automating-deployment-amazon-workspaces-active-directory-group/
-
Mass deploy Endpoints agent to auto-activate the workspaces without the auto-restore switch using Integrated Mass Deployment. For more information, see Integrated Mass Deployment.
-
Initiate mass restores using Druva Restore API on all impacted Endpoints. For more information see https://developer.druva.com/reference#post_endpoints-v1-restores
Note:
- You must build the automation around automating the bulk restores using the restore API.
- We recommend you to restore to a custom location to avoid restore failures as Workspaces have user profiles on the D:Volume and System volume is not accessible.
Format existing impacted devices (OS reinstall) or provision a new device
Procedure
- Scan the files before you restore them by enabling the Malicious File Scan under Cyber Resilience > Ransomware Recovery. For more information, see Enable Malicious File Scan.
-
When you have identified a set of malicious files doing rounds in your organization, you can add or import the SHA1 value of those files so that Druva scans the data for those hash values. Whenever Druva finds a match, it will block the file from being restored. For more information, see Add file hash values of malicious files for scanning
-
Identify the impacted users or devices using the Unusual Data Activity feature.
-
Format or re-deploy new OS on the impacted devices.
-
Mass deploy Endpoints agent to auto-activate the workspaces without the auto-restore switch using Integrated Mass Deployment.
-
Initiate mass restores using Druva Restore API on all impacted devices. See https://developer.druva.com/reference#post_endpoints-v1-restores
Note: You must build the automation around automating the bulk restores using the restore API.
Use the same impacted devices as target for restores
Procedure
- Scan the files before you restore them by enabling the Malicious File Scan under Cyber Resilience > Ransomware Recovery. For more information, see Enable Malicious File Scan.
-
When you have identified a set of malicious files doing rounds in your organization, you can add or import the SHA1 value of those files so that Druva scans the data for those hash values. Whenever Druva finds a match, it will block the file from being restored. For more information, see Add file hash values of malicious files for scanning
-
Identify the impacted users or devices using the Unusual Data Activity feature.
-
Initiate mass restores using Druva Restore API on all impacted Endpoints. See https://developer.druva.com/reference#post_endpoints-v1-restores
Note: You must build the automation around automating the bulk restores using the restore API.
File-Server data recovery
Here are different ways to recover File Server data. Choose the way that suits your organization's requirements.
- Recover data using AWS EC2
- Set up a new file server or virtual machine or format existing impacted file server(OS reinstall)
Recover data using AWS EC2
This approach has the following benefits:
- Provides quickest data recovery with minimal downtime
- Allows infosec administrators to perform security-related investigations in an isolated environment to recover data
Procedure
-
Scan the files before you restore them by enabling the Malicious File Scan under Cyber Resilience > Ransomware Recovery. For more information, see Enable Malicious File Scan.
-
When you have identified a set of malicious files doing rounds in your organization, you can add or import the SHA1 value of those files so that Druva scans the data for those hash values. Whenever Druva finds a match, it will block the file from being restored. For more information, see Add file hash values of malicious files for scanning
-
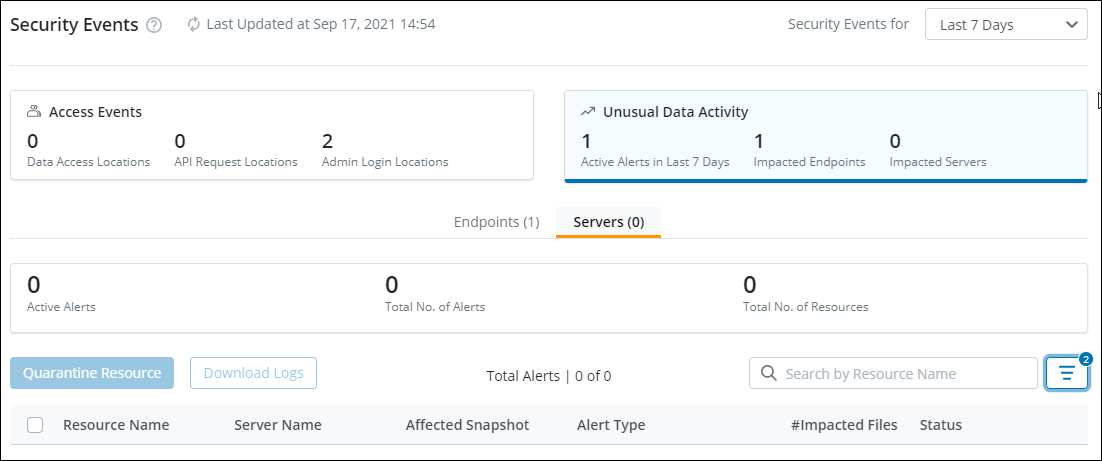
Identify the impacted users or devices using the Unusual Data Activity feature.
-
Set up Phoenix for backup and restore of files and folders.
-
Deploy an EC2 instance with the right resources and storage
-
Install the operating system
-
Install the file server agent and register the server. For more information, see Install the agent and register the server.
-
Initiate a restore from the latest snapshot in the backup set or identify a clean snapshot and then initiate a restore. For more information, see Restore files and folders.
Set up a new file server or virtual machine or format existing impacted file server(OS reinstall)
Procedure
- Scan the files before you restore them by enabling the Malicious File Scan under Cyber Resilience > Ransomware Recovery. For more information, see Enable Malicious File Scan.
-
When you have identified a set of malicious files doing rounds in your organization, you can add or import the SHA1 value of those files so that Druva scans the data for those hash values. Whenever Druva finds a match, it will block the file from being restored. For more information, see Add file hash values of malicious files for scanning
-
Identify the impacted users or devices using the Unusual Data Activity feature.
-
To set up a new file server, install the file server agent and register the server. For more information, see Install the agent and register the server. Initiate a restore from the latest snapshot in the backup set or identify a clean snapshot and then initiate a restore to the new file server. For more information, see Restore files and folders to an alternate file server.
-
If the impacted file server is formatted and OS is reinstalled, you must re-register the same server. For more information, see File Server Re-registration. Initiate a restore from the latest snapshot in the backup set or identify a clean snapshot and then initiate a restore to the same or original file server. For more information, see Restore files and folders to the original file server.
NAS data recovery
Here are different ways to recover NAS data. Choose the way that suits your organization's requirements.
- Set up a new NAS share in AWS
- Set up a new NAS share or format the existing impacted NAS device (OS reinstall)
Set up a new NAS share in AWS
This approach has the following benefits:
- Provides quickest data recovery with minimal downtime
- Allows infosec administrators to perform security-related investigations in an isolated environment to recover data
Procedure
-
Scan the files before you restore them by enabling the Malicious File Scan under Cyber Resilience > Ransomware Recovery. For more information, see Enable Malicious File Scan.
-
When you have identified a set of malicious files doing rounds in your organization, you can add or import the SHA1 value of those files so that Druva scans the data for those hash values. Whenever Druva finds a match, it will block the file from being restored. For more information, see Add file hash values of malicious files for scanning.
-
Identify the impacted users or devices using the Unusual Data Activity feature.
-
Register a new NAS proxy in AWS. For more information, see Add and activate a NAS proxy.
-
Set up a new NAS box by adding the NAS device and mapping it to a NAS proxy. For more information, see Add a NAS device.
-
Add a NAS share to the already configured new NAS device on the Phoenix Management Console. For more information, see Add a NAS share.
-
Initiate a restore from the latest snapshot in the backup set or identify a clean snapshot and then initiate a restore. For more information, see Restore a NAS share.
Set up a new NAS share or format the existing impacted NAS device (OS reinstall)
Procedure
- Scan the files before you restore them by enabling the Malicious File Scan under Cyber Resilience > Ransomware Recovery. For more information, see Enable Malicious File Scan.
-
When you have identified a set of malicious files doing rounds in your organization, you can add or import the SHA1 value of those files so that Druva scans the data for those hash values. Whenever Druva finds a match, it will block the file from being restored. For more information, see Add file hash values of malicious files for scanning.
-
Identify the impacted users or devices using the Unusual Data Activity feature.
-
Set up a new NAS box by adding the NAS device and mapping it to a NAS proxy. For more information, see Add a NAS device.
-
Add a NAS share to the already configured new NAS device on the Phoenix Management Console. For more information, see Add a NAS share.
-
Initiate a restore from the latest snapshot in the backup set or identify a clean snapshot and then initiate a restore. For more information, see Restore a NAS share.
OR
If the impacted NAS share was cleaned or the NAS box was formatted then initiate a restore from the latest snapshot to the same share using the restore to original option. For more information, see Restore a NAS share.