Curated Snapshot for M365
Overview
Curated Snapshot is a unique version of snapshot that is a collection of the latest, safest, and most secure versions of files/folders in a single snapshot. The Curated Snapshot is created by processing files from multiple snapshots within a specified date range. The files are processed and scanned for the following Indicators of Compromise:
- Anti-Virus
- File hash match
- File extensions exclusion and encryption check
Note: The anti-virus scan and Indicators of Compromise (IOC) scan happen irrespective of the value provided for the excludeFileHashes parameter while creating Curated Snapshot using API.
After the files/folders are scanned for all the above-mentioned indicators, a Curated Snapshot is created for that user and is available for restore from the Users page for OneDrive and from the Restore page for Sharepoint.
By default, Curated Snapshot is the selected snapshot available for restoring Microsoft 365-OneDrive and Sharepoint data if the Ransomware Recovery service is enabled for your organization and administrators have created a Curated Snapshot for Microsoft 365 - OneDrive and Sharepoint.
Now that you know what a Curated Snapshot is, let us understand the workflow of how to use them.
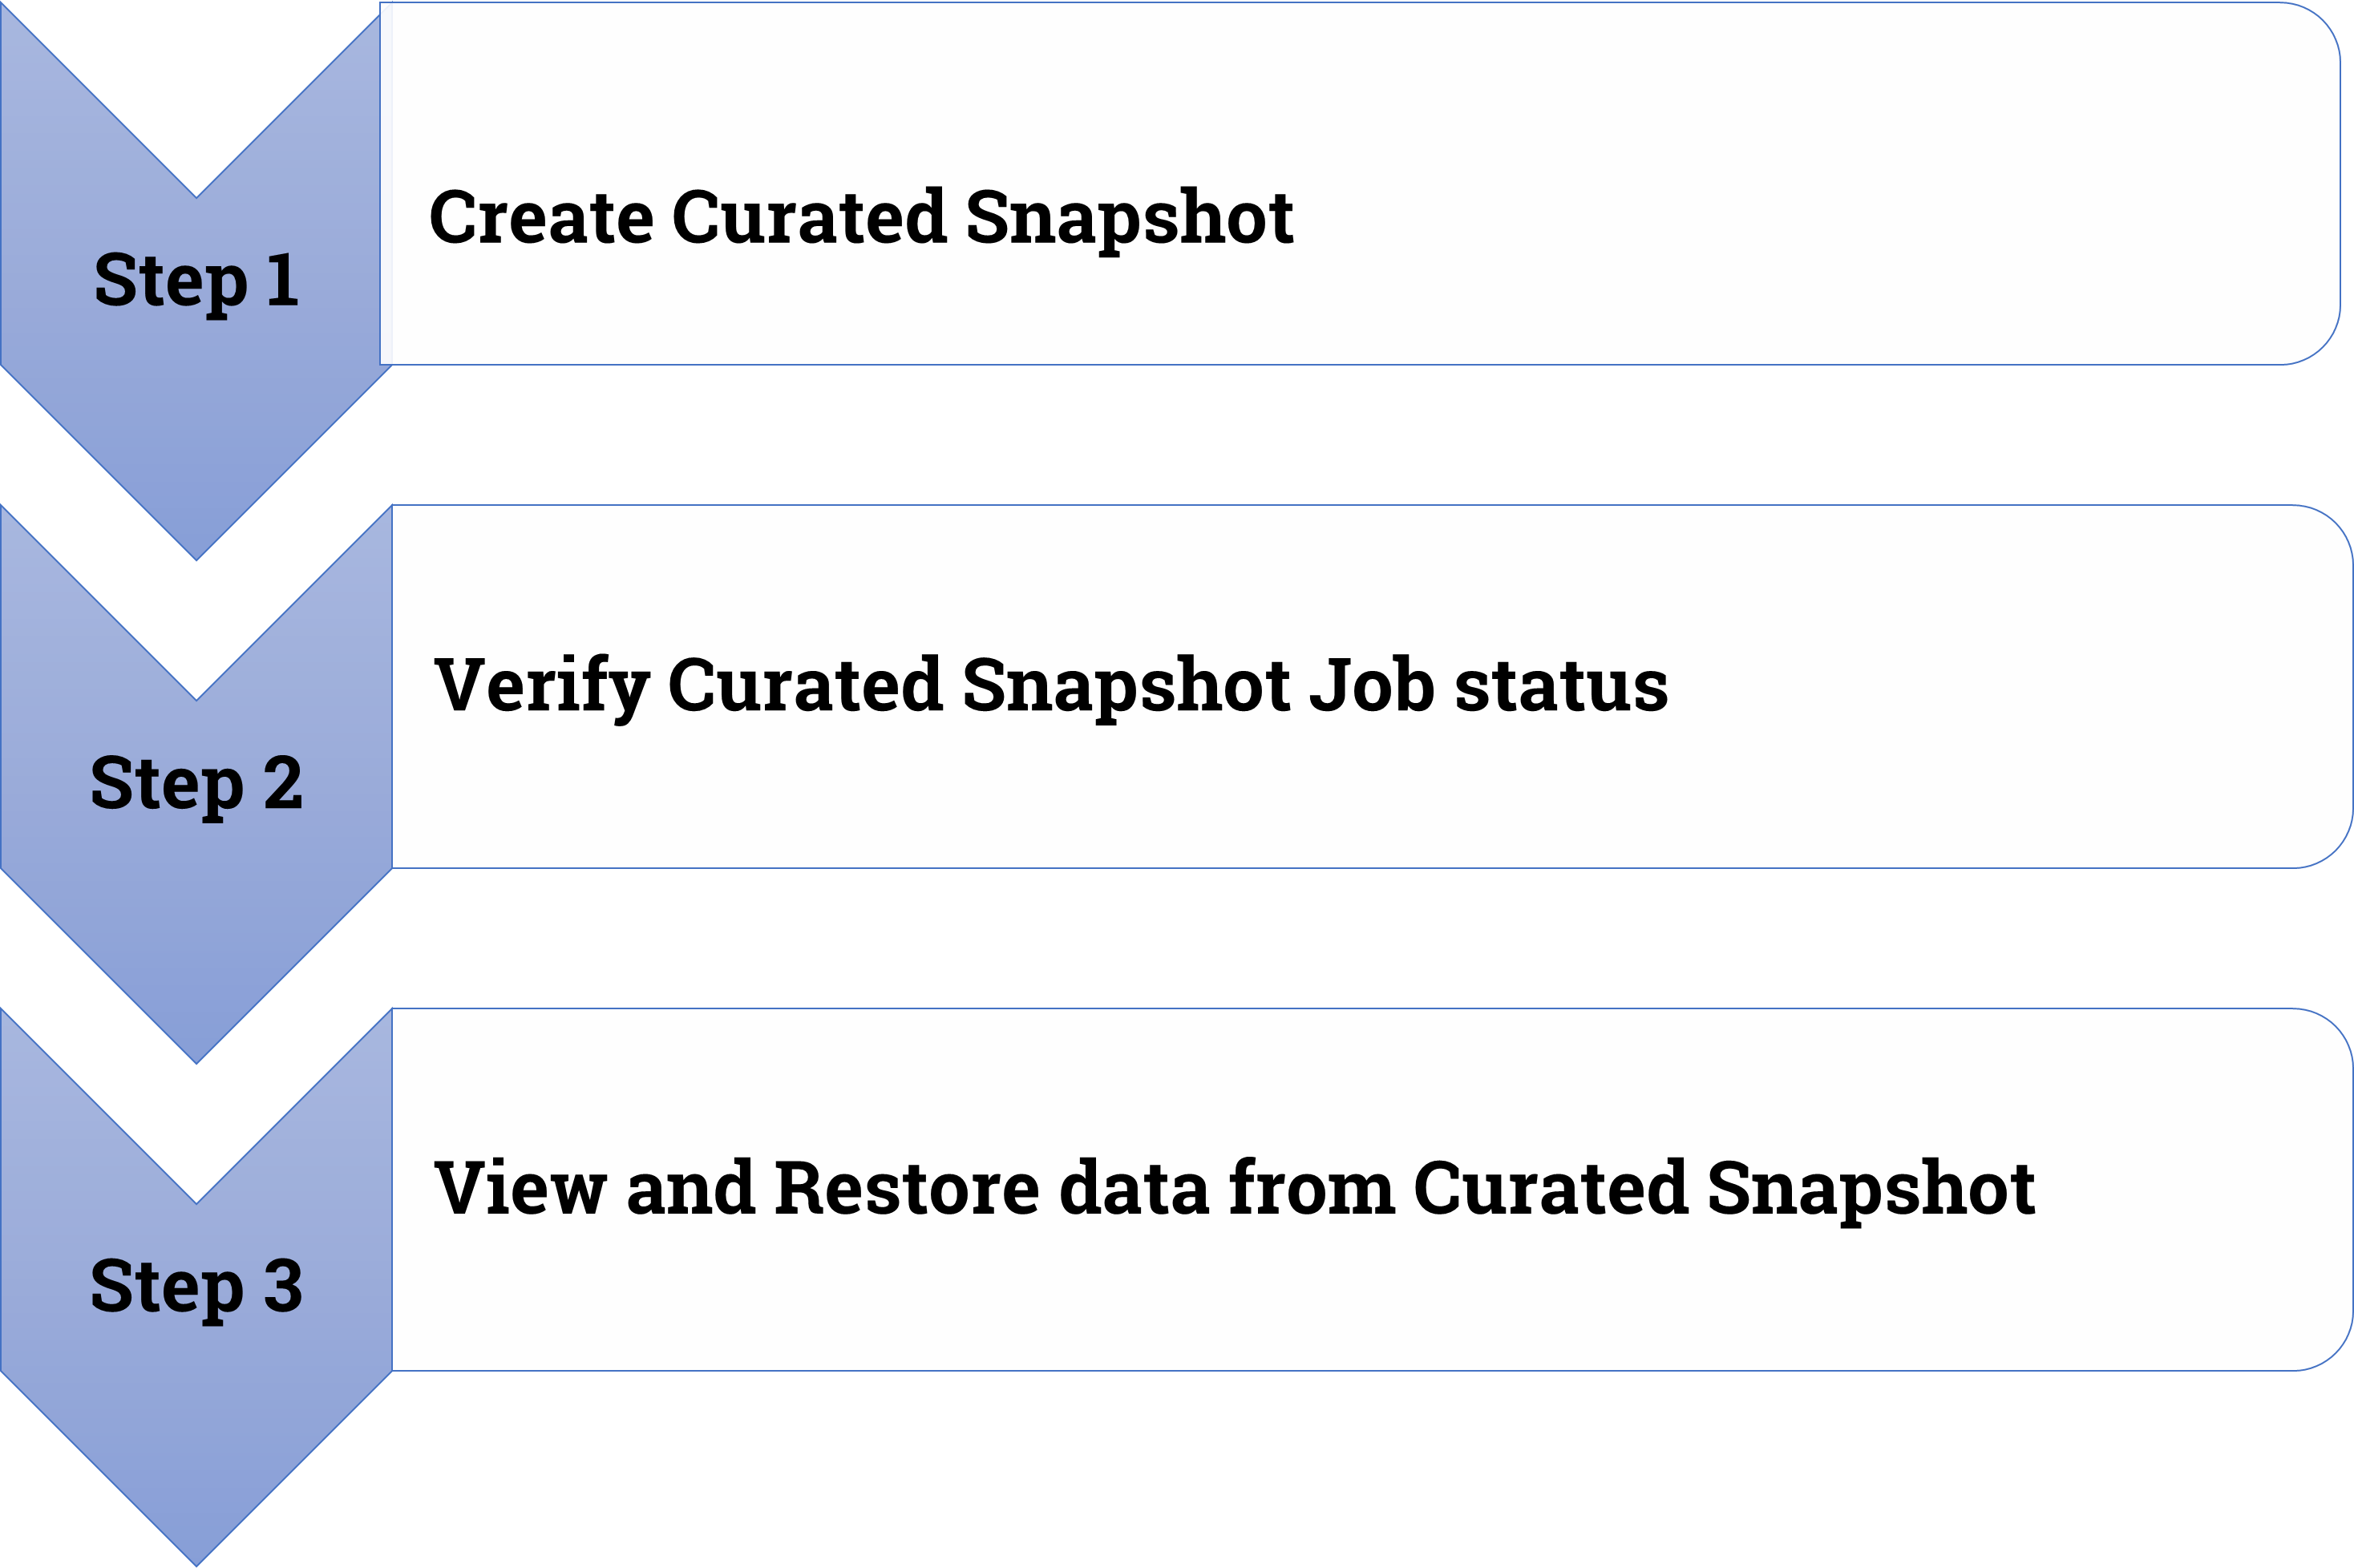
Create a Curated Snapshot for OneDrive
You can create only one active Curated Snapshot per user per device at a given point in time. However, if one user is associated with two devices, the user can have one active Curated Snapshot for each of these devices.
Procedure
- Log in to Druva Cloud Platform (DCP) Console.
- On the DCP Console dashboard, under Cyber Resilience, click the Ransomware Recovery service.
- On the left pane, click Curated Snapshots > Create Curated Snapshots. The Resources page appears.
- Select User's Datasources from the Resource Type dropdown and then select the checkbox for OneDrive from Data Sources.
- Search for the OneDrive users for which you want to create Curated Snapshot using either or a combination of the Profiles and Users.
- Select the OneDrive Resource Name for which you want to create the snapshots and click Next.
- On the Snapshot Response page, enter the Snapshot Parameters for the creation of the snapshot.
- Click Finish. A Malicious File Scan or restore scan job is executed for all the snapshots for the mentioned date range. After the scan is complete, the most recent cleanest versions of the files are encapsulated to generate and create a single Curated Snapshot.
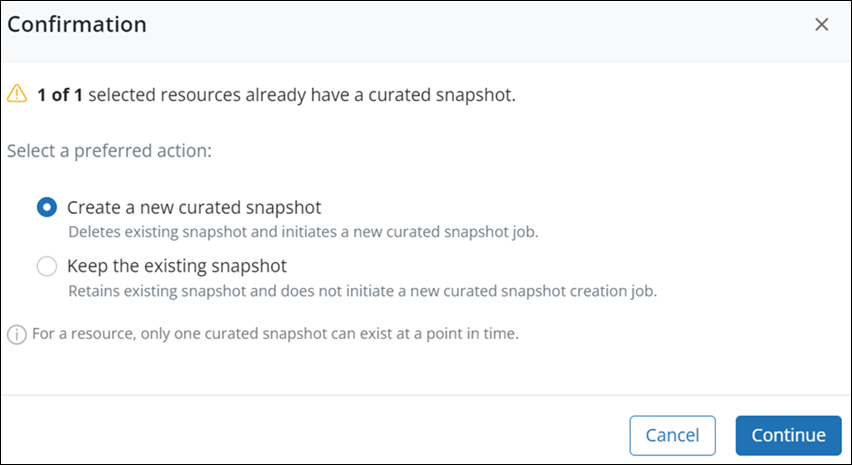
- If an active Curated Snapshot already exists for a user for a device, you will have the following options:
- Create a new one and delete the existing one
OR
- Keep the existing snapshot
Select the option as per your organization's requirements and click Continue.
You can view the status of Curated Snapshot creation on the Jobs page.
Create a Curated Snapshot for Sharepoint
You can create only one active Curated Snapshot per site at a given point in time.
Procedure
- Log in to Druva Cloud Platform (DCP) Console.
- On the DCP Console dashboard, under Cyber Resilience, click the Ransomware Recovery service.
- On the left pane, click Curated Snapshots > Create Curated Snapshots. The Resources page appears.
- Select SaaS Org Apps from the Resource Type dropdown. and then select SharePoint from App Type dropdown.
- Search for the Sharepoint site for which you want to create Curated Snapshot using either the site URL or site title search criteria and click Search. The Sharepoint sites list appears.
- Select the Sharepoint site for which you want to create the snapshots and click Next.
- On the Snapshot Response page, enter the Snapshot Parameters for the creation of the snapshot.
- Click Finish. A Malicious File Scan or restore scan job is executed for all the snapshots for the mentioned date range. After the scan is complete, the most recent cleanest versions of the files are encapsulated to generate and create a single Curated Snapshot.
- If an active Curated Snapshot already exists for a user for a device, you will have the following options:
- Create a new one and delete the existing one
OR
- Keep the existing snapshot
Select the option as per your organization's requirements and click Continue.
You can view the status of Curated Snapshot creation on the Jobs page.
Snapshot Details page
The following table details the Snapshot Parameters for creating a Curated Snapshot.
| Field | Description |
|---|---|
|
Date Range |
Define a date range from which you want the snapshots to be processed and scanned for creating a Curated Snapshot. Start Date: Select a Start Date. End Date: Automatically calculated. The Date displayed here can either be the current date or 180 days from the start date, whichever is the nearest. The maximum limit for the date range is 180 days. For example, if today's date is Aug 5, 2021. You select July 1, 2021, as the start date. In this case, 180 days is a futuristic date. Hence, the end date will be today's date/current date i.e. Aug 5, 2021, 23:59:59 PM. |
| Retain Snapshot for |
The number of days until which the Curated Snapshot will be retained and can be restored. By default, the retention period is 15 days. The maximum limit for retention is 30 days. |
| Indicators of Compromise |
Define the indicators by which you want the snapshots should be scanned for malicious data. By default, files within the snapshots are scanned for encryption checks, anti-virus, and pre-defined file hash matches. Select the Exclude file extensions checkbox, and specify the file extensions to exclude those files from Curated Snapshot. By default, a case-insensitive file extension match is used for file extension exclusion comparison. Toggle the button to enable and allow case-sensitive comparison. |
Know how the Curated Snapshot is created
Here's an example that explains how the Curated Snapshot is created based on the defined Date Range and Indicators of Compromise (Anti-Virus, File Hash match, file extensions exclusion, or encryption) encountered or detected.
Resource Name: SharePoint Engineering site
Resource Type: SharePoint
| Snapshot - Create date | Version | Files | Action |
|---|---|---|---|
| Snapshot 1 - Aug 1, 2021 | 16 | file 1, file 2, file 3 | Files added |
| Snapshot 2 - Aug 1, 2021 | 17 | file 1, file 2, file 3 | No change |
| Snapshot 3 - Aug 2, 2021 | 18 | file 1, file 2, file 3, file 4, file 5, and file 6 |
Added: file 4, file 5, and file 6 Modified: file 1 |
| Snapshot 4 - Aug 2, 2021 | 19 | file 1, file 3, file 4, file 5, and file 6 | Deleted: file 2. |
For the creation of a Curated snapshot the maximum date range limit is 180 days.
Assume that today's date is Aug 5, 2021.
- If you select Jan 1, 2020 as the start date, the end date will be Jan 1, 2020, +180 days.
- If you select July 1, 2021 as the start date, +180 days is a futuristic date. Therefore, the current date/today's date is considered as the end date. i.e Aug 5, 2021, 23:59:59.
In the case of the above example, if you select July 1 as the Start Date, the End Date will be Aug 5, 2021, 23:59:59. Once the date range is defined, the scan job is executed on Snapshot versions 16, 17, 18, and 19.
During the scan, file hash match is detected for file 1, and file extensions exclusion is detected for file 5 in version 18. The file 1 in version 18 is skipped from Curated Snapshot.
The scan is then performed on a previous version (version 16) that contains file 1. If the scan does not detect any Indicators of Compromise that indicate any malicious attacks on the file, then, file 1 from version 16 is considered for the creation of Curated Snapshot. Also, file 5 will not be included in the Curated Snapshot.
So, the final Curated Snapshot created will include:
- Version 16: file 1, file 2,and file 3
- Version 18: file 4 and file 6
Verify Curated Snapshot Job status
Whenever you submit a request for Create Curated Snapshot, a scan job is initiated. You can monitor and manage all the scan jobs from the Jobs tab. The Last Updated at timestamp is displayed beside the page heading to help you understand when the details of the page were last updated.
Only after the job is complete, the Curated Snapshot gets created. You can view a summary of the scan job from the Jobs page.
For Curated Snapshot, jobs are retained for 180 days.
You can cancel an ongoing job if you initiated the request by mistake or no longer need to create Curated Snapshot.
Click the Job ID to view the following job details:
| Fields | Description |
|---|---|
| Job Details section | |
| Job ID | The unique ID of the scan job. |
| Resource Name | The name of the data source. |
| Resource Type | The type of the data source. Example: SharePoint |
| Site Type (Only for SharePoint) | The Sharepoint Site type. |
| Site URL(Only for SharePoint) | The URL details of the SharePoint site. |
| User Name (Only for OneDrive) | The name of the user to whom the OneDrive belongs. This field is only displayed when the data source is OneDrive. |
| Created By | The name of the administrator who initiated the job. |
| Start Time | The time when the scan job was initiated. The details are displayed in UTC timezone. |
| End Time | The time when the scan job finished. If the job ended prematurely due to cancelation, or due to failure, this field displays that timestamp. The details are displayed in UTC timezone. |
| Snapshot Creation Status |
The current status of the job. It can be any of the following:
|
| Curated Snapshot section | |
| Snapshot | The name of the snapshot. |
| Size | The size of the snapshot. |
| Date Range | The start and end date selected for the creation of the snapshot. |
| Retained Till | The date and timestamp when the snapshot will expire. |
| #Files Included | The count of files included for snapshot creation. |
| Snapshot Availability |
Status of the snapshot which can be any one of the following:
|
You can download the report to view the details of the scanned files.
Download Report
On the Jobs details page, click Download Report to download the report of the Curated Snapshot to view details of the malicious files within this snapshot. The report is downloaded in <Druva_CuratedSnapshot_JobID_<JobIDnumber>_<curatedsnapshotname>.csv.zip format. For example, <Druva_CuratedSnapshot_JobID_45_Sep_16_2021_12_02>.csv.zip .
Expand the zip folder to view the CSV file. The CSV file provides the following details.
| Field | Description |
|---|---|
| File Name | Name of the scanned file. |
| File Type | Type of file. It can be either a file or folder. |
| Path | Location of the file. |
| Backup Folder | The folder from which the file is created. |
| Modified time |
Date and timestamp when modifications were made to the file. This is the administrator's timezone. For example, Jun 23, 2020 15:04. |
| Is Skipped from Curated Snapshot |
Displays "True" if the file was skipped for Curated Snapshot. Displays "False" if the file was not skipped from Curated Snapshot. |
| Reason to skip from Curated Snapshot | Details of why the file was skipped. |
| Snapshot Name |
Name of the snapshot from which the file is used for the creation of Curated Snapshot. For example, Tue Aug 31 12:23:43 2021. |
Delete Snapshot
You cannot delete a snapshot that is a part of active Curated Snapshot.
You can delete the snapshots that are no longer required.
- On the Curated Snapshot dashboard, select the snapshot that you want to delete.
- On the Delete Snapshot confirmation pop-up, specify the reason for deletion (the reason is mandatory with a character limit between 10-150) and then click Delete. Snapshot once deleted cannot be retrieved. The reason for deletion will be captured in the Audit Trail for auditing purposes.
View and Restore data from Curated Snapshot
If you are reading this section, that means Curated Snapshot is created successfully and is listed in the Curated Snapshots > Snapshot tab.
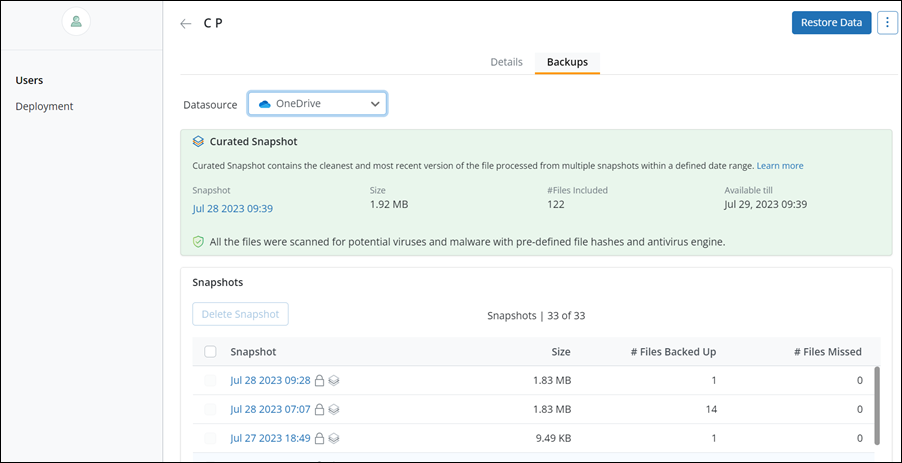
Procedure for OneDrive
- On the Curated Snapshots > Jobs tab, click the Job ID for OneDrive for which you want to perform a restore. The Job Details page appears.
- On the Job Details page > Curated Snapshot card, click on the snapshot to view and restore data. You will be redirected to the Users > Backups page. Ensure the selected Data Source is OneDrive.
The Curated Snapshot card is displayed and you can restore data from this snapshot. For more information, see Restore OneDrive data.
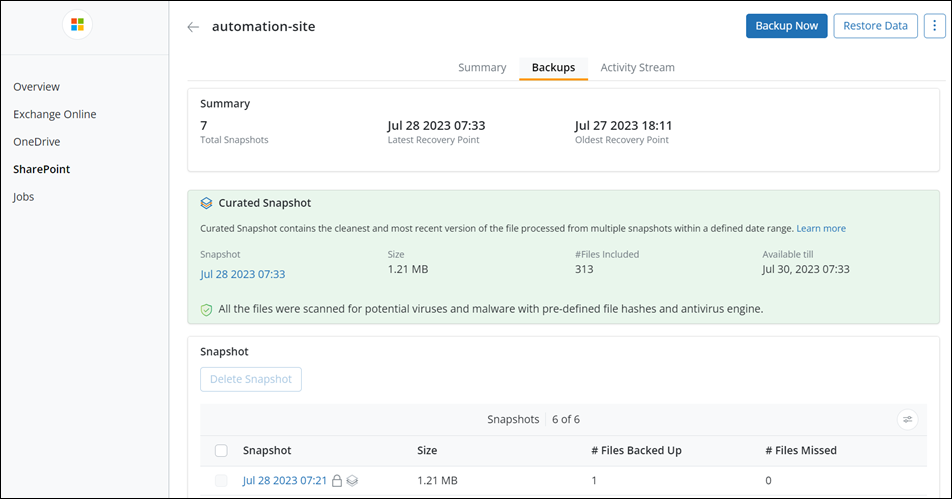
Procedure for SharePoint
- On the Curated Snapshots > Jobs tab, click the Job ID for SharePoint site for which you want to perform a restore. The Job Details page appears.
- On the Job Details page > Curated Snapshot card, click on the snapshot to view and restore data. You will be redirected to the SharePoint > Backups page.
The Curated Snapshot card is displayed and you can restore data from this snapshot. For more information, see Restore SharePoint data.
The ![]() icon is displayed beside the snapshots that are used for creating Curated Snapshot.
icon is displayed beside the snapshots that are used for creating Curated Snapshot.
By default, Curated Snapshot is the selected snapshot available for restoring OneDrive and Sharepoint data if the Ransomware Recovery service is enabled for your organization and administrators have created a Curated Snapshot for these resource types.
You cannot delete a snapshot that is a part of active Curated Snapshot.