Download, install, and activate CloudCache R3 on Linux
 Business
  Enterprise Elite
To configure CloudCache R3, you must deploy a Linux CloudCache virtual machine in your virtual infrastructure environment and then register the Linux CloudCache using an activation token.
Notes:
You must install CloudCache within the firewall limits of your remote office locations.
Ensure that you do not install any other services on the proxy server.
Perform the following steps:
-
Step 3: Deploy OVA for Linux Phoenix CloudCache using
Before you begin 
-
Ensure that the server on which you plan to install CloudCache matches the minimum requirements listed for CloudCache R3 under System requirements.
-
Upgrade your operating system to Ubuntu 22.04.
-
Instant Restore (IR) is not available on CloudCache R3. If you want to avail IR, do not upgrade your CloudCache to R3 and Operating System to the R3 version. Any virtual machines configured for IR are not upgradable to R3.
Step 1: Download the OVA for Linux CloudCache 
-
Login to the Management Console.
-
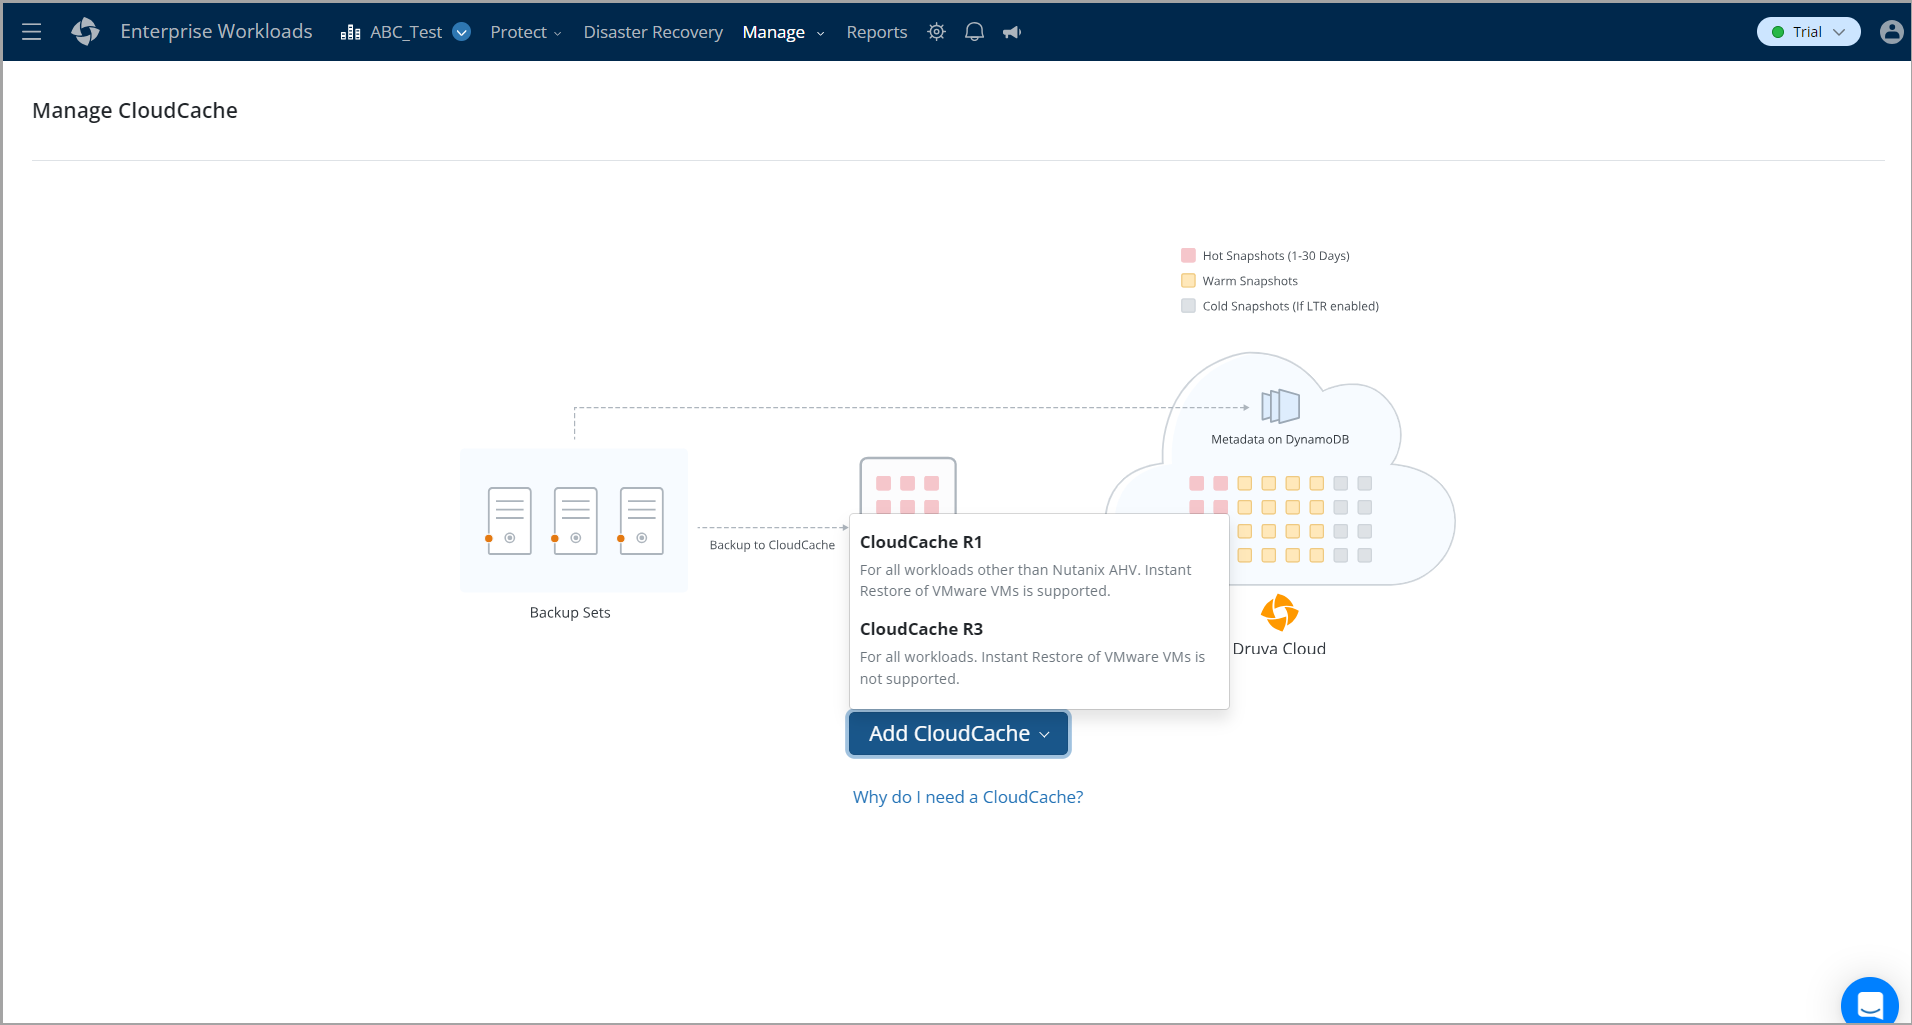
Click Manage > CloudCache. Note that if the All Organizations menu is enabled, you have to first select an organization and then click Manage > CloudCache.
-
Click Add CloudCache.
-
You will see a dropdown with two values – CloudCache R1 and CloudCache R3. Select R1 if you want to use Instant Restore.
-
On the Add CloudCache page, click Download.
-
Alternatively, you can go to the Downloads page and download the OVA directly.
The download page has two different sections for CloudCache R1 and CloudCache R3.
On the Downloads page, Select CloudCache Installer from the Select Agent drop-down list.
Step 2: Generate activation token
-
Click Add CloudCache.
-
Select the version of the CloudCache, R1 or R3.
-
To copy the activation token, in the Activate CloudCache section, click the copy icon
next to the Activation Token box.
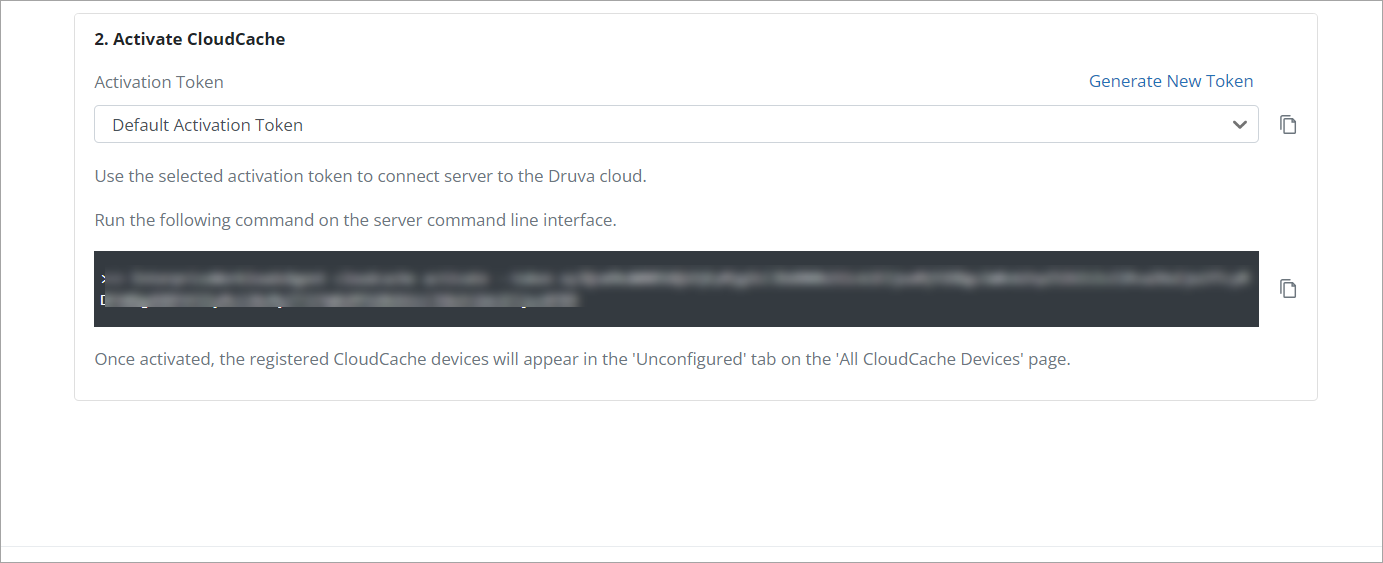
-
Copy this token to a simple text file, and save the file. Click Finish.
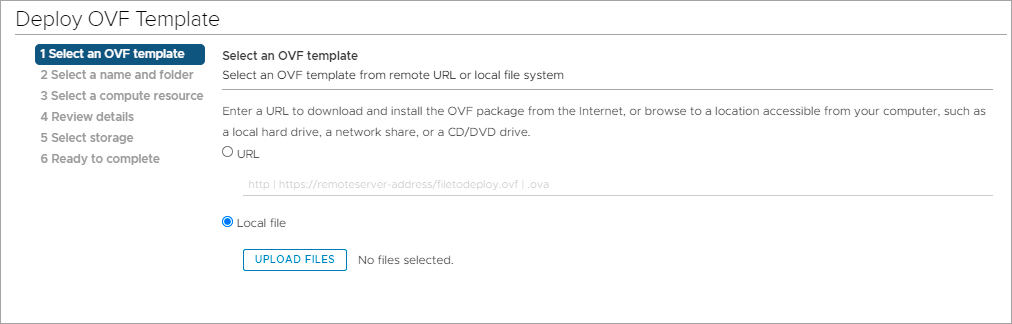
Step 3: Deploy OVA for Linux CloudCache using the vSphere Web Client 
-
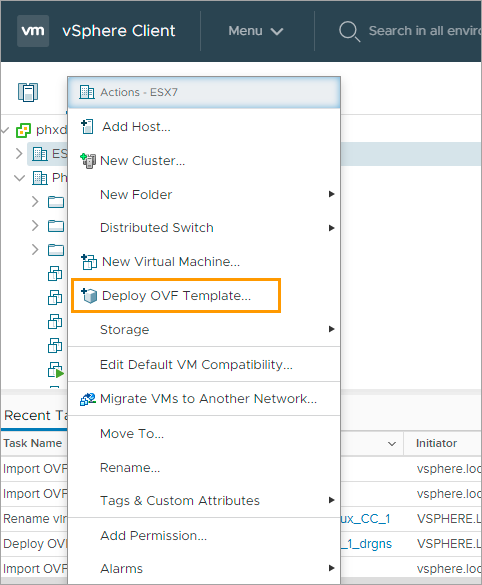
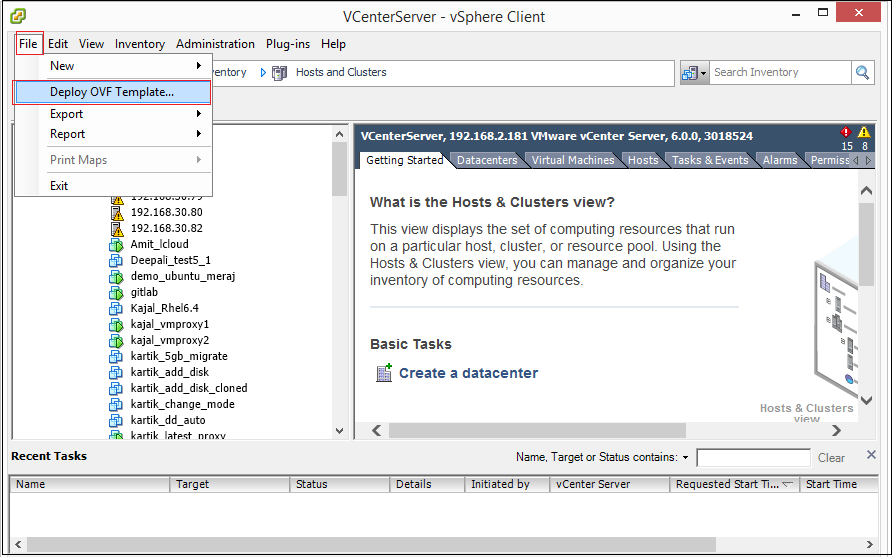
Log on to vCenter Server using vSphere Client.
-
From the File menu, click Deploy OVF Template.
-
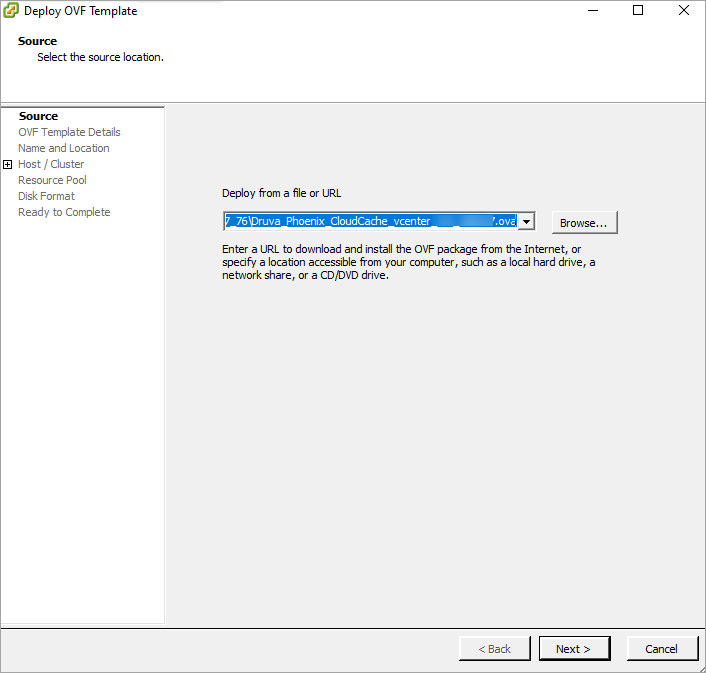
In the Deploy from a file or URL box, type or select the full path to the OVF template that you downloaded, and click Next.
-
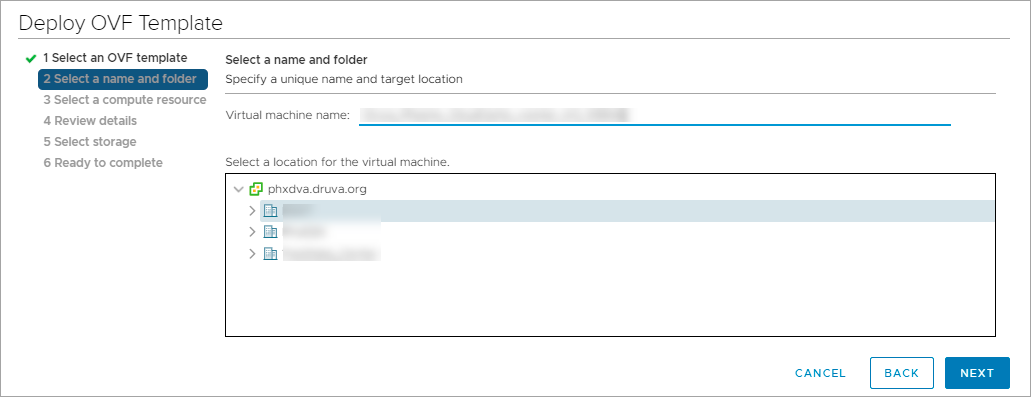
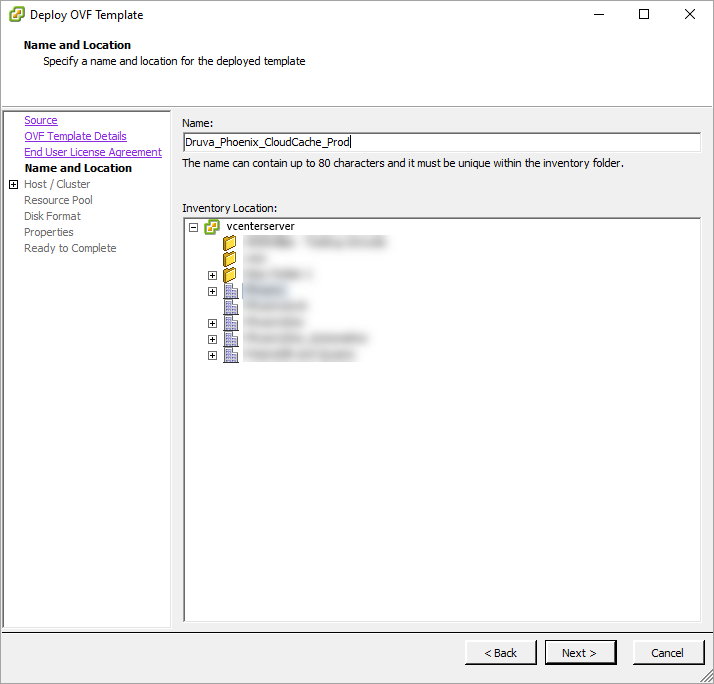
In the Name box, type a name for the template.
-
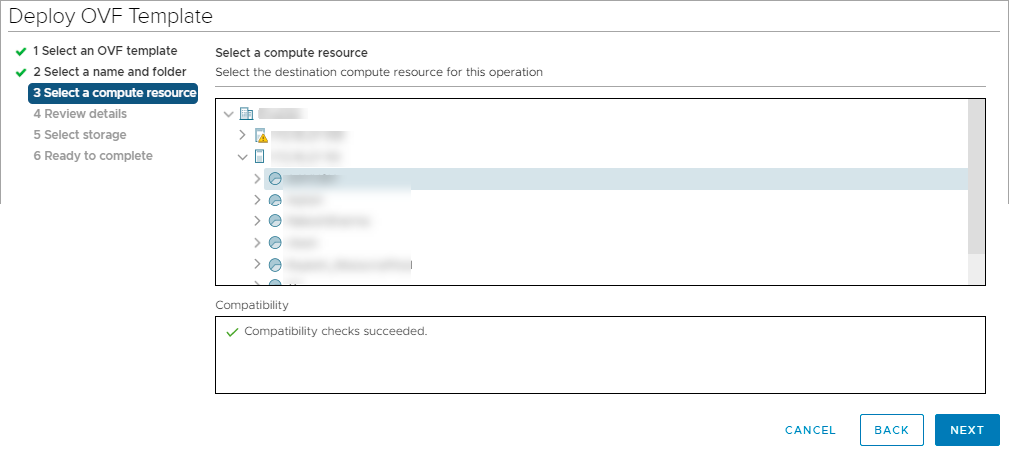
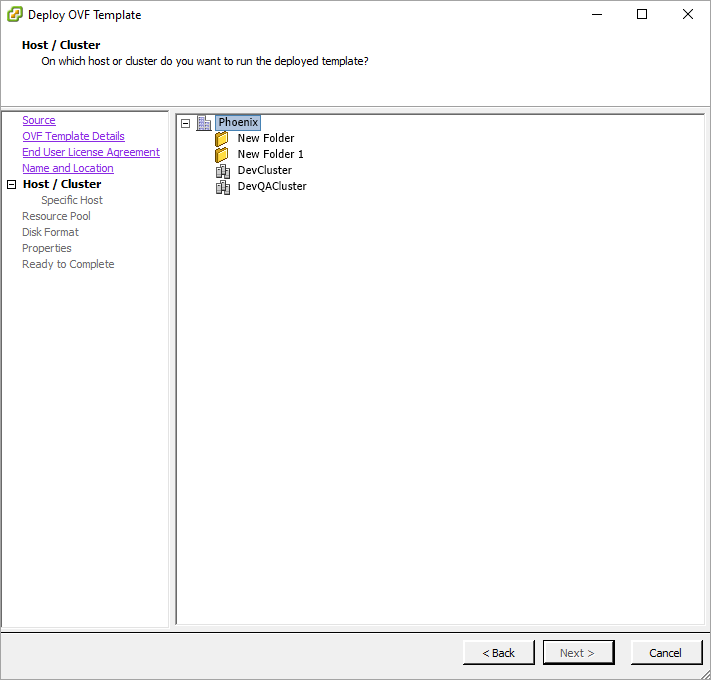
Select a host or a cluster on which you want to deploy Linux CloudCache and click Next.
-
From the list of resource pools, click the resource pool that you want to assign to this virtual machine, and click Next.
-
Review the details and click Next.
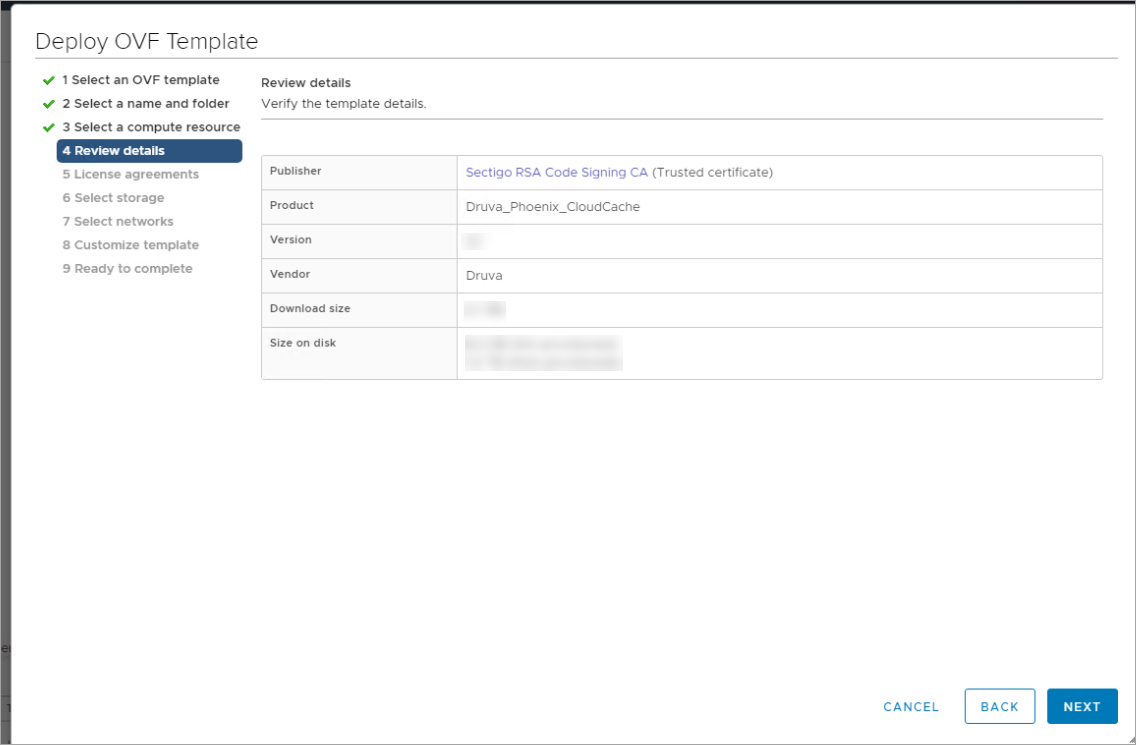
Note: The size on the disk cannot be changed during CloudCache deployment. You can, however, add or edit data volumes and increase or decrease disk size using LVM commands. For more info see the Data Volumes article. -
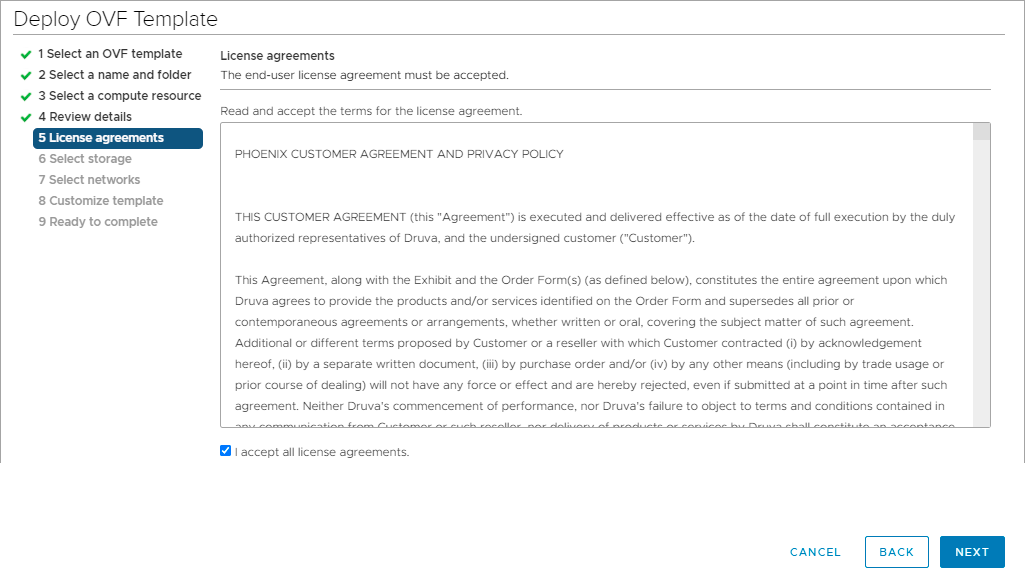
Click I Accept all license agreements to accept the End User License Agreement (EULA), and click Next.
-
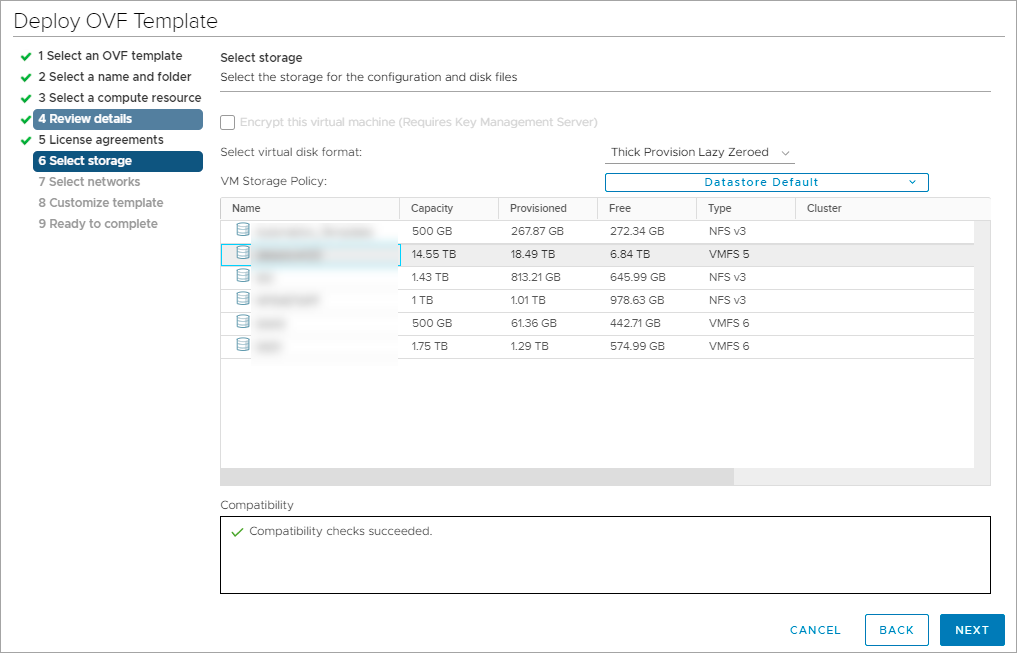
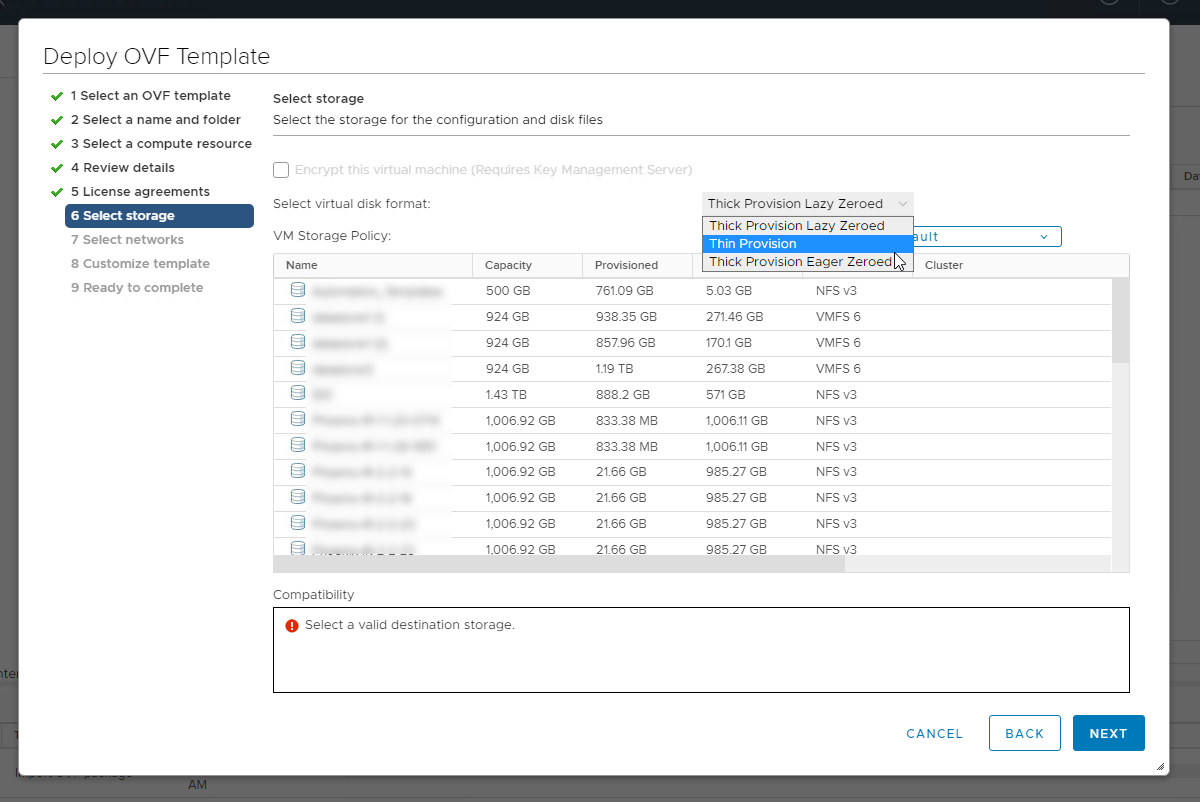
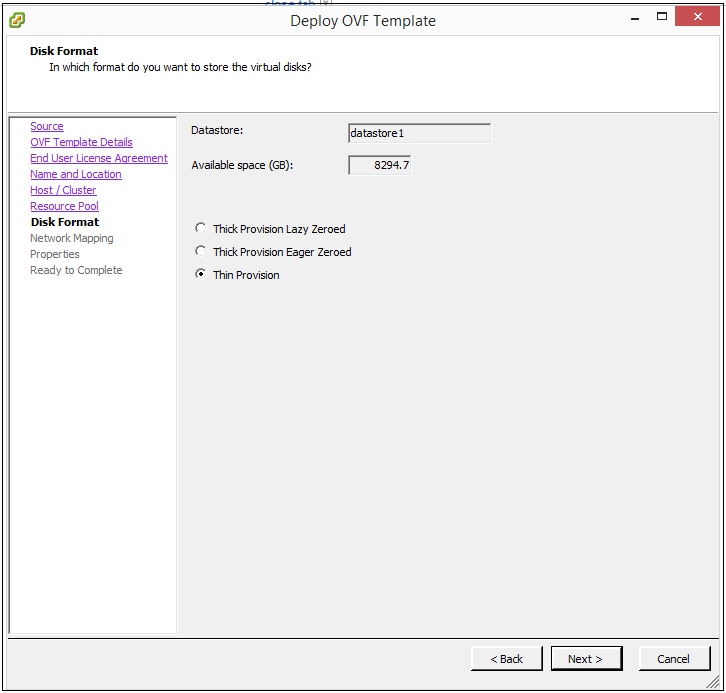
In the Select virtual disk format drop-down list, select a provisioning format:
-
Thick Provisioned Lazy Zeroed: If you select this format, a thick virtual disk is created, and the existing data is lazy zeroed (existing data on the provisioned storage are cleared when the virtual machine writes to the storage for the first time).
-
Thick Provisioned Eager Zeroed: If you select this format, a thick virtual disk is created, and the existing data is eager zeroed (existing data on the provisioned storage is overwritten with zeroes at the time of creating the virtual machine).
-
Thin Provisioned: If you select this format, a thin virtual disk is created.
-
-
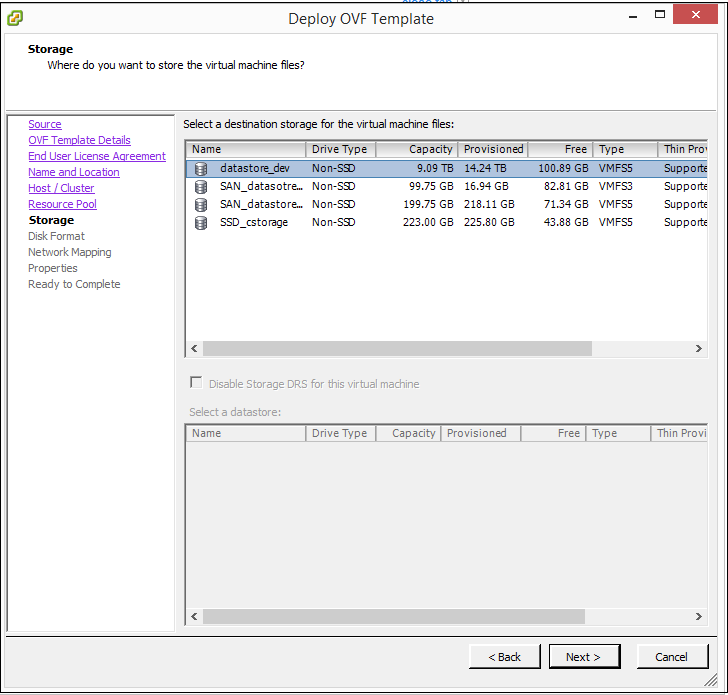
Select destination storage, and click Next. If you created storage profiles, click the storage profile that you want to assign to the virtual machine. From the list of storage, click storage that you want to set as destination storage for this virtual machine.
Note: You can change the disk type to Thin Provision to save storage space.
-
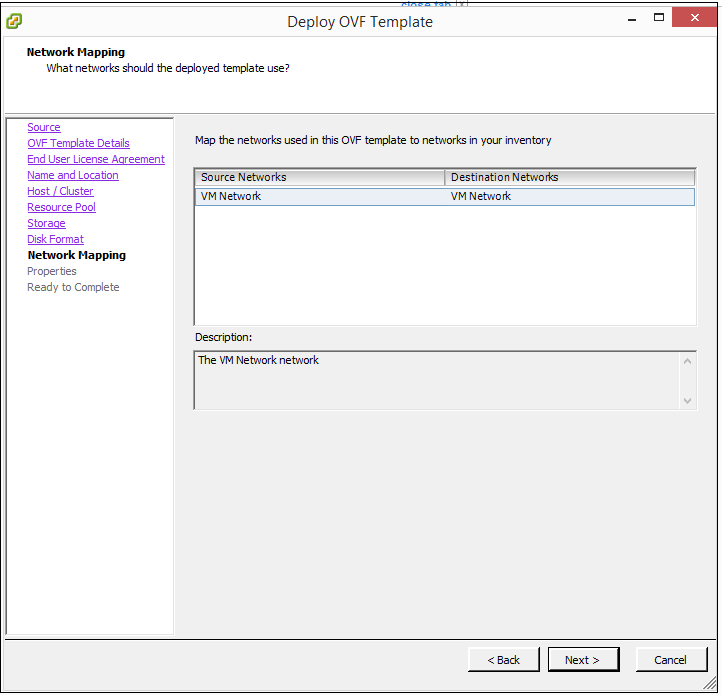
Select the source and destination network and provide the following details:
Note: Linux CloudCache uses the default network mapping settings of the vCenter Server.
|
Field |
Description |
|
Network Settings |
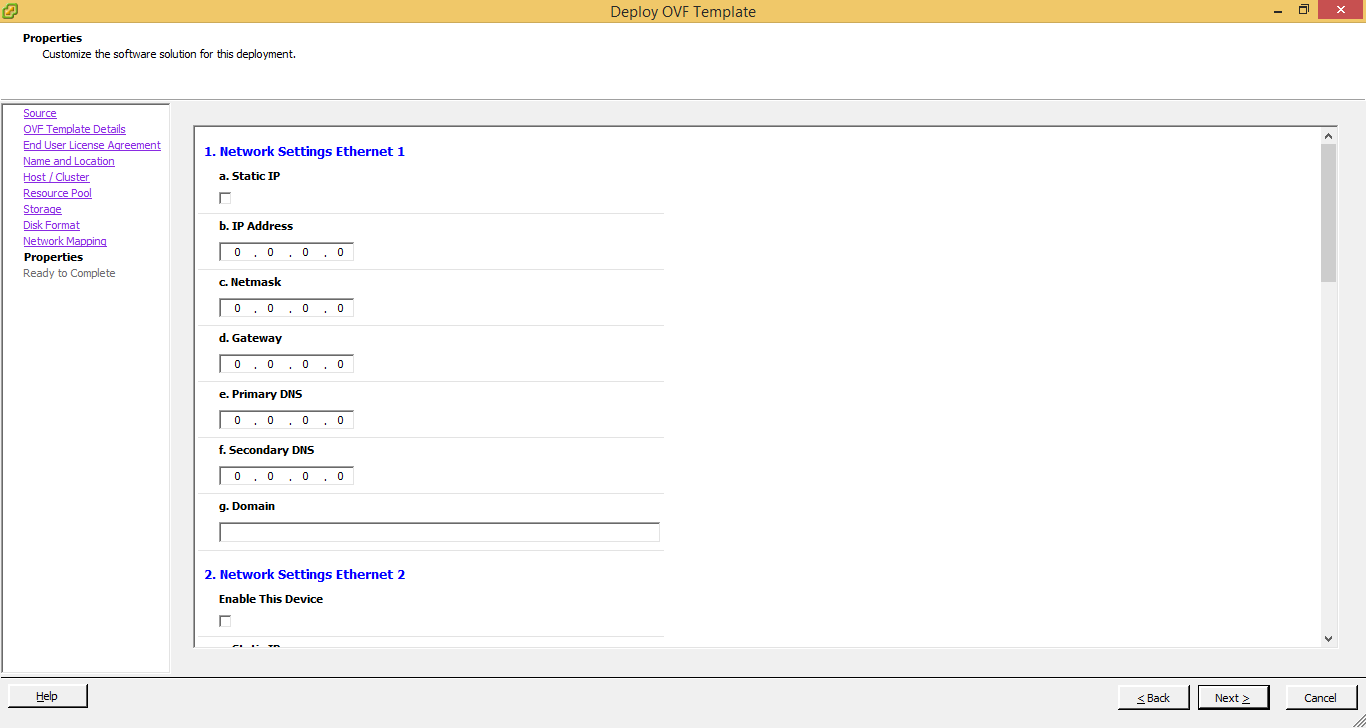
Linux CloudCache provides two network interface cards for configuration. Select the Static IP check box and provide:
|
|
Hostname |
Provide the hostname. Ensure that you do not enter a special character or space in the hostname. |
|
Web Proxy Settings |
You can configure a Web proxy for your environment. To set up the Web proxy, select the Use Web Proxy checkbox and provide the following details:
|
|
Activation Token |
The activation token that you have received while registering the VMware setup. Govcloud: Select the checkbox if you are deploying the Linux CloudCache on GovCloud. |
|
Timezone |
From the drop-down list, select the required time zone |
-
Click Next.
-
Verify the summary, and click Finish.
-
The CloudCache appears under the Unconfigured tab on Management Console.
-
You can now configure the CloudCache. See, Configure Phoenix CloudCache.
Step 3: Deploy OVA for Linux CloudCache using the vSphere Desktop Client 
Before you begin 
Before you begin, ensure the following:
-
vSphere Client for desktop is installed on the server
-
The OVA is downloaded on the same machine as the vSphere Client or a location accessible from the system
-
You have the following information:
-
vCenter credentials
-
Web proxy credentials (If you use a Web proxy in your environment).
-
Activation token. For more information see, Generate activation token.
-
IP settings.
-
Note: If you use an HTML5 Web client for proxy deployment, you'd need to enter 'j.proxy type' in the HTTP field under Web Proxy Settings as a hard value even if there is no Web proxy. The proxy will not power on post-deployment without this value.
To deploy the OVA 
-
Log on to vCenter Server using vSphere Client.
-
From the File menu, click Deploy OVF Template.
-
In the Deploy from a file or URL box, type or select the full path to the OVF template that you downloaded, and click Next.
-
Verify the OVF template details, and click Next.
-
Click Accept to accept the End User License Agreement (EULA), and click Next.
-
In the Name box, type a name for the template.
Under Inventory Location, expand or collapse the inventory tree, click a location, and click Next.
-
Select a host or a cluster on which you want to deploy Linux CloudCache, and click Next.
-
From the list of resource pools, click the resource pool that you want to assign to this virtual machine, and click Next.
|
Field |
Description |
|
Network Settings |
Linux CloudCache provides two network interface cards for configuration. Select the Static IP box and provide:
|
|
Hostname |
Provide the hostname. Ensure that you do not enter a special character or space in the hostname. |
|
Web proxy settings |
You can configure a Web proxy for your environment. To set up the Web proxy, select the Use Web Proxy checkbox and provide the following details:
|
|
Activation Token |
The activation token that you have received while registering the VMware setup. |
|
Govcloud |
Select the checkbox if you are deploying the Linux CloudCache on GovCloud. |
|
Timezone |
From the drop-down list, select the required time zone. |
-
Select destination storage, and click Next.
If you created storage profiles, click the storage profile that you want to assign to the virtual machine.
From the list of storage, click storage that you want to set as destination storage for this virtual machine.
-
Select a provisioning format, and click Next.
-
Thick Provisioned Lazy Zeroed: If you select this format, a thick virtual disk is created, and the existing data is lazy zeroed (existing data on the provisioned storage are cleared when the virtual machine writes to the storage for the first time).
-
Thick Provisioned Eager Zeroed: If you select this format, a thick virtual disk is created, and the existing data is eager zeroed (existing data on the provisioned storage is overwritten with zeroes at the time of creating the virtual machine).
-
Thin Provisioned: If you select this format, a thin virtual disk is created.
Note: You can change the disk type to Thin Provision to save storage space.
Note: Linux CloudCache uses the default network mapping settings of the vCenter Server
-
-
Select the source and destination network and click Next.
-
On the Properties screen, provide the following details:
-
Click Next.
-
To start the virtual machine after deployment, select Power on after deployment.
-
Verify the summary, and click Finish.
-
You can now configure the CloudCache. See, Configure CloudCache.
Option 2: Deploy QCOW2 image for CloudCache
Before you begin
On the downloads page, locate the tarball containing the QCOW2 images. The file name for this tarball will be as follows:
DruvaPhoenixCloudCacheQCow2.tar.gz
Once you have downloaded the tarball, unzip it to extract the following images:
-
DruvaPhoenixCloudCache-OSDisk.qcow2 - Image for the operating system disk.
-
DruvaPhoenixCloudCache-DataDisk.qcow2 - Image for the data disk.
Upload these images to the Nutanix Hypervisor as follows:
-
Log in to Prism Element
-
Expand the main navigation menu and select Settings.
-
Select Image Configuration.
-
Click the Upload Image button, specify the required settings for the OS disk and click Save.
-
Repeat the above steps for the data disk.
Once the image is uploaded, proceed to create the virtual machine.
Procedure
-
Select Create VM option from Prism Element.
-
Enter a name for the VM. This name differs from the hostname and is only for management purposes from Prism Element.
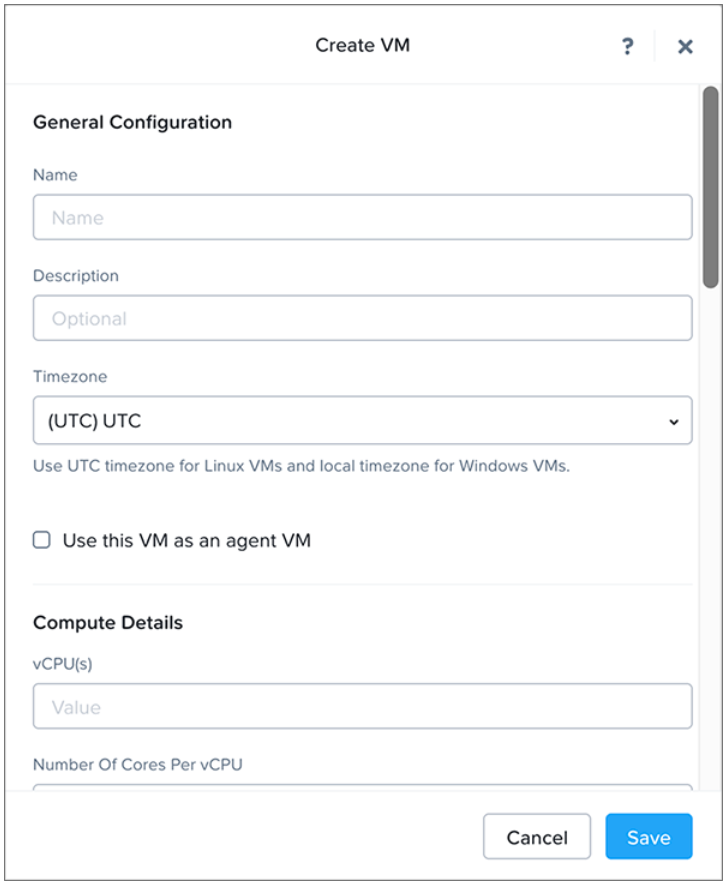
-
Enter the CPUs and RAM as per System Requirements.
-
Under the Disks section, select Add New Disk.
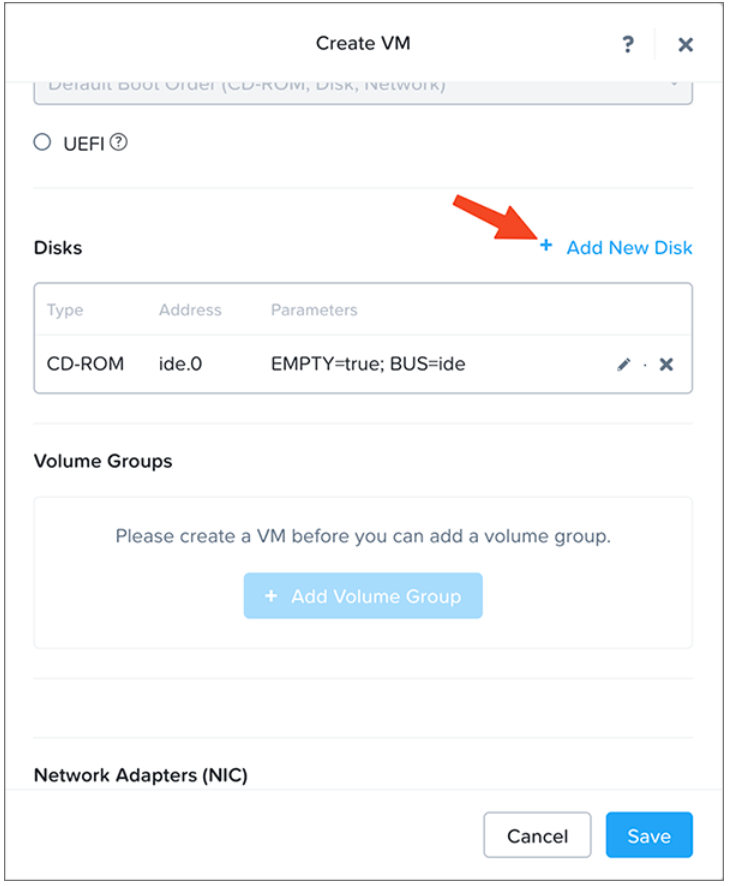
-
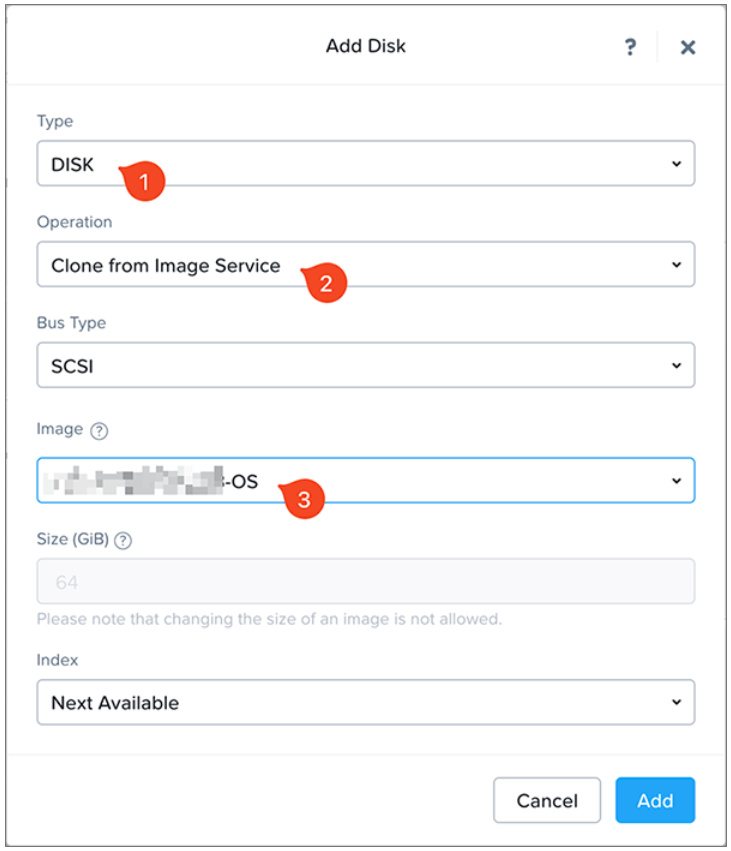
Select the Type as Disk, Operation as Clone from Image Service, and then select the OS image.
-
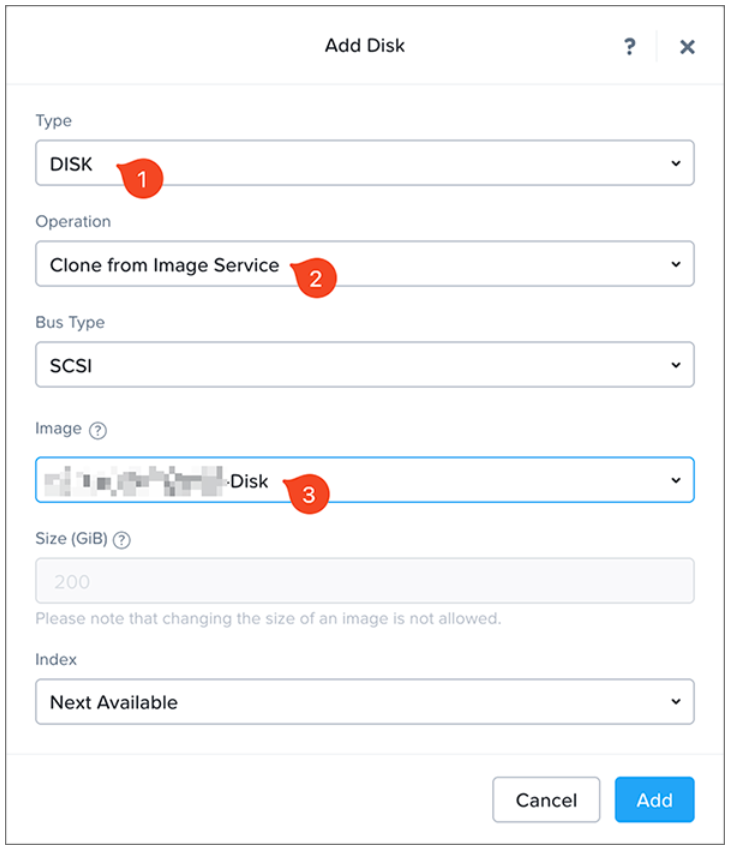
Add another disk for storing data. From the Image, select the Disk image.
-
Click Save
-
Click Add NIC. Verify the Subnet name and click Add.
-
Finally, click Save.
-
For the next step, proceed to Step 4: Configure and activate CloudCache.
Option 3: Install .deb package for CloudCache
CloudCache installer is available as a Debian package on the Downloads page. You can install it on a Ubuntu machine that meets the System Requirements.
Once you have downloaded the .deb package to the server where you want to set up CloudCache, run the following command to install CloudCache as root:
dpkg -i <CloudCache-packge-file.deb>
Replace <CloudCache-packge-file.deb> with the actual file name downloaded.
After installation is complete, move on Download, install, and activate CloudCache R3 on Linux.
Step 4: Configure and activate CloudCache
For easy configuration and activation, CloudCache includes a utility with a command line interface. This utility is Cloudcache_Conf.
Once you have deployed the image with CloudCache or installed the standalone .deb package, power on the VM and log in to the CloudCache box.
If you deployed the OVA or QCOW2 image, the default credentials are as follows:
- Username: root
- Password: druvaphoenix
You will be prompted to change your password when you log in for the first time.
Open the terminal on the CloudCache machine and enter the following command to activate the CloudCache Configuration utility:
Cloudcache_Conf
You will see the following screen with six options:
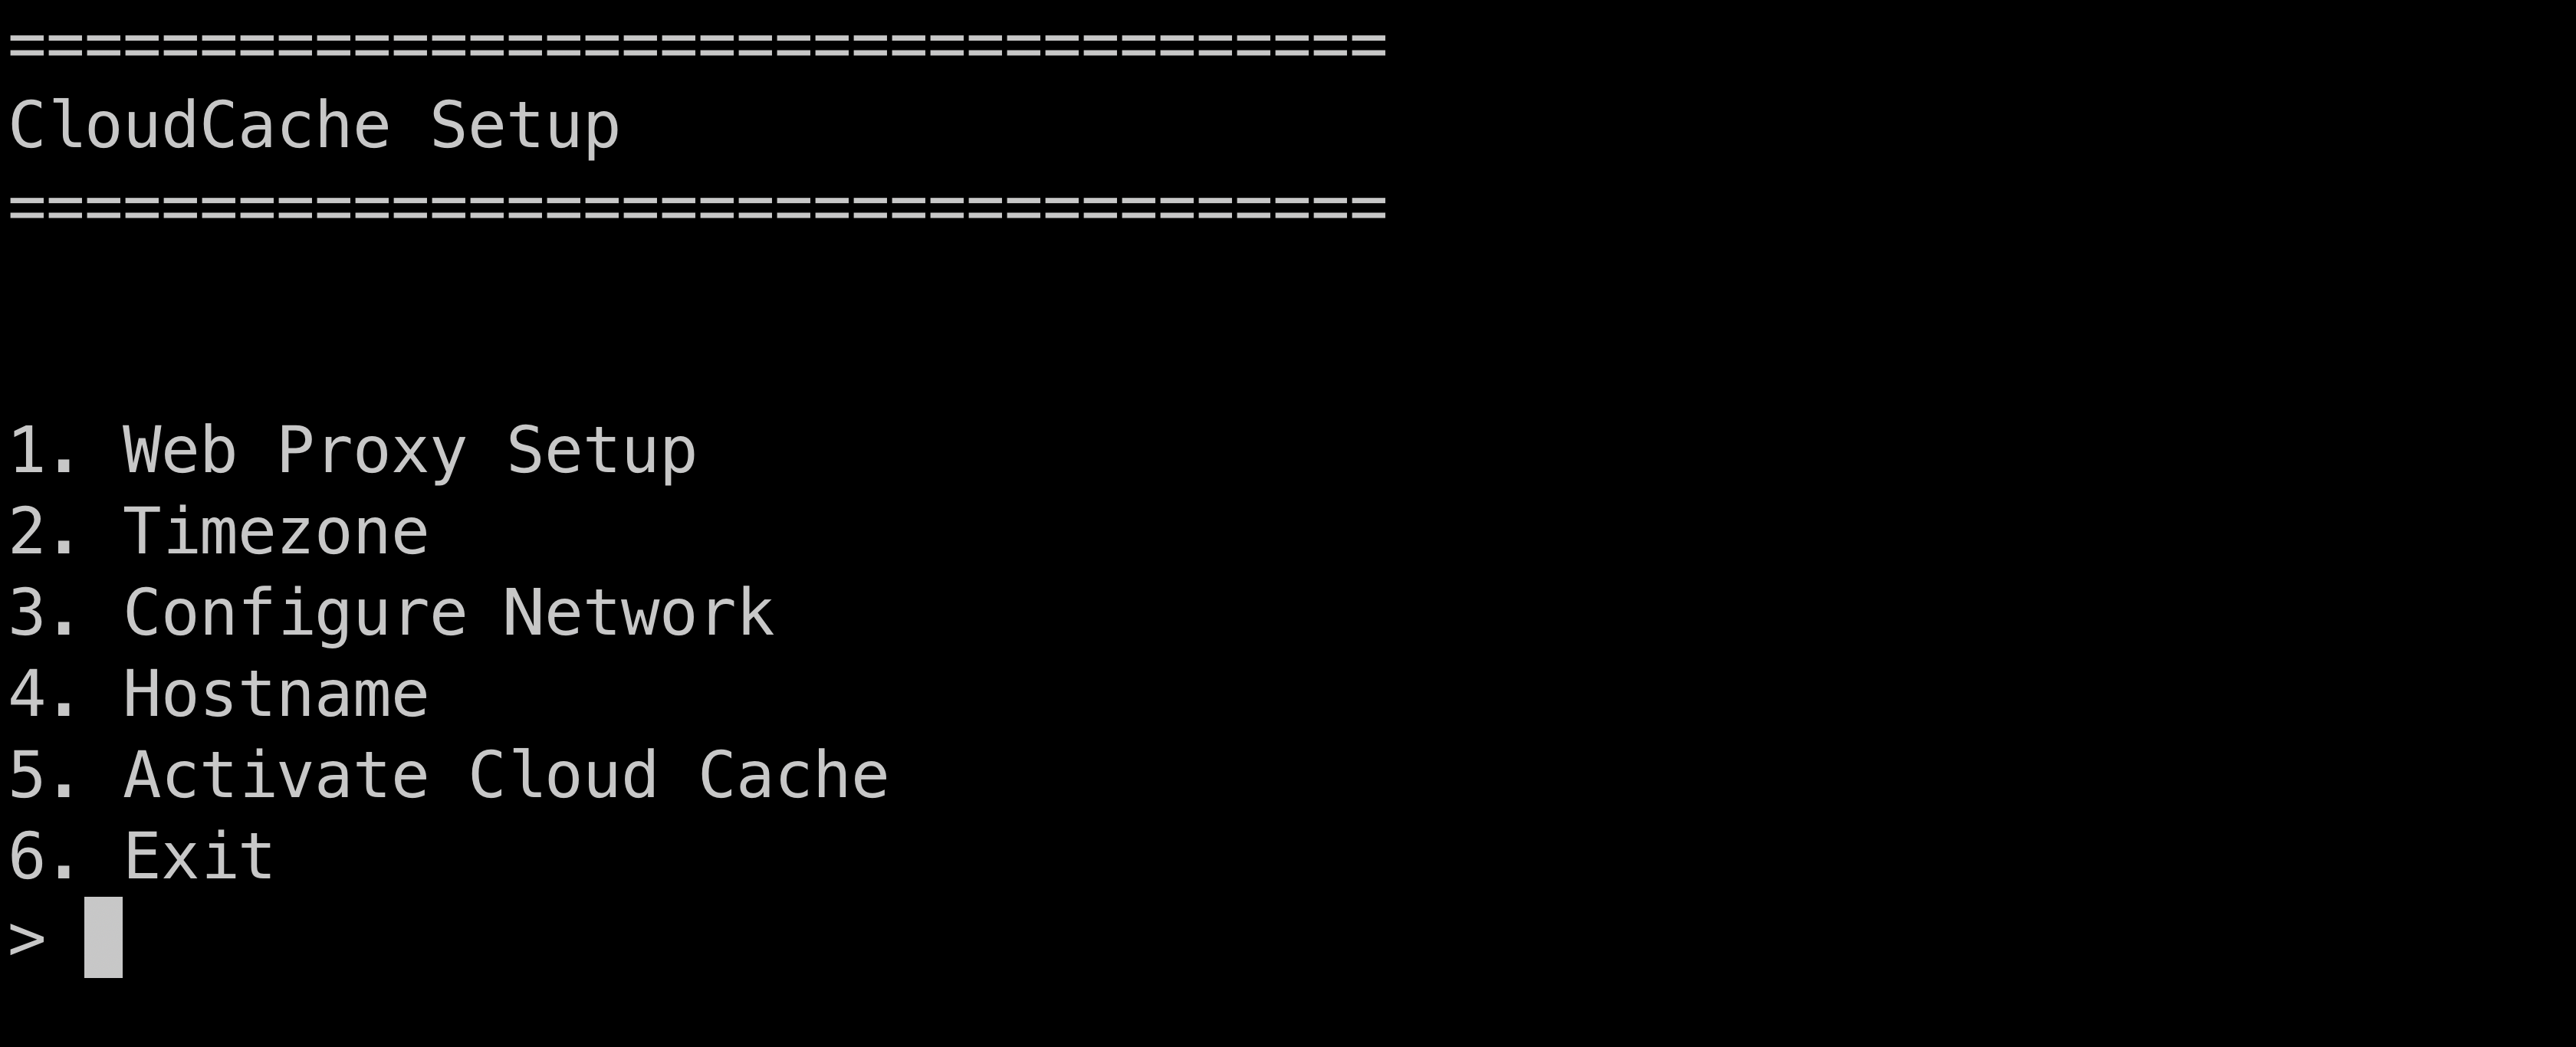
Enter 1 and press Enter to begin web proxy setup.
Web Proxy Setup
Enter 1 to begin setting up web proxy credentials.
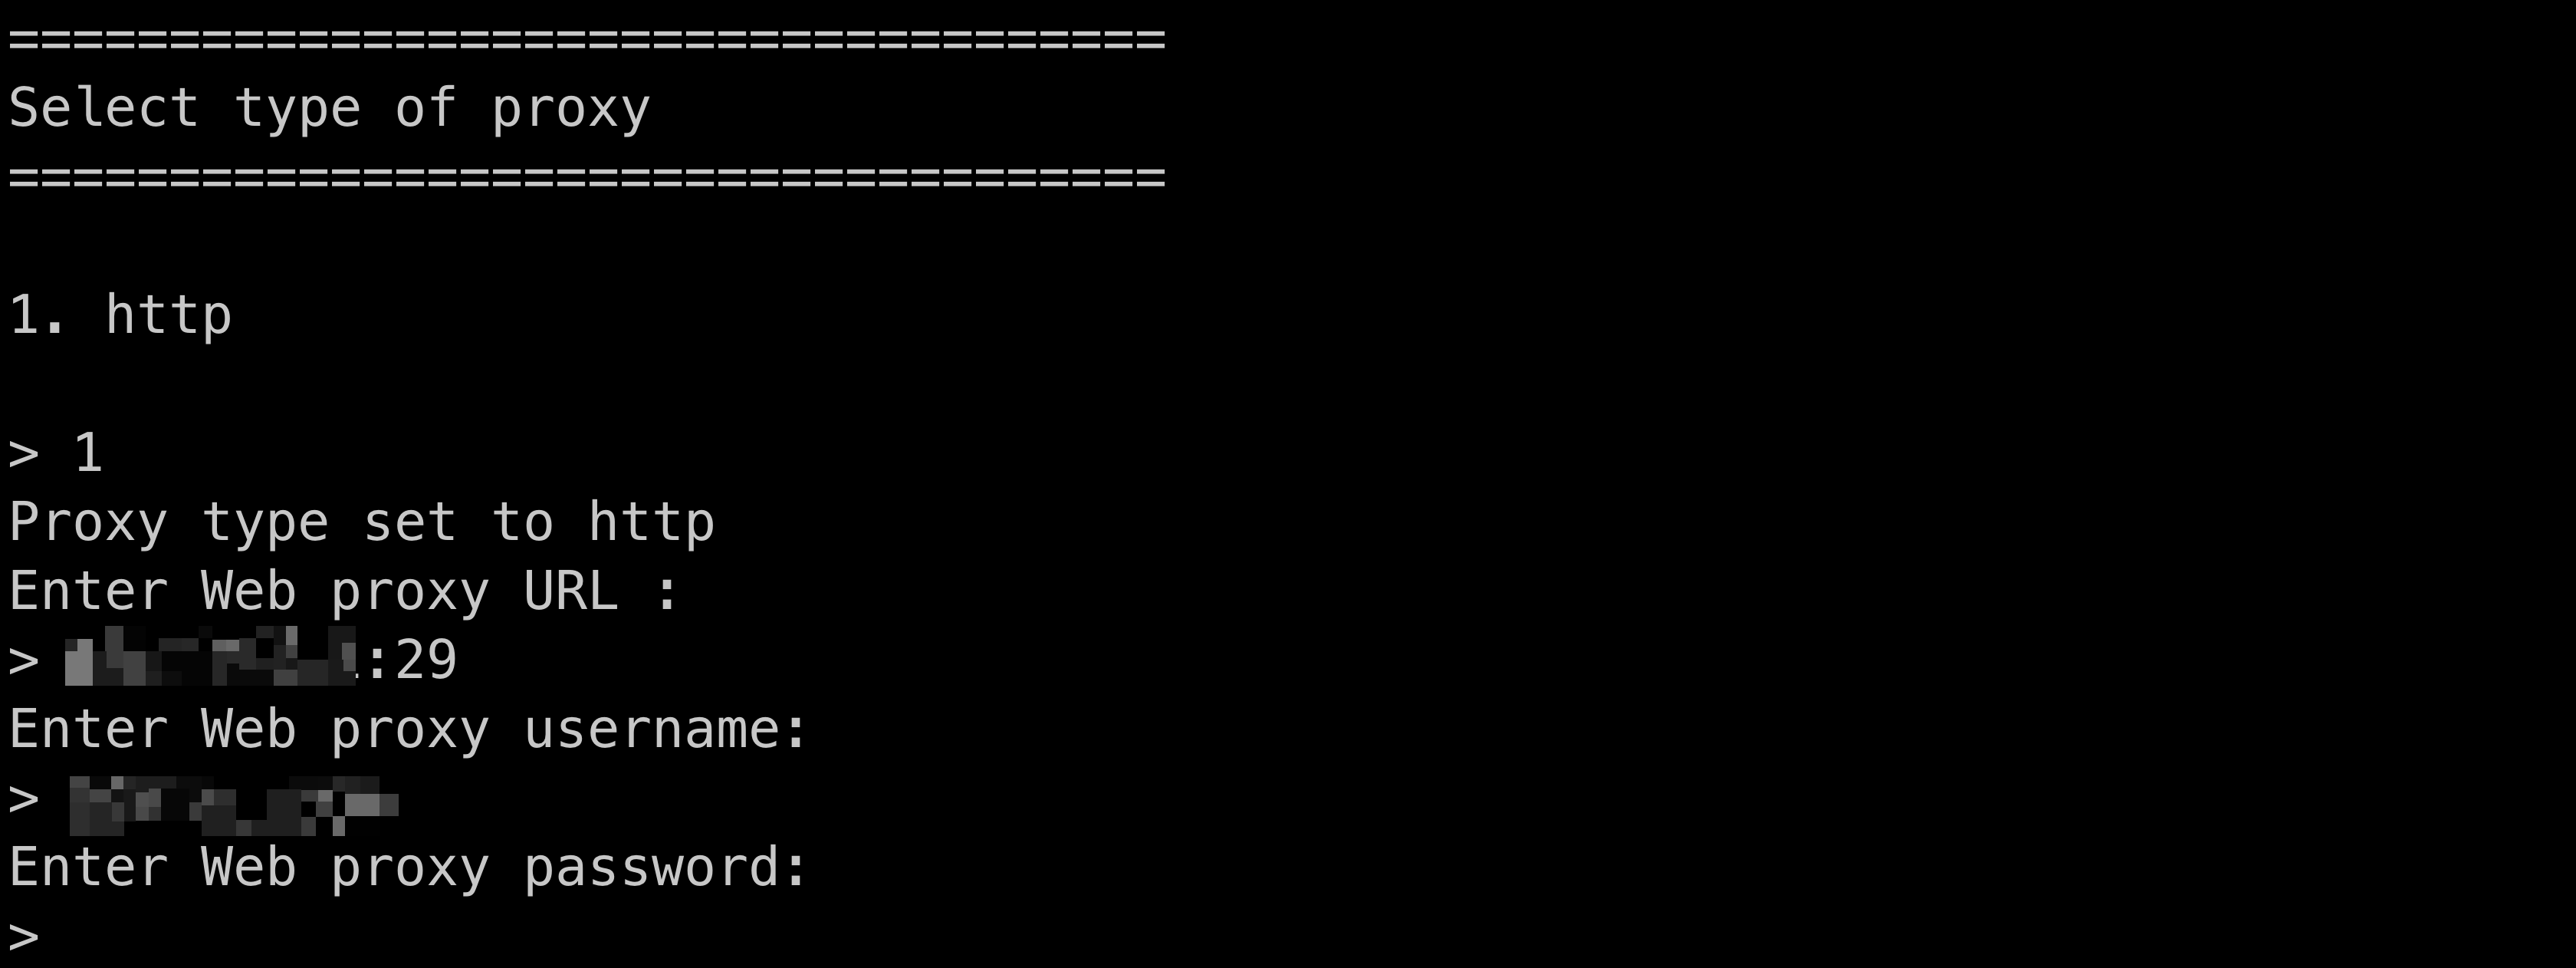
You can configure a Web proxy for your environment. To set up the Web proxy, provide the following details:
-
Proxy Type: We support HTTP, socks4, and socks5 proxies.
-
Proxy Server IP: Valid IP and port of the proxy server. Enter the IP and port, separated with a colon. For example, to use the IP 11.11.11.11 and port 21, enter the following:
-
11.11.11.11:21
-
-
Username: Valid proxy username. For a proxy that does not require authentication, enter *.
-
Password: Valid proxy password. For a proxy that does not require authentication, enter *.
Timezone
After selecting the TimeZone option, you will see the following options:
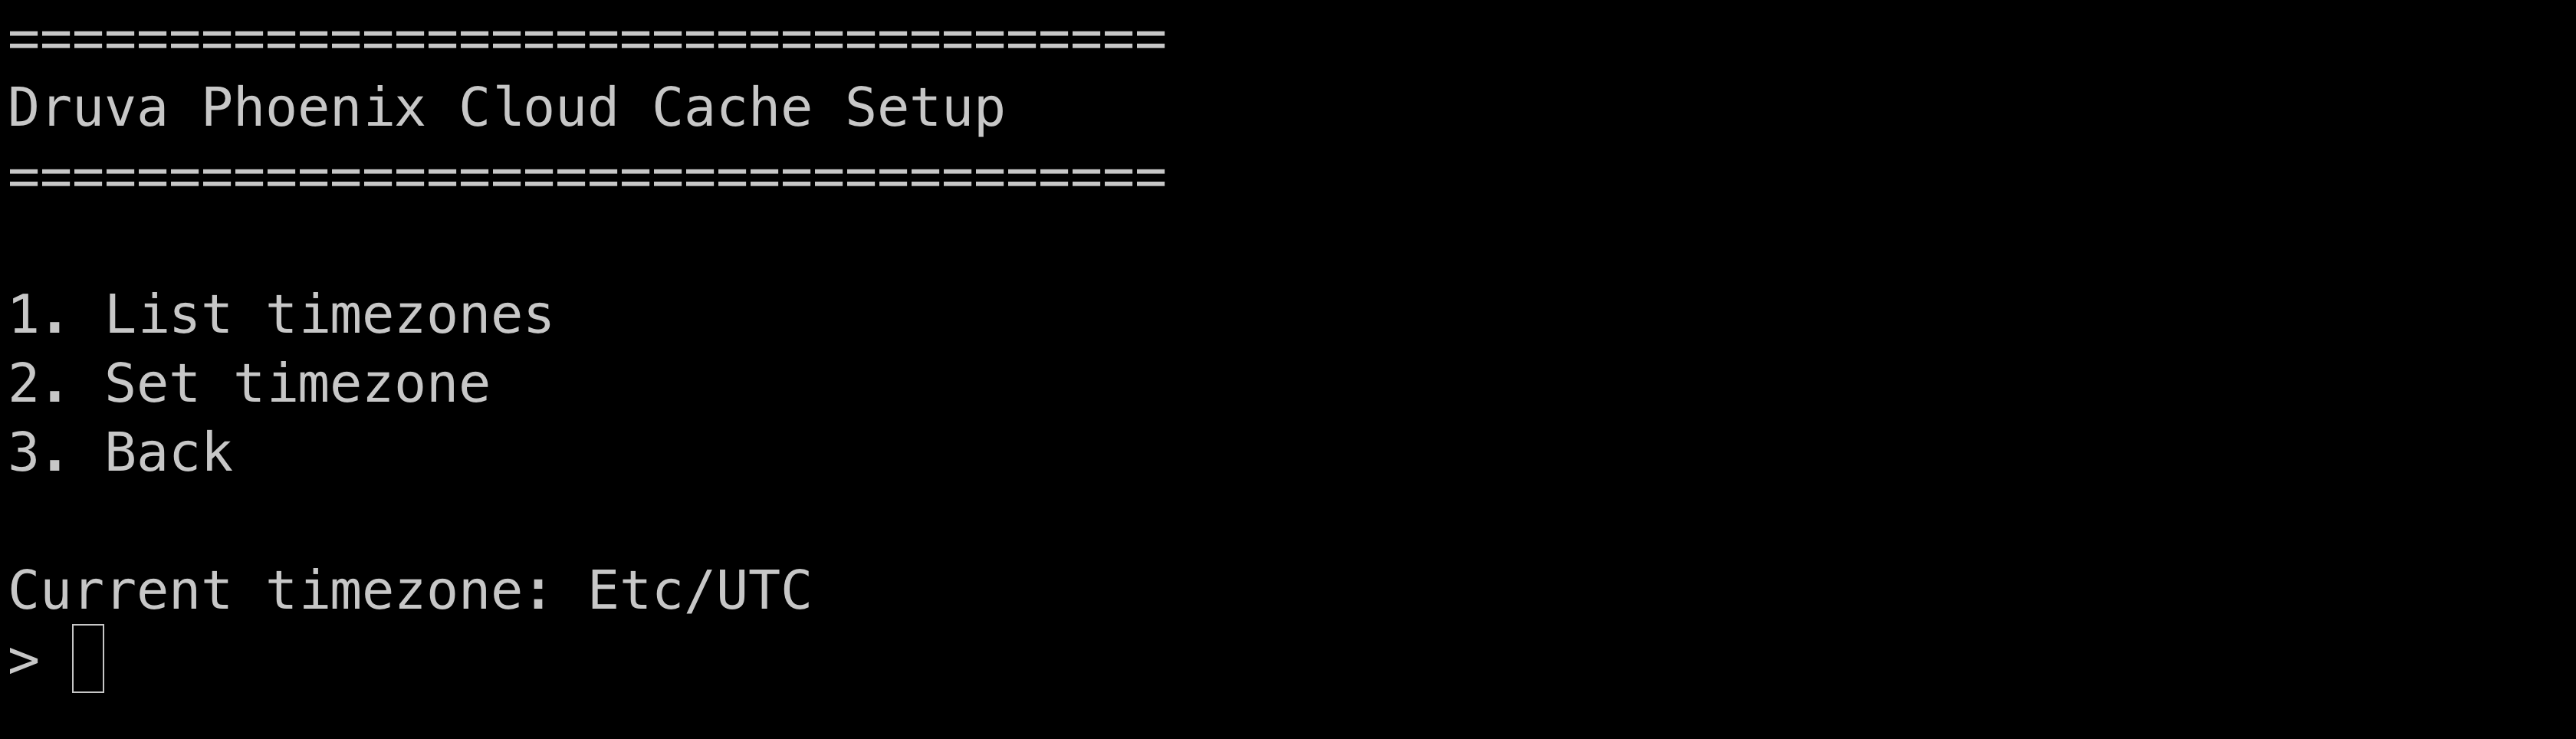
Select 1 to list the available time zones. You can select a time zone from these options and set it for this CloudCache machine.
Configure Network
Select option 3 from the main screen of the Cloudcache_Conf utility. You can view and perform the following actions from this screen:
-
List available network interfaces
-
See Details of a network interface
-
Change interface settings such as:
-
Static IP address. Static IP addresses also require the following configurations:
-
Netmask
-
Gateway
-
Primary DNS
-
Secondary DNS
-
Domain
-
-
Dynamic IP address
-
Hostname
Select option 4 on the main screen to view and change the hostname as follows:
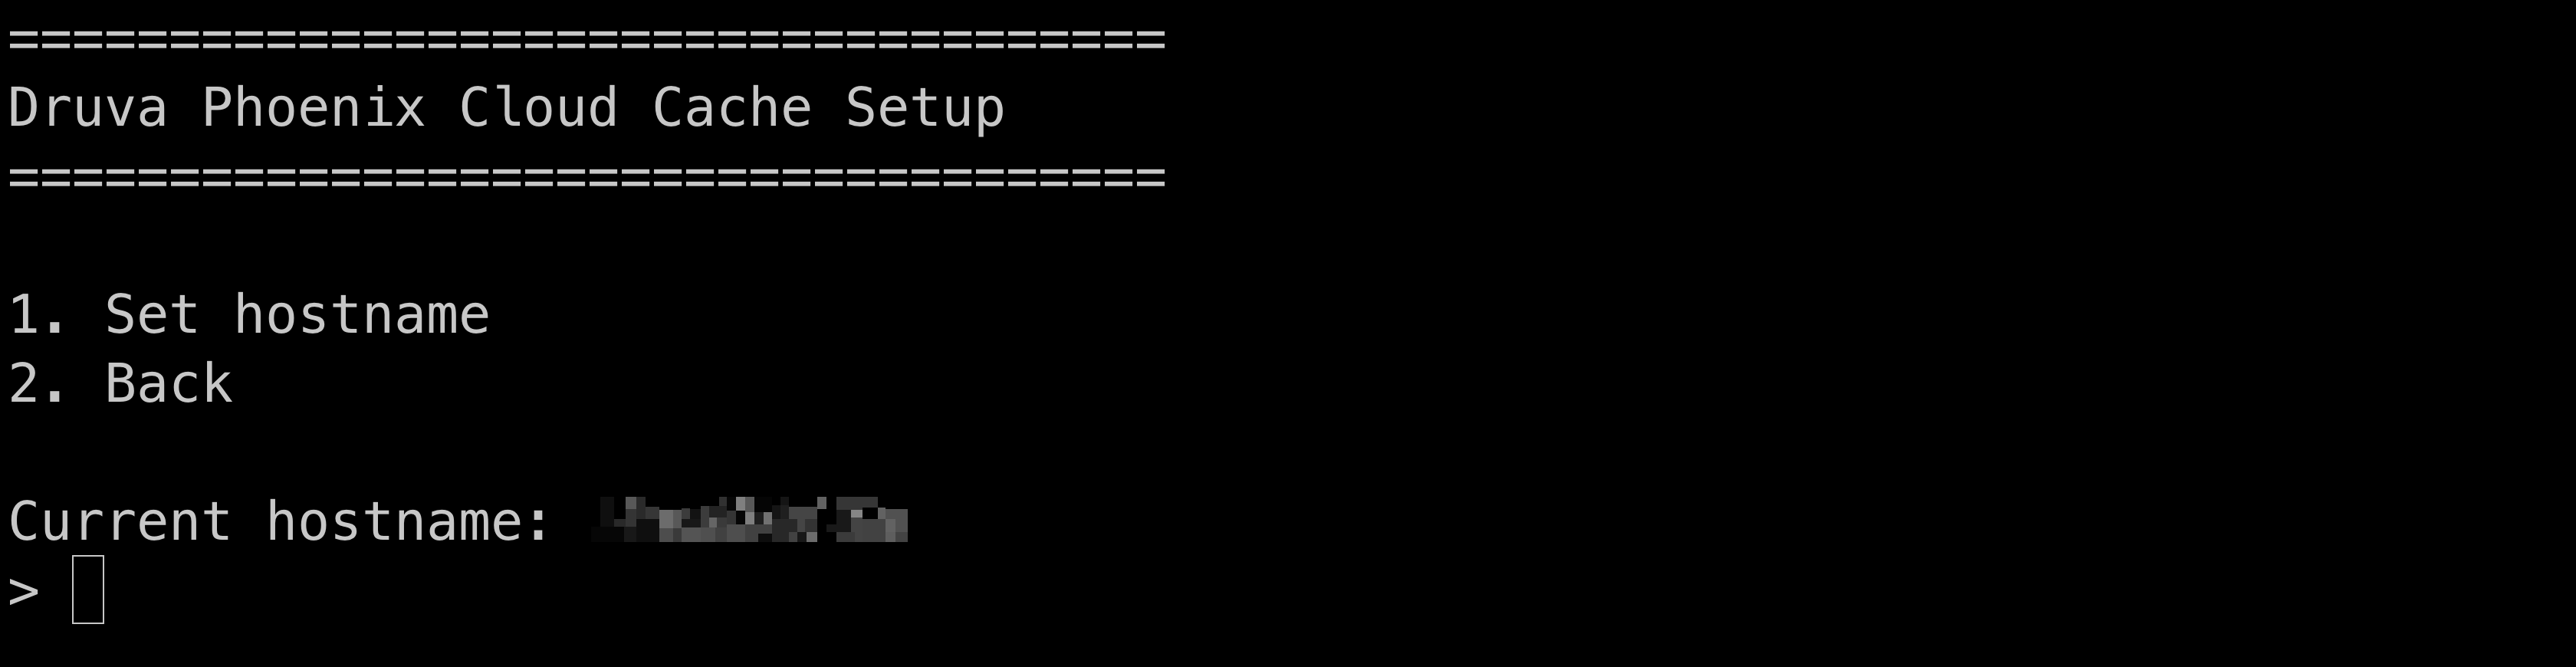
Do not enter a special character or space in the hostname.
Activate CloudCache
Select option 5 from the main screen of Cloudcache_Conf to activate CloudCache.
Select option 1, and you will see the prompt to enter the activation token as follows:
Paste in the activation token, which you copied in Step 2: Generate the activation token.
After you paste the activation token, you will see the confirmation message:
> Successfully activated cloudcache.
Activate Linux CloudCache using the terminal
The Linux CloudCache is activated as part of the OVA deployment. However, you can activate the Linux CloudCache using the command line, should the activation fail during the deployment. Once the OVA deployment is complete, you can log in to the virtual machine using the following credentials:
-
Username: root
-
Password: druvaphoenix
Launch the terminal on the virtual machine, and execute the following command to activate the Linux CloudCache:
- For R1:
- PhoenixActivate <Token>
- For R3:
- EnterpriseWorkloadsAgent cloudcache activate --token <Token>
Where <Token> is the activation token copied from the Management Console in Step 2.