Data volumes
 Business
  Enterprise Elite
This topic provides an overview of data volumes. It also provides the instructions to add data volumes and edit the existing data volumes.
- About data volume
- Add data volumes
- Edit data volumes
- Error messages
- Increasing data size on Linux CloudCache
About data volumes
A data volume is a folder on a CloudCache where Druva stores the backup data. For each data volume, you must set an appropriate size. A data volume permits you to consume a portion of the storage. You can only consume a portion of the storage that is equivalent to the size of the data volume. If your setup requires more storage, you can add data volumes, and set a size for the data volumes.
After you create CloudCache data volumes, you can resize the data volumes. Ensure that you connect the CloudCache to the Druva Cloud before you add or edit the data volume size.
Note: You can add up to 10 data volumes for each instance of the CloudCache. The total size of all the data volumes on all instances of the CloudCache that you configured must not exceed the size limit specified in your license.
To add data volume
-
- Log in to the Management Console.
- Click Manage > CloudCache. Note that if the All Organizations menu is enabled, you have to first select an organization and then click Manage > CloudCache.
- In the Configured tab, click the CloudCache for which you want to add a data volume.
- In the left navigation pane, click Configuration.
- On the Configuration page, in the Data Volumes section, click Add Data Volume.
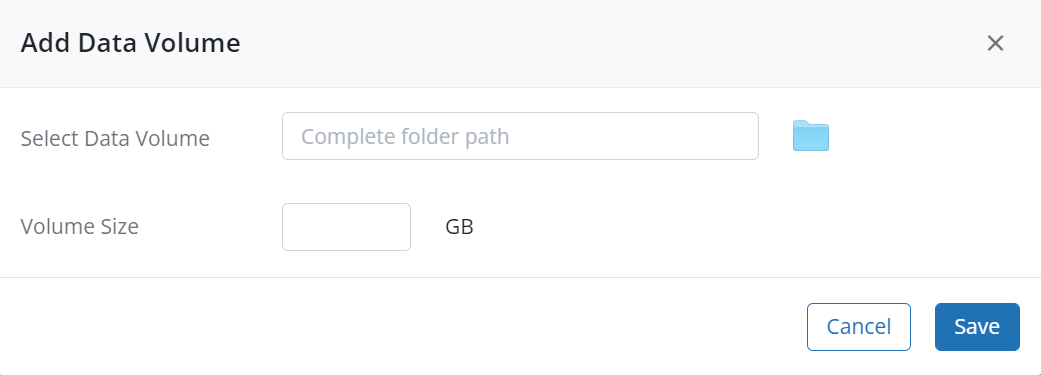
- On the Add Data Volume page, add the following details:
- Select Data Volume: Type or select the path to the data folder on the CloudCache where you want to save the data.
- Volume Size: Specify the data size in GB that this volume can accommodate.
Your server data is saved to the data folder and the metadata is saved to the cloud storage.
- Click Save.
To edit data volume size
- Log in to the Management Console.
- Click Manage > CloudCache. Note that if the All Organizations menu is enabled, you have to first select an organization and then click Manage > CloudCache.
- In the Configured tab, click the CloudCache for which you want to edit the data volume size.
- In the left navigation pane, click Configuration.
- On the Configuration page, in the Data Volumes section, click the
 icon to edit the data volume.

- On the Edit Data Volume Size page, edit Volume Size Assigned as required.
Ensure that the value assigned in the Volume Size Assigned field is greater than the value specified in the Volume Size Used field.
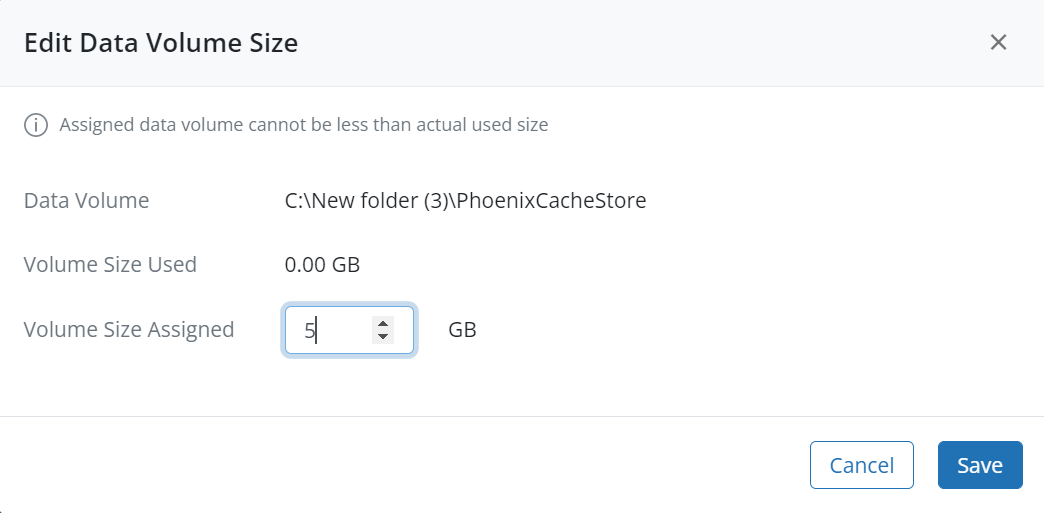
- Click Save.
Managing disk size for Linux CloudCache
Using the standard LVM commands, you can manage the disk size (increase or reduce) to manage the Linux CloudCache size. See, Increasing the size of a virtual disk (VMware KB article).
Increasing data size on Linux CloudCache
- Check the currently available data size.
root@cloudcache:~# df -h
Filesystem Size Used Avail Use% Mounted on
/dev/mapper/vg1-vol1 1007G 77M 956G 1% /mnt/data - Attach a new disk to the Linux Cloud Cache VM from vCenter or ESXi.
- Reboot the VM.
- Check if the disk is visible.
root@cloudcache:~# ls /dev/sdc
/dev/sdc - Create a new physical volume.
root@cloudcache:~# pvcreate /dev/sdc
Physical volume "/dev/sdc" successfully created. - Check physical volume.
root@cloudcache:~# pvs
PV VG Fmt Attr PSize PFree
/dev/sda3 ubuntu-vg lvm2 a-- <49.00g <24.50g
/dev/sdb vg1 lvm2 a-- <1024.00g 0
/dev/sdc lvm2 --- 500.00g 500.00g - Add new physical volume to Volume Group.
root@cloudcache:~# vgextend /dev/mapper/vg1 /dev/sdc
Volume group "vg1" successfully extended - Extend the volume group size.
root@cloudcache:~# lvm lvextend -l +100%FREE /dev/mapper/vg1-vol1
Size of logical volume vg1/vol1 changed from <1024.00 GiB (262143 extents) to <1.49 TiB (390142 extents).
Logical volume vg1/vol1 successfully resized. - Extend the logical volume file system with all the available free size.
root@cloudcache:~# resize2fs -p /dev/mapper/vg1-vol1
resize2fs 1.45.5 (07-Jan-2020)
Filesystem at /dev/mapper/vg1-vol1 is mounted on /mnt/data; on-line resizing required
old_desc_blocks = 128, new_desc_blocks = 191
The filesystem on /dev/mapper/vg1-vol1 is now 399505408 (4k) blocks long. -
Check the updated data size
root@cloudcache:~# df -h
Filesystem Size Used Avail Use% Mounted on
/dev/mapper/vg1-vol1 1.5T 72M 1.4T 1% /mnt/data
Error messages
You may encounter errors while editing data volume size. The following table describes the error message and its solution.
| Error message | Description | Solution |
|---|---|---|
|
Assigned data volume cannot be less than actual used size |
Druva displays this error on the Edit Data Volume Size page when you attempt to edit data volume size and enter a size lesser than the value of the Volume Size Used field. |
Enter the data volume size greater than the value specified in the Volume Size Used field. |
|
Error getting refreshed cloud cache volumes. Error: Failed to connect to client. |
Druva displays this error on the Edit Data Volume Size page when you attempt to edit data volume size and the CloudCache is not connected to the Druva Cloud. |
Ensure that the CloudCache is connected to the Druva Cloud before you edit the data volume size. |
|
Can not update volume size. Cache is in decommissioning state. |
Druva displays this error on the Edit Data Volume Size page when you attempt to edit data volume size and the CloudCache decommission operation is in progress. |
You have attempted to edit data volume size for the CloudCache that is undergoing decommission operation. Therefore, you cannot edit data volume size.
|