Download, install, and activate CloudCache - Windows
 Business
  Enterprise Elite
This guide applies only to CloudCache R1.
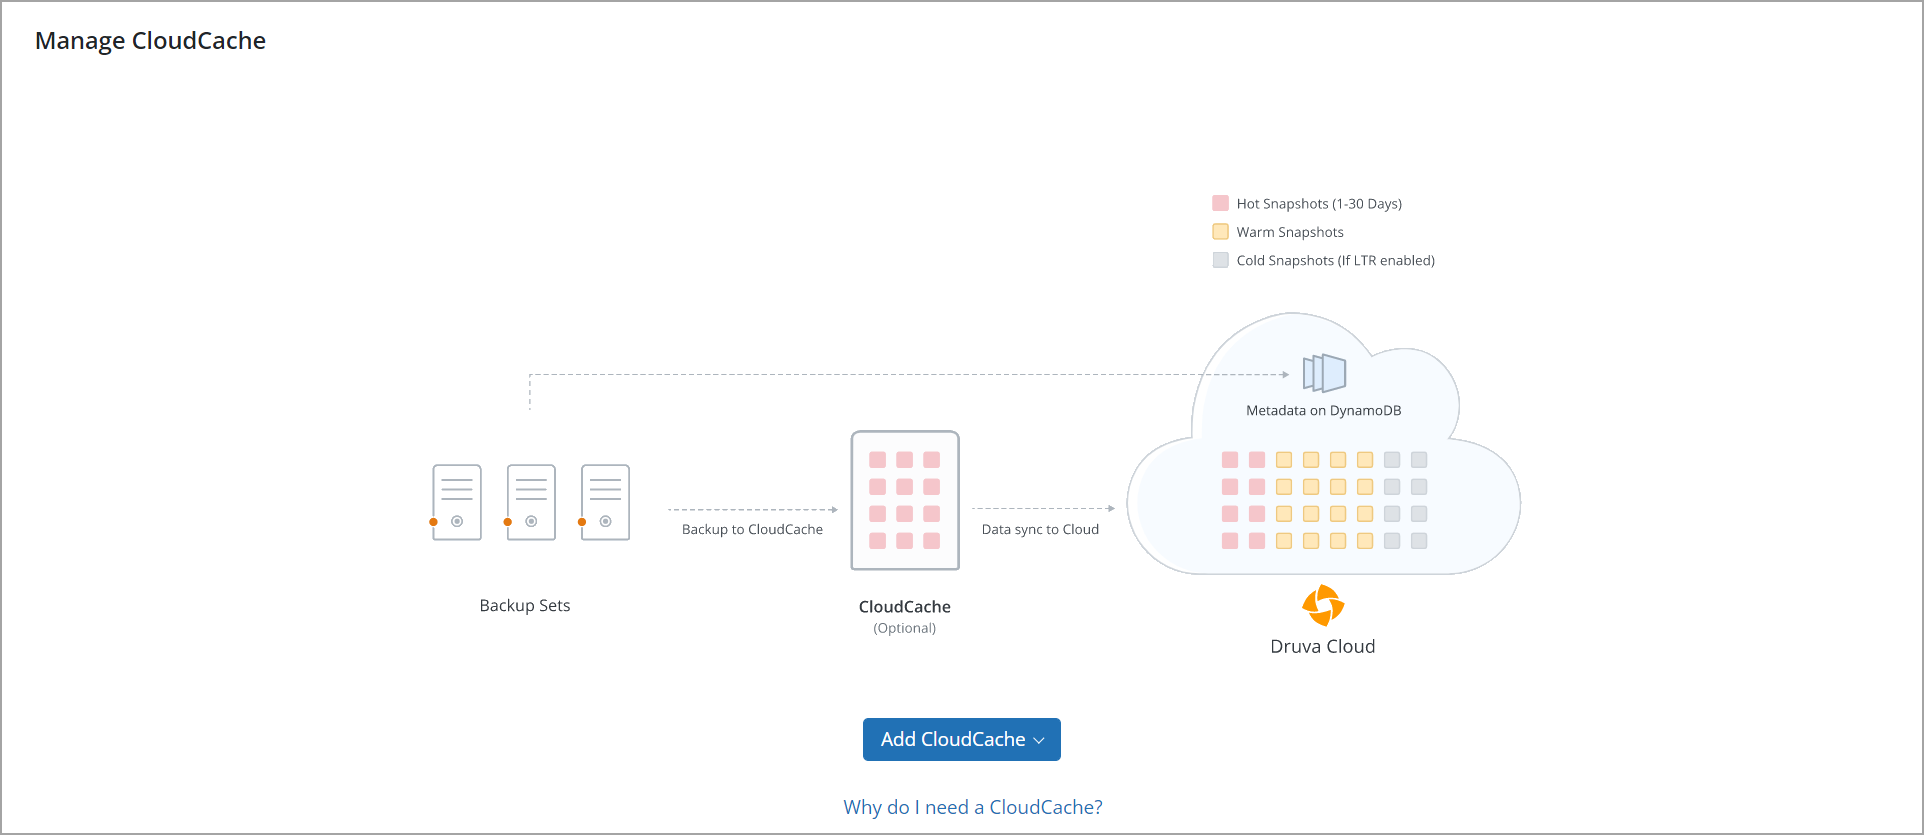
To deploy CloudCache for your setup, add CloudCache from the Management Console.
When you add CloudCache, Druva Cloud generates an activation key. The activation key functions as a unique identifier and establishes a connection between Druva Cloud and CloudCache. After installation, use the key to activate CloudCache.
Notes:
- You must install CloudCache within the firewall limits of your remote office locations.
- In a production environment, we recommend that you install CloudCache on a server on which Hybrid Workloads agent is not installed.
- To ensure faster backups and restores, we recommend that you use a dedicated server for CloudCache.
Perform the following steps:
- Step 1: Download the installer
- Step 2: Get CloudCache activation token
- Step 3: Install CloudCache
- Step 4: Configure Web proxy (Optional)
- Step 5: Activate CloudCache
Before you begin
Ensure that the server on which you plan to install CloudCache matches the minimum requirements listed under System requirements.
Step 1: Download the installer
You can download the CloudCache installer from the  > Downloads option on the Management Console menu or from the Downloads page.
Note: You can also download the installer at the time of adding CloudCache.
- Log in to Management Console.
- Click Manage > CloudCache. Note that if the All Organizations menu is enabled, you have to first select an organization and then click Manage > CloudCache.
- Click Add CloudCache. From the dropdown menu, select R1.
- On the Add CloudCache page, in the Download and Install CloudCache agent on the server section, click Download for downloading the installer for Windows.
Step 2: Get CloudCache activation token
- Log on to Management Console.
- Click Manage > CloudCache. Note that if the All Organizations menu is enabled, you have to first select an organization and then click Manage > CloudCache.
- Click Add New CloudCache.
Note: If you did not download the CloudCache installer in step 1, click Download here.
- To copy the activation token, in the Activate CloudCache section, click the
 icon next to the Activation Token box.
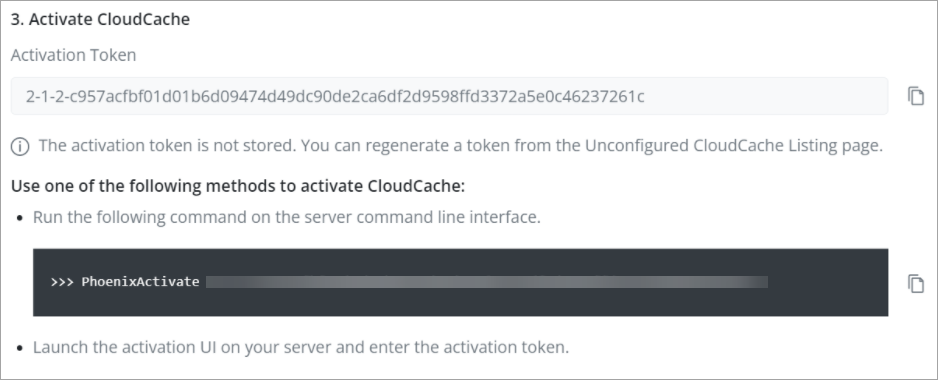
Note: You can use the activation token to activate only one instance of CloudCache. The token remains active only for 3 days from the time of generation. If you do not use it to activate CloudCache within 3 days, regenerate your activation token.
- Copy this token to a simple text file, and save the file.
Note: Druva does not store activation tokens.
- Click Done.
CloudCache appears under the Unconfigured tab on Management Console. The Activation Status appears as "Not activated".
Step 3: Install CloudCache
To install CloudCache, administrator privileges are required on the server.
- Double-click the installer, and click Next.
- Accept the license agreement, and then click Next.
- In the Install Location box, type or select the full path to the installation home directory.
- (Optional) Select Desktop Shortcut.
- Click Install.
- After the installation completes, click Finish.
Step 4: Configure Web proxy (Optional)
Perform this step only if you are using Web proxy in your environment. Ensure that CloudCache service is running before you start proxy settings.
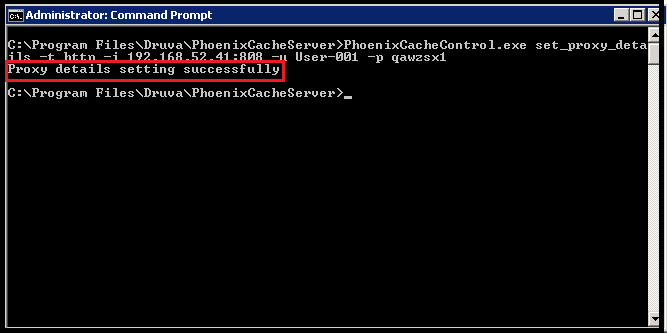
- Open the command line interface window.
- Change the directory path to the location on your system, where You have installed the Hybrid Workloads agent.
Default path: C:\Program Files\Druva\Phoenix CacheServer. - On the command prompt, run the following command:
PhoenixCacheControl.exe set_proxy_details -t proxy_type -i proxy_IP:port -u proxy_user -p proxy_password
After the command runs successfully, a message appears indicating that Web proxy is installed successfully.Field Details Proxy_type Druva supports the following proxy types: - http
- socks4
- socks5
Proxy_IP Valid proxy IP address. Port Respective proxy port number. Proxy_user Valid proxy username. Enter * for an unauthenticated proxy. Proxy_password Valid proxy password. Enter * for an unauthenticated proxy.
Additional information
-
- The TMG drops IDLE connections after the defined timeout duration, due to which the client does an aggressive retry with the server.
Note: In TMG application, we recommend to set the connection timeout value to 5 minutes.
- The configuration file path for Cache Server is as follows:
Client Path Cache Server C:\ProgramData\PhoenixCloudCache\PhoenixCloudCache.cfg - After successfully setting up the proxy, if you want to remove the proxy setting, then you must manually remove the following proxy entries from Phoenix.cfg file.
- PROXY_USER
- PROXY_SERVER
- PROXY_TYPE
- PROXY_PASSWD2
Note: After deleting the above listed entries, set USE_PROXY = False in same file.
In case of cache server, remove proxy entires from PhoenixCloudCache.cfg
Step 5: Activate CloudCache
To establish a persistent connection between CloudCache and Druva Cloud, activate CloudCache using the activation token generated in step 2.
Note: Before you activate CloudCache, ensure that the file containing the activation token is available on your server.
You can use the activation token to activate only one instance of CloudCache.
If you lose the activation token or if the activation token crosses expiration (3 days), you must regenerate the activation token. For instructions, see Regenerate activation token.
- Wait for the Druva CloudCache window to appear or double-click the CloudCache desktop shortcut.
- Disable the govCloud option and enter the activation token.
Note: If you are activating CloudCache with Gov Phoenix, enable the govCloud option.
- Click Activate.
After activation, the status of CloudCache listed under the Unconfigured tab changes to Connected. The entry in the Action column changes to Configure.
(Optional) Command-line method for activation
-
- Open the Command Prompt and go to the following directory:
C:\Program Files\Druva\PhoenixCacheServer - Run the following command.
PhoenixActivate <Activation Token>
where, <Activation Token> represents the activation token generated in step 2.
For example, your command might look like this:
PhoenixActivate 24-33-xxxxxxxxxxxxxxxxxxxxxxxxxxxxxxxxxxxxxxxxxxxxxxxxxxxxxxxxxxxxxxxx
If the activation completes successfully, the message Successfully Connected appears.
-
If the activation does not complete successfully, the message Activation Failed appears. Perform the step 1 again.
30194 - Open the Command Prompt and go to the following directory: