Add a new device to your inSync account
Overview
If your administrator permits, you can have multiple devices linked to your inSync account. The inSync Client will back up data from all these devices. If you have inSync Share, contents inside the inSync Share folder on all the linked devices are always in sync.
For example, if you have a Windows 8 laptop on which you have installed an inSync Client and your organization assigns another Windows 8 laptop to you, then you can install an inSync Client on it and add this new laptop to your inSync account. Therefore, you can have two devices linked to your inSync account. You can also access the restore data for both the devices.
To add more devices to your inSync account, you must install and activate the inSync Client on all your devices. When you activate the inSync Client, you can select to restore the following data from one of the existing devices:
- Backup data: You can restore data from the backup folders of one of the devices already linked to your account.
- System Application & Settings: You can restore system and application settings from one of the devices already linked to your account. On a Windows laptop, you can restore system and application settings from another Windows laptop. Similarly, on a Mac laptop, you can restore system and application settings from another Mac laptop. See, Restore system settings.
Before you begin
Before you add a new device to your inSync account, ensure the following:
- You have installed and activated the inSync Client on at least one device.
- You have your inSync account activation email handy for the server URL details.
- You have the password for your inSync account.
- If this is the first device on which you are activating the inSync Client, use the password that is included in the activation email.
- If you are using your Active Directory credentials to activate the inSync Client, then use your Active Directory password.
- If you are using your Single Sign-On credentials to activate the inSync Client, then leave the Password box empty.
- You are logged on to your new device using your own credentials.
- You have the proxy server details. You require proxy server details only if the inSync Client has to contact the inSync Server through a proxy server.
Procedure
To add a new device to your inSync account
- Install the inSync Client. For more information, see Install the inSync Client.
- Double-click inSync icon. The Activate Backup window appears.
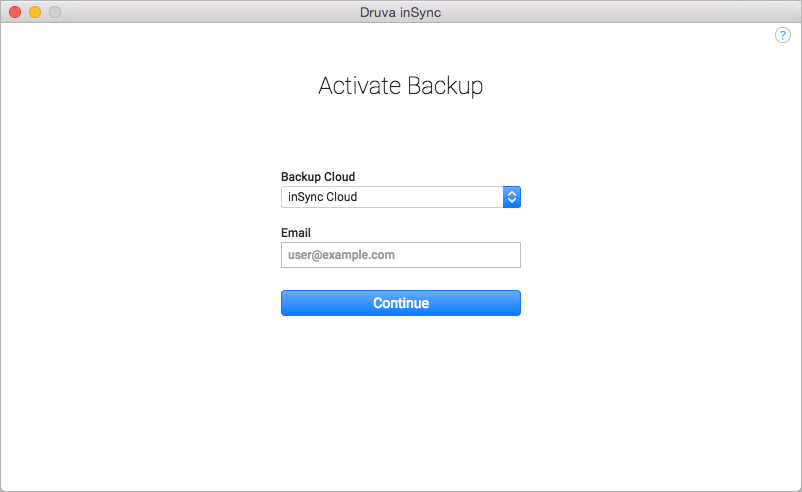
- Select the appropriate inSync edition from the Backup Cloud drop-down box.
Note: If you want to know the inSync edition that your organization is using, contact your administrator.
- Enter your email, and click Continue.
- If you use Single Sign-On (SSO) activation, the login page of your SSO provider is displayed.
- If you use manual activation, the Password field is displayed.
Note: For more information on activation of inSync Client and to troubleshoot any errors during activation, see Activate the inSync Client on your device.
- Enter the required information and click Continue.
As you already have an existing device configured for backup, inSync displays the Add as New Device and Replace an Existing Device options window.
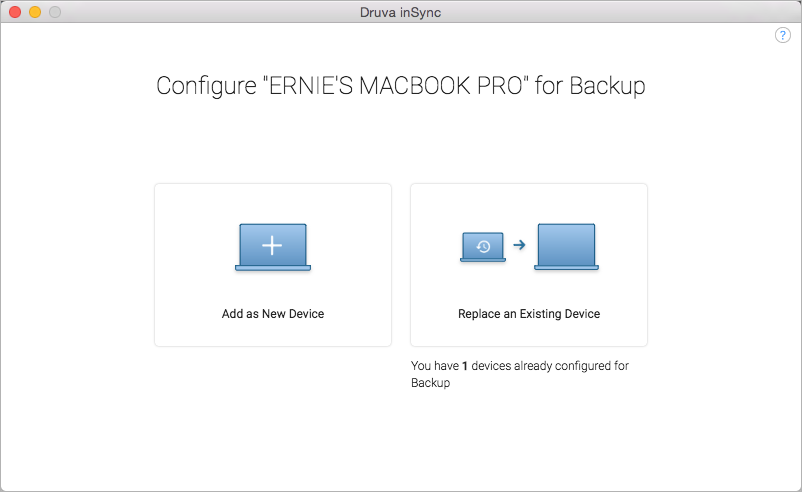
- Click Add as New Device.
Note:
- If the same device name already exists, inSync displays a Device with the same name is already configured message and prompts you to replace your device. In such case, click Replace to replace the existing device with the current device. For more information, see Replace a device linked with your inSync account.
- If you have added the maximum number of devices allowed for your account, inSync displays the You have exceeded the maximum number of devices that can be configured for backup message. Contact your administrator for more details.
- In the Ready for Backup window, do any one of the following:
- To restore existing data to your current device click Restore Now.
- To start backing up data from your current device right away click Maybe Later.
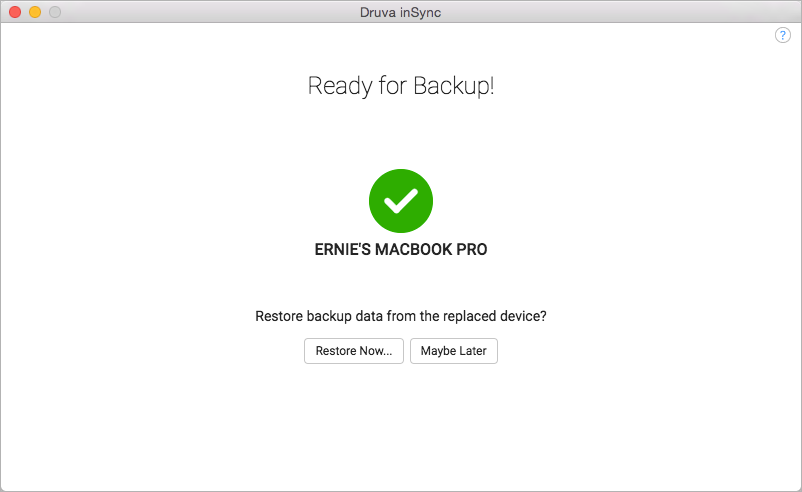
The Ready for Backup window is displayed only when you are configuring the new device on the same operating system where an existing device is configured.
- In the Restore Backup window, under Select Device section, select the device from which you want to restore data.
- In the Restore Backup window, under Data to Restore section, complete the following:
- To restore all backed up data, select the Backup Data check box.
- To restore system and application settings, select the System Application & Settings check box. This check box appears only if your inSync administrator has enabled system and application settings for you. You must restart your device after your system and application settings are restored.
- Click Restore.
After the restore operation completes successfully, inSync displays the amount of data restored and the count of files whose restoration failed, in the Restore Complete window. Click the Files not Restored link to view a detailed report of the files whose restoration failed. The report is saved in a *.txt format and contains details about the files whose restoration failed along with the file path for each file.
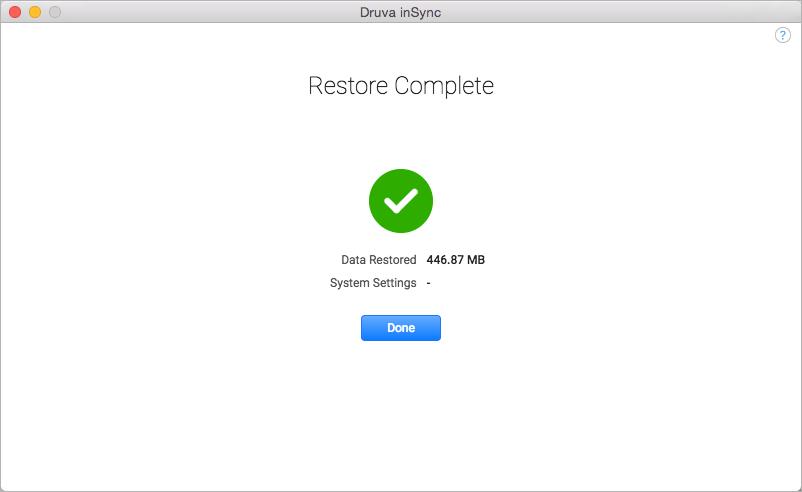
- Click Done.
inSync starts backing up your data.