Configure proxy settings during the inSync Client activation
During inSync activation, if the inSync Client has to communicate with the inSync Server through a proxy server, you are prompted to provide the proxy server details to the inSync Client. You can configure the inSync Client for the proxy details by using one of the following methods:
- You can leverage the system proxy server settings used by the web browser on your device. The inSync Client can use the same IP address and port number configured for the proxy server. On Windows and Mac, the inSync Client can also reuse proxy settings if you select automatic configuration scripts for your browser. The inSync Client uses SOCKS4, SOCKS5, and PROXY servers for authentication.
- You can manually enter the IP address or FQDN and port number of the proxy server on the inSync Client. If your proxy server requires a unique username and password for authentication and the proxy server is using Kerberos protocol for authentication, you must provide the FQDN of the proxy server.
- You can upload a PAC file or provide its WPAD URL to the inSync Client.
- You can choose to detect proxy settings automatically. inSync Client automatically searches for the PAC file location based on the WPAD protocol. Alternatively, you can also choose the DHCP (252 option) to allow inSync to detect the proxy settings automatically.
The inSync Client supports both authenticated and unauthenticated access to a proxy server:
- If your proxy server requires a unique username and password for authentication, you can enter these credentials details on the inSync Client.
- If your organization uses your Active Directory credentials for authentication at the proxy server, the inSync Client automatically facilitates it.
Before you begin
Before you configure the proxy details, contact the administrator for your proxy server information:
- Proxy server details. You might need the IP address and port number of the proxy server, or the PAC file, or the WPAD URL of the PAC file.
- Authentication details for the proxy server.
- Proxy type. inSync supports SOCKS4, SOCKS5, and HTTP.
Activate the inSync Client on your device
- To activate the inSync Client on your first device, see Activate the inSync Client on your first laptop.
- To add a new device to your inSync account, see Add a new laptop to your inSync account.
- To replace a device linked to your inSync account, see Replace a laptop linked to your inSync account.
Configure proxy settings for the inSync Client
Procedure
- Start the inSync Client.
- On the navigation pane, click Settings.
- Click the Network tab.
- Click Open Proxy Settings...

- Select the Enable Proxy Settings checkbox to configure the proxy settings.
- If you want to use system proxy settings, see Configure proxy using system proxy settings.
If you want to use proxy server details, see Configure proxy using proxy server details.
If you want to use PAC file, see Configure proxy settings using PAC file.
If you want to use PAC file URL, see Configure proxy settings using PAC file URL.
If you want inSync Client to automatically detect proxy settings, see Configure automatic detection of proxy. - Click Save.
Configure proxy using system proxy settings
To configure proxy using system proxy settings
- Start the inSync Client.
- On the navigation pane, click Settings.
- Click the Network tab.
- Click Open Proxy Settings.
- Select the Enable Proxy Settings checkbox to configure the proxy settings.
- In the Configure Proxy Server Using list, click System Proxy Settings.
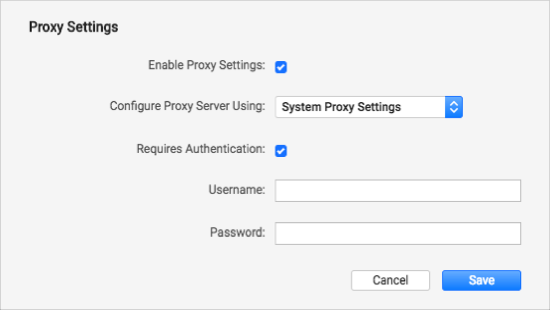
- If the inSync Client requires authentication, select the Requires Authentication checkbox. Do not select this checkbox if authentication is not required or if authentication is through your AD credentials.
- In case of devices connected to AD domain, inSync Client uses the Kerberos or NTLM authentication to validate and connect to inSync Cloud using the proxy. Leave the Username and Password field blank.
- In case of devices that are not part of an AD domain, inSync user must type their Username and Password. inSync does not support Kerberos or NTLM authentication in case of non-AD devices.
- NTLM authentication does not work on macOS when using SOCKS5 and HTTP proxy types.
- NTLM authentication works on Windows OS when using HTTP proxy type.
- In the Username box, enter the proxy username.
- In the Password box, enter the proxy password.
- Click Save.
Configure proxy using proxy server details
To configure proxy using system proxy settings
- Start the inSync Client.
- On the navigation pane, click Settings.
- Click the Network tab.
- Click Open Proxy Settings...
- Select the Enable Proxy Settings checkbox to configure the proxy settings.
- In the Configure Proxy Server Using list, click Proxy Server Details.
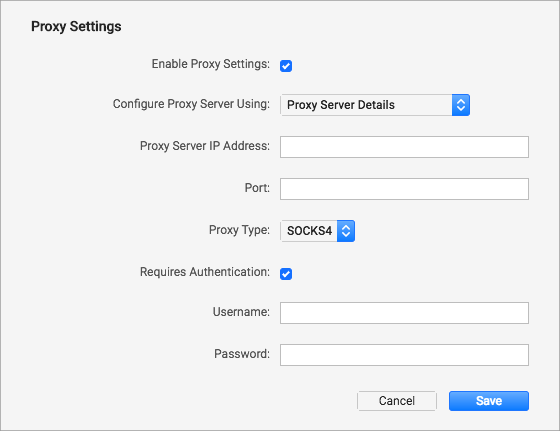
- In the Proxy Server IP Address box, enter the IP address for the proxy server.
- In the Port box, enter the port number for the proxy server.
- In the Proxy Type list, click the proxy type that your organization is using.
- If the inSync Client requires authentication, select the Requires Authentication checkbox. Do not select this checkbox if authentication is not required or if authentication is through your AD credentials.
- In case of devices connected to AD domain, inSync Client uses the Kerberos or NTLM authentication to validate and connect to inSync Cloud using the proxy. Leave the Username and Password field blank.
- In case of devices that are not part of an AD domain, inSync user must type their Username and Password. inSync does not support Kerberos or NTLM authentication in case of non-AD devices.
- NTLM authentication does not work on macOS when using SOCKS5 and HTTP proxy types.
- NTLM authentication works on Windows OS when using HTTP proxy type.
- In the Username box, enter the proxy username.
- In the Password box, enter the proxy password.
- Click Save.
Configure proxy settings using PAC file
- Start the inSync Client.
- On the navigation pane, click Settings.
- Click the Network tab.
- Click Open Proxy Settings...
- Select the Enable Proxy Settings checkbox to configure the proxy settings.
- In the Configure Proxy Server Using list, click Configuration File.
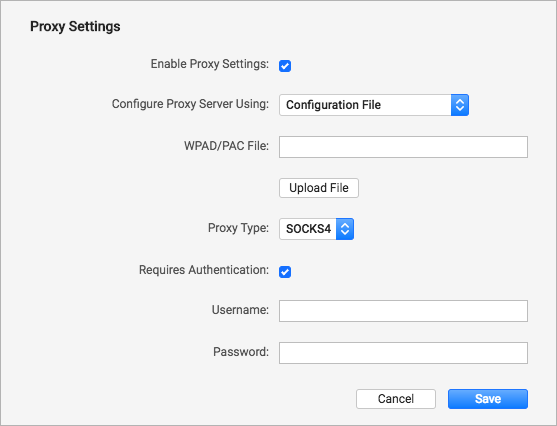
- If the PAC file is available on your device, click Choose file to select the file.
- In the Proxy Type list, select the proxy type that your organization is using.
- If the inSync Client requires authentication, select the Requires Authentication checkbox. Do not select this checkbox if authentication is not required or if authentication is through your AD credentials.
- In case of devices connected to AD domain, inSync Client uses the Kerberos or NTLM authentication to validate and connect to inSync Cloud using the proxy. Leave the Username and Password field blank.
- In case of devices that are not part of an AD domain, inSync user must type their Username and Password. inSync does not support Kerberos or NTLM authentication in case of non-AD devices.
- NTLM authentication does not work on macOS when using SOCKS5 and HTTP proxy types.
- NTLM authentication works on Windows OS when using HTTP proxy type.
- In the Username box, enter the proxy username.
- In the Password box, enter the proxy password.
- Click Save.
Configure proxy settings using PAC file URL
- Start the inSync Client.
- On the navigation pane, click Settings.
- Click the Network tab.
- Click Open Proxy Settings...
- Select the Enable Proxy Settings checkbox to configure the proxy settings.
- In the Configure Proxy Server Using list, click Configuration File URL.
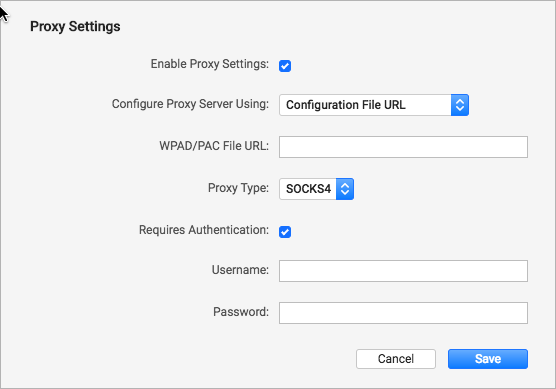
- If the PAC file is available on a WPAD URL, in the WPAD / PAC file URL, enter the URL in the text box.
- In the Proxy Type list, select the proxy type that your organization is using.
- If the inSync Client requires authentication, select the Requires Authentication checkbox. Do not select this checkbox if authentication is not required or if authentication is through your AD credentials.
- In the Username box, enter the proxy username.
- In the Password box, enter the proxy password.
- Click Save.
Configure automatic detection of proxy
To configure proxy using automatic detection of proxy settings
- Start the inSync Client.
- On the navigation pane, click Settings.
- Click the Network tab.
- Click Open Proxy Settings...
- Select the Enable Proxy Settings checkbox to configure the proxy settings.
- In the Configure Proxy Server Using list, click Automatically Detect Settings.
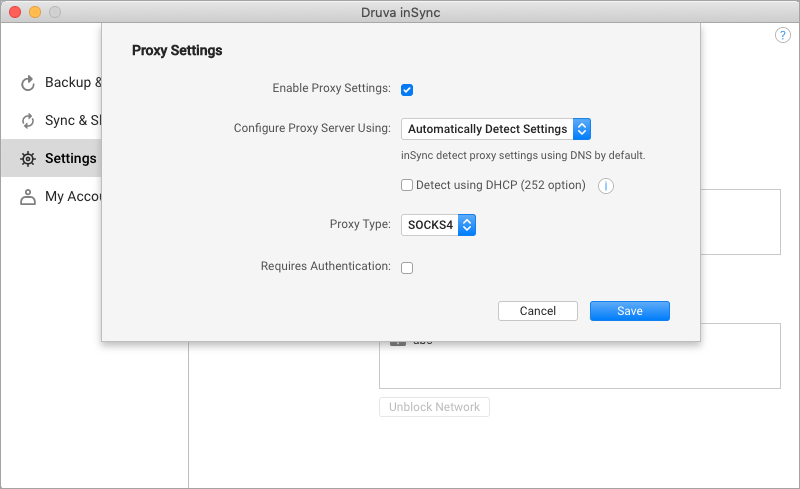
- In the Proxy Type list, click the proxy type that your organization is using.
inSync by default detects the proxy settings using the DNS.
- Alternatively, select the Detect using DHCP (252 option) checkbox to allow inSync to detect the proxy settings using DHCP.
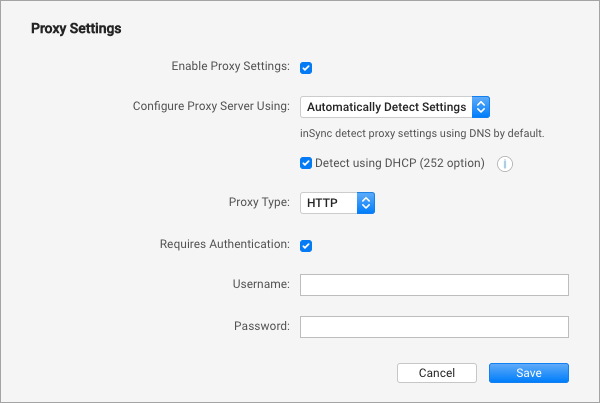
- If the inSync Client requires authentication, select the Requires Authentication checkbox. Do not select this checkbox if authentication is not required.
- In case of devices connected to AD domain, inSync Client uses the Kerberos or NTLM authentication to validate and connect to inSync Cloud using the proxy. Leave the Username and Password field blank.
- In case of devices that are not part of an AD domain, inSync user must type their Username and Password. inSync does not support Kerberos or NTLM authentication in case of non-AD devices.
- NTLM authentication does not work on macOS when using SOCKS5 and HTTP proxy types.
- NTLM authentication works on Windows OS when using HTTP proxy type.
- In the Username box, enter the proxy username.
- In the Password box, enter the proxy password.
- Click Save.
Proxy support for Windows
|
Setting |
System Proxy |
Proxy details in Client |
WPAD URL |
|---|---|---|---|
|
HTTP - unauthenticated |
PASS |
PASS |
PASS |
|
HTTP - authenticated |
PASS |
PASS |
PASS |
|
SOCKS 4 - unauthenticated |
PASS |
PASS |
PASS |
|
SOCKS 4 - authenticated |
PASS |
PASS |
PASS |
|
SOCKS 5 - unauthenticated |
PASS |
PASS |
PASS |
|
SOCKS 5 - authenticated |
PASS |
PASS |
PASS |
|
HTTP Kerberos |
PASS |
PASS |
PASS |
|
HTTP NTLM |
PASS |
PASS |
PASS |
|
SOCKS5 Kerberos |
PASS |
PASS |
PASS |
|
SOCKS5 NTLM |
FAIL |
FAIL |
FAIL |
|
Configuration file in System Proxy |
PASS |
NA |
NA |
|
Multiple proxies in .config file |
NA |
NA |
FAIL |
|
Auto upgrade |
FAIL |
PASS |
PASS |
Proxy support for macOS
|
Setting |
System Proxy |
Proxy details in Client |
WPAD URL |
|---|---|---|---|
|
HTTP - unauthenticated |
PASS |
PASS |
PASS |
|
HTTP - authenticated |
PASS |
PASS |
PASS |
|
SOCKS 4 - unauthenticated |
PASS |
PASS |
PASS |
|
SOCKS 4 - authenticated |
PASS |
PASS |
PASS |
|
SOCKS 5 - unauthenticated |
PASS |
PASS |
PASS |
|
SOCKS 5 - authenticated |
PASS |
PASS |
PASS |
|
HTTP Kerberos |
PASS |
PASS |
PASS |
|
HTTP NTLM |
FAIL |
FAIL |
FAIL |
|
SOCKS5 Kerberos |
PASS |
PASS |
PASS |
|
SOCKS5 NTLM |
NA for MAC |
NA for MAC |
NA for MAC |
|
Configuration file in System Proxy |
PASS |
NA |
NA |
|
Multiple proxies in .config file |
NA |
NA |
FAIL |
|
Auto upgrade |
PASS |
PASS |
NA |