Restore an Oracle database to a point-in-time
 Business Enterprise Elite
When Oracle databases run in the ARCHIVELOG mode, the databases make copies of all online redo logs after the databases are filled. Druva backs up such archive logs, and you can use it to restore your databases to any point-in-time between the available range of the archived logs. It is a useful, lightweight approach to backup and restore. Archive log backups are incrementally triggered after a full backup job has completed, and a recovery point exists. The archive log is backed up every few minutes based on your settings.
You can restore the database either to the same server or to an alternate location. For more information, see Restore database to an alternate server
Druva uses the recovery point and the archive logs that were logged, to perform a point-in-time restore. When you restore the database using archive logs, databases are restored to the nearest, last available committed transaction before the specified point-in-time.
You can choose to restore all database files or select individual database elements, such as data files, control files, system parameter files, archive logs, wallet files, and metadata. For more information about restoring wallet files, see Restore Oracle Wallet files.
When you initiate a restore operation, the backup data is downloaded to the requested restore location. The DBA can run RMAN commands to fetch backup data downloaded to the restore location and recover the database on the required Oracle server host. For more information, see Recover database from the downloaded backup data.
The following video illustrates the process.
Before you begin
-
While restoring to an alternate server:
-
Make sure you have registered an alternate server with version 6.1.0 or later.
-
Make sure you have the SYSDBA/SYSBACKUP permission.
-
You can restore a standalone database to an alternate server using the ASM location. For this, you must pass custom spfile parameters from the console.
-
- For automated restore of RAC databases, make sure that the directories of the following files are present on the shared storage (ASM):
-
Server Parameter file
-
Control File
-
Archive log files
We can then restore these files from the recovery points.
Procedure
- Log in to the Management Console.
- Click Oracle > Direct to cloud from the Protect menu. Note that if the All Organizations menu is enabled, you have to first select an organization and then click Oracle > Direct to Cloud.
- In the left navigation pane, click Configured Databases.
- On the Configured Databases page, select the database that you want to restore and click Restore.
Note: To quickly search and select a database, you can use the search box on the top-right corner of the Configured Databases page to filter the listed database. Type the name of the database, Oracle server, or the availability group in the search tab to narrow down on the database that you want to select.
- On the Restore Database page, click Point-in-Time Restore.
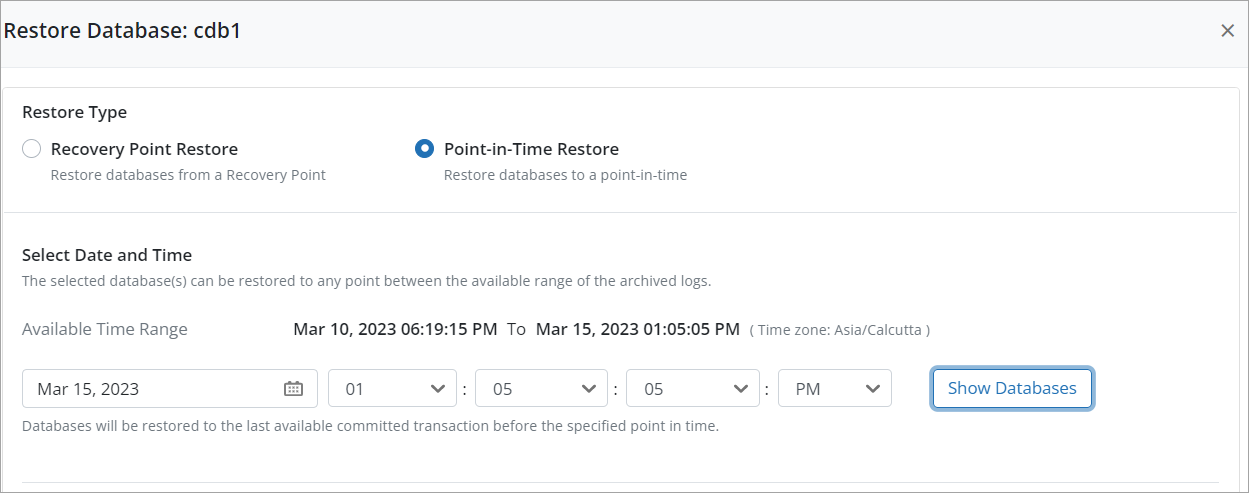
- In the Select Date and Time section, the Available Time Range section displays all available recovery points with the daily retention.
- Specify a date and time to which you want Druva to restore the databases. Click the Calendar icon to select a date of the recovery point and select the recovery point from the available range of recovery points for the selected date. The timestamps of the archive logs are displayed according to the Oracle server time zone. For example, the timestamps for servers located in New York and London are displayed according to EST and UTC time zones, respectively.
Databases will be restored to the last available committed transaction before the specified point in time. - Click Show Databases.
The Databases section displays all the available databases for restore based on the selected date and time. - In the Database Files section, select the database or individual database elements that you want to restore.
- Click Restore.
Note: If a backup job for the database selected for recovery point restore is already running, Druva prompts a message to cancel the backup job and trigger restore.
- The following screen is displayed:
If you choose to restore the complete database in Step.9, you can restore the selected database either automatically or manually. If you choose to restore individual database elements, you can restore them manually only. -
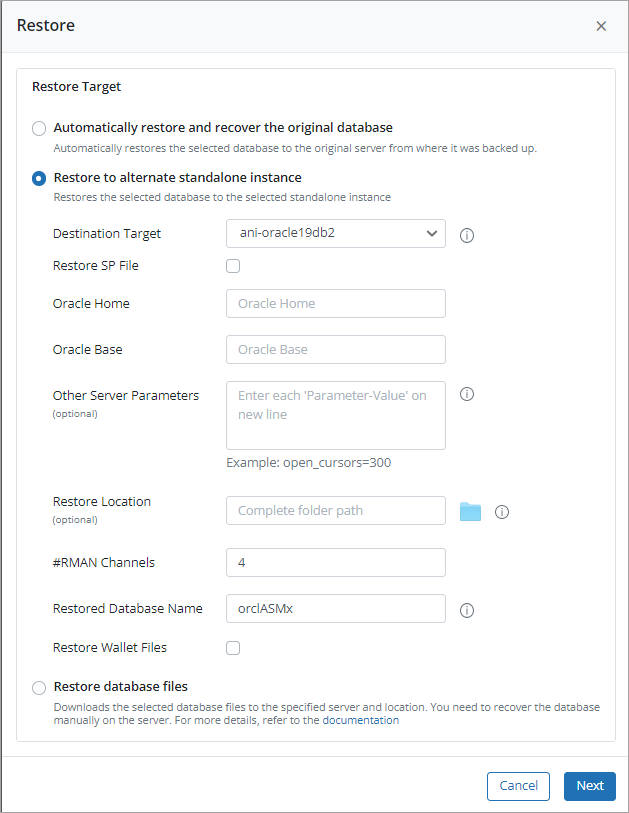
To restore the database automatically, select either of the following options:
- Automatically restore and recover the original database: Select to restore the complete database automatically to the original Oracle server from where it was backed up. Provide the following details and click Finish:
Druva prompts you with a warning message that the original database on your Oracle server will be replaced with the restored data. Click Yes on the confirmation dialog.Field Description #RMAN Channels The number of channels to be established between RMAN and the databases to be restored. The default value for the number of channels is set to ‘4’. Druva recommends you to specify a maximum of 32 RMAN channels. For more information about RMAN Channels, see About RMAN Channels. Restore and recover Wallet Files For wallet files, select the Restore and recover Wallet Files checkbox if you want to restore the wallet files. If you select this checkbox, and if there is an existing wallet directory at the restore location, it is renamed and a new directory is created with the restored wallet files, thereby retaining the existing wallet files for future reference. Note: The Restore and recover Wallet Files checkbox is visible only if you have wallet files.
Destination Target To restore data from a standby database, provide the destination target where you want to restore the database. You can restore to a standby or primary database.
Notes:
- To restore on a primary database, make sure the primary database is registered and authentication is assigned to it. Also, after assigning authentication, perform discovery.
- After restoring to a standby database, the Database Administrator must make sure the standby database is in sync with the primary database to avoid discrepancies in the data.
- If you perform a point-in-time restore of standby to standby database, you get an error while opening the database. To avoid this, make sure you restore to the primary database and sync the database.
Druva terminates connections to the database on the original server host and then replaces the database with the restored database. -
Restore to alternate standalone instance: Select to restore the database to a standalone instance. Provide the following details and click Finish.
- Automatically restore and recover the original database: Select to restore the complete database automatically to the original Oracle server from where it was backed up. Provide the following details and click Finish:
|
Field |
Description |
|
Destination Target |
The target Oracle server where you want to restore the database. Notes: |
|
Restore SP File |
Select to restore the SP File. Note: If you select this field, make sure that the source and the target server are the same in terms of the directory structure, memory configuration, and so on. |
|
Restore location |
The location on the selected server where you want to restore the database or type the absolute path to the restore location. By default, Oracle base is used as the restore location. |
|
Oracle Home |
The environment variable that contains the directory structure where the Oracle database is installed. |
|
Oracle Base |
The directory structure of the location where Oracle software and configuration files are stored. |
| Other Server Parameters |
The list of custom SPFile parameters that can be used for the restored database. Provide the parameters in the <parameter=value> format. For example, open_cursors=300. In case of multiple custom parameters, provide each parameter on a new line. For example
To restore a standalone database to an alternate server using an ASM storage, pass the following parameters in the Other Server Parameters field:db_create_file_dest=+Data
|
|
#RMAN Channels
|
The number of channels to be established between RMAN and the databases to be restored. The default value for the number of channels is set to ‘4’. Druva recommends you to specify a maximum of 32 RMAN channels. For more information about RMAN Channels, see About RMAN Channels. |
|
Restored Database Name |
The name of the database that is to be restored to an alternate server.
|
|
Restore Wallet Files |
Select to restore the wallet files. If you select this checkbox, a new directory is created for wallet files. If the wallet directory exists already, the existing wallet files are retained for future reference, and new files are downloaded in the directory. Note: The Restore and recover Wallet Files checkbox is visible only if you have wallet files. |
For more information about restoring to an alternate server, see Restore database to an alternate server.
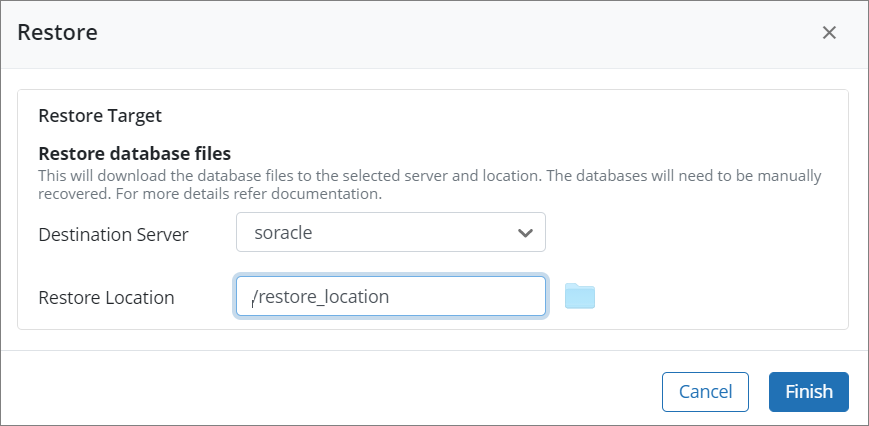
- To restore the complete database or individual database elements manually, select the Restore database files checkbox. Provide the following details and click Finish:
.
Provide the following details and click Finish:
| Field | Description |
|---|---|
| Destination Server | The Oracle server host to download the backup data to. By default, the original Oracle server host is selected where the database was backed up. When you restore a database to its original location, Druva replaces the database on the Oracle server host with the restored database. |
| Restore Location | The location on the selected server where you want to download the backup data or type the absolute path to the restore location. |
The database files are downloaded to the selected server and location. The database needs to be manually recovered on the server. For more details, see Recover database from the downloaded backup data.
The backup data is downloaded to the location you specify. After you click Finish, restore prechecks are run and a restore job is created. You can track the progress of the job by viewing the progress log. For more information, see View progress logs.
Next steps
- After the restore job is successful, the DBA can run RMAN scripts to fetch backup data downloaded to the restore location and recover the database on the required Oracle server host host. For more information, see Recover database from the downloaded backup data.
- You can view the details of the completed job on the Audit Trails page. For more information, see View Admin Audit Trails page.