Hyper-V virtual machine restore
 Business Enterprise Elite
Phoenix lets you restore your virtual machines to a Hyper-V host that is registered with Phoenix. You can choose to restore your virtual machine to the original location or the alternate location.
Restore virtual machine to the original location
- On the Management Console, select the workload from the Protect menu. Note that if the All Organizations menu is enabled, you have to first select an organization and then select the workload.
- In the left navigation, click Configured VMs.
- In the right pane, select the virtual machine you want to restore.
Note: You can apply filters based on VM, Host, or Admin Group.
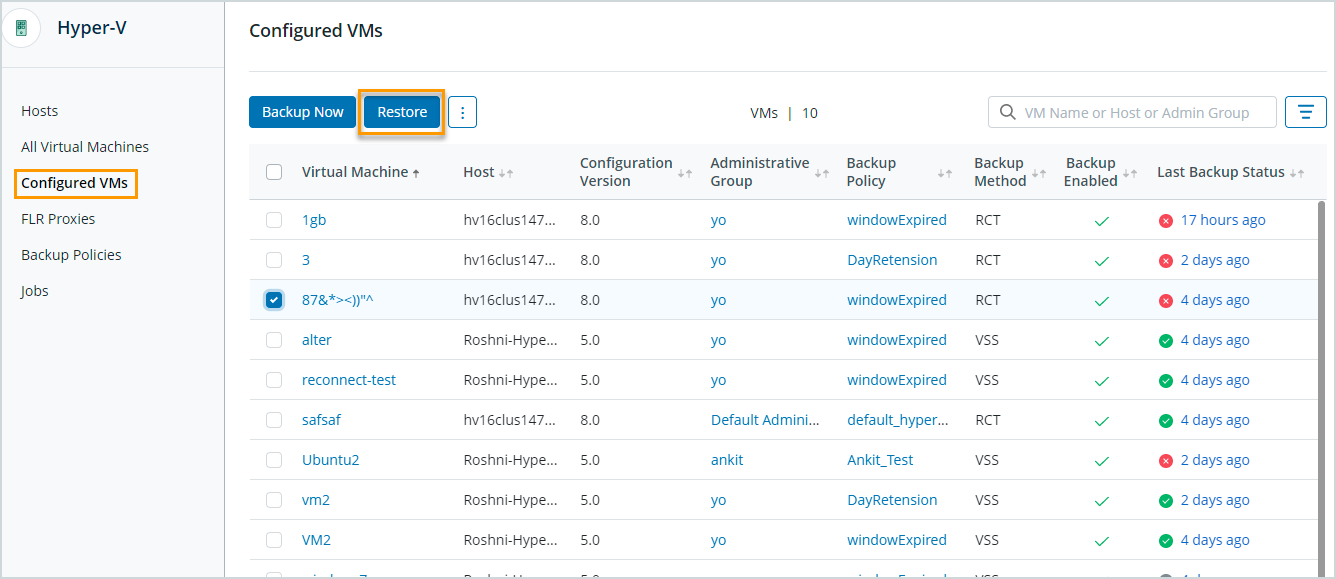
- Click Restore. The Restore VM wizard appears.
- The Data Restore option is selected by default. Select Full VM Restore.
- Select a recovery point from the drop-down and click Proceed to Restore.
- On the Full VM Restore dialog box, the restore target is selected by default to Restore to original location. This restores the entire VMs to the original hypervisor with original settings.
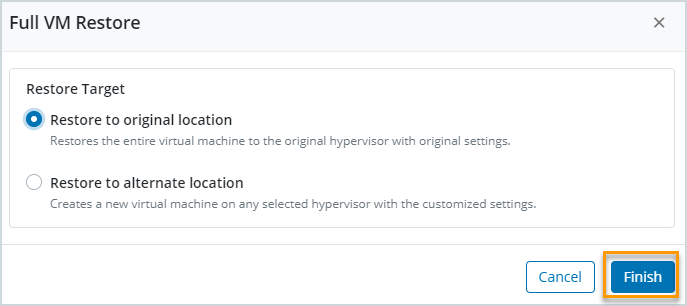
- Click Finish.
Note: To avoid accidental overwrites, ensure you have enough space available on the destination location, as original VHDs are not cleaned up after the restore is completed. The VHDs can be manually removed to recover space only after successful restores.
Note: For a virtual machine backed up using Hybrid Workloads agent version 4.7.4 or earlier, if you change the virtual machine configuration such as name, memory, and vCPUs after backing up the virtual machine:
- Phoenix overwrites the updated configuration at the time of restore
- Phoenix restores the virtual machine with original configuration such as name, memory, and vCPUs of the virtual machine at the time of backup
After the agent fetches the virtual machine from the cloud, it performs the following tasks on the host:
- The agent deletes the virtual machine. Deleting the virtual machine does not delete the virtual machine's files and disks (if the virtual machine was backed up using the Hybrid Workloads agent version 4.7.4 or earlier).
- The agent downloads the disks and configuration files and restores them to the original location that Phoenix records at the time of backup.
- The agent renames the files and disks in that location. The agent adds the suffix ‘.Phoenix.${restore_job_id} to the existing files and virtual disks.
- The agent creates a virtual machine using the disks and configuration files it restores (if the virtual machine was backed up using the Hybrid Workloads agent version 4.7.4 or earlier).
- If a virtual disk was excluded in the backup policy, then the disk is not attached to the restored virtual machine.
- A physical disk (Passthrough disk) or a shared disk attached to the original virtual machine is not attached at the time of restore. Druva does not backup physical disks (Passthrough disks) or shared disks attached to a virtual machine.
- Virtual machine ID is preserved to let a user perform a guest repair.
Restore virtual machine to an alternate location
- Log in to Management Console.
- select the workload from the Protect menu. Note that if the All Organizations menu is enabled, you have to first select an organization and then select the workload.
- In the left navigation, click Configured VMs.
- In the right pane, select the virtual machine you want to restore.
- Click Restore. The Restore VM wizard appears.
- The Data Restore option is selected by default. Select Full VM Restore.
- Select a recovery point from the drop-down and click Proceed to Restore.
- On the Full VM Restore dialog box, the restore target is selected by default to Restore to alternate location. This creates a new VM on any selected hypervisor with the customized settings.
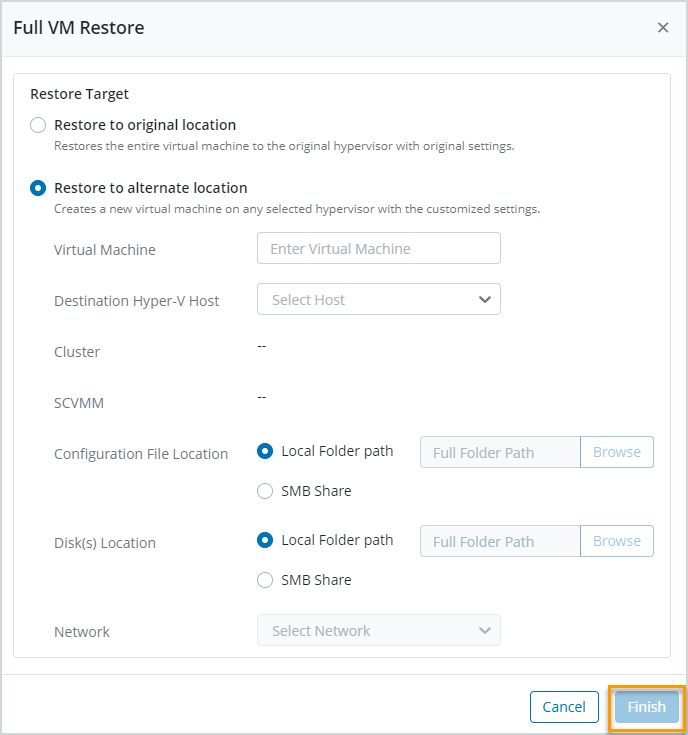
Field Description Virtual Machine Name of the virtual machine after restore. If you choose an alternate location for restore, a new virtual machine is created on the destination host.
Destination Hyper-V Host Host on which the virtual machine will be restored. Cluster Cluster on which the selected host is present. SCVMM SCVMM on which the selected host is present. Configuration File Location Specify the location on the host where the configuration files are downloaded. You can choose: - A local folder
You can browse and select the destination folder - SMB share
Type the shared folder path
Disk(s) Location Specify the location where the virtual disks are downloaded. You can choose: - A local folder
You can browse and select the destination folder - SMB share
Type the shared folder path
Network Select a network available on the destination Hyper-V host. - A local folder
-
Click Finish.
After the agent fetches the virtual machine from the cloud, it performs the following tasks on the host:
- Agent downloads the disks at the entered disk location and configuration files at the entered configuration file location.
- If disks or files are present in the entered location, the agent renames the files with suffix ‘.Phoenix.${restore_job_id}.
If multiple disks use the same name, the agent renames the disks by adding a suffix such as _1, _2, and _3. - The agent creates the virtual machine using the restored disks and configuration files and a new virtual machine ID.
-
If a virtual disk was excluded in the backup policy, then the disk is not attached to the restored virtual machine.
- A physical disk or shared disk attached to the original virtual machine is not attached at the time of restore. Phoenix does not backup physical disks or shared disks attached to a virtual machine.
- All checkpoints at the time of backup are preserved if the backup method is VSS.
Note: The virtual machine is in powered-off state after it is restored.